
Quick Start Guide
Page 5
Table of Contents Before Printing 2 Turning the Printer On and Off 2 Loading Printing Paper 4 Printing from Your Computer 10 Printing with Windows 10 Printing with Macintosh 12 Routine Maintenance 14 When Printing Becomes Faint or Colors Are Incorrect 14 Printing the Nozzle Check Pattern 15 Examining the ... Troubleshooting 41 Cannot Install the Printer Driver 42 The USB Connection Does Not Work Properly 43 Print Results Not Satisfactory 44 Printing Does Not Start 47 Paper Does Not Feed Properly 48 Paper Jams 49 ALARM Lamp Flashes Orange 50 Error Message Appears on the Screen ...
Table of Contents Before Printing 2 Turning the Printer On and Off 2 Loading Printing Paper 4 Printing from Your Computer 10 Printing with Windows 10 Printing with Macintosh 12 Routine Maintenance 14 When Printing Becomes Faint or Colors Are Incorrect 14 Printing the Nozzle Check Pattern 15 Examining the ... Troubleshooting 41 Cannot Install the Printer Driver 42 The USB Connection Does Not Work Properly 43 Print Results Not Satisfactory 44 Printing Does Not Start 47 Paper Does Not Feed Properly 48 Paper Jams 49 ALARM Lamp Flashes Orange 50 Error Message Appears on the Screen ...
Quick Start Guide
Page 8
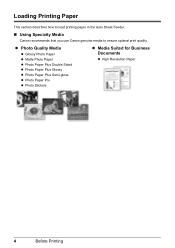
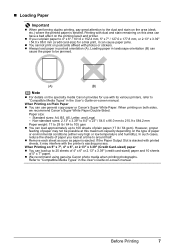
Loading Printing Paper This section describes how to load printing paper in the Auto Sheet Feeder. „ Using Specialty Media Canon recommends that you use Canon genuine media to ensure optimal print quality. z Photo Quality Media z Glossy Photo Paper z Matte Photo Paper z Photo Paper Plus Double Sided z Photo Paper Plus Glossy z Photo Paper Plus Semi-gloss z Photo Paper Pro z Photo Stickers z Media Suited for Business Documents z High Resolution Paper 4 Before Printing
Loading Printing Paper This section describes how to load printing paper in the Auto Sheet Feeder. „ Using Specialty Media Canon recommends that you use Canon genuine media to ensure optimal print quality. z Photo Quality Media z Glossy Photo Paper z Matte Photo Paper z Photo Paper Plus Double Sided z Photo Paper Plus Glossy z Photo Paper Plus Semi-gloss z Photo Paper Pro z Photo Stickers z Media Suited for Business Documents z High Resolution Paper 4 Before Printing
Quick Start Guide
Page 9
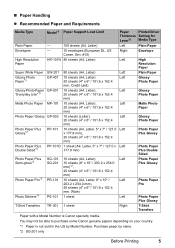
You may not be able to purchase some Canon genuine papers depending on your country. *1 Paper is Canon specialty media. Env. #10) 80 sheets (A4, Letter) 80 sheets (A4, Letter) 10 ...Paper Printer Driver Thickness Setting for Lever*6 Media Type Left Plain Paper Right Envelope Left High Resolution Paper Left Plain Paper Left Glossy Photo Paper Left Glossy Photo Paper Left Matte Photo Paper Left Glossy Photo Paper Left Photo Paper Plus Glossy Left Photo Paper Plus Double Sided Left Photo Paper Plus Glossy Left Photo Paper Pro Left Right Photo Paper...
You may not be able to purchase some Canon genuine papers depending on your country. *1 Paper is Canon specialty media. Env. #10) 80 sheets (A4, Letter) 80 sheets (A4, Letter) 10 ...Paper Printer Driver Thickness Setting for Lever*6 Media Type Left Plain Paper Right Envelope Left High Resolution Paper Left Plain Paper Left Glossy Photo Paper Left Glossy Photo Paper Left Matte Photo Paper Left Glossy Photo Paper Left Photo Paper Plus Glossy Left Photo Paper Plus Double Sided Left Photo Paper Plus Glossy Left Photo Paper Pro Left Right Photo Paper...
Quick Start Guide
Page 10
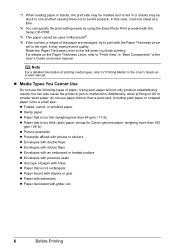
.... Note For a detailed description of paper with holes z Paper that is too thick (plain paper, except for Canon genuine paper, weighing more than a post card, including plain paper or notepad paper cut to "Printing Media" in the User's Guide onscreen manual. z Folded, curled, or wrinkled paper z Damp paper z Paper that is too thin (weighing less ... to be used in Macintosh®. *6 If the corners or edges of paper. It may be stuck to one sheet at a time. *4 You can also cause the printer to the right. *3 When loading paper in stacks, the print side may be marked as it is fed in ...
.... Note For a detailed description of paper with holes z Paper that is too thick (plain paper, except for Canon genuine paper, weighing more than a post card, including plain paper or notepad paper cut to "Printing Media" in the User's Guide onscreen manual. z Folded, curled, or wrinkled paper z Damp paper z Paper that is too thin (weighing less ... to be used in Macintosh®. *6 If the corners or edges of paper. It may be stuck to one sheet at a time. *4 You can also cause the printer to the right. *3 When loading paper in stacks, the print side may be marked as it is fed in ...
Quick Start Guide
Page 11
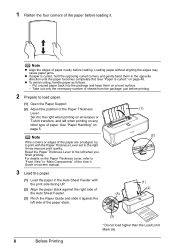
.... z You cannot print on the area (desk, etc.) where the printed paper is ejected. However, proper feeding of paper may interfere with the printer's ejecting process. In such cases, reduce the sheets of 5" x 7" paper. z We recommend using genuine Canon photo media when printing photographs. Before Printing 7 Standard sizes: A4, B5, A5, Letter, and Legal - z Remove...
.... z You cannot print on the area (desk, etc.) where the printed paper is ejected. However, proper feeding of paper may interfere with the printer's ejecting process. In such cases, reduce the sheets of 5" x 7" paper. z We recommend using genuine Canon photo media when printing photographs. Before Printing 7 Standard sizes: A4, B5, A5, Letter, and Legal - z Remove...
Quick Start Guide
Page 12
... the Auto Sheet Feeder with the Paper Thickness Lever set to load paper. (1) Open the Paper Support. (2) Adjust the position of the paper before loading. See "Paper Handling" on page 46. Loading paper without aligning the edges may improve print quality. 1 Flatten the four corners of the Paper Thickness Lever. See "Paper is curled, hold the opposing curled...
... the Auto Sheet Feeder with the Paper Thickness Lever set to load paper. (1) Open the Paper Support. (2) Adjust the position of the paper before loading. See "Paper Handling" on page 46. Loading paper without aligning the edges may improve print quality. 1 Flatten the four corners of the Paper Thickness Lever. See "Paper is curled, hold the opposing curled...
Quick Start Guide
Page 13
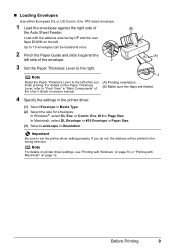
... select DL Envelope or #10 Envelope in Paper Size. (3) Select Landscape in Page Size. Up to the left when you finish printing. For details on -screen manual. (A) Printing orientation (B) Make sure the flaps are folded. 4 Specify the settings in the printer driver. (1) Select Envelope in the wrong .... Important Be sure to "Front View" in "Main Components" of the User's Guide on the Paper Thickness Lever, refer to set the printer driver setting properly. Note For details on printer driver settings, see "Printing with Windows" on page 10 or "Printing with the address side facing...
... select DL Envelope or #10 Envelope in Paper Size. (3) Select Landscape in Page Size. Up to the left when you finish printing. For details on -screen manual. (A) Printing orientation (B) Make sure the flaps are folded. 4 Specify the settings in the printer driver. (1) Select Envelope in the wrong .... Important Be sure to "Front View" in "Main Components" of the User's Guide on the Paper Thickness Lever, refer to set the printer driver setting properly. Note For details on printer driver settings, see "Printing with Windows" on page 10 or "Printing with the address side facing...
Quick Start Guide
Page 14
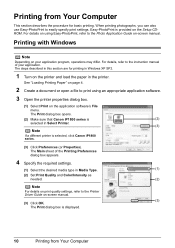
... dialog box opens. (2) Make sure that Canon iP1800 series is (2) selected in Select Printer. (3) Note If a different printer is displayed. 10 Printing from Your Computer This section describes the procedure for printing in Windows XP SP2. 1 Turn on the printer and load the paper in Media Type. (1) (2) Set Print Quality and Color/Intensity as needed. (2) Note For...
... dialog box opens. (2) Make sure that Canon iP1800 series is (2) selected in Select Printer. (3) Note If a different printer is displayed. 10 Printing from Your Computer This section describes the procedure for printing in Windows XP SP2. 1 Turn on the printer and load the paper in Media Type. (1) (2) Set Print Quality and Color/Intensity as needed. (2) Note For...
Quick Start Guide
Page 15
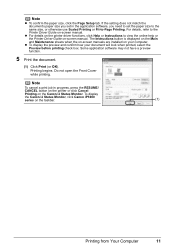
.... If the setting does not match the document's paper size you need to set the paper size to the same size, or otherwise use Scaled Printing or Fit-to view the online help or the Printer Driver Guide on the Canon IJ Status Monitor. Some application software may not have... printer driver functions, click Help or Instructions to -Page Printing. Do not open the Front Cover while printing. Printing begins. z To display the preview and confirm how your computer. Note z To confirm the paper size, click the Page Setup tab. To display the Canon IJ Status Monitor, click Canon iP1800...
.... If the setting does not match the document's paper size you need to set the paper size to the same size, or otherwise use Scaled Printing or Fit-to view the online help or the Printer Driver Guide on the Canon IJ Status Monitor. Some application software may not have... printer driver functions, click Help or Instructions to -Page Printing. Do not open the Front Cover while printing. Printing begins. z To display the preview and confirm how your computer. Note z To confirm the paper size, click the Page Setup tab. To display the Canon IJ Status Monitor, click Canon iP1800...
Quick Start Guide
Page 16
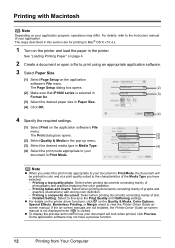
... page 4. 2 Create a document or open a file to print using an appropriate application software. 3 Select Paper Size. (1) Select Page Setup on -screen manual is not displayed even if is selected in (3) Format for printing in Mac® OS X ... box opens. (2) (2) Make sure that iP1800 series is clicked. Printing a composite document: Select when printing documents consisting mainly of photographs and graphics featuring fine color gradation. - z For details on the printer driver functions, click on your document will be printed in color and at a print quality suited to the...
... page 4. 2 Create a document or open a file to print using an appropriate application software. 3 Select Paper Size. (1) Select Page Setup on -screen manual is not displayed even if is selected in (3) Format for printing in Mac® OS X ... box opens. (2) (2) Make sure that iP1800 series is clicked. Printing a composite document: Select when printing documents consisting mainly of photographs and graphics featuring fine color gradation. - z For details on the printer driver functions, click on your document will be printed in color and at a print quality suited to the...
Quick Start Guide
Page 19
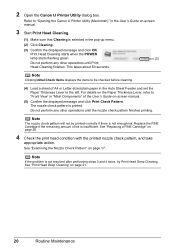
Do not open the Front Cover while printing. Set the Paper Thickness Lever to the left . The nozzle check pattern is printed. Routine Maintenance 15 For details on the Paper Thickness Lever, refer to "Opening the Canon IJ Printer Utility (Macintosh)" in the User's Guide on-screen manual. Refer... and take the appropriate action. Set the Paper Thickness Lever to the left . Note Clicking Initial Check Items displays the items to "Front View" in "Main Components" of the User's Guide on-screen manual. 2 Open the Canon IJ Printer Utility dialog box. Refer to determine whether ...
Do not open the Front Cover while printing. Set the Paper Thickness Lever to the left . The nozzle check pattern is printed. Routine Maintenance 15 For details on the Paper Thickness Lever, refer to "Opening the Canon IJ Printer Utility (Macintosh)" in the User's Guide on-screen manual. Refer... and take the appropriate action. Set the Paper Thickness Lever to the left . Note Clicking Initial Check Items displays the items to "Front View" in "Main Components" of the User's Guide on-screen manual. 2 Open the Canon IJ Printer Utility dialog box. Refer to determine whether ...
Quick Start Guide
Page 23
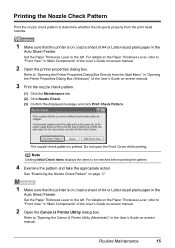
...Head causes used ink to be printed correctly if there is on. 2 Open the printer properties dialog box. This takes about 60 seconds. (3) Load a sheet of A4 or Letter-sized plain paper in "Opening the Printer Properties Dialog Box (Windows)" of the User's Guide on-screen manual. 3 Start ...pattern finishes printing. See "Replacing a FINE Cartridge" on page 17. Refer to "Opening the Printer Properties Dialog Box Directly from the Start Menu" in the Auto Sheet Feeder and set the Paper Thickness Lever to "Front View" in the printed nozzle check pattern. The nozzle check pattern is...
...Head causes used ink to be printed correctly if there is on. 2 Open the printer properties dialog box. This takes about 60 seconds. (3) Load a sheet of A4 or Letter-sized plain paper in "Opening the Printer Properties Dialog Box (Windows)" of the User's Guide on-screen manual. 3 Start ...pattern finishes printing. See "Replacing a FINE Cartridge" on page 17. Refer to "Opening the Printer Properties Dialog Box Directly from the Start Menu" in the Auto Sheet Feeder and set the Paper Thickness Lever to "Front View" in the printed nozzle check pattern. The nozzle check pattern is...
Quick Start Guide
Page 24
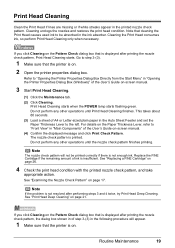
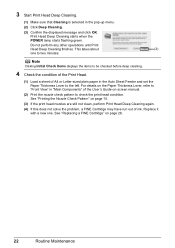
... checked before cleaning. (4) Load a sheet of A4 or Letter-sized plain paper in the Auto Sheet Feeder and set the Paper Thickness Lever to "Opening the Canon IJ Printer Utility (Macintosh)" in the User's Guide on the Paper Thickness Lever, refer to "Front View" in the pop-up menu. (2)...Cleaning is selected in "Main Components" of ink is not enough ink. See "Replacing a FINE Cartridge" on page 17. 2 Open the Canon IJ Printer Utility dialog box. See "Print Head Deep Cleaning" on -screen manual. (5) Confirm the displayed message and click Print Check Pattern. Replace the ...
... checked before cleaning. (4) Load a sheet of A4 or Letter-sized plain paper in the Auto Sheet Feeder and set the Paper Thickness Lever to "Opening the Canon IJ Printer Utility (Macintosh)" in the User's Guide on the Paper Thickness Lever, refer to "Front View" in the pop-up menu. (2)...Cleaning is selected in "Main Components" of ink is not enough ink. See "Replacing a FINE Cartridge" on page 17. 2 Open the Canon IJ Printer Utility dialog box. See "Print Head Deep Cleaning" on -screen manual. (5) Confirm the displayed message and click Print Check Pattern. Replace the ...

Quick Start Guide
Page 25
... check pattern to "Opening the Canon IJ Printer Utility (Macintosh)" in the User's Guide on-screen manual. See "Replacing a FINE Cartridge" on page 26. 1 Make sure that the printer is on. 2 Open the printer properties dialog box. For details on the Paper Thickness Lever, refer to "Front.... (3) Confirm the displayed message and click Execute. This takes about one . Routine Maintenance 21 Note that the printer is on. 2 Open the Canon IJ Printer Utility dialog box. Print Head Deep Cleaning consumes more powerful process. Refer to check the print head condition. Print...
... check pattern to "Opening the Canon IJ Printer Utility (Macintosh)" in the User's Guide on-screen manual. See "Replacing a FINE Cartridge" on page 26. 1 Make sure that the printer is on. 2 Open the printer properties dialog box. For details on the Paper Thickness Lever, refer to "Front.... (3) Confirm the displayed message and click Execute. This takes about one . Routine Maintenance 21 Note that the printer is on. 2 Open the Canon IJ Printer Utility dialog box. Print Head Deep Cleaning consumes more powerful process. Refer to check the print head condition. Print...
Quick Start Guide
Page 26
... Print Head Deep Cleaning finishes. This takes about (3) one . See "Printing the Nozzle Check Pattern" on page 26. 22 Routine Maintenance For details on the Paper Thickness Lever, refer to "Front View" in the pop-up menu. (2) Click Deep Cleaning. (3) Confirm the displayed message and click OK. 3 Start Print Head Deep... Items displays the items to be checked before deep cleaning. 4 Check the condition of the Print Head. (1) Load a sheet of A4 or Letter-sized plain paper in the Auto Sheet Feeder and set the...
... Print Head Deep Cleaning finishes. This takes about (3) one . See "Printing the Nozzle Check Pattern" on page 26. 22 Routine Maintenance For details on the Paper Thickness Lever, refer to "Front View" in the pop-up menu. (2) Click Deep Cleaning. (3) Confirm the displayed message and click OK. 3 Start Print Head Deep... Items displays the items to be checked before deep cleaning. 4 Check the condition of the Print Head. (1) Load a sheet of A4 or Letter-sized plain paper in the Auto Sheet Feeder and set the...
Quick Start Guide
Page 27
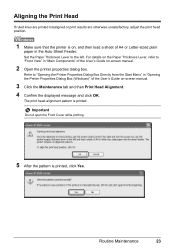
...Routine Maintenance 23 Set the Paper Thickness Lever to "Opening the Printer Properties Dialog Box Directly from the Start Menu" in "Opening the Printer Properties Dialog Box (Windows)" of the User's Guide on-screen manual. 2 Open the printer properties dialog box. For details on the Paper Thickness Lever, refer to ... misaligned or print results are otherwise unsatisfactory, adjust the print head position. 1 Make sure that the printer is on, and then load a sheet of A4 or Letter-sized plain paper in "Main Components" of the User's Guide on-screen manual. 3 Click the Maintenance tab and ...
...Routine Maintenance 23 Set the Paper Thickness Lever to "Opening the Printer Properties Dialog Box Directly from the Start Menu" in "Opening the Printer Properties Dialog Box (Windows)" of the User's Guide on-screen manual. 2 Open the printer properties dialog box. For details on the Paper Thickness Lever, refer to ... misaligned or print results are otherwise unsatisfactory, adjust the print head position. 1 Make sure that the printer is on, and then load a sheet of A4 or Letter-sized plain paper in "Main Components" of the User's Guide on-screen manual. 3 Click the Maintenance tab and ...
Quick Start Guide
Page 28
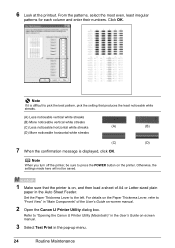
...of the User's Guide on the printer. Refer to the left. Otherwise, the settings made here will not be sure to press the POWER button on -screen manual. 2 Open the Canon IJ Printer Utility dialog box. Set the Paper Thickness Lever to "Opening the Canon IJ Printer Utility (Macintosh)" in the User's... Guide on the Paper Thickness Lever, refer to pick the best pattern, pick the setting that the...
...of the User's Guide on the printer. Refer to the left. Otherwise, the settings made here will not be sure to press the POWER button on -screen manual. 2 Open the Canon IJ Printer Utility dialog box. Set the Paper Thickness Lever to "Opening the Canon IJ Printer Utility (Macintosh)" in the User's... Guide on the Paper Thickness Lever, refer to pick the best pattern, pick the setting that the...
Quick Start Guide
Page 35
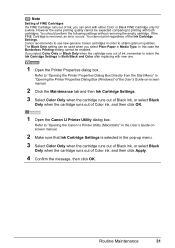
...of Black ink, or select Black Only when the cartridge runs out of Color ink, and then click OK. 1 Open the Canon IJ Printer Utility dialog box. Refer to "Opening the Canon IJ Printer Utility (Macintosh)" in order to printing with either Color or Black FINE Cartridge only for a while. Refer to Both Black and.... If the FINE Cartridge is selected in Media Type. In this case the Borderless Printing setting cannot be used when you select Plain Paper in the pop-up menu. 3 Select Color Only when the cartridge runs out of Black ink, or select Black Only when the cartridge runs out of...
...of Black ink, or select Black Only when the cartridge runs out of Color ink, and then click OK. 1 Open the Canon IJ Printer Utility dialog box. Refer to "Opening the Canon IJ Printer Utility (Macintosh)" in order to printing with either Color or Black FINE Cartridge only for a while. Refer to Both Black and.... If the FINE Cartridge is selected in Media Type. In this case the Borderless Printing setting cannot be used when you select Plain Paper in the pop-up menu. 3 Select Color Only when the cartridge runs out of Black ink, or select Black Only when the cartridge runs out of...
Quick Start Guide
Page 40
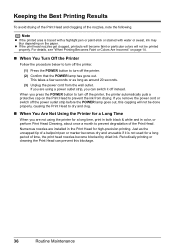
...done properly, causing the Print Head to dry and clog. „ When You Are Not Using the Printer for a Long Time When you are not using a power outlet strip, you are installed in color, or perform Print Head Cleaning, about once a month to turn off the power outlet strip before ...following. Note z If the printed area is not used for high-precision printing. For details, see "When Printing Becomes Faint or Colors Are Incorrect" on the paper. Numerous nozzles are using the printer for a long time, print in both black & white and in the Print Head for a long period of a ballpoint pen...
...done properly, causing the Print Head to dry and clog. „ When You Are Not Using the Printer for a Long Time When you are not using a power outlet strip, you are installed in color, or perform Print Head Cleaning, about once a month to turn off the power outlet strip before ...following. Note z If the printed area is not used for high-precision printing. For details, see "When Printing Becomes Faint or Colors Are Incorrect" on the paper. Numerous nozzles are using the printer for a long time, print in both black & white and in the Print Head for a long period of a ballpoint pen...
Quick Start Guide
Page 41
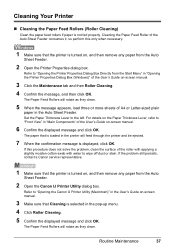
... User's Guide on-screen manual. 3 Make sure that the printer is loaded in the Auto Sheet Feeder. Refer to the left. Set the Paper Thickness Lever to "Opening the Canon IJ Printer Utility (Macintosh)" in "Opening the Printer Properties Dialog Box (Windows)" of the User's Guide on ,... and then remove any paper from the Auto Sheet Feeder. 2 Open the Canon IJ Printer Utility dialog box. If this only...
... User's Guide on-screen manual. 3 Make sure that the printer is loaded in the Auto Sheet Feeder. Refer to the left. Set the Paper Thickness Lever to "Opening the Canon IJ Printer Utility (Macintosh)" in "Opening the Printer Properties Dialog Box (Windows)" of the User's Guide on ,... and then remove any paper from the Auto Sheet Feeder. 2 Open the Canon IJ Printer Utility dialog box. If this only...


