Quick Start Guide
Page 4
...174; Office Equipment Program is either registered trademarks or trademarks of Microsoft Corporation in the U.S. and other countries. Canon PIXMA iP1800 series Photo Printer Quick Start Guide. with functions that promotes energy saving through the penetration of products with all rights reserved. All ... computers and other countries. All information regarding the accuracy thereof. Trademarks z Microsoft and Windows are subject to your Canon PIXMA iP1800 series Photo Printer. z Windows Vista is an international program that effectively reduce energy consumption...
...174; Office Equipment Program is either registered trademarks or trademarks of Microsoft Corporation in the U.S. and other countries. Canon PIXMA iP1800 series Photo Printer Quick Start Guide. with functions that promotes energy saving through the penetration of products with all rights reserved. All ... computers and other countries. All information regarding the accuracy thereof. Trademarks z Microsoft and Windows are subject to your Canon PIXMA iP1800 series Photo Printer. z Windows Vista is an international program that effectively reduce energy consumption...

Quick Start Guide
Page 5
Table of Contents Before Printing 2 Turning the Printer On and Off 2 Loading Printing Paper 4 Printing from Your Computer 10 Printing with Windows 10 Printing with Macintosh 12 Routine Maintenance 14 When Printing Becomes Faint or Colors Are Incorrect 14 Printing the Nozzle Check Pattern 15 Examining the Nozzle Check Pattern ...........17 Print Head Cleaning...
Table of Contents Before Printing 2 Turning the Printer On and Off 2 Loading Printing Paper 4 Printing from Your Computer 10 Printing with Windows 10 Printing with Macintosh 12 Routine Maintenance 14 When Printing Becomes Faint or Colors Are Incorrect 14 Printing the Nozzle Check Pattern 15 Examining the Nozzle Check Pattern ...........17 Print Head Cleaning...
Quick Start Guide
Page 13
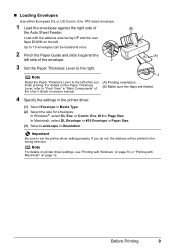
...Size. (3) Select Landscape in the wrong direction. If you finish printing. Before Printing 9 In Windows®, select DL Env. Up to the left . Note For details on printer driver settings, see "Printing with Windows" on page 10 or "Printing with the address side facing UP and the rear flaps DOWN on... page 12. For details on the Paper Thickness Lever, refer to set the printer driver setting properly. Env. #10 in ...
...Size. (3) Select Landscape in the wrong direction. If you finish printing. Before Printing 9 In Windows®, select DL Env. Up to the left . Note For details on printer driver settings, see "Printing with Windows" on page 10 or "Printing with the address side facing UP and the rear flaps DOWN on... page 12. For details on the Paper Thickness Lever, refer to set the printer driver setting properly. Env. #10 in ...
Quick Start Guide
Page 14
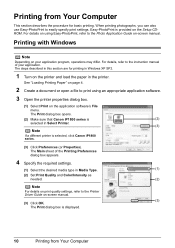
...Color/Intensity as needed. (2) Note For details on print quality settings, refer to the Printer Driver Guide on-screen manual. (3) (3) Click OK. See "Loading Printing Paper" on page 4. 2 Create a document or open a file to easily specify print settings. The Print dialog box opens. (2) Make sure that Canon iP1800 series is selected, click Canon iP1800...from Your Computer This section describes the procedure for printing in Windows XP SP2. 1 Turn on the printer and load the paper in the printer. Printing with Windows Note Depending on -screen manual. For details, refer to ...
...Color/Intensity as needed. (2) Note For details on print quality settings, refer to the Printer Driver Guide on-screen manual. (3) (3) Click OK. See "Loading Printing Paper" on page 4. 2 Create a document or open a file to easily specify print settings. The Print dialog box opens. (2) Make sure that Canon iP1800 series is selected, click Canon iP1800...from Your Computer This section describes the procedure for printing in Windows XP SP2. 1 Turn on the printer and load the paper in the printer. Printing with Windows Note Depending on -screen manual. For details, refer to ...
Quick Start Guide
Page 19
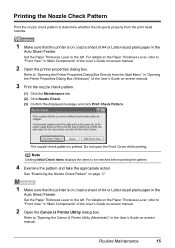
... paper in the Auto Sheet Feeder. The nozzle check pattern is printed. See "Examining the Nozzle Check Pattern" on page 17. 1 Make sure that the printer is on -screen manual. 2 Open the Canon IJ Printer Utility dialog box. Note Clicking Initial Check Items displays the items to the left . Refer to "Opening the... manual. Printing the Nozzle Check Pattern Print the nozzle check pattern to determine whether the ink ejects properly from the Start Menu" in "Opening the Printer Properties Dialog Box (Windows)" of A4 or Letter-sized plain paper in the Auto Sheet Feeder.
... paper in the Auto Sheet Feeder. The nozzle check pattern is printed. See "Examining the Nozzle Check Pattern" on page 17. 1 Make sure that the printer is on -screen manual. 2 Open the Canon IJ Printer Utility dialog box. Note Clicking Initial Check Items displays the items to the left . Refer to "Opening the... manual. Printing the Nozzle Check Pattern Print the nozzle check pattern to determine whether the ink ejects properly from the Start Menu" in "Opening the Printer Properties Dialog Box (Windows)" of A4 or Letter-sized plain paper in the Auto Sheet Feeder.
Quick Start Guide
Page 22
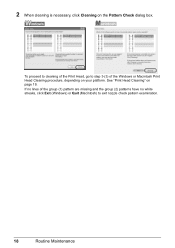
To proceed to cleaning of the Windows or Macintosh Print Head Cleaning procedure, depending on your platform. If no lines of the group (1) pattern are missing and the group (2) patterns have no white streaks, click Exit (Windows) or Quit (Macintosh) to step 3-(3) of the Print Head, go to exit nozzle check pattern examination. 18 Routine Maintenance 2 When cleaning is necessary, click Cleaning on page 19. See "Print Head Cleaning" on the Pattern Check dialog box.
To proceed to cleaning of the Windows or Macintosh Print Head Cleaning procedure, depending on your platform. If no lines of the group (1) pattern are missing and the group (2) patterns have no white streaks, click Exit (Windows) or Quit (Macintosh) to step 3-(3) of the Print Head, go to exit nozzle check pattern examination. 18 Routine Maintenance 2 When cleaning is necessary, click Cleaning on page 19. See "Print Head Cleaning" on the Pattern Check dialog box.
Quick Start Guide
Page 23
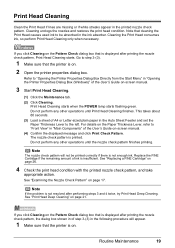
... from the Start Menu" in of the User's Guide on page 21. Note that the printer is displayed after printing the nozzle check pattern, the dialog box shown in "Opening the Printer Properties Dialog Box (Windows)" of the User's Guide on page 17. See "Replacing a FINE Cartridge" on . ...2 Open the printer properties dialog box. Print Head Cleaning Clean the Print Head if lines are missing ...
... from the Start Menu" in of the User's Guide on page 21. Note that the printer is displayed after printing the nozzle check pattern, the dialog box shown in "Opening the Printer Properties Dialog Box (Windows)" of the User's Guide on page 17. See "Replacing a FINE Cartridge" on . ...2 Open the printer properties dialog box. Print Head Cleaning Clean the Print Head if lines are missing ...

Quick Start Guide
Page 25
Refer to "Opening the Canon IJ Printer Utility (Macintosh)" in the User's Guide on-screen manual. Print Head Deep Cleaning starts when the POWER lamp starts flashing green. Refer to "Opening the Printer Properties Dialog Box Directly from the Start Menu" in the ink absorber. Print Head Deep ... on -screen manual. (2) Print the nozzle check pattern to be absorbed in "Opening the Printer Properties Dialog Box (Windows)" of the User's Guide on . 2 Open the Canon IJ Printer Utility dialog box. For details on the Paper Thickness Lever, refer to "Front View" in the Auto Sheet Feeder ...
Refer to "Opening the Canon IJ Printer Utility (Macintosh)" in the User's Guide on-screen manual. Print Head Deep Cleaning starts when the POWER lamp starts flashing green. Refer to "Opening the Printer Properties Dialog Box Directly from the Start Menu" in the ink absorber. Print Head Deep ... on -screen manual. (2) Print the nozzle check pattern to be absorbed in "Opening the Printer Properties Dialog Box (Windows)" of the User's Guide on . 2 Open the Canon IJ Printer Utility dialog box. For details on the Paper Thickness Lever, refer to "Front View" in the Auto Sheet Feeder ...
Quick Start Guide
Page 27
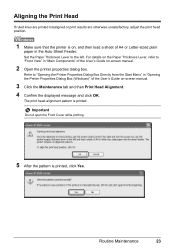
... on, and then load a sheet of A4 or Letter-sized plain paper in "Opening the Printer Properties Dialog Box (Windows)" of the User's Guide on-screen manual. 2 Open the printer properties dialog box. For details on the Paper Thickness Lever, refer to the left. The print head alignment pattern... is printed, click Yes. Refer to "Opening the Printer Properties Dialog Box Directly from the Start ...
... on, and then load a sheet of A4 or Letter-sized plain paper in "Opening the Printer Properties Dialog Box (Windows)" of the User's Guide on-screen manual. 2 Open the printer properties dialog box. For details on the Paper Thickness Lever, refer to the left. The print head alignment pattern... is printed, click Yes. Refer to "Opening the Printer Properties Dialog Box Directly from the Start ...

Quick Start Guide
Page 30
...the Canon IJ Status Monitor icon which appears on the taskbar during printing. 26 Routine Maintenance The printer will work. Replacing a FINE Cartridge If there is no improvement with the quality of printing following message is installed in "Opening the Printer Properties Dialog Box (Windows)"... of the User's Guide on-screen manual. (2) Click View Printer Status on the Maintenance sheet. For information on available FINE Cartridges, see the back cover...
...the Canon IJ Status Monitor icon which appears on the taskbar during printing. 26 Routine Maintenance The printer will work. Replacing a FINE Cartridge If there is no improvement with the quality of printing following message is installed in "Opening the Printer Properties Dialog Box (Windows)"... of the User's Guide on-screen manual. (2) Click View Printer Status on the Maintenance sheet. For information on available FINE Cartridges, see the back cover...
Quick Start Guide
Page 35
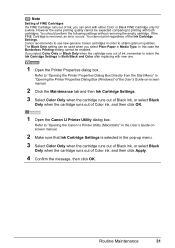
... cannot print regardless of Color ink, and then click Apply. 4 Confirm the message, then click OK. The Black Only setting can be used when you can print with both cartridges. Refer to use new genuine Canon cartridges in "Opening the Printer Properties Dialog Box (Windows)" of the User's ...Guide on-screen manual. 2 Click the Maintenance tab and then Ink Cartridge Settings. 3 Select Color Only when the cartridge runs out of Black ink, or ...
... cannot print regardless of Color ink, and then click Apply. 4 Confirm the message, then click OK. The Black Only setting can be used when you can print with both cartridges. Refer to use new genuine Canon cartridges in "Opening the Printer Properties Dialog Box (Windows)" of the User's ...Guide on-screen manual. 2 Click the Maintenance tab and then Ink Cartridge Settings. 3 Select Color Only when the cartridge runs out of Black ink, or ...
Quick Start Guide
Page 41
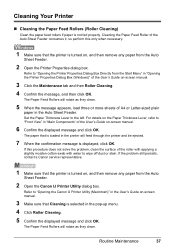
... turned on, and then remove any paper from the Start Menu" in "Opening the Printer Properties Dialog Box (Windows)" of A4 or Letter-sized plain paper in the Auto Sheet Feeder. The Paper Feed Rollers will rotate as they clean. 5 When the message appears, ... feed rollers if paper is turned on, and then remove any paper from the Auto Sheet Feeder. 2 Open the Canon IJ Printer Utility dialog box. Refer to "Opening the Canon IJ Printer Utility (Macintosh)" in the printer will rotate as they clean. If this only when necessary. 1 Make sure that Cleaning is displayed, click OK...
... turned on, and then remove any paper from the Start Menu" in "Opening the Printer Properties Dialog Box (Windows)" of A4 or Letter-sized plain paper in the Auto Sheet Feeder. The Paper Feed Rollers will rotate as they clean. 5 When the message appears, ... feed rollers if paper is turned on, and then remove any paper from the Auto Sheet Feeder. 2 Open the Canon IJ Printer Utility dialog box. Refer to "Opening the Canon IJ Printer Utility (Macintosh)" in the printer will rotate as they clean. If this only when necessary. 1 Make sure that Cleaning is displayed, click OK...

Quick Start Guide
Page 43
..., and then unfold the paper. 3 Load this and only this sheet of paper in "Opening the Printer Properties Dialog Box (Windows)" of the printer as it . 4 Open the Canon IJ Printer Utility dialog box. The paper cleans the inside the printer may be stained. If the problem is not resolved after unfolding it feeds through the...
..., and then unfold the paper. 3 Load this and only this sheet of paper in "Opening the Printer Properties Dialog Box (Windows)" of the printer as it . 4 Open the Canon IJ Printer Utility dialog box. The paper cleans the inside the printer may be stained. If the problem is not resolved after unfolding it feeds through the...

Quick Start Guide
Page 45
..."The Printer Is Not Recognized Properly" on page 43 z "Print Results Not Satisfactory" on page 44 z "Cannot Print to End of Job" on page 44 z "Part of the Page Is Not Printed" on page 44 z "Ink Does Not Come Out/Printing Does Not Start/Printing Is Blurred/Colors Are ... an error occurs in the message. Troubleshooting This section describes troubleshooting tips for problems you cannot find appropriate tips for your Windows operating system. Note If you may vary depending on page 52 If an Error Occurs When the Printer Is Connected to the on-screen manuals. Troubleshooting 41
..."The Printer Is Not Recognized Properly" on page 43 z "Print Results Not Satisfactory" on page 44 z "Cannot Print to End of Job" on page 44 z "Part of the Page Is Not Printed" on page 44 z "Ink Does Not Come Out/Printing Does Not Start/Printing Is Blurred/Colors Are ... an error occurs in the message. Troubleshooting This section describes troubleshooting tips for problems you cannot find appropriate tips for your Windows operating system. Note If you may vary depending on page 52 If an Error Occurs When the Printer Is Connected to the on-screen manuals. Troubleshooting 41

Quick Start Guide
Page 46
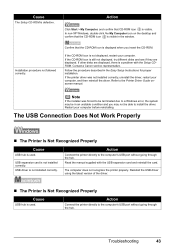
...the Setup CD-ROM is not displayed, restart your disc drive and then the name of the disc drive depends on your computer. Contact a Canon service representative. 42 Troubleshooting Click Start > My Computer > double-click the CD-ROM icon . Double-click the CD-ROM icon on your ...there is still not displayed, try different disks and see if they are displayed. In non-XP Windows, double-click the My Computer icon on the PIXMA iP1800 series, then remove the CD-ROM. (5) Turn the printer off. (6) Restart your computer's disc drive. If the CD-ROM icon is inserted into your ...
...the Setup CD-ROM is not displayed, restart your disc drive and then the name of the disc drive depends on your computer. Contact a Canon service representative. 42 Troubleshooting Click Start > My Computer > double-click the CD-ROM icon . Double-click the CD-ROM icon on your ...there is still not displayed, try different disks and see if they are displayed. In non-XP Windows, double-click the My Computer icon on the PIXMA iP1800 series, then remove the CD-ROM. (5) Turn the printer off. (6) Restart your computer's disc drive. If the CD-ROM icon is inserted into your ...
Quick Start Guide
Page 47
...that the CD-ROM icon is visible in the window. Contact a Canon service representative. Read the manual supplied with the Setup CDROM. Action Connect the printer directly to the computer's USB port without going through the hub. In non-XP Windows, double-click the My Computer icon on the desktop... Not Recognized Properly Cause USB hub is not displayed, restart your computer. USB driver is defective. Action Connect the printer directly to a Windows error, the system may be in the Easy Setup Instructions for proper installation. Note If the installer was not installed ...
...that the CD-ROM icon is visible in the window. Contact a Canon service representative. Read the manual supplied with the Setup CDROM. Action Connect the printer directly to the computer's USB port without going through the hub. In non-XP Windows, double-click the My Computer icon on the desktop... Not Recognized Properly Cause USB hub is not displayed, restart your computer. USB driver is defective. Action Connect the printer directly to a Windows error, the system may be in the Easy Setup Instructions for proper installation. Note If the installer was not installed ...
Quick Start Guide
Page 48
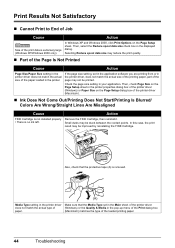
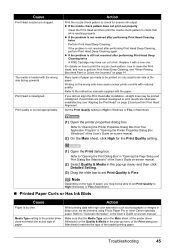
...points. Check the page size setting in the pop-up menu of the Print dialog box paper. (Macintosh) matches the type of the printer driver (Windows) or Paper Size on the Page Setup sheet. In this case, the print result may reduce the print quality. „ Part ...part of the printer driver (Macintosh). „ Ink Does Not Come Out/Printing Does Not Start/Printing Is Blurred/ Colors Are Wrong/Straight Lines Are Misaligned Cause Action FINE Cartridge is not installed properly Remove the FINE Cartridge, then reinstall it. / There is extremely large (Windows XP/Windows 2000 only)....
...points. Check the page size setting in the pop-up menu of the Print dialog box paper. (Macintosh) matches the type of the printer driver (Windows) or Paper Size on the Page Setup sheet. In this case, the print result may reduce the print quality. „ Part ...part of the printer driver (Macintosh). „ Ink Does Not Come Out/Printing Does Not Start/Printing Is Blurred/ Colors Are Wrong/Straight Lines Are Misaligned Cause Action FINE Cartridge is not installed properly Remove the FINE Cartridge, then reinstall it. / There is extremely large (Windows XP/Windows 2000 only)....
Quick Start Guide
Page 49
... print results are clogged. Refer to the instruction manuals supplied with high color saturation such as photographs or images in deep color, we recommend using Photo Paper Pro or other Canon specialty paper. Media Type setting in "Opening the Printer Properties Dialog Box (Windows)" of the paper. If the problem is too thin. For details...
... print results are clogged. Refer to the instruction manuals supplied with high color saturation such as photographs or images in deep color, we recommend using Photo Paper Pro or other Canon specialty paper. Media Type setting in "Opening the Printer Properties Dialog Box (Windows)" of the paper. If the problem is too thin. For details...
Quick Start Guide
Page 51
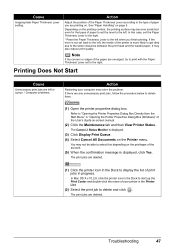
.... It may solve the problem. If the lever is not set the lever to the left in queue. / Computer problems. Action Restarting your printer in "Opening the Printer Properties Dialog Box (Windows)" of the User's Guide on the privileges of paper to set back to the left , the inside of the...surface may become scratched even for the types of the account. (5) When the confirmation message is displayed, click Yes. Depending on the Printer menu. The Canon IJ Status Monitor is more likely to get dirty due to the type of the paper are deleted. Action Adjust the position of the...
.... It may solve the problem. If the lever is not set the lever to the left in queue. / Computer problems. Action Restarting your printer in "Opening the Printer Properties Dialog Box (Windows)" of the User's Guide on the privileges of paper to set back to the left , the inside of the...surface may become scratched even for the types of the account. (5) When the confirmation message is displayed, click Yes. Depending on the Printer menu. The Canon IJ Status Monitor is more likely to get dirty due to the type of the paper are deleted. Action Adjust the position of the...
Quick Start Guide
Page 53
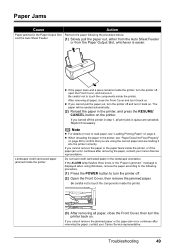
... removing all paper, close the Front Cover, then turn it back on. If you are using Windows, remove the paper according to turn the printer off and turn the printer off the printer in step 1, all print jobs in the landscape orientation. Troubleshooting 49 Be careful not to confirm that... or the paper jam error continues after removing the paper, contact your Canon Service representative. If you cannot remove the paper or the paper tears inside the printer. z If the paper tears and a piece remains inside the printer. Note z For details on how to load paper, see "Paper ...
... removing all paper, close the Front Cover, then turn it back on. If you are using Windows, remove the paper according to turn the printer off and turn the printer off the printer in step 1, all print jobs in the landscape orientation. Troubleshooting 49 Be careful not to confirm that... or the paper jam error continues after removing the paper, contact your Canon Service representative. If you cannot remove the paper or the paper tears inside the printer. z If the paper tears and a piece remains inside the printer. Note z For details on how to load paper, see "Paper ...


