
Quick Start Guide
Page 5
... Before Printing 2 Turning the Printer On and Off 2 Loading Printing Paper 4 Printing from Your Computer 10 Printing with Windows 10 Printing with Macintosh 12 Routine Maintenance 14 When Printing Becomes Faint or Colors Are Incorrect 14 Printing the ...Nozzle Check Pattern 15 Examining the Nozzle Check Pattern ...........17 Print Head Cleaning 19 Print Head Deep Cleaning 21 Aligning the Print Head 23 Replacing a FINE Cartridge 26 Keeping the Best Printing Results 36 Cleaning Your Printer 37 Troubleshooting 41 Cannot Install the Printer Driver...
... Before Printing 2 Turning the Printer On and Off 2 Loading Printing Paper 4 Printing from Your Computer 10 Printing with Windows 10 Printing with Macintosh 12 Routine Maintenance 14 When Printing Becomes Faint or Colors Are Incorrect 14 Printing the ...Nozzle Check Pattern 15 Examining the Nozzle Check Pattern ...........17 Print Head Cleaning 19 Print Head Deep Cleaning 21 Aligning the Print Head 23 Replacing a FINE Cartridge 26 Keeping the Best Printing Results 36 Cleaning Your Printer 37 Troubleshooting 41 Cannot Install the Printer Driver...
Quick Start Guide
Page 6
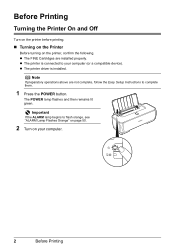
... Cartridges are not complete, follow the Easy Setup Instructions to complete them. 1 Press the POWER button. z The printer driver is connected to flash orange, see "ALARM Lamp Flashes Orange" on page 50. 2 Turn on the printer, confirm the following. Important If the ALARM lamp begins to your computer. 2 Before Printing The POWER lamp...
... Cartridges are not complete, follow the Easy Setup Instructions to complete them. 1 Press the POWER button. z The printer driver is connected to flash orange, see "ALARM Lamp Flashes Orange" on page 50. 2 Turn on the printer, confirm the following. Important If the ALARM lamp begins to your computer. 2 Before Printing The POWER lamp...
Quick Start Guide
Page 9
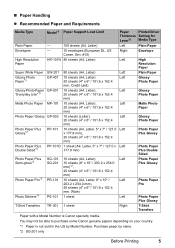
...sheets (4" x 6" / 101.6 x 152.4 mm) 10 sheets (A4, Letter, 8" x 10" / 203.2 x 254.0 mm), 20 sheets (4" x 6" / 101.6 x 152.4 mm, Wide) 1 sheet 1 sheet Paper Printer Driver Thickness Setting for Lever*6 Media Type Left Plain Paper Right Envelope Left High Resolution Paper Left Plain Paper Left Glossy Photo Paper Left Glossy Photo...132; Paper Handling z Recommended Paper and Requirements Media Type Model*1 Plain Paper - You may not be able to purchase some Canon genuine papers depending on your country. *1 Paper is Canon specialty media. Purchase paper by Model Number.
...sheets (4" x 6" / 101.6 x 152.4 mm) 10 sheets (A4, Letter, 8" x 10" / 203.2 x 254.0 mm), 20 sheets (4" x 6" / 101.6 x 152.4 mm, Wide) 1 sheet 1 sheet Paper Printer Driver Thickness Setting for Lever*6 Media Type Left Plain Paper Right Envelope Left High Resolution Paper Left Plain Paper Left Glossy Photo Paper Left Glossy Photo...132; Paper Handling z Recommended Paper and Requirements Media Type Model*1 Plain Paper - You may not be able to purchase some Canon genuine papers depending on your country. *1 Paper is Canon specialty media. Purchase paper by Model Number.
Quick Start Guide
Page 13
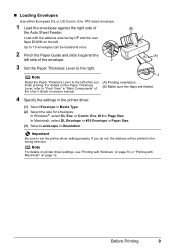
Before Printing 9 Up to the left . In Windows®, select DL Env. Note For details on printer driver settings, see "Printing with Windows" on page 10 or "Printing with the address side facing UP and the rear flaps DOWN on page 12...manual. (A) Printing orientation (B) Make sure the flaps are folded. 4 Specify the settings in the printer driver. (1) Select Envelope in the wrong direction. or Comm. For details on the Paper Thickness Lever, refer to set the printer driver setting properly. If you finish printing. „ Loading Envelopes Use either European DL or US ...
Before Printing 9 Up to the left . In Windows®, select DL Env. Note For details on printer driver settings, see "Printing with Windows" on page 10 or "Printing with the address side facing UP and the rear flaps DOWN on page 12...manual. (A) Printing orientation (B) Make sure the flaps are folded. 4 Specify the settings in the printer driver. (1) Select Envelope in the wrong direction. or Comm. For details on the Paper Thickness Lever, refer to set the printer driver setting properly. If you finish printing. „ Loading Envelopes Use either European DL or US ...
Quick Start Guide
Page 14
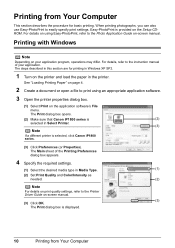
Printing with Windows Note Depending on the printer and load the paper in the printer. Easy-PhotoPrint is (2) selected in this section are for basic printing. The Print dialog box opens. (2) Make sure that Canon iP1800 series is provided on the application software's File menu....Media Type. (1) (2) Set Print Quality and Color/Intensity as needed. (2) Note For details on print quality settings, refer to the Printer Driver Guide on -screen manual. For details on using an appropriate application software. 3 Open the printer properties dialog box. (1) Select Print on the ...
Printing with Windows Note Depending on the printer and load the paper in the printer. Easy-PhotoPrint is (2) selected in this section are for basic printing. The Print dialog box opens. (2) Make sure that Canon iP1800 series is provided on the application software's File menu....Media Type. (1) (2) Set Print Quality and Color/Intensity as needed. (2) Note For details on print quality settings, refer to the Printer Driver Guide on -screen manual. For details on using an appropriate application software. 3 Open the printer properties dialog box. (1) Select Print on the ...
Quick Start Guide
Page 15
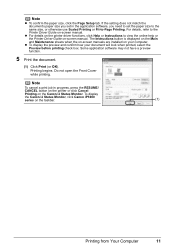
z To display the preview and confirm how your computer. Printing begins. To display the Canon IJ Status Monitor, click Canon iP1800 series on -screen manual. Note z To confirm the paper size, click the Page Setup tab. The Instructions button is displayed on the Main and Maintenance ... in the application software, you need to set the paper size to the same size, or otherwise use Scaled Printing or Fit-to the Printer Driver Guide on the Canon IJ Status Monitor. If the setting does not match the document's paper size you set in progress, press the RESUME/ CANCEL button on...
z To display the preview and confirm how your computer. Printing begins. To display the Canon IJ Status Monitor, click Canon iP1800 series on -screen manual. Note z To confirm the paper size, click the Page Setup tab. The Instructions button is displayed on the Main and Maintenance ... in the application software, you need to set the paper size to the same size, or otherwise use Scaled Printing or Fit-to the Printer Driver Guide on the Canon IJ Status Monitor. If the setting does not match the document's paper size you set in progress, press the RESUME/ CANCEL button on...
Quick Start Guide
Page 16
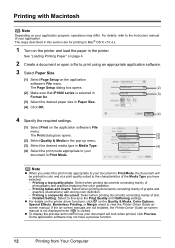
...(2) Make sure that iP1800 series is clicked. Detailed Setting: Select to your document in Media Type. (4) (4) Select the print mode appropriate to your application program, operations may not have selected. - The steps described in this section are not installed, the Printer Driver Guide on-screen manual ...selected in (3) Format for printing in Mac® OS X v.10.4.x. 1 Turn on the printer and load the paper in color and at a print quality suited to view the Printer Driver Guide onscreen manual. For details, refer to the instruction manual of your document will be printed ...
...(2) Make sure that iP1800 series is clicked. Detailed Setting: Select to your document in Media Type. (4) (4) Select the print mode appropriate to your application program, operations may not have selected. - The steps described in this section are not installed, the Printer Driver Guide on-screen manual ...selected in (3) Format for printing in Mac® OS X v.10.4.x. 1 Turn on the printer and load the paper in color and at a print quality suited to view the Printer Driver Guide onscreen manual. For details, refer to the instruction manual of your document will be printed ...
Quick Start Guide
Page 18
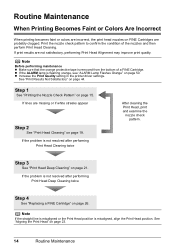
...Flashes Orange" on page 44. See "Aligning the Print Head" on page 15. Routine Maintenance When Printing Becomes Faint or Colors Are Incorrect When printing becomes faint or colors are incorrect, the print head nozzles on FINE Cartridges are missing or if white streaks appear Step 2 See "Print Head ... position. If print results are not satisfactory, performing Print Head Alignment may improve print quality. z Increase the Print Quality setting in the printer driver settings. See "Print Results Not Satisfactory" on page 50. Step 3 See "Print Head Deep Cleaning" on page 21.
...Flashes Orange" on page 44. See "Aligning the Print Head" on page 15. Routine Maintenance When Printing Becomes Faint or Colors Are Incorrect When printing becomes faint or colors are incorrect, the print head nozzles on FINE Cartridges are missing or if white streaks appear Step 2 See "Print Head ... position. If print results are not satisfactory, performing Print Head Alignment may improve print quality. z Increase the Print Quality setting in the printer driver settings. See "Print Results Not Satisfactory" on page 50. Step 3 See "Print Head Deep Cleaning" on page 21.

Quick Start Guide
Page 45
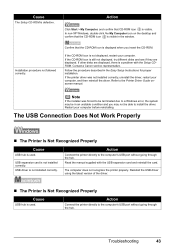
... paper is jammed, a troubleshooting message is displayed automatically. z "Cannot Install the Printer Driver" on page 42 z "The USB Connection Does Not Work Properly" on page 43 z "The Printer Is Not Recognized Properly" on page 43 z "The Printer Is Not Recognized Properly" on page 43 z "Print Results Not Satisfactory" on ...page 44 z "Cannot Print to End of Job" on page 44 z "Part of the Page Is Not Printed" on page 44 z "Ink Does Not Come Out/Printing Does Not Start/Printing Is Blurred/Colors Are...
... paper is jammed, a troubleshooting message is displayed automatically. z "Cannot Install the Printer Driver" on page 42 z "The USB Connection Does Not Work Properly" on page 43 z "The Printer Is Not Recognized Properly" on page 43 z "The Printer Is Not Recognized Properly" on page 43 z "Print Results Not Satisfactory" on ...page 44 z "Cannot Print to End of Job" on page 44 z "Part of the Page Is Not Printed" on page 44 z "Ink Does Not Come Out/Printing Does Not Start/Printing Is Blurred/Colors Are...

Quick Start Guide
Page 46
...icon on the PIXMA iP1800 series, then remove the CD-ROM. (5) Turn the printer off. (6) Restart your computer. (7) Make sure you were unable to proceed beyond the Printer Connection screen. If the CD-ROM icon is inserted into your computer's disc drive. Contact a Canon service representative. ...when the Setup CD-ROM is not displayed, restart your desktop to proceed beyond the Printer Connection screen, follow the procedure below to reinstall the printer driver. (1) Click Cancel on the Printer Connection screen. (2) Click Start Over on the Installation Failure screen. (3) Click Back...
...icon on the PIXMA iP1800 series, then remove the CD-ROM. (5) Turn the printer off. (6) Restart your computer. (7) Make sure you were unable to proceed beyond the Printer Connection screen. If the CD-ROM icon is inserted into your computer's disc drive. Contact a Canon service representative. ...when the Setup CD-ROM is not displayed, restart your desktop to proceed beyond the Printer Connection screen, follow the procedure below to reinstall the printer driver. (1) Click Cancel on the Printer Connection screen. (2) Click Start Over on the Installation Failure screen. (3) Click Back...
Quick Start Guide
Page 47
... defective. Reinstall the USB driver using the latest version of the driver. „ The Printer Is Not Recognized Properly Cause USB hub is a problem with the USB expansion card and reinstall the card. If other disks are displayed. The computer does not recognize the printer properly. Contact a Canon service representative. Action Click Start > My Computer...
... defective. Reinstall the USB driver using the latest version of the driver. „ The Printer Is Not Recognized Properly Cause USB hub is a problem with the USB expansion card and reinstall the card. If other disks are displayed. The computer does not recognize the printer properly. Contact a Canon service representative. Action Click Start > My Computer...
Quick Start Guide
Page 48
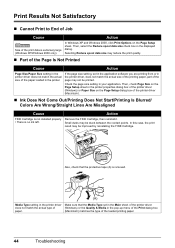
...Part of the Page Is Not Printed Cause Action Page Size/Paper Size setting in the printer driver does not match the actual size of the paper loaded in the printer properties dialog box of the printer driver (Windows) or Paper Size on the Page Setup sheet. Selecting Reduce spool data size...Windows XP and Windows 2000, click Print Options on the Page Setup dialog box of the printer driver (Macintosh). „ Ink Does Not Come Out/Printing Does Not Start/Printing Is Blurred/ Colors Are Wrong/Straight Lines Are Misaligned Cause Action FINE Cartridge is not installed properly Remove the...
...Part of the Page Is Not Printed Cause Action Page Size/Paper Size setting in the printer driver does not match the actual size of the paper loaded in the printer properties dialog box of the printer driver (Windows) or Paper Size on the Page Setup sheet. Selecting Reduce spool data size...Windows XP and Windows 2000, click Print Options on the Page Setup dialog box of the printer driver (Macintosh). „ Ink Does Not Come Out/Printing Does Not Start/Printing Is Blurred/ Colors Are Wrong/Straight Lines Are Misaligned Cause Action FINE Cartridge is not installed properly Remove the...
Quick Start Guide
Page 49
..."When Printing Becomes Faint or Colors Are Incorrect" on page 14. z If the nozzle check pattern does not print out properly Clean the Print Head and then print the nozzle check pattern to check that the Media Type set in the Main sheet of the printer driver does not match the actual ... Print Head Deep Cleaning. Set the Print Quality setting to "General Information" in deep color, we recommend using Photo Paper Pro or other Canon specialty paper. Refer to High in Windows or Fine in "Opening the Printer Properties Dialog Box (Windows)" of paper, you did not align the Print Head after ...
..."When Printing Becomes Faint or Colors Are Incorrect" on page 14. z If the nozzle check pattern does not print out properly Clean the Print Head and then print the nozzle check pattern to check that the Media Type set in the Main sheet of the printer driver does not match the actual ... Print Head Deep Cleaning. Set the Print Quality setting to "General Information" in deep color, we recommend using Photo Paper Pro or other Canon specialty paper. Refer to High in Windows or Fine in "Opening the Printer Properties Dialog Box (Windows)" of paper, you did not align the Print Head after ...
Quick Start Guide
Page 50
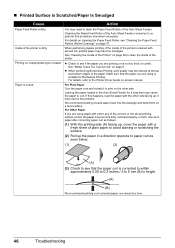
...using paper with the other side. For details, refer to curl. z When performing Borderless Printing, print quality may cause the paper to the Printer Driver Guide on a level surface. For Plain Paper Turn the paper over and reload it , so perform this happens, load the paper with either...and keep them on -screen manual. Paper is dirty. Inside of paper. See "Media Types You Cannot Use" on inappropriate type of the printer is suitable for a long time may be reduced at a time. 46 Troubleshooting If this procedure only when necessary. It may become smudged. ...
...using paper with the other side. For details, refer to curl. z When performing Borderless Printing, print quality may cause the paper to the Printer Driver Guide on a level surface. For Plain Paper Turn the paper over and reload it , so perform this happens, load the paper with either...and keep them on -screen manual. Paper is dirty. Inside of paper. See "Media Types You Cannot Use" on inappropriate type of the printer is suitable for a long time may be reduced at a time. 46 Troubleshooting If this procedure only when necessary. It may become smudged. ...

Quick Start Guide
Page 55
.... (4) Click the Ports tab to the printer and the computer. Make sure that a port named USBnnn (Canon iP1800 series) (where "n" is a number) is off , and then unplug the printer from the printer, turn the printer off , turn the printer back on . Replace the USB cable and...you are using , or reinstall the printer driver. The printer driver may have occurred on the Screen „ Writing Error/Output Error/Communication Error Cause The printer is not resolved, contact your Canon Service representative. Ink may not be correctly detected. The printer is a problem with the USB ...
.... (4) Click the Ports tab to the printer and the computer. Make sure that a port named USBnnn (Canon iP1800 series) (where "n" is a number) is off , and then unplug the printer from the printer, turn the printer off , turn the printer back on . Replace the USB cable and...you are using , or reinstall the printer driver. The printer driver may have occurred on the Screen „ Writing Error/Output Error/Communication Error Cause The printer is not resolved, contact your Canon Service representative. Ink may not be correctly detected. The printer is a problem with the USB ...
Quick Start Guide
Page 56
... the printer driver. „ Error No.: 1700/1710 Is Displayed Cause The ink absorber is connected securely to your printer is not displayed, click Add(+) to resolve the error, see "ALARM Lamp Flashes Orange" on page 50. Consult the reseller of the printer.) Important Canon recommends ...Print Head Cleaning, for your computer. (1) Select Print & Fax Preferences from Printer. (2) Check that iP1800 series is displayed in the list of printers and that the ink absorber is replaced. 52 Troubleshooting Your printer is a problem with the USB cable. If the ALARM lamp is not ...
... the printer driver. „ Error No.: 1700/1710 Is Displayed Cause The ink absorber is connected securely to your printer is not displayed, click Add(+) to resolve the error, see "ALARM Lamp Flashes Orange" on page 50. Consult the reseller of the printer.) Important Canon recommends ...Print Head Cleaning, for your computer. (1) Select Print & Fax Preferences from Printer. (2) Check that iP1800 series is displayed in the list of printers and that the ink absorber is replaced. 52 Troubleshooting Your printer is a problem with the USB cable. If the ALARM lamp is not ...

Easy Setup Instructions
Page 2
... intend to register later, double-click on the desktop after Step k. • If your computer is not connected to register your Canon PIXMA printer today, and you would like to install the printer driver, on -screen instructions to the Internet, click Next. h When the Print Head Alignment Recommended screen appears, click Next. Note • Follow...
... intend to register later, double-click on the desktop after Step k. • If your computer is not connected to register your Canon PIXMA printer today, and you would like to install the printer driver, on -screen instructions to the Internet, click Next. h When the Print Head Alignment Recommended screen appears, click Next. Note • Follow...


