
User Manual
Page 3
...) contains Open Source Software modules. Please be advised that Canon shall not be liable in any way in the event of a dispute between any user and any third party concerning the installation of the product or camera and/or audio monitoring or recording. Copyright Videos, images or sounds recorded with your camera may be utilized or published without consent of such problems. License...
...) contains Open Source Software modules. Please be advised that Canon shall not be liable in any way in the event of a dispute between any user and any third party concerning the installation of the product or camera and/or audio monitoring or recording. Copyright Videos, images or sounds recorded with your camera may be utilized or published without consent of such problems. License...
User Manual
Page 5
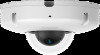
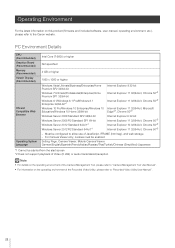
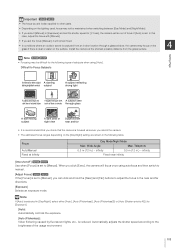
... differ from the actual screens displayed. The video size set , substitute those sizes. 5 Camera Management Tool User Manual This explains details on how to accuracy. Network Video Recording Software RM Series Administrator Manual This explains details on a computer screen. Software Screenshots The software screenshots samples shown in this guide are instructed to use Windows 8.1 for the operating system, Internet Explorer 11 for the web browser, and the VB-S30VE for any outcome...
... differ from the actual screens displayed. The video size set , substitute those sizes. 5 Camera Management Tool User Manual This explains details on how to accuracy. Network Video Recording Software RM Series Administrator Manual This explains details on a computer screen. Software Screenshots The software screenshots samples shown in this guide are instructed to use Windows 8.1 for the operating system, Internet Explorer 11 for the web browser, and the VB-S30VE for any outcome...
User Manual
Page 12
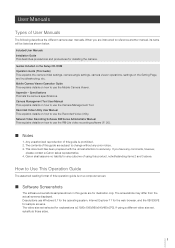
... Viewer Settings ...98 [Camera] > [Camera] Setting General Camera Controls 100 Camera Name...100 Camera Control...100 Day/Night (When Auto Is Set 101 Installation Conditions...101 Camera Position Control ...101 External Input Device...101 External Output Device ...102 [Camera] > [Initial Setting] Setting Initial Video Settings 103 Camera Position...103 Camera Settings ...104 [Camera] > [Panorama] Creating a Panorama Image 110 Creating a Panorama Image 110 Saving the Panorama Image as an Image File/Opening the Image File 112 Capture Settings ...113 [Camera] > [Restrict View] Setting View...
... Viewer Settings ...98 [Camera] > [Camera] Setting General Camera Controls 100 Camera Name...100 Camera Control...100 Day/Night (When Auto Is Set 101 Installation Conditions...101 Camera Position Control ...101 External Input Device...101 External Output Device ...102 [Camera] > [Initial Setting] Setting Initial Video Settings 103 Camera Position...103 Camera Settings ...104 [Camera] > [Panorama] Creating a Panorama Image 110 Creating a Panorama Image 110 Saving the Panorama Image as an Image File/Opening the Image File 112 Capture Settings ...113 [Camera] > [Restrict View] Setting View...

User Manual
Page 19
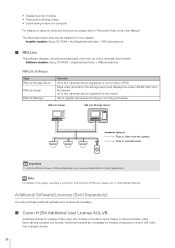
.... Installer location: Setup CD-ROM > [Applications] folder > VBToolsInstall.exe Recorded Video Utility This utility is used for batch managing multiple cameras, from initial settings to "Camera Management Tool User Manual". Camera Software 1 The following software is available for cameras (P. 36). You can perform the following tasks. • Detecting cameras • Set various camera settings. • Display the Viewer and the Setting Page. • Update firmware, back up/restore settings, perform memory card and other uses and functions...
.... Installer location: Setup CD-ROM > [Applications] folder > VBToolsInstall.exe Recorded Video Utility This utility is used for batch managing multiple cameras, from initial settings to "Camera Management Tool User Manual". Camera Software 1 The following software is available for cameras (P. 36). You can perform the following tasks. • Detecting cameras • Set various camera settings. • Display the Viewer and the Setting Page. • Update firmware, back up/restore settings, perform memory card and other uses and functions...
User Manual
Page 20
... of video from the camera Flow of videos • Playing and deleting videos • Downloading videos to a computer For details on the usage, operating environment, and functions of RM-Lite, please refer to view H.264 video from the camera. The Recorded Video Utility can purchase additional software and licenses as necessary. Canon H.264 Additional User License AUL-VB Additional license for multiple computers to "Administrator Manual". • Displaying a list of recorded video Important...
... of video from the camera Flow of videos • Playing and deleting videos • Downloading videos to a computer For details on the usage, operating environment, and functions of RM-Lite, please refer to view H.264 video from the camera. The Recorded Video Utility can purchase additional software and licenses as necessary. Canon H.264 Additional User License AUL-VB Additional license for multiple computers to "Administrator Manual". • Displaying a list of recorded video Important...
User Manual
Page 22
... screen *2 Does not support playback of Video (H.264) or audio transmission/reception Note • For details on the operating environment of the Camera Management Tool, please refer to "Camera Management Tool User Manual". • For information on this product (firmware and included software, user manual, operating environment, etc.), please refer to the Canon website. For Camera Viewer only, cookies must be enabled Setting Page, Camera Viewer, Mobile Camera Viewer: German/English...
... screen *2 Does not support playback of Video (H.264) or audio transmission/reception Note • For details on the operating environment of the Camera Management Tool, please refer to "Camera Management Tool User Manual". • For information on this product (firmware and included software, user manual, operating environment, etc.), please refer to the Canon website. For Camera Viewer only, cookies must be enabled Setting Page, Camera Viewer, Mobile Camera Viewer: German/English...

User Manual
Page 67
... captured by each Viewer. The size of the received data is large. PTZ operation can camera and then displays it in the video display area while using the digital zoom. Independent operation cannot be performed independently for situations like the use of a video (using the Viewer PTZ. 1 Click the [Viewer PTZ] button. Important S30VE You cannot perform camera operations by clicking/dragging in the viewer. If multiple Viewers are both functions...
... captured by each Viewer. The size of the received data is large. PTZ operation can camera and then displays it in the video display area while using the digital zoom. Independent operation cannot be performed independently for situations like the use of a video (using the Viewer PTZ. 1 Click the [Viewer PTZ] button. Important S30VE You cannot perform camera operations by clicking/dragging in the viewer. If multiple Viewers are both functions...

User Manual
Page 73
Camera Viewer Confirming Recorded Video Use the Recorded Video Utility to confirm and play back the video manually recorded to "Recorded Video Utility User Manual". 3 73 For details, please refer to a memory card.
Camera Viewer Confirming Recorded Video Use the Recorded Video Utility to confirm and play back the video manually recorded to "Recorded Video Utility User Manual". 3 73 For details, please refer to a memory card.

User Manual
Page 88
... Address] When [IPv4 Address Setting Method] is set IPv4 address is displayed. If this to enable or disable IPv6. [Auto (RA)] Select [Enable] to set an address automatically using IPv6 to connect to the camera. If this to enable or disable AutoIP. [IPv4 Address (AutoIP)] When [AutoIP] is set to [Enable], an automatically set to [Manual], enter a fixed IPv4 address. Important If [Auto (DHCP)] is selected...
... Address] When [IPv4 Address Setting Method] is set IPv4 address is displayed. If this to enable or disable IPv6. [Auto (RA)] Select [Enable] to set an address automatically using IPv6 to connect to the camera. If this to enable or disable AutoIP. [IPv4 Address (AutoIP)] When [AutoIP] is set to [Enable], an automatically set to [Manual], enter a fixed IPv4 address. Important If [Auto (DHCP)] is selected...
User Manual
Page 96
... [Video Record] > [Upload] or [Memory Card] > [Video Record Action] (P. 141). Intelligent Function (P. 154) - Up to 30 frames per second transmitted to [Use bit rate control]. [Video Quality] You can be set or selected depend on the [Video Size Set] setting. [Video Size] Select the size of JPEG video transmitted from the camera. [Bit Rate Control] Set the video bit rate. The video sizes that can select the video quality if [Bit Rate Control] is changed, review the following settings and check the operation. - Important Changing...
... [Video Record] > [Upload] or [Memory Card] > [Video Record Action] (P. 141). Intelligent Function (P. 154) - Up to 30 frames per second transmitted to [Use bit rate control]. [Video Quality] You can be set or selected depend on the [Video Size Set] setting. [Video Size] Select the size of JPEG video transmitted from the camera. [Bit Rate Control] Set the video bit rate. The video sizes that can select the video quality if [Bit Rate Control] is changed, review the following settings and check the operation. - Important Changing...
User Manual
Page 101
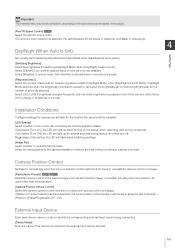
... be achievable, depending on the power, when rebooting, and during startup, and then turn on a desk. Camera Position Control Settings for camera use . If [Control by zoom position] is selected, the pan/tilt speed will flash when initializing settings. [Image Flip] Select whether to vertically flip the video. Select the setting suited to the camera installation method, such as possible. Day/Night Mode switches when the brightness continues to...
... be achievable, depending on the power, when rebooting, and during startup, and then turn on a desk. Camera Position Control Settings for camera use . If [Control by zoom position] is selected, the pan/tilt speed will flash when initializing settings. [Image Flip] Select whether to vertically flip the video. Select the setting suited to the camera installation method, such as possible. Day/Night Mode switches when the brightness continues to...
User Manual
Page 104
... then switch to manual mode. [Fixed at camera start up. [Simple Camera Settings] Recommended settings for moving subjects in dark situations. [Focus] S30VE S910F Selects the focus. [Auto] Automatically adjusts the focus. [Manual] You can be set are displayed according to incremental sizes. Auto 6 1/8 (sec.) 1/16000 (sec.) Disable Strong 3 4 Disable Data Size Reduction Standard Setting Reduces the data size in the near infinity. 104 Type Usage scenario [Exposure] [AGC Limit] [Shutter Speed Limit (Lower)] [Shutter Speed Limit (Upper)] [Smart Shade Control] [Noise...
... then switch to manual mode. [Fixed at camera start up. [Simple Camera Settings] Recommended settings for moving subjects in dark situations. [Focus] S30VE S910F Selects the focus. [Auto] Automatically adjusts the focus. [Manual] You can be set are displayed according to incremental sizes. Auto 6 1/8 (sec.) 1/16000 (sec.) Disable Strong 3 4 Disable Data Size Reduction Standard Setting Reduces the data size in the near infinity. 104 Type Usage scenario [Exposure] [AGC Limit] [Shutter Speed Limit (Lower)] [Shutter Speed Limit (Upper)] [Smart Shade Control] [Noise...
User Manual
Page 105
... a glass window, the camera may be difficult for [Exposure]. [Auto] Automatically controls the exposure. [Auto (Flickerless)] Video flickering caused by fluorescent lights, etc., is set. Telephoto 0.3 m (12 in .) - Install the camera at Infinity Day Mode/Night Mode Max. Automatically adjusts the shutter speed according to the brightness of subjects when using autofocus and then switch to manual. [Adjust Focus] S30VE S910F If the [Focus] is focused whenever you set the focus [Manual], it will remain fixed. •...
... a glass window, the camera may be difficult for [Exposure]. [Auto] Automatically controls the exposure. [Auto (Flickerless)] Video flickering caused by fluorescent lights, etc., is set. Telephoto 0.3 m (12 in .) - Install the camera at Infinity Day Mode/Night Mode Max. Automatically adjusts the shutter speed according to the brightness of subjects when using autofocus and then switch to manual. [Adjust Focus] S30VE S910F If the [Focus] is focused whenever you set the focus [Manual], it will remain fixed. •...

User Manual
Page 141
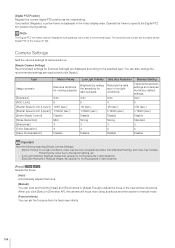
... of the [Event] > [External Device], [Audio Detection] and [Linked Events]. - Video Record Setting When an event is triggered. Doing so may be configured here. 4 • Video Record Setting • General Upload • HTTP Upload • FTP Upload Setting Page Important • When using the upload function or recording to a memory card, the following settings can set whether to upload camera video with e-mail notification by text and video, set [Video] > [JPEG] > [Video Size: Upload / Memory card] (P. 96) to upload with the [Memory Card] submenu (P. 194) and...
... of the [Event] > [External Device], [Audio Detection] and [Linked Events]. - Video Record Setting When an event is triggered. Doing so may be configured here. 4 • Video Record Setting • General Upload • HTTP Upload • FTP Upload Setting Page Important • When using the upload function or recording to a memory card, the following settings can set whether to upload camera video with e-mail notification by text and video, set [Video] > [JPEG] > [Video Size: Upload / Memory card] (P. 96) to upload with the [Memory Card] submenu (P. 194) and...

User Manual
Page 150
.... Important • Volume detection is temporarily disabled when an event causes the playback of a sound clip or when audio is transmitted from the built-in "Safety Precautions". Note • Reconfigure [Reference Volume Level] settings if you change [Video and Audio] > [Audio] > [General Sound] > [Low-Cut Filter] (P. 133) settings on the [Event and Input/Output] menu of audio detection, please refer to be used for triggering a volume detection event and the operations to...
.... Important • Volume detection is temporarily disabled when an event causes the playback of a sound clip or when audio is transmitted from the built-in "Safety Precautions". Note • Reconfigure [Reference Volume Level] settings if you change [Video and Audio] > [Audio] > [General Sound] > [Low-Cut Filter] (P. 133) settings on the [Event and Input/Output] menu of audio detection, please refer to be used for triggering a volume detection event and the operations to...

User Manual
Page 194
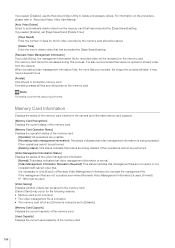
... releasing the camera to a memory card or upload it will take). [Memory Card] Memory Card Operations and Information Display Settings for recording video to a memory card inserted in [Auto Video Delete], or manually delete unneeded files with [Video Record] > [Upload] (P. 141) and will be regarded as [Video Record] > [Memory Card]. The following memory cards can take a considerable amount of time to "Installation Guide". • If you are also reflected on the memory card can greatly be reduced, by using H.264 as the video format, instead of files, the longer...
... releasing the camera to a memory card or upload it will take). [Memory Card] Memory Card Operations and Information Display Settings for recording video to a memory card inserted in [Auto Video Delete], or manually delete unneeded files with [Video Record] > [Upload] (P. 141) and will be regarded as [Video Record] > [Memory Card]. The following memory cards can take a considerable amount of time to "Installation Guide". • If you are also reflected on the memory card can greatly be reduced, by using H.264 as the video format, instead of files, the longer...
User Manual
Page 196
.... [Memory Card Recognition] Displays the current status of the memory card. [Memory Card Operation Status] Displays the operation status of the video management information. [Normal]: This status indicates that video management information is performed using a quick format. For information on the memory card. Formatting erases all files and directories on the procedure, please refer to "Recorded Video Utility User Manual." [Auto Video Delete] Select to delete unnecessary videos. If you select [Disable], use the Recorded Video Utility to automatically delete video from the camera.
.... [Memory Card Recognition] Displays the current status of the memory card. [Memory Card Operation Status] Displays the operation status of the video management information. [Normal]: This status indicates that video management information is performed using a quick format. For information on the memory card. Formatting erases all files and directories on the procedure, please refer to "Recorded Video Utility User Manual." [Auto Video Delete] Select to delete unnecessary videos. If you select [Disable], use the Recorded Video Utility to automatically delete video from the camera.
User Manual
Page 207
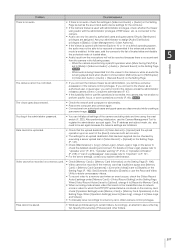
... errors or video for abnormality. • Reboot the computer and connect again. • Connections from authorized users and guest users are both set to a memory card, obtain camera control privileges. Also please refer to the camera. • Audio can initialize all settings of the camera excluding date and time using audio with Internet Explorer 10 or 11 on a 64-bit operating system, the audio may fail. is connected to "Important" on the Setting Page. S30VE...
... errors or video for abnormality. • Reboot the computer and connect again. • Connections from authorized users and guest users are both set to a memory card, obtain camera control privileges. Also please refer to the camera. • Audio can initialize all settings of the camera excluding date and time using audio with Internet Explorer 10 or 11 on a 64-bit operating system, the audio may fail. is connected to "Important" on the Setting Page. S30VE...
User Manual
Page 222
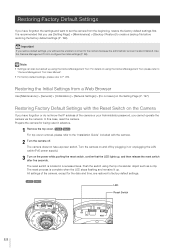
... the switch using the Camera Management Tool. The reset process is located in advance. 1 Remove the top cover. Important If you restore default settings, you have forgotten the settings and want to factory default settings. Use the Camera Management Tool to P. 224. S30VE S800VE For top cover removal, please refer to the "Installation Guide" included with the Reset Switch on using the Camera Management Tool, please refer to "Camera Management Tool User Manual...
... the switch using the Camera Management Tool. The reset process is located in advance. 1 Remove the top cover. Important If you restore default settings, you have forgotten the settings and want to factory default settings. Use the Camera Management Tool to P. 224. S30VE S800VE For top cover removal, please refer to the "Installation Guide" included with the Reset Switch on using the Camera Management Tool, please refer to "Camera Management Tool User Manual...
User Manual
Page 235
... Communications 186 Error Message 220 Event and Input/Output Audio Detection 77 External Device Input 76 External Device Output 76 Image Detection 76 Linked Events 77 Event Display 76, 173 Exposure 105 Exposure Compensation 64, 106 External Device Input 76, 148 External Device Output 147 External Input Device 101 External Output Device 102 F Factory Default Settings 222, 224 Firewall 31 Firmware 197 Focus 64, 104 Format 196 Frame Rate 96, 140, 142 FTP Server 136 FTP Upload 143 Full Screen Display 56 G Gain...
... Communications 186 Error Message 220 Event and Input/Output Audio Detection 77 External Device Input 76 External Device Output 76 Image Detection 76 Linked Events 77 Event Display 76, 173 Exposure 105 Exposure Compensation 64, 106 External Device Input 76, 148 External Device Output 147 External Input Device 101 External Output Device 102 F Factory Default Settings 222, 224 Firewall 31 Firmware 197 Focus 64, 104 Format 196 Frame Rate 96, 140, 142 FTP Server 136 FTP Upload 143 Full Screen Display 56 G Gain...


