User Manual
Page 2
... IFC-400PCU AV Cable AVC-DC400 Wrist Strap WS-DC7 Memory Card (32 MB) Canon Digital Camera Solution Disk Warranty "Canon Customer Card Support" leaflet Camera User Guide (This Guide) Direct Print User Guide Read when you want to connect the camera to a printer (sold separately) and print. If anything is required to a computer. Checking the...
... IFC-400PCU AV Cable AVC-DC400 Wrist Strap WS-DC7 Memory Card (32 MB) Canon Digital Camera Solution Disk Warranty "Canon Customer Card Support" leaflet Camera User Guide (This Guide) Direct Print User Guide Read when you want to connect the camera to a printer (sold separately) and print. If anything is required to a computer. Checking the...
User Manual
Page 3
... damaged. Read This First Test Shots Take some initial test shots and play them back to as memory cards in this camera are intended for personal use. For Canon Customer Support contacts, please see the customer support list supplied with a warranty claim to be advised that in certain cases ...the image was shot for personal use various types of the copyright holder. Memory Cards This camera can use . This also has no effect on the recorded image. Do not record images that Canon Inc., its subsidiaries and affiliates, and its distributors are collectively referred to make sure the ...
... damaged. Read This First Test Shots Take some initial test shots and play them back to as memory cards in this camera are intended for personal use. For Canon Customer Support contacts, please see the customer support list supplied with a warranty claim to be advised that in certain cases ...the image was shot for personal use various types of the copyright holder. Memory Cards This camera can use . This also has no effect on the recorded image. Do not record images that Canon Inc., its subsidiaries and affiliates, and its distributors are collectively referred to make sure the ...
User Manual
Page 4
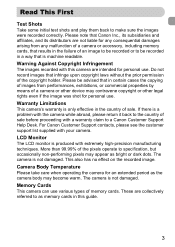
What Do You Want to Do? 4 Shoot ● Shoot, leaving it to the camera to take (recording pixels 68 ● Take pictures continuously 72 ● Shoot without camera shake (image stabilization 145 ● Shoot without camera shake even in them too (self-timer 61, 62 ● Insert the date and time ...into my shots 60 ● Take close-up pictures of subjects (macro shooting 63 ● Take close up pictures of subjects using the zoom (digital macro shooting 64 ● ...
What Do You Want to Do? 4 Shoot ● Shoot, leaving it to the camera to take (recording pixels 68 ● Take pictures continuously 72 ● Shoot without camera shake (image stabilization 145 ● Shoot without camera shake even in them too (self-timer 61, 62 ● Insert the date and time ...into my shots 60 ● Take close-up pictures of subjects (macro shooting 63 ● Take close up pictures of subjects using the zoom (digital macro shooting 64 ● ...

User Manual
Page 5
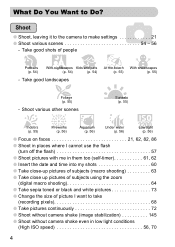
... movies 30 2 Print ● Easily print pictures 26 Save ● Save images to a computer 31, 128 3 Other ● Turn off sound 47 ● Use the camera abroad 13, 139 5
... movies 30 2 Print ● Easily print pictures 26 Save ● Save images to a computer 31, 128 3 Other ● Turn off sound 47 ● Use the camera abroad 13, 139 5
User Manual
Page 6
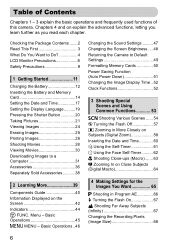
... 42 Indicators 44 m FUNC. Basic Operations ..46 Changing the Sound Settings ......... 47 Changing the Screen Brightness .... 48 Returning the Camera to a Computer 31 Accessories 36 Separately Sold Accessories ...........38 2 Learning More 39 Components Guide 40 Information Displayed on explain the advanced...53 K Shooting Various Scenes ...... 54 ! Basic Operations 45 n MENU - Turning the Flash Off 57 i Zooming in More Closely on Subjects (Digital Zoom 58 Inserting the Date and Time 60 Ò Using the Self-Timer 61 " Using the Face Self-Timer.......... 62 e Shooting Close-...
... 42 Indicators 44 m FUNC. Basic Operations ..46 Changing the Sound Settings ......... 47 Changing the Screen Brightness .... 48 Returning the Camera to a Computer 31 Accessories 36 Separately Sold Accessories ...........38 2 Learning More 39 Components Guide 40 Information Displayed on explain the advanced...53 K Shooting Various Scenes ...... 54 ! Basic Operations 45 n MENU - Turning the Flash Off 57 i Zooming in More Closely on Subjects (Digital Zoom 58 Inserting the Date and Time 60 Ò Using the Self-Timer 61 " Using the Face Self-Timer.......... 62 e Shooting Close-...
User Manual
Page 8
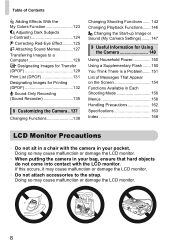
... 163 Index 166 LCD Monitor Precautions • Do not sit in a chair with the camera in your pocket. Doing so may cause malfunction or damage the LCD monitor. • When putting the camera in your bag, ensure that hard objects do not come into contact with the LCD monitor... Images for Transfer (DPOF 129 Print List (DPOF 131 Designating Images for Printing (DPOF 132 _ Sound-Only Recording (Sound Recorder 135 8 Customizing the Camera ..137 Changing Functions 138 Changing Shooting Functions ....... 142 Changing Playback Functions....... 146 5 Changing the Start-up Image or Sound (My...
... 163 Index 166 LCD Monitor Precautions • Do not sit in a chair with the camera in your pocket. Doing so may cause malfunction or damage the LCD monitor. • When putting the camera in your bag, ensure that hard objects do not come into contact with the LCD monitor... Images for Transfer (DPOF 129 Print List (DPOF 131 Designating Images for Printing (DPOF 132 _ Sound-Only Recording (Sound Recorder 135 8 Customizing the Camera ..137 Changing Functions 138 Changing Shooting Functions ....... 142 Changing Playback Functions....... 146 5 Changing the Start-up Image or Sound (My...

User Manual
Page 9
... abnormally. • Do not allow liquids or foreign objects to enter the camera. Warnings Camera • Do not look through the camera viewfinder at least one meter (39 inches) away from infants when using the camera, please ensure that you use organic solvents such as alcohol, benzine, or thinner...8226; Do not place the battery near or in direct flame. • Do not let the battery come into contact with the camera interior, immediately turn the camera power off and remove the battery. • Do not use . Warnings Denotes the possibility of serious injury or death. Exposure ...
... abnormally. • Do not allow liquids or foreign objects to enter the camera. Warnings Camera • Do not look through the camera viewfinder at least one meter (39 inches) away from infants when using the camera, please ensure that you use organic solvents such as alcohol, benzine, or thinner...8226; Do not place the battery near or in direct flame. • Do not let the battery come into contact with the camera interior, immediately turn the camera power off and remove the battery. • Do not use . Warnings Denotes the possibility of serious injury or death. Exposure ...
User Manual
Page 10
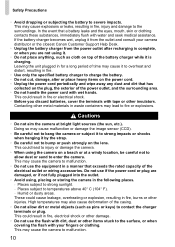
...at bright light sources (the sun, etc.). Places subject to strong sunlight. - Humid or dusty areas. This may lead to enter the camera. This may also cause deformation of the electrical outlet or wiring accessories. If the battery charger becomes wet, unplug it is complete, or when... you discard batteries, cover the terminals with your camera distributor or the closest Canon Customer Support Help Desk. • Unplug the battery charger from the outlet and consult your fingers or clothing. This could cause...
...at bright light sources (the sun, etc.). Places subject to strong sunlight. - Humid or dusty areas. This may lead to enter the camera. This may also cause deformation of the electrical outlet or wiring accessories. If the battery charger becomes wet, unplug it is complete, or when... you discard batteries, cover the terminals with your camera distributor or the closest Canon Customer Support Help Desk. • Unplug the battery charger from the outlet and consult your fingers or clothing. This could cause...

User Manual
Page 11
1 Getting Started This chapter explains preparations before shooting, how to shoot in A mode, and then how to a computer. The latter part of this chapter explains how to shoot and view movies, and how to download images to view, erase and print the images you take. Attaching the Strap/Holding the Camera • Attach the included strap and place it around your wrist to avoid dropping the camera during use. • Keep your arms tight against your fingers do not block the flash. Strap 11 Be sure that your body while holding the camera firmly by the sides.
1 Getting Started This chapter explains preparations before shooting, how to shoot in A mode, and then how to a computer. The latter part of this chapter explains how to shoot and view movies, and how to download images to view, erase and print the images you take. Attaching the Strap/Holding the Camera • Attach the included strap and place it around your wrist to avoid dropping the camera during use. • Keep your arms tight against your fingers do not block the flash. Strap 11 Be sure that your body while holding the camera firmly by the sides.

User Manual
Page 13
... S mark is visible. • How to discharge naturally even if they will cause malfunctions. • If the battery is based on the Camera & Imaging Products Association (CIPA) measurement standard. • Depending on the shooting conditions, the number of shots that can be taken may shorten... 13 Charged batteries continue to store the battery for foreign travel because they are not used . Deplete and remove the battery from the camera. Charging the Battery Approximate Number of Shots That Can Be Taken Number of LCD monitor on.* 280 shots LCD monitor off. 700 Playback...
... S mark is visible. • How to discharge naturally even if they will cause malfunctions. • If the battery is based on the Camera & Imaging Products Association (CIPA) measurement standard. • Depending on the shooting conditions, the number of shots that can be taken may shorten... 13 Charged batteries continue to store the battery for foreign travel because they are not used . Deplete and remove the battery from the camera. Charging the Battery Approximate Number of Shots That Can Be Taken Number of LCD monitor on.* 280 shots LCD monitor off. 700 Playback...

User Manual
Page 14
Slide the tab up until you will not properly lock into place with a click. ● Inserting the card in the wrong direction could damage the camera. Insert the memory card. ● Insert the memory card as shown until it . Check the card's write-protect tab. ● If the memory card has a ... will not be able to insert the battery in the locked position. Open the cover. ● Slide the cover , and open it locks into the camera. Be sure the card is in the correct direction or it locks into place.
Slide the tab up until you will not properly lock into place with a click. ● Inserting the card in the wrong direction could damage the camera. Insert the memory card. ● Insert the memory card as shown until it . Check the card's write-protect tab. ● If the memory card has a ... will not be able to insert the battery in the locked position. Open the cover. ● Slide the cover , and open it locks into the camera. Be sure the card is in the correct direction or it locks into place.

User Manual
Page 16
You can check the number of shots that can be taken when the camera is the write-protect tab? If this tab is in a Shooting Mode (p. 21). SD and SDHC memory cards have a write-protect tab. Compatible Memory Cards &#... Card Approximate Number of Shots per Memory Card Memory Card 32 MB (Supplied) 2 GB 8 GB Number of shots 7 516 2063 • Values are based on a camera at default settings. • The number of shots that can be taken will vary depending on the screen and you check the number of shots...
You can check the number of shots that can be taken when the camera is the write-protect tab? If this tab is in a Shooting Mode (p. 21). SD and SDHC memory cards have a write-protect tab. Compatible Memory Cards &#... Card Approximate Number of Shots per Memory Card Memory Card 32 MB (Supplied) 2 GB 8 GB Number of shots 7 516 2063 • Values are based on a camera at default settings. • The number of shots that can be taken will vary depending on the screen and you check the number of shots...

User Manual
Page 17
.... Setting the Date and Time The Date/Time settings menu will appear. X The Date/Time settings menu will appear the first time the camera is turned on the camera. Make the setting. ● Press the m button. Set the date and time. ● Press the qr buttons to make them. If you turn.../ Time settings menu will be sure to select an option. ● Press the op buttons or turn off the camera. Since the date and time recorded into your images are based on the camera. ● Press the power button. Daylight saving time settings In Step 2, if you select and press the op...
.... Setting the Date and Time The Date/Time settings menu will appear. X The Date/Time settings menu will appear the first time the camera is turned on the camera. Make the setting. ● Press the m button. Set the date and time. ● Press the qr buttons to make them. If you turn.../ Time settings menu will be sure to select an option. ● Press the op buttons or turn off the camera. Since the date and time recorded into your images are based on the camera. ● Press the power button. Daylight saving time settings In Step 2, if you select and press the op...

User Manual
Page 18
.../time settings to be charged in the 3 tab. ● Press the qr buttons to select the 3 tab. ● Press the op buttons or turn the camera on p. 17 to select [Date/Time], then press the m button. Select [Date/Time] in about three weeks after the battery pack has been removed. •... time settings. Follow the steps on . Setting the Date and Time Changing the Date and Time You can be retained about 4 hours even if the camera is not turned on. • If the date/time battery is depleted, the Date/Time menu will close the menu. Change the date and time...
.../time settings to be charged in the 3 tab. ● Press the qr buttons to select the 3 tab. ● Press the op buttons or turn the camera on p. 17 to select [Date/Time], then press the m button. Select [Date/Time] in about three weeks after the battery pack has been removed. •... time settings. Follow the steps on . Setting the Date and Time Changing the Date and Time You can be retained about 4 hours even if the camera is not turned on. • If the date/time battery is depleted, the Date/Time menu will close the menu. Change the date and time...
User Manual
Page 20
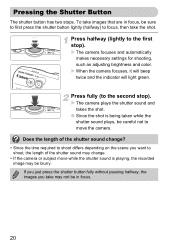
Press halfway (lightly to the first stop ). Press fully (to shoot, the length of the shutter sound change . • If the camera or subject move the camera. If you just press the shutter button fully without pausing halfway, the images you want to the second stop ). Pressing the Shutter Button The shutter ... differs depending on the scene you take may be in focus, be careful not to focus, then take images that are in focus. 20 X The camera plays the shutter sound and takes the shot. ● Since the shot is being taken while the shutter sound plays, be sure to first press...
Press halfway (lightly to the first stop ). Press fully (to shoot, the length of the shutter sound change . • If the camera or subject move the camera. If you just press the shutter button fully without pausing halfway, the images you want to the second stop ). Pressing the Shutter Button The shutter ... differs depending on the scene you take may be in focus, be careful not to focus, then take images that are in focus. 20 X The camera plays the shutter sound and takes the shot. ● Since the shot is being taken while the shutter sound plays, be sure to first press...

User Manual
Page 21
...A mode. ● Set the mode dial to the optimum levels. Also, when taking pictures of your subject making it appear smaller. Taking Pictures The camera can automatically make all settings so that you can take images just by pressing the shutter button. Compose the shot of people, the face will... be the main subject, while gray frames appear on the face the camera judges to be automatically detected and focused (p. 82), and the color and the brightness will zoom out from your subject. ● Moving the zoom...
...A mode. ● Set the mode dial to the optimum levels. Also, when taking pictures of your subject making it appear smaller. Taking Pictures The camera can automatically make all settings so that you can take images just by pressing the shutter button. Compose the shot of people, the face will... be the main subject, while gray frames appear on the face the camera judges to be automatically detected and focused (p. 82), and the color and the brightness will zoom out from your subject. ● Moving the zoom...

User Manual
Page 22
...9679; Even when an image is recorded to focus. X Several AF frames will appear on more than one point. X The indicator will appear where the camera focused. Shoot. ● Press the shutter button fully. X A green frame will blink green while the image is displayed, you can take a second... sound and shoot. Taking Pictures AF Frames Focus. ● Press the shutter button halfway to the memory card. The camera will automatically fire in low light conditions. X When the camera focuses, it will beep twice and the indicator will light green (orange when the flash will fire).
...9679; Even when an image is recorded to focus. X Several AF frames will appear on more than one point. X The indicator will appear where the camera focused. Shoot. ● Press the shutter button fully. X A green frame will blink green while the image is displayed, you can take a second... sound and shoot. Taking Pictures AF Frames Focus. ● Press the shutter button halfway to the memory card. The camera will automatically fire in low light conditions. X When the camera focuses, it will beep twice and the indicator will light green (orange when the flash will fire).

User Manual
Page 23
... will take the shot. 23 The subject is pressed halfway. Keep the shutter button pressed fully, after a while the indicator will light orange and the camera will turn off all sounds except for the flash to assist in focusing, the lamp may light when shooting in dark areas (pp. 142 - 143... is too close. To reduce red-eye and to reach. To turn on the LCD monitor. • The camera does not play any sounds? Taking Pictures What if... • Nothing displays when the camera is too far away for warning sounds. Press the l button to select [Off]. • The image comes out...
... will take the shot. 23 The subject is pressed halfway. Keep the shutter button pressed fully, after a while the indicator will light orange and the camera will turn off all sounds except for the flash to assist in focusing, the lamp may light when shooting in dark areas (pp. 142 - 143... is too close. To reduce red-eye and to reach. To turn on the LCD monitor. • The camera does not play any sounds? Taking Pictures What if... • Nothing displays when the camera is too far away for warning sounds. Press the l button to select [Off]. • The image comes out...
User Manual
Page 24
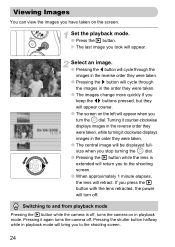
... will bring you took will retract. Pressing the shutter button halfway while in the reverse order they were taken, while turning it again turns the camera off. Select an image. ● Pressing the q button will cycle through the images in the reverse order they were taken. ● Pressing the r... will return you stop turning the  dial. ● Pressing the 1 button while the lens is off . If you turn off , turns the camera on the screen. Pressing it clockwise displays images in the order they were taken. ● The images change more quickly if you keep the qr...
... will bring you took will retract. Pressing the shutter button halfway while in the reverse order they were taken, while turning it again turns the camera off. Select an image. ● Pressing the q button will cycle through the images in the reverse order they were taken. ● Pressing the r... will return you stop turning the  dial. ● Pressing the 1 button while the lens is off . If you turn off , turns the camera on the screen. Pressing it clockwise displays images in the order they were taken. ● The images change more quickly if you keep the qr...

User Manual
Page 26
.... 26 X will appear on the printer. Items to Prepare • Camera and PictBridge compliant printer (sold separately). Connect the camera to the printer. ● Open the cover, and insert the small end of the plug firmly into the camera terminal in the direction shown. ● Insert the cable's larger plug ...into the printer. Press the 1 button and turn on the camera. Printing Images You can easily print the images you have taken if you ...
.... 26 X will appear on the printer. Items to Prepare • Camera and PictBridge compliant printer (sold separately). Connect the camera to the printer. ● Open the cover, and insert the small end of the plug firmly into the camera terminal in the direction shown. ● Insert the cable's larger plug ...into the printer. Press the 1 button and turn on the camera. Printing Images You can easily print the images you have taken if you ...


