User Manual
Page 2
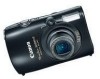
... Terminal Cover) Battery Charger CB-2LX/CB-2LXE Interface Cable IFC-400PCU AV Cable AVC-DC400 Wrist Strap WS-DC7 Memory Card (32 MB) Canon Digital Camera Solution Disk Warranty "Canon Customer Card Support" leaflet Camera User Guide (This Guide) Direct Print User Guide Read when you want to connect the camera to a printer (sold separately) and print. Detailed user guides (PDF format) for using the included ZoomBrowser EX and ImageBrowser programs are included in your new camera and take some test shots. • Adobe...
... Terminal Cover) Battery Charger CB-2LX/CB-2LXE Interface Cable IFC-400PCU AV Cable AVC-DC400 Wrist Strap WS-DC7 Memory Card (32 MB) Canon Digital Camera Solution Disk Warranty "Canon Customer Card Support" leaflet Camera User Guide (This Guide) Direct Print User Guide Read when you want to connect the camera to a printer (sold separately) and print. Detailed user guides (PDF format) for using the included ZoomBrowser EX and ImageBrowser programs are included in your new camera and take some test shots. • Adobe...
User Manual
Page 4
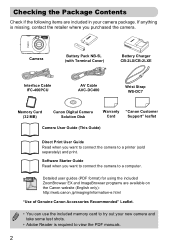
... to the camera to take (recording pixels 68 ● Take pictures continuously 72 ● Shoot without camera shake (image stabilization 145 ● Shoot without camera shake even in them too (self-timer 61, 62 ● Insert the date and time into my shots 60 ● Take close-up pictures of subjects (macro shooting 63 ● Take close up pictures of subjects using the zoom (digital macro shooting 64 ● Take sepia toned or black and white pictures 73 ● Change the size of...
... to the camera to take (recording pixels 68 ● Take pictures continuously 72 ● Shoot without camera shake (image stabilization 145 ● Shoot without camera shake even in them too (self-timer 61, 62 ● Insert the date and time into my shots 60 ● Take close-up pictures of subjects (macro shooting 63 ● Take close up pictures of subjects using the zoom (digital macro shooting 64 ● Take sepia toned or black and white pictures 73 ● Change the size of...
User Manual
Page 6
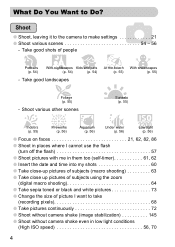
... 9 1 Getting Started 11 Charging the Battery 12 Inserting the Battery and Memory Card 14 Setting the Date and Time 17 Setting the Display Language..........19 Pressing the Shutter Button 20 Taking Pictures 21 Viewing Images 24 Erasing Images 25 Printing Images 26 Shooting Movies 28 Viewing Movies 30 Downloading Images to Default Settings 49 Formatting Memory Cards 50 Power Saving Function (Auto Power Down 51 Changing the Image Display Time .. 52 Clock Functions 52 3 Shooting Special Scenes and Using Common Functions 53 K Shooting Various Scenes ...... 54 ! Menu -
... 9 1 Getting Started 11 Charging the Battery 12 Inserting the Battery and Memory Card 14 Setting the Date and Time 17 Setting the Display Language..........19 Pressing the Shutter Button 20 Taking Pictures 21 Viewing Images 24 Erasing Images 25 Printing Images 26 Shooting Movies 28 Viewing Movies 30 Downloading Images to Default Settings 49 Formatting Memory Cards 50 Power Saving Function (Auto Power Down 51 Changing the Image Display Time .. 52 Clock Functions 52 3 Shooting Special Scenes and Using Common Functions 53 K Shooting Various Scenes ...... 54 ! Menu -

User Manual
Page 7
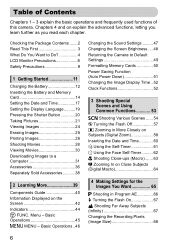
Changing the ISO Speed......... 70 Adjusting the Tone (White Balance 71 Adjusting the Brightness (Exposure Compensation 72 W Continuous Shooting 72 Changing the Tone of an Image (My Colors 73 Î Shooting Using the Two Second Self-Timer 74 $ Customizing the Self-Timer ........ 75 Shooting Using the Viewfinder........ 76 Shooting Using a TV 76 Shoot While Checking the Histogram 77 Changing the Composition to Shoot (Focus Lock 78 Shooting with 8 (Quick Shot)..... 79 5 Using Advanced Shooting Functions 81 Changing the AF Frame Mode........ 82 Shooting With Magnified Focus Display 83 ...
Changing the ISO Speed......... 70 Adjusting the Tone (White Balance 71 Adjusting the Brightness (Exposure Compensation 72 W Continuous Shooting 72 Changing the Tone of an Image (My Colors 73 Î Shooting Using the Two Second Self-Timer 74 $ Customizing the Self-Timer ........ 75 Shooting Using the Viewfinder........ 76 Shooting Using a TV 76 Shoot While Checking the Histogram 77 Changing the Composition to Shoot (Focus Lock 78 Shooting with 8 (Quick Shot)..... 79 5 Using Advanced Shooting Functions 81 Changing the AF Frame Mode........ 82 Shooting With Magnified Focus Display 83 ...
User Manual
Page 8
... 132 _ Sound-Only Recording (Sound Recorder 135 8 Customizing the Camera ..137 Changing Functions 138 Changing Shooting Functions ....... 142 Changing Playback Functions....... 146 5 Changing the Start-up Image or Sound (My Camera Settings)........ 147 9 Useful Information for Using the Camera 149 Using Household Power 150 Using a Supplementary Flash ....... 150 You Think There is a Problem....... 151 List of Contents ? Table of Messages That Appear on the Screen 154 Functions Available in Each Shooting Mode 156 Menus 158 Handling Precautions 162 Specifications 163 Index 166 LCD...
... 132 _ Sound-Only Recording (Sound Recorder 135 8 Customizing the Camera ..137 Changing Functions 138 Changing Shooting Functions ....... 142 Changing Playback Functions....... 146 5 Changing the Start-up Image or Sound (My Camera Settings)........ 147 9 Useful Information for Using the Camera 149 Using Household Power 150 Using a Supplementary Flash ....... 150 You Think There is a Problem....... 151 List of Contents ? Table of Messages That Appear on the Screen 154 Functions Available in Each Shooting Mode 156 Menus 158 Handling Precautions 162 Specifications 163 Index 166 LCD...
User Manual
Page 24
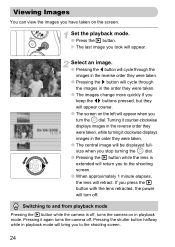
... images change more quickly if you stop turning the  dial. ● Pressing the 1 button while the lens is off . Switching to and from playback mode Pressing the 1 button while the camera is extended will turn the  dial. Pressing it clockwise displays images in the reverse order they were taken, while turning it again turns the camera off , turns the camera on the screen. Select an image. ● Pressing the q button...
... images change more quickly if you stop turning the  dial. ● Pressing the 1 button while the lens is off . Switching to and from playback mode Pressing the 1 button while the camera is extended will turn the  dial. Pressing it clockwise displays images in the reverse order they were taken, while turning it again turns the camera off , turns the camera on the screen. Select an image. ● Pressing the q button...

User Manual
Page 28
... E. Shooting Movies The camera can automatically make all settings so that you can shoot movies just by pressing the shutter button. Shooting Time Compose the shot of your subject. ● Moving the zoom lever towards j will zoom out from your subject making it will beep twice and the indicator will zoom in on your subject making it appear larger. Moving the lever towards i will light green. 28 Set the E mode. ● Set the mode...
... E. Shooting Movies The camera can automatically make all settings so that you can shoot movies just by pressing the shutter button. Shooting Time Compose the shot of your subject. ● Moving the zoom lever towards j will zoom out from your subject making it will beep twice and the indicator will zoom in on your subject making it appear larger. Moving the lever towards i will light green. 28 Set the E mode. ● Set the mode...

User Manual
Page 31
... use the included software to download the images you have taken to Prepare • Camera and computer • Canon Digital Camera Solution Disk supplied with the camera (p. 2) • Interface cable supplied with the camera (p. 2) System Requirements Windows OS Computer model CPU RAM Interface Free Hard Disk Space Display Windows Vista (including Service Pack 1) Windows XP Service Pack 2 The above OS should be pre-installed on computers with built-in USB ports. Items to a computer. Viewing images Windows...
... use the included software to download the images you have taken to Prepare • Camera and computer • Canon Digital Camera Solution Disk supplied with the camera (p. 2) • Interface cable supplied with the camera (p. 2) System Requirements Windows OS Computer model CPU RAM Interface Free Hard Disk Space Display Windows Vista (including Service Pack 1) Windows XP Service Pack 2 The above OS should be pre-installed on computers with built-in USB ports. Items to a computer. Viewing images Windows...

User Manual
Page 42
... can change the display using the l button. Information Displayed on the Screen Shooting (Information Display) Exposure Compensation (p. 72) White Balance (p. 71) My Colors (p. 73) Flash Exposure Compensation/ Flash Output (pp. 88, 90) Metering Modes (p. 87) Image Quality (Compression) (p. 68) Recording Pixels (p. 68) Histogram (p. 44) Digital Zoom Magnification (p. 58) / Digital TeleConverter (p. 59) Macro (p. 63) / Infinity (p. 67) / Manual Focus (p. 85) ISO Speed (p. 70) Flash Mode (pp. 57, 67) Red-Eye Correction (p. 92) Drive Mode (pp. 61, 62, 72, 75) Camera Orientation* Battery Charge...
... can change the display using the l button. Information Displayed on the Screen Shooting (Information Display) Exposure Compensation (p. 72) White Balance (p. 71) My Colors (p. 73) Flash Exposure Compensation/ Flash Output (pp. 88, 90) Metering Modes (p. 87) Image Quality (Compression) (p. 68) Recording Pixels (p. 68) Histogram (p. 44) Digital Zoom Magnification (p. 58) / Digital TeleConverter (p. 59) Macro (p. 63) / Infinity (p. 67) / Manual Focus (p. 85) ISO Speed (p. 70) Flash Mode (pp. 57, 67) Red-Eye Correction (p. 92) Drive Mode (pp. 61, 62, 72, 75) Camera Orientation* Battery Charge...

User Manual
Page 43
...Number (p. 140) Displayed image number / Total number of images ISO Speed (p. 70) Aperture Value (p. 89) / Image Quality (Movies) (p. 98) i-Contrast (p. 124) Flash Exposure Compensation/Flash Output (pp. 88, 90) Macro / Infinity / Manual Focus (pp. 63, 67, 85) File Size (pp. 68, 98) Recording Pixels (p. 68) / Elapsed Time (Movies) (p. 99) Sound Memo (p. 127) Protect (p. 117) My Colors (p. 73) Red-Eye Correction (p. 125) Shooting Date and Time (p. 60) Switching the Display You can change the display using the l button. No Information Display Simple Information Display Focus Check Display...
...Number (p. 140) Displayed image number / Total number of images ISO Speed (p. 70) Aperture Value (p. 89) / Image Quality (Movies) (p. 98) i-Contrast (p. 124) Flash Exposure Compensation/Flash Output (pp. 88, 90) Macro / Infinity / Manual Focus (pp. 63, 67, 85) File Size (pp. 68, 98) Recording Pixels (p. 68) / Elapsed Time (Movies) (p. 99) Sound Memo (p. 127) Protect (p. 117) My Colors (p. 73) Red-Eye Correction (p. 125) Shooting Date and Time (p. 60) Switching the Display You can change the display using the l button. No Information Display Simple Information Display Focus Check Display...

User Manual
Page 51
... time. Power Saving Function (Auto Power Down) To save battery power, the camera shuts down and the power turns off. • You can adjust the time before formatting. • Formatting or erasing data on a memory card merely changes the file management information on the card and does not ensure its data will display in the right hand corner of the screen in the formatting screen may be less than standard formatting, since all recorded data are completely deleted. Formatting Memory Cards About formatting • The supplied memory card...
... time. Power Saving Function (Auto Power Down) To save battery power, the camera shuts down and the power turns off. • You can adjust the time before formatting. • Formatting or erasing data on a memory card merely changes the file management information on the card and does not ensure its data will display in the right hand corner of the screen in the formatting screen may be less than standard formatting, since all recorded data are completely deleted. Formatting Memory Cards About formatting • The supplied memory card...
User Manual
Page 92
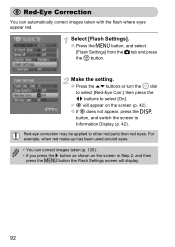
... the n button the Flash Settings screen will display. 92 Red-eye correction may be applied to Information Display (p. 42). Select [Flash Settings]. ● Press the n button, and select [Flash Settings] from the 4 tab and press the m button. Make the setting. ● Press the op buttons or turn the  dial to select [Red-Eye Corr.] then press the qr buttons to select [On]. For example, when red make-up has been used around eyes. •...
... the n button the Flash Settings screen will display. 92 Red-eye correction may be applied to Information Display (p. 42). Select [Flash Settings]. ● Press the n button, and select [Flash Settings] from the 4 tab and press the m button. Make the setting. ● Press the op buttons or turn the  dial to select [Red-Eye Corr.] then press the qr buttons to select [On]. For example, when red make-up has been used around eyes. •...

User Manual
Page 125
... image using the operation in "k Magnifying Images" (p. 111). Select an image. ● Press the qr buttons or turn the  dial to select [New File], and press the m button. Save as a new file. ● Perform the operation in Step 5 on p. 121. 125 X A frame will appear around the red-eye portion detected by the camera, and [Start] will be saved as a new image and display. ● Press the opqr buttons, or turn...
... image using the operation in "k Magnifying Images" (p. 111). Select an image. ● Press the qr buttons or turn the  dial to select [New File], and press the m button. Save as a new file. ● Perform the operation in Step 5 on p. 121. 125 X A frame will appear around the red-eye portion detected by the camera, and [Start] will be saved as a new image and display. ● Press the opqr buttons, or turn...
User Manual
Page 145
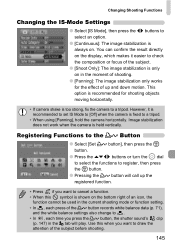
... current shooting mode or function setting. • In , each time you want to cancel a function. • When this when you want to draw the attention of the c button records white balance data (p. 71), and the white balance settings also change to . • In , each press of the subject before shooting. 145 Changing Shooting Functions Changing the IS-Mode Settings ● Select [IS Mode], then press the qr buttons to select an option. ● [Continuous]: The image...
... current shooting mode or function setting. • In , each time you want to cancel a function. • When this when you want to draw the attention of the c button records white balance data (p. 71), and the white balance settings also change to . • In , each press of the subject before shooting. 145 Changing Shooting Functions Changing the IS-Mode Settings ● Select [IS Mode], then press the qr buttons to select an option. ● [Continuous]: The image...
User Manual
Page 153
... movies. • If the file name or folder structure is a Problem Recording images to the memory card takes a long time, or continuous shooting slows down. • Format the memory card in which settings can 't make settings for information regarding folder structure or file names. Check the Menu lists (pp. 156 - 159). Playback Cannot play back images or movies. Camera's internal memory was actually shot (p. 29). Try one of the following. • Format the memory card in the camera, or use a memory card capable of recording at high speeds. menu...
... movies. • If the file name or folder structure is a Problem Recording images to the memory card takes a long time, or continuous shooting slows down. • Format the memory card in which settings can 't make settings for information regarding folder structure or file names. Check the Menu lists (pp. 156 - 159). Playback Cannot play back images or movies. Camera's internal memory was actually shot (p. 29). Try one of the following. • Format the memory card in the camera, or use a memory card capable of recording at high speeds. menu...
User Manual
Page 155
... you tried to select an ending image that the camera is attempting to turn the camera off and back on (p. 40). • If an error code displays directly after taking a picture, the shot may not have been recorded. Lens error, restart camera • A lens error was detected. Reduce the number of settings and try again (pp. 129, 132). List of Messages That Appear on the Screen Cannot select! • When selecting the...
... you tried to select an ending image that the camera is attempting to turn the camera off and back on (p. 40). • If an error code displays directly after taking a picture, the shot may not have been recorded. Lens error, restart camera • A lens error was detected. Reduce the number of settings and try again (pp. 129, 132). List of Messages That Appear on the Screen Cannot select! • When selecting the...
User Manual
Page 160
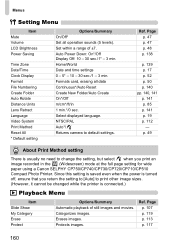
... [Auto] to print other image sizes. (However, it cannot be changed while the printer is usually no need to default settings. Ref. Ref. Erases images. Menus 3 Setting Menu Item Mute Volume LCD Brightness Power Saving Time Zone Date/Time Clock Display Format File Numbering Create Folder Auto Rotate Distance Units Lens Retract Language Video System Print Method Reset All * Default setting Options/Summary On/Off* Set all data Continuous*/Auto Reset Create New Folder/Auto Create On*/Off m/cm*/ft/in the (Widescreen) mode at the full page setting for wide paper using a Canon...
... [Auto] to print other image sizes. (However, it cannot be changed while the printer is usually no need to default settings. Ref. Ref. Erases images. Menus 3 Setting Menu Item Mute Volume LCD Brightness Power Saving Time Zone Date/Time Clock Display Format File Numbering Create Folder Auto Rotate Distance Units Lens Retract Language Video System Print Method Reset All * Default setting Options/Summary On/Off* Set all data Continuous*/Auto Reset Create New Folder/Auto Create On*/Off m/cm*/ft/in the (Widescreen) mode at the full page setting for wide paper using a Canon...
User Manual
Page 164
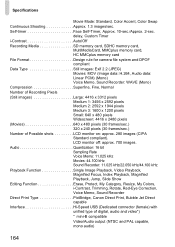
...: 11.025 kHz Movies: 44.100 kHz Sound Recorder: 11.025 kHz/22.050 kHz/44.100 kHz Playback Function Single Image Playback, Video Playback, Magnified Focus, Index Playback, Magnified Playback, Jump, Slide Show Editing Function Erase, Protect, My Category, Resize, My Colors, i-Contrast, Trimming, Rotate, Red-Eye Correction, Voice Memo, Sound Recorder Direct Print Type PictBridge, Canon Direct Print, Bubble Jet Direct capable Interface Hi-Speed USB (Dedicated connector (female) with unified type of Possible shots LCD monitor on...
...: 11.025 kHz Movies: 44.100 kHz Sound Recorder: 11.025 kHz/22.050 kHz/44.100 kHz Playback Function Single Image Playback, Video Playback, Magnified Focus, Index Playback, Magnified Playback, Jump, Slide Show Editing Function Erase, Protect, My Category, Resize, My Colors, i-Contrast, Trimming, Rotate, Red-Eye Correction, Voice Memo, Sound Recorder Direct Print Type PictBridge, Canon Direct Print, Bubble Jet Direct capable Interface Hi-Speed USB (Dedicated connector (female) with unified type of Possible shots LCD monitor on...

User Manual
Page 166
...12 Battery Charger 12 Beach (Scene Mode 55 Black and White Images 73 C Camera Shake 57, 145 Canon Digital Camera Solution Disk .... 2, 31 Clock Function 52 Color Accent (Scene Mode 93, 98 Color Swap (Scene Mode 94, 98 Components Guide 40 Compression J Image Quality Continuous Shooting 72 Control Dial 39, 41 D Date and Time Adding to Image 60 Changing 18 Date/Time Battery 18 Settings 17 Date and Time J Date/Time 166 Default Settings 49 Deleting J Erasing Digital Macro (Scene Mode 64 Digital Tele-Converter 59 Digital Zoom 58 Direct Print 27 Direct Print User Guide 2 Display...
...12 Battery Charger 12 Beach (Scene Mode 55 Black and White Images 73 C Camera Shake 57, 145 Canon Digital Camera Solution Disk .... 2, 31 Clock Function 52 Color Accent (Scene Mode 93, 98 Color Swap (Scene Mode 94, 98 Components Guide 40 Compression J Image Quality Continuous Shooting 72 Control Dial 39, 41 D Date and Time Adding to Image 60 Changing 18 Date/Time Battery 18 Settings 17 Date and Time J Date/Time 166 Default Settings 49 Deleting J Erasing Digital Macro (Scene Mode 64 Digital Tele-Converter 59 Digital Zoom 58 Direct Print 27 Direct Print User Guide 2 Display...

User Manual
Page 168
...84 Shooting Date and Time J Date/Time Shooting Using a TV 76 Shooting With Macro 63 Shutter Button 20 Slide Show 107 Snow (Scene Mode 55 Software Canon Digital Camera Solution Disk . 2, 31 Software Starter Guide 2 Transferring Images to a Computer ...... 31 Sound Memos 127 Sound Recorder 135 Stitch Assist (Scene Mode 96 168 Strap 2, 11 Sunset (Scene Mode 55 Supplementary Flash 38, 150 T Terminal 26, 112 Tone (White Balance 71 Transferring Images to a Computer . 31, 128 Trimming 122 U Underwater (Scene Mode 56 V Video J Movies Viewfinder 76 Viewing (Playback) Enlarged Display...
...84 Shooting Date and Time J Date/Time Shooting Using a TV 76 Shooting With Macro 63 Shutter Button 20 Slide Show 107 Snow (Scene Mode 55 Software Canon Digital Camera Solution Disk . 2, 31 Software Starter Guide 2 Transferring Images to a Computer ...... 31 Sound Memos 127 Sound Recorder 135 Stitch Assist (Scene Mode 96 168 Strap 2, 11 Sunset (Scene Mode 55 Supplementary Flash 38, 150 T Terminal 26, 112 Tone (White Balance 71 Transferring Images to a Computer . 31, 128 Trimming 122 U Underwater (Scene Mode 56 V Video J Movies Viewfinder 76 Viewing (Playback) Enlarged Display...


