
User Guide
Page 1
Camera User Guide ENGLISH • Make sure you read this guide before using the camera. • Store this guide safely so that you can use it in the future.
Camera User Guide ENGLISH • Make sure you read this guide before using the camera. • Store this guide safely so that you can use it in the future.
User Guide
Page 2
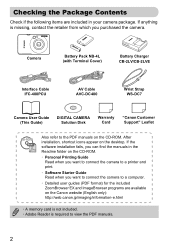
...8226; Software Starter Guide Read when you want to connect the camera to a computer. • Detailed user guides (PDF format) for the included ZoomBrowser EX and ImageBrowser programs are available on the Canon website (English only): http://web.canon.jp/imaging/information-e.html • A memory card is not... Battery Charger CB-2LV/CB-2LVE Interface Cable IFC-400PCU AV Cable AVC-DC400 Wrist Strap WS-DC7 Camera User Guide (This Guide) DIGITAL CAMERA Solution Disk Warranty Card "Canon Customer Support" Leaflet Also refer to view the PDF manuals. 2 If anything is required to the PDF...
...8226; Software Starter Guide Read when you want to connect the camera to a computer. • Detailed user guides (PDF format) for the included ZoomBrowser EX and ImageBrowser programs are available on the Canon website (English only): http://web.canon.jp/imaging/information-e.html • A memory card is not... Battery Charger CB-2LV/CB-2LVE Interface Cable IFC-400PCU AV Cable AVC-DC400 Wrist Strap WS-DC7 Camera User Guide (This Guide) DIGITAL CAMERA Solution Disk Warranty Card "Canon Customer Support" Leaflet Also refer to view the PDF manuals. 2 If anything is required to the PDF...
User Guide
Page 3
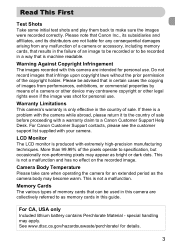
... . Memory Cards The various types of sale. Please note that is produced with your camera. If there is only effective in the country of memory cards that results in a way that Canon Inc., its subsidiaries and affiliates, and its distributors are intended for details. 3 Warranty... Limitations This camera's warranty is a problem with the camera while abroad, please return it to the country of an image to...
... . Memory Cards The various types of sale. Please note that is produced with your camera. If there is only effective in the country of memory cards that results in a way that Canon Inc., its subsidiaries and affiliates, and its distributors are intended for details. 3 Warranty... Limitations This camera's warranty is a problem with the camera while abroad, please return it to the country of an image to...
User Guide
Page 4
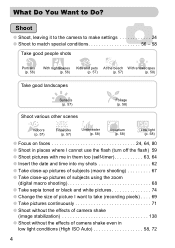
... time into my shots 62 ● Take close-up pictures of subjects (macro shooting 67 ● Take close-up pictures of subjects using the zoom (digital macro shooting 68 ● Take sepia toned or black and white pictures 74 ● Change the size of picture I want to take (recording pixels) . . .... . 69 ● Take pictures continuously 71 ● Shoot without the effects of camera shake (image stabilization 138 ● Shoot without the effects of camera shake even in low light conditions (High ISO Auto 58, 72 4
... time into my shots 62 ● Take close-up pictures of subjects (macro shooting 67 ● Take close-up pictures of subjects using the zoom (digital macro shooting 68 ● Take sepia toned or black and white pictures 74 ● Change the size of picture I want to take (recording pixels) . . .... . 69 ● Take pictures continuously 71 ● Shoot without the effects of camera shake (image stabilization 138 ● Shoot without the effects of camera shake even in low light conditions (High ISO Auto 58, 72 4

User Guide
Page 5
...; View movies 33 2 Print ● Easily print pictures 29 Save ● Save images to a computer 34 3 Other ● Turn off sounds 49 ● Use the camera abroad 15, 133 5
...; View movies 33 2 Print ● Easily print pictures 29 Save ● Save images to a computer 34 3 Other ● Turn off sounds 49 ● Use the camera abroad 15, 133 5
User Guide
Page 6
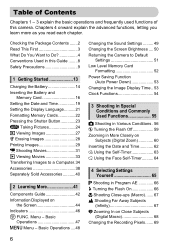
....34 Accessories 38 Separately Sold Accessories ...........40 2 Learning More 41 Components Guide 42 Information Displayed on Close Subjects (Digital Macro 68 Changing the Recording Pixels....... 69 6 Basic Operations ....48 Changing the Sound Settings ......... 49 Changing the Screen Brightness .... 50 ...Returning the Camera to Do 4 Conventions Used in Various Conditions . 56 ! Checking the Package Contents .......2 Read This First 3 What Do You...
....34 Accessories 38 Separately Sold Accessories ...........40 2 Learning More 41 Components Guide 42 Information Displayed on Close Subjects (Digital Macro 68 Changing the Recording Pixels....... 69 6 Basic Operations ....48 Changing the Sound Settings ......... 49 Changing the Screen Brightness .... 50 ...Returning the Camera to Do 4 Conventions Used in Various Conditions . 56 ! Checking the Package Contents .......2 Read This First 3 What Do You...
User Guide
Page 7
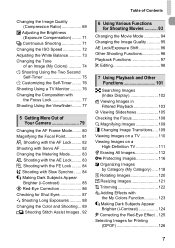
...-Timer ........ 76 Shooting Using a TV Monitor .......... 76 Changing the Composition with the Focus Lock 77 Shooting Using the Viewfinder........ 77 5 Getting More Out of Your Camera 79 Changing the AF Frame Mode........ 80 Magnifying the Focal Point 81 % Shooting with the AF Lock ........ 82 Shooting with Servo AF 82 Changing the...
...-Timer ........ 76 Shooting Using a TV Monitor .......... 76 Changing the Composition with the Focus Lock 77 Shooting Using the Viewfinder........ 77 5 Getting More Out of Your Camera 79 Changing the AF Frame Mode........ 80 Magnifying the Focal Point 81 % Shooting with the AF Lock ........ 82 Shooting with Servo AF 82 Changing the...

User Guide
Page 8
...Handling Precautions 154 Specifications 155 Index 158 Conventions Used in this Guide • Icons are used in the text to represent the camera buttons and switches. • Language that displays on the screen appears inside [ ] (square brackets). • The directional... page number. • This chapter assumes all functions are at their default settings. 8 Conventions Used in this Guide 8 Customizing the Camera ..131 Changing Functions 132 Changing Shooting Functions........136 Changing Playback Functions .......139 Changing the Start-up Image or Sound 139 9 Useful Information ...
...Handling Precautions 154 Specifications 155 Index 158 Conventions Used in this Guide • Icons are used in the text to represent the camera buttons and switches. • Language that displays on the screen appears inside [ ] (square brackets). • The directional... page number. • This chapter assumes all functions are at their default settings. 8 Conventions Used in this Guide 8 Customizing the Camera ..131 Changing Functions 132 Changing Shooting Functions........136 Changing Playback Functions .......139 Changing the Start-up Image or Sound 139 9 Useful Information ...
User Guide
Page 9
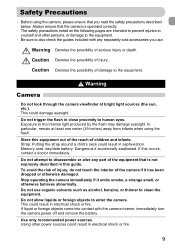
... or death. Memory card, day/date battery: Dangerous if accidentally swallowed. Caution Denotes the possibility of the camera if it has been dropped or otherwise damaged. • Stop operating the camera immediately if it emits smoke, a strange smell, or otherwise behaves abnormally. • Do not use ..... • Do not trigger the flash in electrical shock or fire. Warning Camera • Do not look through the camera viewfinder at least one meter (39 inches) away from infants when using the camera, please ensure that is operated correctly. • The safety precautions noted on ...
... or death. Memory card, day/date battery: Dangerous if accidentally swallowed. Caution Denotes the possibility of the camera if it has been dropped or otherwise damaged. • Stop operating the camera immediately if it emits smoke, a strange smell, or otherwise behaves abnormally. • Do not use ..... • Do not trigger the flash in electrical shock or fire. Warning Camera • Do not look through the camera viewfinder at least one meter (39 inches) away from infants when using the camera, please ensure that is operated correctly. • The safety precautions noted on ...

User Guide
Page 10
... or fire. It is also possible to suffer hearing loss from the outlet and consult your camera distributor or the closest Canon Customer Support Help Desk. • Use only the specified battery charger to charge the battery....the battery to severe impacts. Caution • Be careful not to bang the camera or subject it to strong impacts or shocks when hanging it from listening with headphones to injury or damage the... camera. • Do not use if the power cord or plug are damaged, or not ...
... or fire. It is also possible to suffer hearing loss from the outlet and consult your camera distributor or the closest Canon Customer Support Help Desk. • Use only the specified battery charger to charge the battery....the battery to severe impacts. Caution • Be careful not to bang the camera or subject it to strong impacts or shocks when hanging it from listening with headphones to injury or damage the... camera. • Do not use if the power cord or plug are damaged, or not ...

User Guide
Page 11
...or explosions. • Keep the battery out of the reach of the battery charger while it is charging. Caution • Do not aim the camera at a windy location, be careful not to malfunction. • Unplug the battery charger from the power outlet after recharging is complete, or when you... are not using the camera. This could cause leakage, overheating or an explosion, resulting in fire, burns or other injuries. • Do not sit in a chair with tape...
...or explosions. • Keep the battery out of the reach of the battery charger while it is charging. Caution • Do not aim the camera at a windy location, be careful not to malfunction. • Unplug the battery charger from the power outlet after recharging is complete, or when you... are not using the camera. This could cause leakage, overheating or an explosion, resulting in fire, burns or other injuries. • Do not sit in a chair with tape...
User Guide
Page 13
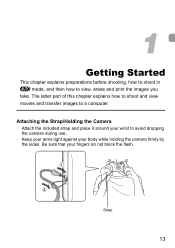
Strap 13 Attaching the Strap/Holding the Camera • Attach the included strap and place it around your wrist to view, erase and print the images you take. Be sure that your fingers do not block the flash. 1 Getting Started This chapter explains preparations before shooting, how to shoot in A mode, and then how to avoid dropping the camera during use. • Keep your arms tight against your body while holding the camera firmly by the sides. The latter part of this chapter explains how to shoot and view movies and transfer images to a computer.
Strap 13 Attaching the Strap/Holding the Camera • Attach the included strap and place it around your wrist to view, erase and print the images you take. Be sure that your fingers do not block the flash. 1 Getting Started This chapter explains preparations before shooting, how to shoot in A mode, and then how to avoid dropping the camera during use. • Keep your arms tight against your body while holding the camera firmly by the sides. The latter part of this chapter explains how to shoot and view movies and transfer images to a computer.
User Guide
Page 15
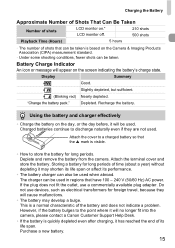
... charge state. Charged batteries continue to discharge naturally even if they will be used when abroad. Deplete and remove the battery from the camera. Charging the Battery Approximate Number of Shots That Can Be Taken Number of shots LCD monitor on.* LCD monitor off. 210 shots 500...time (about a year) without depleting it may develop a bulge. Battery Charge Indicator An icon or message will no longer fit into the camera, please contact a Canon Customer Support Help Desk. • If the battery is a normal characteristic of the battery and does not indicate a problem. If the plug...
... charge state. Charged batteries continue to discharge naturally even if they will be used when abroad. Deplete and remove the battery from the camera. Charging the Battery Approximate Number of Shots That Can Be Taken Number of shots LCD monitor on.* LCD monitor off. 210 shots 500...time (about a year) without depleting it may develop a bulge. Battery Charge Indicator An icon or message will no longer fit into the camera, please contact a Canon Customer Support Help Desk. • If the battery is a normal characteristic of the battery and does not indicate a problem. If the plug...
User Guide
Page 16
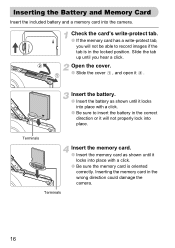
...; Slide the cover , and open it locks into place with a click. ● Be sure to insert the battery in the wrong direction could damage the camera. 16 Inserting the Battery and Memory Card Insert the included battery and a memory card into place. Inserting the memory card in the correct direction or... record images if the tab is oriented correctly. Insert the battery. ● Insert the battery as shown until you will not properly lock into the camera. Slide the tab up until it .
...; Slide the cover , and open it locks into place with a click. ● Be sure to insert the battery in the wrong direction could damage the camera. 16 Inserting the Battery and Memory Card Insert the included battery and a memory card into place. Inserting the memory card in the correct direction or... record images if the tab is oriented correctly. Insert the battery. ● Insert the battery as shown until you will not properly lock into the camera. Slide the tab up until it .
User Guide
Page 18
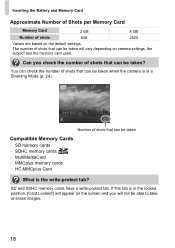
... 8 GB Number of shots 626 2505 • Values are based on the default settings. • The number of shots that can be taken when the camera is in the locked position, [Card Locked!] will appear on...
... 8 GB Number of shots 626 2505 • Values are based on the default settings. • The number of shots that can be taken when the camera is in the locked position, [Card Locked!] will appear on...

User Guide
Page 19
... select the time to set 19 Daylight saving time settings If you turn off the camera. Setting the Date and Time The Date/Time settings screen will appear the first time the camera is turned on the camera. ● Press the power button. Since the dates and times recorded into your images are... based on the camera. Set the date and time. ● Press the qr buttons to select an option...
... select the time to set 19 Daylight saving time settings If you turn off the camera. Setting the Date and Time The Date/Time settings screen will appear the first time the camera is turned on the camera. ● Press the power button. Since the dates and times recorded into your images are... based on the camera. Set the date and time. ● Press the qr buttons to select an option...

User Guide
Page 20
Date/Time battery • The camera has a built-in date/time battery (backup battery) that allows the date/time settings to set the date and time. 20 Change the date and ... menus. ● Press the n button. Setting the Date and Time Changing the Date and Time You can be charged in about 4 hours even if the camera is not turned on. • If the date/time battery is depleted, the Date/Time menu will appear when you turn the...
Date/Time battery • The camera has a built-in date/time battery (backup battery) that allows the date/time settings to set the date and time. 20 Change the date and ... menus. ● Press the n button. Setting the Date and Time Changing the Date and Time You can be charged in about 4 hours even if the camera is not turned on. • If the date/time battery is depleted, the Date/Time menu will appear when you turn the...
User Guide
Page 22
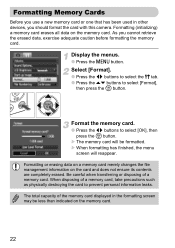
.... Formatting or erasing data on a memory card merely changes the file management information on the memory card. As you should format the card with this camera. Format the memory card. ● Press the qr buttons to select [Format], then press the m button. The memory card will reappear. When formatting has finished...
.... Formatting or erasing data on a memory card merely changes the file management information on the memory card. As you should format the card with this camera. Format the memory card. ● Press the qr buttons to select [Format], then press the m button. The memory card will reappear. When formatting has finished...
User Guide
Page 23
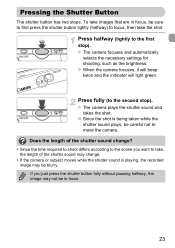
... the shutter button fully without pausing halfway, the image may be sure to first press the shutter button lightly (halfway) to move the camera. When the camera focuses, it will beep twice and the indicator will light green. Press fully (to the first stop ). If you want to take ...the shot. The camera focuses and automatically selects the necessary settings for shooting, such as the brightness. Pressing the Shutter Button The shutter button has two stops. Press ...
... the shutter button fully without pausing halfway, the image may be sure to first press the shutter button lightly (halfway) to move the camera. When the camera focuses, it will beep twice and the indicator will light green. Press fully (to the first stop ). If you want to take ...the shot. The camera focuses and automatically selects the necessary settings for shooting, such as the brightness. Pressing the Shutter Button The shutter button has two stops. Press ...

User Guide
Page 24
.... ● Pressing the power button again will follow the faces within a certain range. Even if the detected faces move, the camera will turn the camera off. The camera can let it automatically select the best settings for the determined scene in on your subject, making it determines the scene. The... camera focuses on the subject it appear smaller. 24 Turn on faces, setting the color and brightness to be the main subject, and ...
.... ● Pressing the power button again will follow the faces within a certain range. Even if the detected faces move, the camera will turn the camera off. The camera can let it automatically select the best settings for the determined scene in on your subject, making it determines the scene. The... camera focuses on the subject it appear smaller. 24 Turn on faces, setting the color and brightness to be the main subject, and ...


