User Guide
Page 2
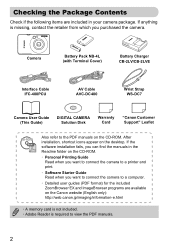
... Cover) Battery Charger CB-2LV/CB-2LVE Interface Cable IFC-400PCU AV Cable AVC-DC400 Wrist Strap WS-DC7 Camera User Guide (This Guide) DIGITAL CAMERA Solution Disk Warranty Card "Canon Customer Support" Leaflet Also refer to the PDF manuals on the desktop. If anything is required to a printer and print. • Software Starter Guide Read when you purchased the camera. After installation, shortcut icons appear on the CD-ROM. If the software installation fails, you...
... Cover) Battery Charger CB-2LV/CB-2LVE Interface Cable IFC-400PCU AV Cable AVC-DC400 Wrist Strap WS-DC7 Camera User Guide (This Guide) DIGITAL CAMERA Solution Disk Warranty Card "Canon Customer Support" Leaflet Also refer to the PDF manuals on the desktop. If anything is required to a printer and print. • Software Starter Guide Read when you purchased the camera. After installation, shortcut icons appear on the CD-ROM. If the software installation fails, you...
User Guide
Page 4
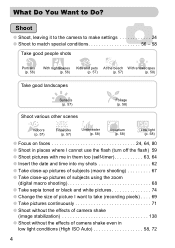
...; Focus on faces 24, 64, 80 ● Shoot in places where I cannot use the flash (turn off the flash) 59 ● Shoot pictures with me in them too (self-timer 63, 64 ● Insert the date and time into my shots 62 ● Take close-up pictures of subjects (macro shooting 67 ● Take close-up pictures of subjects using the zoom (digital macro shooting 68 ● Take sepia toned or black and white pictures 74 ● Change the size...
...; Focus on faces 24, 64, 80 ● Shoot in places where I cannot use the flash (turn off the flash) 59 ● Shoot pictures with me in them too (self-timer 63, 64 ● Insert the date and time into my shots 62 ● Take close-up pictures of subjects (macro shooting 67 ● Take close-up pictures of subjects using the zoom (digital macro shooting 68 ● Take sepia toned or black and white pictures 74 ● Change the size...
User Guide
Page 6
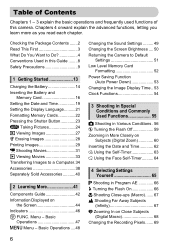
...used functions of this Guide ........8 Safety Precautions 9 1 Getting Started 13 Charging the Battery 14 Inserting the Battery and Memory Card 16 Setting the Date and Time 19 Setting the Display Language..........21 Formatting Memory Cards 22 Pressing the Shutter Button 23 A Taking Pictures 24 1 Viewing Images 27 / Erasing Images 28 Printing Images 29 E Shooting Movies 31 1 Viewing Movies 33 Transferring Images to a Computer.34 Accessories 38 Separately Sold Accessories ...........40 2 Learning More 41 Components Guide 42 Information Displayed on Close Subjects (Digital Macro...
...used functions of this Guide ........8 Safety Precautions 9 1 Getting Started 13 Charging the Battery 14 Inserting the Battery and Memory Card 16 Setting the Date and Time 19 Setting the Display Language..........21 Formatting Memory Cards 22 Pressing the Shutter Button 23 A Taking Pictures 24 1 Viewing Images 27 / Erasing Images 28 Printing Images 29 E Shooting Movies 31 1 Viewing Movies 33 Transferring Images to a Computer.34 Accessories 38 Separately Sold Accessories ...........40 2 Learning More 41 Components Guide 42 Information Displayed on Close Subjects (Digital Macro...
User Guide
Page 15
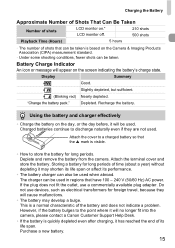
... long periods. Battery Charge Indicator An icon or message will be used when abroad. Charging the Battery Approximate Number of Shots That Can Be Taken Number of shots LCD monitor on.* LCD monitor off. 210 shots 500 shots Playback Time (Hours) 5 hours • The number of shots that can be taken is based on the Camera & Imaging Products Association (CIPA) measurement standard. • Under some shooting conditions, fewer shots can be used in regions that...
... long periods. Battery Charge Indicator An icon or message will be used when abroad. Charging the Battery Approximate Number of Shots That Can Be Taken Number of shots LCD monitor on.* LCD monitor off. 210 shots 500 shots Playback Time (Hours) 5 hours • The number of shots that can be taken is based on the Camera & Imaging Products Association (CIPA) measurement standard. • Under some shooting conditions, fewer shots can be used in regions that...

User Guide
Page 21
..., press the m button to select a language, then press the m button. Display the settings screen. ● Press and hold the m button , then immediately press the n button . The clock will close. Once the display language has been set, the language menu will display if too much time passes between pressing the m button and the n button in the LCD monitor menus and messages. Set the display language. ● Press the opqr buttons to remove the clock and...
..., press the m button to select a language, then press the m button. Display the settings screen. ● Press and hold the m button , then immediately press the n button . The clock will close. Once the display language has been set, the language menu will display if too much time passes between pressing the m button and the n button in the LCD monitor menus and messages. Set the display language. ● Press the opqr buttons to remove the clock and...
User Guide
Page 25
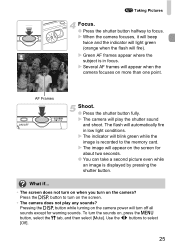
... not play the shutter sound and shoot. Pressing the l button while turning on the camera power will appear on more than one point. A Taking Pictures Focus. ● Press the shutter button halfway to select [Off]. 25 Several AF frames will fire). When the camera focuses, it will beep twice and the indicator will light green (orange when the flash will appear when the camera focuses on the screen for warning sounds. The flash will blink green...
... not play the shutter sound and shoot. Pressing the l button while turning on the camera power will appear on more than one point. A Taking Pictures Focus. ● Press the shutter button halfway to select [Off]. 25 Several AF frames will fire). When the camera focuses, it will beep twice and the indicator will light green (orange when the flash will appear when the camera focuses on the screen for warning sounds. The flash will blink green...

User Guide
Page 31
... E mode. ● Set the mode switch to focus. This is set. Moving the lever toward i will light green. 31 Shooting Time Compose the shot. ● Moving the zoom lever toward j will zoom out from your subject, making it will beep twice and the indicator will zoom in on your subject, making it appear larger. Focus. ● Press the shutter button halfway to E. ● Make sure X is not a malfunction. E Shooting Movies The camera can shoot movies just...
... E mode. ● Set the mode switch to focus. This is set. Moving the lever toward i will light green. 31 Shooting Time Compose the shot. ● Moving the zoom lever toward j will zoom out from your subject, making it will beep twice and the indicator will zoom in on your subject, making it appear larger. Focus. ● Press the shutter button halfway to E. ● Make sure X is not a malfunction. E Shooting Movies The camera can shoot movies just...
User Guide
Page 32
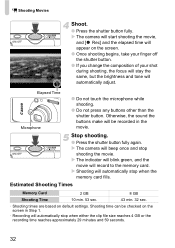
... shooting begins, take your finger off the shutter button. ● If you change the composition of your shot during shooting, the focus will stay the same, but the brightness and tone will be checked on the screen in the movie. The indicator will blink green, and the movie will appear on default settings. The camera will automatically stop when either the clip file size reaches 4 GB or the recording time reaches...
... shooting begins, take your finger off the shutter button. ● If you change the composition of your shot during shooting, the focus will stay the same, but the brightness and tone will be checked on the screen in the movie. The indicator will blink green, and the movie will appear on default settings. The camera will automatically stop when either the clip file size reaches 4 GB or the recording time reaches...
User Guide
Page 44
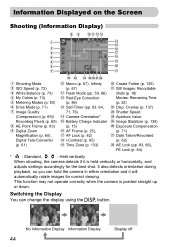
... best shot. This function may not operate correctly when the camera is held vertically or horizontally, and adjusts settings accordingly for correct viewing. Information Displayed on the Screen Shooting (Information Display) Shooting Mode ISO Speed (p. 72) White Balance (p. 73) My Colors (p. 74) Metering Modes (p. 83) Drive Mode (p. 71) Image Quality (Compression) (p. 69)/ Recording Pixels (p. 69) AE Point Frame (p. 83) Digital Zoom Magnification (p. 60), Digital Tele-Converter (p. 61) Macro (p. 67), Infinity (p. 67) Flash Mode (pp. 59, 66) Red-Eye Correction (p. 86) Self-Timer...
... best shot. This function may not operate correctly when the camera is held vertically or horizontally, and adjusts settings accordingly for correct viewing. Information Displayed on the Screen Shooting (Information Display) Shooting Mode ISO Speed (p. 72) White Balance (p. 73) My Colors (p. 74) Metering Modes (p. 83) Drive Mode (p. 71) Image Quality (Compression) (p. 69)/ Recording Pixels (p. 69) AE Point Frame (p. 83) Digital Zoom Magnification (p. 60), Digital Tele-Converter (p. 61) Macro (p. 67), Infinity (p. 67) Flash Mode (pp. 59, 66) Red-Eye Correction (p. 86) Self-Timer...

User Guide
Page 45
... 69) Battery Charge Indicator (p. 15) Metering Modes (p. 83) Folder Number - File Number (p. 134) Displayed Image Number /Total Number of Images ISO Speed (p. 72) Aperture Value, Image Quality (Movies) (p. 94) i-Contrast (pp. 85, 124) Flash Sync (p. 66) Macro (p. 67), Infinity (p. 67) File Size (pp. 69, 95) Still Images: Recording Pixels (p. 69) Movies: Movie Length (p. 95) Protect (p. 116) My Colors (pp. 74, 123) Red-Eye Correction (pp. 86, 125) Shooting Date and Time (p. 62) Switching the Display You can also switch the display by pressing the l button while the image displays shortly...
... 69) Battery Charge Indicator (p. 15) Metering Modes (p. 83) Folder Number - File Number (p. 134) Displayed Image Number /Total Number of Images ISO Speed (p. 72) Aperture Value, Image Quality (Movies) (p. 94) i-Contrast (pp. 85, 124) Flash Sync (p. 66) Macro (p. 67), Infinity (p. 67) File Size (pp. 69, 95) Still Images: Recording Pixels (p. 69) Movies: Movie Length (p. 95) Protect (p. 116) My Colors (pp. 74, 123) Red-Eye Correction (pp. 86, 125) Shooting Date and Time (p. 62) Switching the Display You can also switch the display by pressing the l button while the image displays shortly...

User Guide
Page 61
... a faster shutter speed and less chance of , or will cause image deterioration ( and the zoom factor will display in More Closely on the screen. ● To return to select [Digital Zoom]. The view will be enlarged, and and the zoom factor will display on Subjects (Digital Zoom) Digital Tele-Converter The focal length of the lens can be increased by itself at a recording pixel setting of camera shake...
... a faster shutter speed and less chance of , or will cause image deterioration ( and the zoom factor will display in More Closely on the screen. ● To return to select [Digital Zoom]. The view will be enlarged, and and the zoom factor will display on Subjects (Digital Zoom) Digital Tele-Converter The focal length of the lens can be increased by itself at a recording pixel setting of camera shake...

User Guide
Page 66
... make the flash fire every time you shoot. Set the mode switch to select h, then press the m button. If a correct exposure cannot be obtained when pressing the shutter button halfway, the shutter speed and aperture value display in red? Select h. ● After pressing the r button, press the qr buttons to 4 (p. 42). ● G will appear. 66 Press the qr buttons to obtain the correct exposure. • Turn on the flash • Select a higher ISO speed...
... make the flash fire every time you shoot. Set the mode switch to select h, then press the m button. If a correct exposure cannot be obtained when pressing the shutter button halfway, the shutter speed and aperture value display in red? Select h. ● After pressing the r button, press the qr buttons to 4 (p. 42). ● G will appear. 66 Press the qr buttons to obtain the correct exposure. • Turn on the flash • Select a higher ISO speed...

User Guide
Page 125
...). Correct the image. ● When you press the m button, red-eye detected by the camera will appear. Select an image. ● Press the qr buttons, select the image. Save as new files. ] Correcting the Red-Eye Effect You can zoom the image using the procedures in images and save them as a new image and display. ● Press the opqr buttons to select [New File], and press the m button. The [Red-Eye Correction] screen will be...
...). Correct the image. ● When you press the m button, red-eye detected by the camera will appear. Select an image. ● Press the qr buttons, select the image. Save as new files. ] Correcting the Red-Eye Effect You can zoom the image using the procedures in images and save them as a new image and display. ● Press the opqr buttons to select [New File], and press the m button. The [Red-Eye Correction] screen will be...

User Guide
Page 138
... [3:2 Guide] are the areas that will include the portion in the gray areas. The actual image recorded will not be printed. Shoot Only Image stabilization is always on the display, which makes it easier to check the composition or focus. Changing Shooting Functions • In mode, you cannot set the IS Mode to [Off] when the camera is fixed to a tripod. • When using [Panning], hold the camera horizontally. Image...
... [3:2 Guide] are the areas that will include the portion in the gray areas. The actual image recorded will not be printed. Shoot Only Image stabilization is always on the display, which makes it easier to check the composition or focus. Changing Shooting Functions • In mode, you cannot set the IS Mode to [Off] when the camera is fixed to a tripod. • When using [Panning], hold the camera horizontally. Image...
User Guide
Page 143
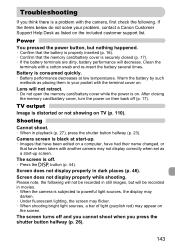
... not be recorded in still images, but nothing happened. • Confirm that the battery is properly inserted (p. 16). • Confirm that have had their name changed, or that the memory card/battery cover is a problem with a cotton swab and re-insert the battery several times. After closing the memory card/battery cover, turn the power on the included customer support list. Troubleshooting If you press the shutter button halfway...
... not be recorded in still images, but nothing happened. • Confirm that the battery is properly inserted (p. 16). • Confirm that have had their name changed, or that the memory card/battery cover is a problem with a cotton swab and re-insert the battery several times. After closing the memory card/battery cover, turn the power on the included customer support list. Troubleshooting If you press the shutter button halfway...

User Guide
Page 144
...). • Adjust the brightness with exposure compensation (p. 71). • Use the AE lock, or spot metering to shoot (p. 83). • The subject is dark even though the flash fired (p. 26). • Increase the ISO speed (p. 72). • Shoot within the focusing distance (p. 155). • Set the [AF-assist beam] to shoot (p. 83). Image appears rough or grainy. • Shoot with the flash. • Light from the flash has...
...). • Adjust the brightness with exposure compensation (p. 71). • Use the AE lock, or spot metering to shoot (p. 83). • The subject is dark even though the flash fired (p. 26). • Increase the ISO speed (p. 72). • Shoot within the focusing distance (p. 155). • Set the [AF-assist beam] to shoot (p. 83). Image appears rough or grainy. • Shoot with the flash. • Light from the flash has...
User Guide
Page 145
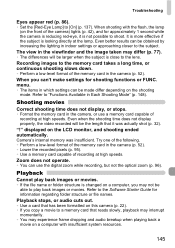
... LCD monitor, and shooting ended automatically. Recording images to shoot. Camera's internal memory was actually shot (p. 32). Zoom does not operate. • You can be larger when the subject is changed on the shooting mode. Troubleshooting Eyes appear red (p. 86). • Set the [Red-Eye Lamp] to the Software Starter Guide for information regarding folder structure or file names. Even when the shooting time does not display properly, the video recorded will be obtained by increasing the lighting in Each Shooting Mode...
... LCD monitor, and shooting ended automatically. Recording images to shoot. Camera's internal memory was actually shot (p. 32). Zoom does not operate. • You can be larger when the subject is changed on the shooting mode. Troubleshooting Eyes appear red (p. 86). • Set the [Red-Eye Lamp] to the Software Starter Guide for information regarding folder structure or file names. Even when the shooting time does not display properly, the video recorded will be obtained by increasing the lighting in Each Shooting Mode...
User Guide
Page 147
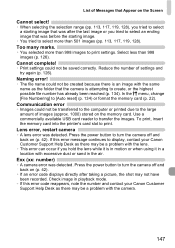
... the starting image that was after taking a picture, the shot may not have been recorded. Use a commercially available USB card reader to [Auto reset] (p. 134) or format the memory card (p. 22). To print, insert the memory card into the printer's card slot to turn the camera off and back on (p. 42). Naming error! • The file name could not be a problem with excessive dust or sand in playback mode. • If this error message continues to display, contact your Canon Customer Support Help...
... the starting image that was after taking a picture, the shot may not have been recorded. Use a commercially available USB card reader to [Auto reset] (p. 134) or format the memory card (p. 22). To print, insert the memory card into the printer's card slot to turn the camera off and back on (p. 42). Naming error! • The file name could not be a problem with excessive dust or sand in playback mode. • If this error message continues to display, contact your Canon Customer Support Help...
User Guide
Page 158
... Changing 20 Date/Time Battery 20 158 Setting 19 Date/Time Date and Time Default Settings 51 DIGITAL CAMERA Solution Disk 2, 35 Digital Macro (Scene Mode 68 Digital Tele-Converter 61 Digital Zoom 60 Direct Print 30 Disp. Overlay 137 Display Language 21 DPOF 126 E Editing i-Contrast 124 My Colors 123 Red-Eye Correction 125 Resizing (Making Images Smaller) ..... 121 Rotating Images 120 Trimming 122 Enlarged Display 109 Erasing 28 Erasing All Images 112 Error Messages 146 Exposure AE Lock 83 Compensation 71 FE Lock 84 F Face AiAF 80 Face Self-Timer...
... Changing 20 Date/Time Battery 20 158 Setting 19 Date/Time Date and Time Default Settings 51 DIGITAL CAMERA Solution Disk 2, 35 Digital Macro (Scene Mode 68 Digital Tele-Converter 61 Digital Zoom 60 Direct Print 30 Disp. Overlay 137 Display Language 21 DPOF 126 E Editing i-Contrast 124 My Colors 123 Red-Eye Correction 125 Resizing (Making Images Smaller) ..... 121 Rotating Images 120 Trimming 122 Enlarged Display 109 Erasing 28 Erasing All Images 112 Error Messages 146 Exposure AE Lock 83 Compensation 71 FE Lock 84 F Face AiAF 80 Face Self-Timer...

User Guide
Page 160
... Switching the Display 44, 45 SD/SDHC Card Memory Card Self-Timer 10 second Self-Timer 63 Changing Delay and Number of Shots . 76 Face Self-Timer 64 Two Second Self-Timer 75 Sepia Tones 74 Servo AF 82 Shooting Date and Time Date and Time Shooting Using a TV Monitor 76 Shooting With Macro 67 Shutter Button 23 Slideshow 105 Snow (Scene Mode 58 Software DIGITAL CAMERA Solution Disk 2, 35 Transferring Images to a Computer ...... 34 Sound 49 Stitch Assist (Scene Mode 92 Strap 2, 13 Sunset (Scene Mode 57 Supplementary Flash...
... Switching the Display 44, 45 SD/SDHC Card Memory Card Self-Timer 10 second Self-Timer 63 Changing Delay and Number of Shots . 76 Face Self-Timer 64 Two Second Self-Timer 75 Sepia Tones 74 Servo AF 82 Shooting Date and Time Date and Time Shooting Using a TV Monitor 76 Shooting With Macro 67 Shutter Button 23 Slideshow 105 Snow (Scene Mode 58 Software DIGITAL CAMERA Solution Disk 2, 35 Transferring Images to a Computer ...... 34 Sound 49 Stitch Assist (Scene Mode 92 Strap 2, 13 Sunset (Scene Mode 57 Supplementary Flash...


