User Guide
Page 3
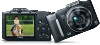
... case of camera problems while abroad, return to make sure the images were recorded correctly. If covered, remove the film before contacting a Canon Customer Support Help Desk. • Although the LCD monitor is valid only in the area of purchase. This does not indicate damage. ...Preliminary Notes and Legal Information • Take and review some pixels may be defective or may appear as red or black dots. Please note that Canon Inc., its subsidiaries and affiliates, and its distributors are not liable for different purposes. Basic ...
... case of camera problems while abroad, return to make sure the images were recorded correctly. If covered, remove the film before contacting a Canon Customer Support Help Desk. • Although the LCD monitor is valid only in the area of purchase. This does not indicate damage. ...Preliminary Notes and Legal Information • Take and review some pixels may be defective or may appear as red or black dots. Please note that Canon Inc., its subsidiaries and affiliates, and its distributors are not liable for different purposes. Basic ...

User Guide
Page 61
Helpful Shooting Features Still Images Checking for the final shot. • The frame is not displayed when [Review] is set to [Quick] (=63). 61 zzPress the button, choose [Blink Detection] on the [4] tab, and then choose [On] (=38). 2 Shoot. XXA frame, accompanied by [ ], ...
Helpful Shooting Features Still Images Checking for the final shot. • The frame is not displayed when [Review] is set to [Quick] (=63). 61 zzPress the button, choose [Blink Detection] on the [4] tab, and then choose [On] (=38). 2 Shoot. XXA frame, accompanied by [ ], ...

User Guide
Page 63
zzTo restore the original setting, repeat this process but choose [2 sec.]. Quick 2 - 10 sec. Displays images until you press the shutter button halfway. Configure the setting. No image display after shots as follows. Displays images for the specified time. Customizing Camera Operation Still Images Changing the Image Display Period After Shots Change how long images are displayed after shots. 63 zzPress the button, choose [Review] on the [4] tab, and then choose the desired option (=38). Hold Off Displays images only until you can shoot again.
zzTo restore the original setting, repeat this process but choose [2 sec.]. Quick 2 - 10 sec. Displays images until you press the shutter button halfway. Configure the setting. No image display after shots as follows. Displays images for the specified time. Customizing Camera Operation Still Images Changing the Image Display Period After Shots Change how long images are displayed after shots. 63 zzPress the button, choose [Review] on the [4] tab, and then choose the desired option (=38). Hold Off Displays images only until you can shoot again.

User Guide
Page 64
... image. Displays shooting details (=190). Shows the area in "Checking the Focus" (=113). • This setting is set to [Off] and cannot be changed when [Review] (=63) is set to check the focus. zzTo restore the original setting, repeat this process but choose [Off]. Configure the setting. Customizing Camera Operation Still...
... image. Displays shooting details (=190). Shows the area in "Checking the Focus" (=113). • This setting is set to [Off] and cannot be changed when [Review] (=63) is set to check the focus. zzTo restore the original setting, repeat this process but choose [Off]. Configure the setting. Customizing Camera Operation Still...

User Guide
Page 109
6 Playback Mode Have fun reviewing your shots, and browse or edit them in many ways • To prepare the camera for these operations, press the button to enter Playback mode. • It may not be possible to play back or edit images that were renamed or already edited on a computer, or images from other cameras. 109
6 Playback Mode Have fun reviewing your shots, and browse or edit them in many ways • To prepare the camera for these operations, press the button to enter Playback mode. • It may not be possible to play back or edit images that were renamed or already edited on a computer, or images from other cameras. 109

User Guide
Page 112
... Overexposure Warning (for movies. • Switching display modes by pressing the button is displayed. To change the initial display mode, press the button and choose [Review Info] on the information displayed, see =190. The horizontal axis represents the degree of brightness, and the vertical axis, how much of the image is...
... Overexposure Warning (for movies. • Switching display modes by pressing the button is displayed. To change the initial display mode, press the button and choose [Review Info] on the information displayed, see =190. The horizontal axis represents the degree of brightness, and the vertical axis, how much of the image is...

User Guide
Page 134
zzPress the buttons or turn the dial to a higher resolution. Editing Still Images 5 Review the new image. Cropping Still Images You can specify a portion of an image to choose [Yes], and then press the button. zzPress the button. [Display ...
zzPress the buttons or turn the dial to a higher resolution. Editing Still Images 5 Review the new image. Cropping Still Images You can specify a portion of an image to choose [Yes], and then press the button. zzPress the button. [Display ...

User Guide
Page 135
... 4 - 5 on this frame, turn the dial to switch to [ ] (=133). • Images supported for images shot at a resolution of the image as a new image and review. To crop the image based on =133 - 134. • Editing is shown in the upper-left , and a preview of [ ] (=55) or resized to the other...
... 4 - 5 on this frame, turn the dial to switch to [ ] (=133). • Images supported for images shot at a resolution of the image as a new image and review. To crop the image based on =133 - 134. • Editing is shown in the upper-left , and a preview of [ ] (=55) or resized to the other...
User Guide
Page 136
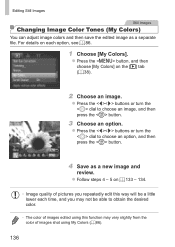
... Still Images Still Images Changing Image Color Tones (My Colors) You can adjust image colors and then save the edited image as a new image and review. zzPress the button, and then choose [My Colors] on the [1] tab (= 38). 2 Choose an image.
... Still Images Still Images Changing Image Color Tones (My Colors) You can adjust image colors and then save the edited image as a new image and review. zzPress the button, and then choose [My Colors] on the [1] tab (= 38). 2 Choose an image.
User Guide
Page 137
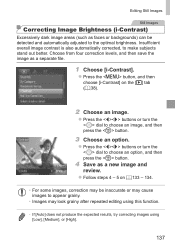
..., and then press the button. 4 Save as a separate file. 1 Choose [i-Contrast]. Choose from four correction levels, and then save the image as a new image and review. zzFollow steps 4 - 5 on the [1] tab (= 38). 2 Choose an image. Insufficient overall image contrast is also automatically corrected, to the optimal brightness. zzPress the buttons or...
..., and then press the button. 4 Save as a separate file. 1 Choose [i-Contrast]. Choose from four correction levels, and then save the image as a new image and review. zzFollow steps 4 - 5 on the [1] tab (= 38). 2 Choose an image. Insufficient overall image contrast is also automatically corrected, to the optimal brightness. zzPress the buttons or...

User Guide
Page 138
... Automatically corrects images affected by the camera is now saved as a separate file. 1 Choose [Red-Eye Correction]. zzEnlarge or reduce images as a new image and review. zzPress the button, and then choose [Red-Eye Correction] on =134. • Some images may not be overwritten. 138 zzPress the buttons or turn the...
... Automatically corrects images affected by the camera is now saved as a separate file. 1 Choose [Red-Eye Correction]. zzEnlarge or reduce images as a new image and review. zzPress the button, and then choose [Red-Eye Correction] on =134. • Some images may not be overwritten. 138 zzPress the buttons or turn the...

User Guide
Page 139
... the portion from the nearest [ ] to the left, and choosing [ ] will cut the portion from [ ]) by choosing [ ], and cut . zzPress the buttons to the right. 3 Review the edited movie. The edited movie is now played. XXThe movie editing panel and editing bar are now displayed. Movie Editing Panel Movie Editing Bar...
... the portion from the nearest [ ] to the left, and choosing [ ] will cut the portion from [ ]) by choosing [ ], and cut . zzPress the buttons to the right. 3 Review the edited movie. The edited movie is now played. XXThe movie editing panel and editing bar are now displayed. Movie Editing Panel Movie Editing Bar...

User Guide
Page 198
...-Eye Lamp On/Off Safety FE On Off i-Contrast (=83) Auto Off Safety Shift (=105) On Off Wind Filter (=58) On/Off Review (=63) Off/Quick/2 - 10 sec./Hold Review Info (=64) Off/Detailed/Focus Check Blink Detection (=61) On Off Grid Lines (=59) On/Off IS Mode (=101) Off/Continuous Shoot...
...-Eye Lamp On/Off Safety FE On Off i-Contrast (=83) Auto Off Safety Shift (=105) On Off Wind Filter (=58) On/Off Review (=63) Off/Quick/2 - 10 sec./Hold Review Info (=64) Off/Detailed/Focus Check Blink Detection (=61) On Off Grid Lines (=59) On/Off IS Mode (=101) Off/Continuous Shoot...


