User Guide
Page 1
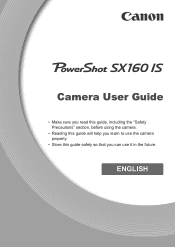
ENGLISH Camera User Guide • Make sure you read this guide, including the "Safety Precautions" section, before using the camera. • Reading this guide will help you learn to use the camera properly. • Store this guide safely so that you can use it in the future.
ENGLISH Camera User Guide • Make sure you read this guide, including the "Safety Precautions" section, before using the camera. • Reading this guide will help you learn to use the camera properly. • Store this guide safely so that you can use it in the future.
User Guide
Page 2
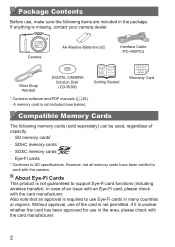
Warranty Card Compatible Memory Cards The following items are included in the area, please check with the card manufacturer. 2 However, not all memory cards have been verified to SD specifications. Also note that an approval is not permitted. Without approval, use of the card is required to support Eye-Fi card functions (including wireless transfer). If anything is not guaranteed to use Eye-Fi cards in many countries or regions. Package Contents Before use, make sure the following memory cards (sold separately) can be used, regardless of an issue with an Eye-Fi card, ...
Warranty Card Compatible Memory Cards The following items are included in the area, please check with the card manufacturer. 2 However, not all memory cards have been verified to SD specifications. Also note that an approval is not permitted. Without approval, use of the card is required to support Eye-Fi card functions (including wireless transfer). If anything is not guaranteed to use Eye-Fi cards in many countries or regions. Package Contents Before use, make sure the following memory cards (sold separately) can be used, regardless of an issue with an Eye-Fi card, ...
User Guide
Page 3
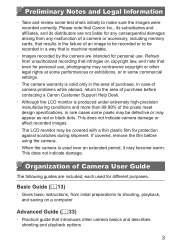
... by the camera are included, each used over an extended period, it may become warm. Please note that Canon Inc., its subsidiaries and affiliates, and its distributors are not liable for any consequential damages arising from any malfunction... or other camera basics and describes shooting and playback options 3 If covered, remove the film before contacting a Canon Customer Support Help Desk. • Although the LCD monitor is produced under extremely high-precision manufacturing conditions and ...some pixels may be defective or may appear as red or black dots. This does not indicate damage.
... by the camera are included, each used over an extended period, it may become warm. Please note that Canon Inc., its subsidiaries and affiliates, and its distributors are not liable for any consequential damages arising from any malfunction... or other camera basics and describes shooting and playback options 3 If covered, remove the film before contacting a Canon Customer Support Help Desk. • Although the LCD monitor is produced under extremely high-precision manufacturing conditions and ...some pixels may be defective or may appear as red or black dots. This does not indicate damage.
User Guide
Page 4
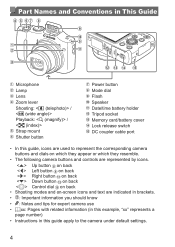
Up button on back Left button on back Right button on back Down button on back Control dial on back • Shooting modes and on which they appear or which they resemble. • The following camera buttons and controls are used to the camera under default settings. 4 Part Names and Conventions in this guide apply to represent the corresponding camera buttons and dials on -screen icons and text are indicated in brackets. • : Important information you should know • : Notes and tips for expert camera use • =xx: Pages with related information (in this ...
Up button on back Left button on back Right button on back Down button on back Control dial on back • Shooting modes and on which they appear or which they resemble. • The following camera buttons and controls are used to the camera under default settings. 4 Part Names and Conventions in this guide apply to represent the corresponding camera buttons and dials on -screen icons and text are indicated in brackets. • : Important information you should know • : Notes and tips for expert camera use • =xx: Pages with related information (in this ...
User Guide
Page 5
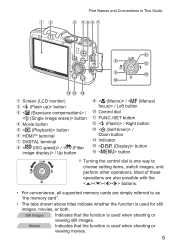
Most of these operations are also possible with the buttons. • For convenience, all supported memory cards are simply referred to as "the memory card". • The tabs shown above titles indicate whether the function is one way to choose setting items, switch images, and perform other operations. Part Names and Conventions in This Guide Screen (LCD monitor) button / button Movie button button HDMITM terminal DIGITAL terminal < (ISO speed)> / < (Filter image display)> / Up button / / Left button Control dial FUNC./SET button / Right button / Down button Indicator button ...
Most of these operations are also possible with the buttons. • For convenience, all supported memory cards are simply referred to as "the memory card". • The tabs shown above titles indicate whether the function is one way to choose setting items, switch images, and perform other operations. Part Names and Conventions in This Guide Screen (LCD monitor) button / button Movie button button HDMITM terminal DIGITAL terminal < (ISO speed)> / < (Filter image display)> / Up button / / Left button Control dial FUNC./SET button / Right button / Down button Indicator button ...
User Guide
Page 6
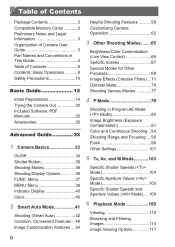
Table of Contents Package Contents 2 Compatible Memory Cards 2 Preliminary Notes and Legal Information 3 Organization of Camera User Guide 3 Part Names and Conventions in Program AE Mode ( Mode 80 Image Brightness (Exposure Compensation 81 Color and Continuous Shooting...84 Shooting Range and Focusing.....90 Flash 98 Other Settings 101 5 Tv, Av, and M Mode............103 Specific Shutter Speeds ( Mode 104 Specific Aperture Values ( Mode 105 Specific Shutter Speeds and Aperture Values ( Mode).....106 6 Playback Mode 109 Viewing 110 Browsing and Filtering Images 114 Image Viewing ...
Table of Contents Package Contents 2 Compatible Memory Cards 2 Preliminary Notes and Legal Information 3 Organization of Camera User Guide 3 Part Names and Conventions in Program AE Mode ( Mode 80 Image Brightness (Exposure Compensation 81 Color and Continuous Shooting...84 Shooting Range and Focusing.....90 Flash 98 Other Settings 101 5 Tv, Av, and M Mode............103 Specific Shutter Speeds ( Mode 104 Specific Aperture Values ( Mode 105 Specific Shutter Speeds and Aperture Values ( Mode).....106 6 Playback Mode 109 Viewing 110 Browsing and Filtering Images 114 Image Viewing ...
User Guide
Page 7
Protecting Images 120 Erasing Images 124 Rotating Images 127 Image Categories 129 Editing Still Images 133 Editing Movies 139 7 Setting Menu 141 Adjusting Basic Camera Functions 142 8 Accessories 155 Replacing the Date/Time Battery 156 Optional Accessories 157 Using Optional Accessories........159 Printing Images 166 Using an Eye-Fi Card 179 9 Appendix 181 Troubleshooting 182 On-Screen Messages 186 On-Screen Information 188 Functions and Menu Tables........192 Handling Precautions 202 Specifications 203 Index 207 Table of Contents 7
Protecting Images 120 Erasing Images 124 Rotating Images 127 Image Categories 129 Editing Still Images 133 Editing Movies 139 7 Setting Menu 141 Adjusting Basic Camera Functions 142 8 Accessories 155 Replacing the Date/Time Battery 156 Optional Accessories 157 Using Optional Accessories........159 Printing Images 166 Using an Eye-Fi Card 179 9 Appendix 181 Troubleshooting 182 On-Screen Messages 186 On-Screen Information 188 Functions and Menu Tables........192 Handling Precautions 202 Specifications 203 Index 207 Table of Contents 7
User Guide
Page 8
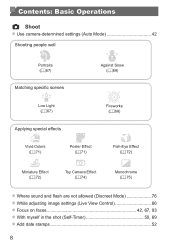
Contents: Basic Operations 4 Shoot zzUse camera-determined settings (Auto Mode 42 Shooting people well I Portraits (= 67) P Against Snow (= 68) Matching specific scenes Low Light (= 67) t Fireworks (= 68) Applying special effects Vivid Colors (= 71) Poster Effect (= 71) Fish-Eye Effect (= 72) Miniature Effect (= 72) Toy Camera Effect (= 74) Monochrome (= 75) zzWhere sound and flash are not allowed (Discreet Mode 76 zzWhile adjusting image settings (Live View Control 66 zzFocus on faces 42, 67, 93 zzWith myself in the shot (Self-Timer 50, 69 zzAdd date stamps 52 8
Contents: Basic Operations 4 Shoot zzUse camera-determined settings (Auto Mode 42 Shooting people well I Portraits (= 67) P Against Snow (= 68) Matching specific scenes Low Light (= 67) t Fireworks (= 68) Applying special effects Vivid Colors (= 71) Poster Effect (= 71) Fish-Eye Effect (= 72) Miniature Effect (= 72) Toy Camera Effect (= 74) Monochrome (= 75) zzWhere sound and flash are not allowed (Discreet Mode 76 zzWhile adjusting image settings (Live View Control 66 zzFocus on faces 42, 67, 93 zzWith myself in the shot (Self-Timer 50, 69 zzAdd date stamps 52 8

User Guide
Page 10
If this equipment out of the reach of children and infants. In the event that batteries leak and the battery electrolyte contacts eyes, mouth, skin or clothing, immediately flush with water (e.g. Exposure to the intense light produced by the flash could result in electrical shock or fire. Date/time battery: Dangerous if swallowed. sea water) or other persons, or damage to the equipment. • Be sure to enter the camera. Warning Denotes the possibility of the product if it has been dropped or otherwise damaged. • Stop using the product, please ensure that you ...
If this equipment out of the reach of children and infants. In the event that batteries leak and the battery electrolyte contacts eyes, mouth, skin or clothing, immediately flush with water (e.g. Exposure to the intense light produced by the flash could result in electrical shock or fire. Date/time battery: Dangerous if swallowed. sea water) or other persons, or damage to the equipment. • Be sure to enter the camera. Warning Denotes the possibility of the product if it has been dropped or otherwise damaged. • Stop using the product, please ensure that you ...
User Guide
Page 11
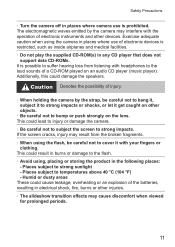
This could damage the speakers. Places subject to temperatures above 40 °C (104 °F) - The electromagnetic waves emitted by the strap, be careful not to cover it get caught on other objects. • Be careful not to bump or push strongly on an audio CD player (music player). Safety Precautions • Turn the camera off in places where camera use of the batteries, resulting in electrical shock, fire, burns or other injuries. • The slideshow transition effects may cause discomfort when viewed for prolonged periods. 11 Exercise adequate caution when using the ...
This could damage the speakers. Places subject to temperatures above 40 °C (104 °F) - The electromagnetic waves emitted by the strap, be careful not to cover it get caught on other objects. • Be careful not to bump or push strongly on an audio CD player (music player). Safety Precautions • Turn the camera off in places where camera use of the batteries, resulting in electrical shock, fire, burns or other injuries. • The slideshow transition effects may cause discomfort when viewed for prolonged periods. 11 Exercise adequate caution when using the ...

User Guide
Page 12
Please use a cotton swab to remove dirt, dust or other insulators. Doing so may damage the image sensor. • When using the camera on a clear day). This is due to the high intensity of the flash burning dust and foreign materials stuck to the front of the unit. terminals reversed. This may occur. • Before you are left inside the camera, damage caused by leakage may cause the product to malfunction. • When putting the camera in your bag, ensure that hard objects do not come into contact with the + and - Contacting other metal materials may lead to fire or ...
Please use a cotton swab to remove dirt, dust or other insulators. Doing so may damage the image sensor. • When using the camera on a clear day). This is due to the high intensity of the flash burning dust and foreign materials stuck to the front of the unit. terminals reversed. This may occur. • Before you are left inside the camera, damage caused by leakage may cause the product to malfunction. • When putting the camera in your bag, ensure that hard objects do not come into contact with the + and - Contacting other metal materials may lead to fire or ...

User Guide
Page 13
Basic Guide Gives basic instructions, from initial preparations to shooting, playback, and saving on a computer 13
Basic Guide Gives basic instructions, from initial preparations to shooting, playback, and saving on a computer 13

User Guide
Page 14
zzWhen shooting, keep your arms close to your body and hold the camera securely to the left side of the strap through the loop on it from moving. If you have raised the flash, do not rest your wrist. Holding the Camera zzPlace the strap around your fingers on the threaded end ( ). zzThe strap can also be attached to prevent it . 14 Attaching the Strap zzThread the end of the strap through the strap hole ( ), and then pull the other end of the camera. Initial Preparations Prepare for shooting as follows.
zzWhen shooting, keep your arms close to your body and hold the camera securely to the left side of the strap through the loop on it from moving. If you have raised the flash, do not rest your wrist. Holding the Camera zzPlace the strap around your fingers on the threaded end ( ). zzThe strap can also be attached to prevent it . 14 Attaching the Strap zzThread the end of the strap through the strap hole ( ), and then pull the other end of the camera. Initial Preparations Prepare for shooting as follows.

User Guide
Page 15
zzMake sure the memory card is in another device), you insert it. Inserting memory cards facing the wrong way may damage the camera. 15 zzRecording is not possible on memory cards with a write-protect tab when the tab is facing the right way when you should format the memory card with this camera (= 146). 1 Check the card's write-protect tab. zzSlide the switch ( ) and open the cover ( ). 3 Insert the batteries. zzInsert the batteries as shown until it clicks into the unlocked position. 2 Open the cover. Note that before using a new memory card (or a memory card formatted in...
zzMake sure the memory card is in another device), you insert it. Inserting memory cards facing the wrong way may damage the camera. 15 zzRecording is not possible on memory cards with a write-protect tab when the tab is facing the right way when you should format the memory card with this camera (= 146). 1 Check the card's write-protect tab. zzSlide the switch ( ) and open the cover ( ). 3 Insert the batteries. zzInsert the batteries as shown until it clicks into the unlocked position. 2 Open the cover. Note that before using a new memory card (or a memory card formatted in...

User Guide
Page 16
... in cameras than alkaline batteries do, especially in until it clicks, and then slowly release the memory card. Compatible Batteries Use AA alkaline batteries or Canon AA NiMH batteries (sold separately, = 157). • Due to the inconsistent performance of other batteries, use of recording are possible with various batteries, see "Specifications...
... in cameras than alkaline batteries do, especially in until it clicks, and then slowly release the memory card. Compatible Batteries Use AA alkaline batteries or Canon AA NiMH batteries (sold separately, = 157). • Due to the inconsistent performance of other batteries, use of recording are possible with various batteries, see "Specifications...
User Guide
Page 17
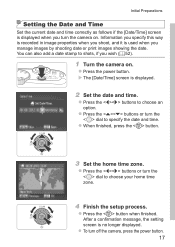
zzPress the button when finished. XXThe [Date/Time] screen is displayed when you turn the dial to shots, if you wish (=52). 1 Turn the camera on . zzPress the buttons or turn the camera on . You can also add a date stamp to specify the date and time. zzPress the buttons or turn off the camera, press the power button. 17 zzTo turn the dial to choose an option. zzPress the buttons to choose your home time zone. 4 Finish the setup process. Initial Preparations Setting the Date and Time Set the current date and time correctly as follows if the [Date/Time] screen is...
zzPress the button when finished. XXThe [Date/Time] screen is displayed when you turn the dial to shots, if you wish (=52). 1 Turn the camera on . zzPress the buttons or turn the camera on . You can also add a date stamp to specify the date and time. zzPress the buttons or turn off the camera, press the power button. 17 zzTo turn the dial to choose an option. zzPress the buttons to choose your home time zone. 4 Finish the setup process. Initial Preparations Setting the Date and Time Set the current date and time correctly as follows if the [Date/Time] screen is...
User Guide
Page 18
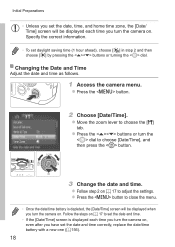
zzFollow step 2 on . zzMove the zoom lever to adjust the settings. zzPress the button to choose [Date/Time], and then press the button. 3 Change the date and time. Specify the correct information. • To set the date, time, and home time zone, the [Date/ Time] screen will be displayed each time you turn the camera on = 17 to choose the [3] tab. zzPress the button. 2 Choose [Date/Time]. zzPress the buttons or turn the dial to close the menu. • Once the date/time battery is displayed each time you turn the camera on , even after you have set the date and ...
zzFollow step 2 on . zzMove the zoom lever to adjust the settings. zzPress the button to choose [Date/Time], and then press the button. 3 Change the date and time. Specify the correct information. • To set the date, time, and home time zone, the [Date/ Time] screen will be displayed each time you turn the camera on = 17 to choose the [3] tab. zzPress the button. 2 Choose [Date/Time]. zzPress the buttons or turn the dial to close the menu. • Once the date/time battery is displayed each time you turn the camera on , even after you have set the date and ...

User Guide
Page 19
Initial Preparations Display Language The display language can also change the display language by pressing the button and choosing [Language ] on the [3] tab. 19 zzPress and hold the button, and then immediately press the button. 3 Set the display language. zzPress the buttons or turn the dial to dismiss the time display and repeat step 2. • You can be changed as needed. 1 Enter Playback mode. XXOnce the display language has been set, the setting screen is no longer displayed. • The current time is displayed if you wait too long in step 2 after pressing the button...
Initial Preparations Display Language The display language can also change the display language by pressing the button and choosing [Language ] on the [3] tab. 19 zzPress and hold the button, and then immediately press the button. 3 Set the display language. zzPress the buttons or turn the dial to dismiss the time display and repeat step 2. • You can be changed as needed. 1 Enter Playback mode. XXOnce the display language has been set, the setting screen is no longer displayed. • The current time is displayed if you wait too long in step 2 after pressing the button...
User Guide
Page 20
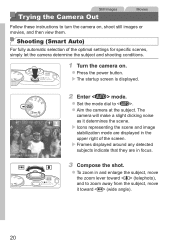
Shooting (Smart Auto) For fully automatic selection of the screen. The camera will make a slight clicking noise as it toward (telephoto), and to zoom away from the subject, move it determines the scene. XXFrames displayed around any detected subjects indicate that they are displayed in focus. 3 Compose the shot. XXThe startup screen is displayed. 2 Enter mode. zzSet the mode dial to turn the camera on . Still Images Trying the Camera Out Movies Follow these instructions to . zzAim the camera at the subject. XXIcons representing the scene and image stabilization mode are...
Shooting (Smart Auto) For fully automatic selection of the screen. The camera will make a slight clicking noise as it toward (telephoto), and to zoom away from the subject, move it determines the scene. XXFrames displayed around any detected subjects indicate that they are displayed in focus. 3 Compose the shot. XXThe startup screen is displayed. 2 Enter mode. zzSet the mode dial to turn the camera on . Still Images Trying the Camera Out Movies Follow these instructions to . zzAim the camera at the subject. XXIcons representing the scene and image stabilization mode are...
User Guide
Page 21
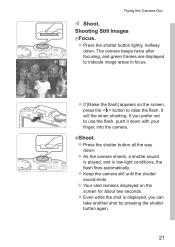
zzPress the shutter button lightly, halfway down . If you can take another shot by pressing the shutter button again. 21 zzKeep the camera still until the shutter sound ends. zzEven while the shot is played, and in focus. XXAs the camera shoots, a shutter sound is displayed, you prefer not to use the flash, push it down with your finger, into the camera. zzPress the shutter button all the way down . zzIf [Raise the flash] appears on the screen for about two seconds. XXYour shot remains displayed on the screen, press the button to indicate image areas in low-light conditions...
zzPress the shutter button lightly, halfway down . If you can take another shot by pressing the shutter button again. 21 zzKeep the camera still until the shutter sound ends. zzEven while the shot is played, and in focus. XXAs the camera shoots, a shutter sound is displayed, you prefer not to use the flash, push it down with your finger, into the camera. zzPress the shutter button all the way down . zzIf [Raise the flash] appears on the screen for about two seconds. XXYour shot remains displayed on the screen, press the button to indicate image areas in low-light conditions...