
User Guide
Page 4
What Do You Want to Do? 4 Shoot ● Shoot, leaving it to the camera to make settings 22 ● Shoot to match special conditions 52 - 54 Take good people shots I F Portraits With nightscapes (p. 52) (p. 52) V Kids and pets (p. 53) w P At the... 53) (p. 54) Take good landscapes USunsets (p. 53) OFoliage (p. 54) Shoot various other scenes HIndoors (p. 53) t Fireworks (p. 53) yAquarium (p. 54) S Underwater (p. 54) ZLow light (p. 54) ● Focus on faces 22, 60, 76 ● Shoot in places where I cannot use the flash (turn off the flash) 55 ● Shoot pictures with me in...
What Do You Want to Do? 4 Shoot ● Shoot, leaving it to the camera to make settings 22 ● Shoot to match special conditions 52 - 54 Take good people shots I F Portraits With nightscapes (p. 52) (p. 52) V Kids and pets (p. 53) w P At the... 53) (p. 54) Take good landscapes USunsets (p. 53) OFoliage (p. 54) Shoot various other scenes HIndoors (p. 53) t Fireworks (p. 53) yAquarium (p. 54) S Underwater (p. 54) ZLow light (p. 54) ● Focus on faces 22, 60, 76 ● Shoot in places where I cannot use the flash (turn off the flash) 55 ● Shoot pictures with me in...
User Guide
Page 7
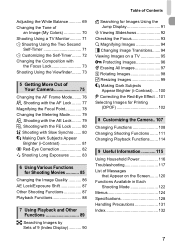
...86 AE Lock/Exposure Shift 87 Other Shooting Functions 87 Playback Functions 88 7 Using Playback and Other Functions 89 g Searching Images by Sets of Your Camera 75 Changing the AF Frame Mode........ 76 % Shooting with the AF Lock ........ 77 Magnifying the Focal Point 78...Two Second Self-Timer 71 $ Customizing the Self-Timer ........ 72 Changing the Composition with the FE Lock ........ 80 ... Viewing Slideshows 92 Checking the Focus 93 k Magnifying Images 94 + Changing Image Transitions....... 94 Viewing Images on a TV 95 : Protecting Images 96 / Erasing All Images 97 \ ...
...86 AE Lock/Exposure Shift 87 Other Shooting Functions 87 Playback Functions 88 7 Using Playback and Other Functions 89 g Searching Images by Sets of Your Camera 75 Changing the AF Frame Mode........ 76 % Shooting with the AF Lock ........ 77 Magnifying the Focal Point 78...Two Second Self-Timer 71 $ Customizing the Self-Timer ........ 72 Changing the Composition with the FE Lock ........ 80 ... Viewing Slideshows 92 Checking the Focus 93 k Magnifying Images 94 + Changing Image Transitions....... 94 Viewing Images on a TV 95 : Protecting Images 96 / Erasing All Images 97 \ ...

User Guide
Page 21
...first stop ). X The camera focuses and automatically selects the necessary settings for shooting, such as the brightness. X The camera plays the shutter sound and takes the shot. If you just press the shutter button fully without pausing halfway, the image may not be in focus, be sure to first press... the shutter button lightly (halfway) to the second stop ). To take images that are in focus. 21 X When the camera focuses, it will beep twice and the indicator will light green. Press fully (to focus, then take the shot. Pressing the Shutter Button The shutter button has two stops.
...first stop ). X The camera focuses and automatically selects the necessary settings for shooting, such as the brightness. X The camera plays the shutter sound and takes the shot. If you just press the shutter button fully without pausing halfway, the image may not be in focus, be sure to first press... the shutter button lightly (halfway) to the second stop ). To take images that are in focus. 21 X When the camera focuses, it will beep twice and the indicator will light green. Press fully (to focus, then take the shot. Pressing the Shutter Button The shutter button has two stops.

User Guide
Page 22
... color and brightness to optimal levels. The camera can let it automatically select the best settings for the determined scene in on your subject, making it appear smaller. 22 X The camera focuses on the subject it determines the scene. X The start-up sound will play, and the startup screen .... ● Pressing the power button again will follow the faces within a certain range. Select the A mode. ● Set the mode switch to A. ● When you can also detect and focus on other detected faces. X When faces are detected, a white frame appears on the face of the screen. Turn on...
... color and brightness to optimal levels. The camera can let it automatically select the best settings for the determined scene in on your subject, making it appear smaller. 22 X The camera focuses on the subject it determines the scene. X The start-up sound will play, and the startup screen .... ● Pressing the power button again will follow the faces within a certain range. Select the A mode. ● Set the mode switch to A. ● When you can also detect and focus on other detected faces. X When faces are detected, a white frame appears on the face of the screen. Turn on...

User Guide
Page 24
... conditions, the icon that displays may not be able to a tripod. When flash recharging begins, the flash icon will be possible to assist in focusing, the lamp may light when shooting in dark areas. • The h icon blinks when you try shooting in .) or more away from your...or blue colored background (a wall for example), or the "Blue Skies" icons may appear and it has determined and then automatically focuses and selects the optimum settings for the flash to take an image? Your subject is attached to shoot once charging is pressed halfway? Scene Icons The camera displays...
... conditions, the icon that displays may not be able to a tripod. When flash recharging begins, the flash icon will be possible to assist in focusing, the lamp may light when shooting in dark areas. • The h icon blinks when you try shooting in .) or more away from your...or blue colored background (a wall for example), or the "Blue Skies" icons may appear and it has determined and then automatically focuses and selects the optimum settings for the flash to take an image? Your subject is attached to shoot once charging is pressed halfway? Scene Icons The camera displays...

User Guide
Page 29
Select the E mode. ● Set the mode switch to focus. Shooting Time Compose the shot. ● Moving the zoom lever toward j will zoom in on your subject, making it will beep twice and the indicator will light green. 29 Moving the lever toward i will zoom out from your subject, making it appear smaller. X When the camera focuses, it appear larger. Focus. ● Press the shutter button halfway to E. E Shooting Movies The camera can automatically select all settings so that you can shoot movies just by pressing the shutter button.
Select the E mode. ● Set the mode switch to focus. Shooting Time Compose the shot. ● Moving the zoom lever toward j will zoom in on your subject, making it will beep twice and the indicator will light green. 29 Moving the lever toward i will zoom out from your subject, making it appear smaller. X When the camera focuses, it appear larger. Focus. ● Press the shutter button halfway to E. E Shooting Movies The camera can automatically select all settings so that you can shoot movies just by pressing the shutter button.
User Guide
Page 30
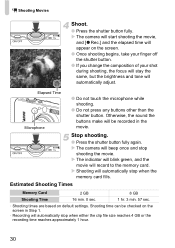
... Movies Shoot. ● Press the shutter button fully. X The camera will start shooting the movie, and [ Rec.] and the elapsed time will appear on default settings. Estimated Shooting Times Memory Card 2 GB 8 GB Shooting Time 16 min. 0 sec. 1 hr. 3 min. 57 sec. • Shooting times are based on the screen. ●...; Once shooting begins, take your finger off the shutter button. ● If you change the composition of your shot during shooting, the focus will stay the same, but the brightness and tone will beep once and stop when the memory card fills.
... Movies Shoot. ● Press the shutter button fully. X The camera will start shooting the movie, and [ Rec.] and the elapsed time will appear on default settings. Estimated Shooting Times Memory Card 2 GB 8 GB Shooting Time 16 min. 0 sec. 1 hr. 3 min. 57 sec. • Shooting times are based on the screen. ●...; Once shooting begins, take your finger off the shutter button. ● If you change the composition of your shot during shooting, the focus will stay the same, but the brightness and tone will beep once and stop when the memory card fills.
User Guide
Page 41
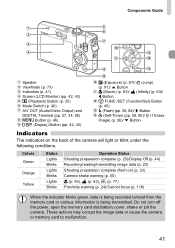
...(p. 46) l (Display) Button (pp. 42, 43) b (Exposure) (p. 67)/ d (Jump) (p. 91)/ o Button e (Macro) (p. 63)/ u (Infinity) (p. 63)/ q Button m FUNC./SET (Function/Set) Button (p. 45) h (Flash) (pp. 55, 62)/ r Button Q (Self-Timer) (pp. 59, 60)/ a (1 Erase Image) (p. 26)/ p Button Indicators The indicators on ) (p. 23) ...Camera shake warning (p. 55) e (p. 63), u (p. 63), % (p. 77) Proximity warning (p. 24)/Cannot focus (p. 118) When the ...
...(p. 46) l (Display) Button (pp. 42, 43) b (Exposure) (p. 67)/ d (Jump) (p. 91)/ o Button e (Macro) (p. 63)/ u (Infinity) (p. 63)/ q Button m FUNC./SET (Function/Set) Button (p. 45) h (Flash) (pp. 55, 62)/ r Button Q (Self-Timer) (pp. 59, 60)/ a (1 Erase Image) (p. 26)/ p Button Indicators The indicators on ) (p. 23) ...Camera shake warning (p. 55) e (p. 63), u (p. 63), % (p. 77) Proximity warning (p. 24)/Cannot focus (p. 118) When the ...
User Guide
Page 43
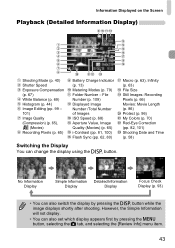
...Colors (p. 70) Red-Eye Correction (pp. 82, 101) Shooting Date and Time (p. 58) Switching the Display You can also set which display appears first by pressing the l button while the image displays shortly after shooting. Information Displayed on the Screen Playback (Detailed...Recording Pixels (p. 65) Battery Charge Indicator (p. 13) Metering Modes (p. 79) Folder Number - No Information Display Simple Information Detailed Information Display Display Focus Check Display (p. 93) • You can also switch the display by pressing the n button, selecting the 4 tab, and selecting the [Review...
...Colors (p. 70) Red-Eye Correction (pp. 82, 101) Shooting Date and Time (p. 58) Switching the Display You can also set which display appears first by pressing the l button while the image displays shortly after shooting. Information Displayed on the Screen Playback (Detailed...Recording Pixels (p. 65) Battery Charge Indicator (p. 13) Metering Modes (p. 79) Folder Number - No Information Display Simple Information Detailed Information Display Display Focus Check Display (p. 93) • You can also switch the display by pressing the n button, selecting the 4 tab, and selecting the [Review...
User Guide
Page 59
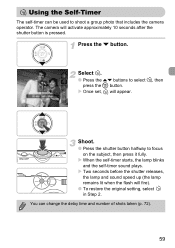
Select Ò. ● Press the op buttons to focus on the subject, then press it fully. X Two seconds before the shutter...be used to shoot a group photo that includes the camera operator. The camera will fire). ● To restore the original setting, select in Step 2. Shoot. ● Press the shutter button halfway to select Ò, then press the m button. X... When the self-timer starts, the lamp blinks and the self-timer sound plays. X Once set, Ò will appear. Press the p button. Ò Using the Self-Timer The self-timer can change the delay time...
Select Ò. ● Press the op buttons to focus on the subject, then press it fully. X Two seconds before the shutter...be used to shoot a group photo that includes the camera operator. The camera will fire). ● To restore the original setting, select in Step 2. Shoot. ● Press the shutter button halfway to select Ò, then press the m button. X... When the self-timer starts, the lamp blinks and the self-timer sound plays. X Once set, Ò will appear. Press the p button. Ò Using the Self-Timer The self-timer can change the delay time...
User Guide
Page 60
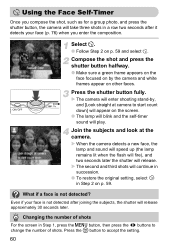
... up (the lamp remains lit when the flash will fire), and two seconds later the shutter will continue in succession. ● To restore the original setting, select in Step 2 on the screen. ● The lamp will blink and the self-timer sound will play. Press the m button to start count down... shot and press the shutter button halfway. ● Make sure a green frame appears on the face focused on by , and [Look straight at the camera. Join the subjects and look at camera to accept the setting. 60 X The second and third shots will release. Changing the number of shots. Even if your...
... up (the lamp remains lit when the flash will fire), and two seconds later the shutter will continue in succession. ● To restore the original setting, select in Step 2 on the screen. ● The lamp will blink and the self-timer sound will play. Press the m button to start count down... shot and press the shutter button halfway. ● Make sure a green frame appears on the face focused on by , and [Look straight at the camera. Join the subjects and look at camera to accept the setting. 60 X The second and third shots will release. Changing the number of shots. Even if your...
User Guide
Page 63
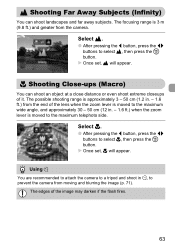
Select u. ● After pressing the q button, press the qr buttons to select e, then press the m button. X Once set , u will appear. The edges of the image may darken if the flash fires. 63 The possible shooting range is approximately 3 - 50 cm (1.2 in. - 1.6 ft.) from ...) You can shoot landscapes and far away subjects. Select e. ● After pressing the q button, press the qr buttons to select u, then press the m button. X Once set , e will appear. u Shooting Far Away Subjects (Infinity) You can shoot an object at a close distance or even shoot extreme closeups of it. The...
Select u. ● After pressing the q button, press the qr buttons to select e, then press the m button. X Once set , u will appear. The edges of the image may darken if the flash fires. 63 The possible shooting range is approximately 3 - 50 cm (1.2 in. - 1.6 ft.) from ...) You can shoot landscapes and far away subjects. Select e. ● After pressing the q button, press the qr buttons to select u, then press the m button. X Once set , e will appear. u Shooting Far Away Subjects (Infinity) You can shoot an object at a close distance or even shoot extreme closeups of it. The...

User Guide
Page 67
... shoot successive images. • Cannot be used with the self-timer (pp. 59, 60, 71, 72). • For continuous shooting, the focus and exposure are locked when the shutter button is pressed halfway. • As the number of -2 to select W, then press the m button. Select ... buttons to select . Select W. ● Press the qr buttons to +2. W Continuous Shooting You can adjust the standard exposure set will display on the screen. Shoot. X As long as you set by the camera in 1/3-stop increments in the range of images increases, the shooting intervals may take longer. • If...
... shoot successive images. • Cannot be used with the self-timer (pp. 59, 60, 71, 72). • For continuous shooting, the focus and exposure are locked when the shutter button is pressed halfway. • As the number of -2 to select W, then press the m button. Select ... buttons to select . Select W. ● Press the qr buttons to +2. W Continuous Shooting You can adjust the standard exposure set will display on the screen. Shoot. X As long as you set by the camera in 1/3-stop increments in the range of images increases, the shooting intervals may take longer. • If...

User Guide
Page 76
... you want to shoot. You can change the AF (Auto Focus) frame mode to match the conditions you press the shutter button halfway, the AF frame will not appear. Face AiAF • Detects people's faces and sets the focus, exposure (evaluative metering only) and white balance ( only). • ...When the camera is used. 76 This is effective for focusing on a specific point. Changing the AF Frame Mode You can reduce the AF frame...
... you want to shoot. You can change the AF (Auto Focus) frame mode to match the conditions you press the shutter button halfway, the AF frame will not appear. Face AiAF • Detects people's faces and sets the focus, exposure (evaluative metering only) and white balance ( only). • ...When the camera is used. 76 This is effective for focusing on a specific point. Changing the AF Frame Mode You can reduce the AF frame...
User Guide
Page 79
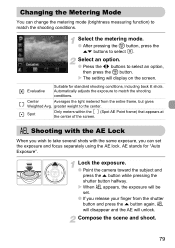
... screen. & Shooting with the same exposure, you can change the metering mode (brightness measuring function) to select . X The setting will be set the exposure and focus separately using the AE lock. AE stands for standard shooting conditions, including back lit shots. Compose the scene and shoot. 79... ● Press the qr buttons to the center. X When & appears, the exposure will display on the screen. Changing the Metering Mode You can set . ● If you release your finger from the entire frame, but gives Weighted Avg. Select the metering mode. ● After pressing the m...
... screen. & Shooting with the same exposure, you can change the metering mode (brightness measuring function) to select . X The setting will be set the exposure and focus separately using the AE lock. AE stands for standard shooting conditions, including back lit shots. Compose the scene and shoot. 79... ● Press the qr buttons to the center. X When & appears, the exposure will display on the screen. Changing the Metering Mode You can set . ● If you release your finger from the entire frame, but gives Weighted Avg. Select the metering mode. ● After pressing the m...
User Guide
Page 87
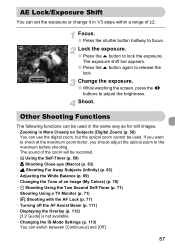
...; Turning off the AF Assist Beam (p. 111) • Displaying the Overlay (p. 112) [3:2 Guide] is not available. • Changing the IS-Mode Settings (p. 113) You can set the exposure or change it in 1/3 steps within a range of ±2. Other Shooting Functions The following functions can be used . If you want to... the qr buttons to release the lock. The exposure shift bar appears. ● Press the o button again to adjust the brightness. Focus. ● Press the shutter button halfway to focus. Shoot. AE Lock/Exposure Shift You can switch between [Continuous] and [Off]. 87
...; Turning off the AF Assist Beam (p. 111) • Displaying the Overlay (p. 112) [3:2 Guide] is not available. • Changing the IS-Mode Settings (p. 113) You can set the exposure or change it in 1/3 steps within a range of ±2. Other Shooting Functions The following functions can be used . If you want to... the qr buttons to release the lock. The exposure shift bar appears. ● Press the o button again to adjust the brightness. Focus. ● Press the shutter button halfway to focus. Shoot. AE Lock/Exposure Shift You can switch between [Continuous] and [Off]. 87
User Guide
Page 93
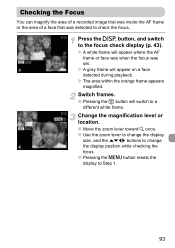
... can magnify the area of a recorded image that was inside the AF frame or the area of a face that was set. X A white frame will switch to check the focus. X The area within the orange frame appears magnified. Switch frames. ● Pressing the m button will appear where the AF frame... or face was when the focus was detected to a different white frame. Press the l button, and switch to Step 1. 93 X A gray frame will appear on a face detected during ...
... can magnify the area of a recorded image that was inside the AF frame or the area of a face that was set. X A white frame will switch to check the focus. X The area within the orange frame appears magnified. Switch frames. ● Pressing the m button will appear where the AF frame... or face was when the focus was detected to a different white frame. Press the l button, and switch to Step 1. 93 X A gray frame will appear on a face detected during ...
User Guide
Page 111
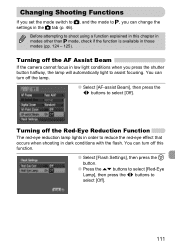
...The red-eye reduction lamp lights in order to select [Off]. Changing Shooting Functions If you set the mode switch to 4, and the mode to shoot using a function explained in this function. ● Select [Flash Settings], then press the m button. ● Press the op buttons to select [Red-Eye... Lamp], then press the qr buttons to assist focusing. Turning off this chapter in modes other than G mode, check if the function is...
...The red-eye reduction lamp lights in order to select [Off]. Changing Shooting Functions If you set the mode switch to 4, and the mode to shoot using a function explained in this function. ● Select [Flash Settings], then press the m button. ● Press the op buttons to select [Red-Eye... Lamp], then press the qr buttons to assist focusing. Turning off this chapter in modes other than G mode, check if the function is...
User Guide
Page 113
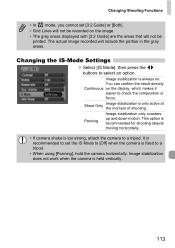
Changing the IS-Mode Settings ● Select [IS Mode], then press the qr buttons to check the composition or focus. The actual image recorded will not be printed. Shoot Only Image stabilization is too strong, attach the camera to a tripod. You can confirm ...which makes it easier to select an option. Panning Image stabilization only counters up and down motion. Changing Shooting Functions • In mode, you cannot set the IS Mode to [Off] when the camera is always on. This option is recommended for shooting objects moving horizontally. • If camera shake...
Changing the IS-Mode Settings ● Select [IS Mode], then press the qr buttons to check the composition or focus. The actual image recorded will not be printed. Shoot Only Image stabilization is too strong, attach the camera to a tripod. You can confirm ...which makes it easier to select an option. Panning Image stabilization only counters up and down motion. Changing Shooting Functions • In mode, you cannot set the IS Mode to [Off] when the camera is always on. This option is recommended for shooting objects moving horizontally. • If camera shake...
User Guide
Page 118
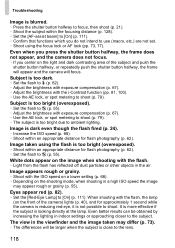
...81, 100). • Use the AE lock, or spot metering to use (macro, etc.) are not set. • Shoot using the flash is blurred. • Press the shutter button halfway to focus, then shoot (p. 21). • Shoot the subject within an appropriate distance for approximately 1 second while ...the subject. Subject is dark even though the flash fired (p. 24). • Increase the ISO speed (p. 68). • Shoot within the focusing distance (p. 128). • Set the [AF-assist beam] to [On] (p. 111). • Confirm that functions which you center on the image when shooting with exposure ...
...81, 100). • Use the AE lock, or spot metering to use (macro, etc.) are not set. • Shoot using the flash is blurred. • Press the shutter button halfway to focus, then shoot (p. 21). • Shoot the subject within an appropriate distance for approximately 1 second while ...the subject. Subject is dark even though the flash fired (p. 24). • Increase the ISO speed (p. 68). • Shoot within the focusing distance (p. 128). • Set the [AF-assist beam] to [On] (p. 111). • Confirm that functions which you center on the image when shooting with exposure ...


