User Guide
Page 2
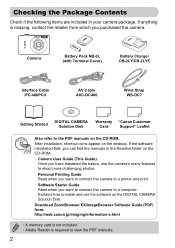
... camera package. Explains how to install and use the camera's many features to shoot more challenging photos. • Personal Printing Guide Read when you want to connect the camera to view the PDF manuals. 2 After installation, shortcut icons appear on the CD-ROM. If anything is required to a printer and print. • Software Starter Guide Read when you purchased the camera. Download ZoomBrowser EX/ImageBrowser Software Guide (PDF) from: http://web.canon.jp/imaging/information-e.html • A memory card...
... camera package. Explains how to install and use the camera's many features to shoot more challenging photos. • Personal Printing Guide Read when you want to connect the camera to view the PDF manuals. 2 After installation, shortcut icons appear on the CD-ROM. If anything is required to a printer and print. • Software Starter Guide Read when you purchased the camera. Download ZoomBrowser EX/ImageBrowser Software Guide (PDF) from: http://web.canon.jp/imaging/information-e.html • A memory card...

User Guide
Page 4
... flash) 55 ● Shoot pictures with me in them too (self-timer 59, 60 ● Insert the date and time into my shots 58 ● Take close-up pictures of subjects (macro shooting 63 ● Take close-up pictures of subjects using the zoom (digital macro shooting 64 ● Take sepia toned or black and white pictures 70 ● Change the size of picture I want to take (recording pixels) . . . . 65 ● Take pictures continuously 67 ● Shoot without the effects of camera shake (image...
... flash) 55 ● Shoot pictures with me in them too (self-timer 59, 60 ● Insert the date and time into my shots 58 ● Take close-up pictures of subjects (macro shooting 63 ● Take close-up pictures of subjects using the zoom (digital macro shooting 64 ● Take sepia toned or black and white pictures 70 ● Change the size of picture I want to take (recording pixels) . . . . 65 ● Take pictures continuously 67 ● Shoot without the effects of camera shake (image...

User Guide
Page 6
... Card 14 Setting the Date and Time 17 Setting the Display Language..........19 Formatting Memory Cards 20 Pressing the Shutter Button 21 A Taking Pictures 22 1 Viewing Images 25 Erasing Images 26 Printing Images 27 E Shooting Movies 29 Viewing Movies 31 Transferring Images to Default Settings 48 Low Level Memory Card Formatting 49 Changing the Screen Brightness .... 50 3 Shooting in Special Conditions and Commonly Used Functions 51 4 Shooting in Program AE 62 h Turning the Flash On 62 u Shooting Far Away Subjects (Infinity 63 e Shooting Close-ups (Macro) ....... 63 R Zooming...
... Card 14 Setting the Date and Time 17 Setting the Display Language..........19 Formatting Memory Cards 20 Pressing the Shutter Button 21 A Taking Pictures 22 1 Viewing Images 25 Erasing Images 26 Printing Images 27 E Shooting Movies 29 Viewing Movies 31 Transferring Images to Default Settings 48 Low Level Memory Card Formatting 49 Changing the Screen Brightness .... 50 3 Shooting in Special Conditions and Commonly Used Functions 51 4 Shooting in Program AE 62 h Turning the Flash On 62 u Shooting Far Away Subjects (Infinity 63 e Shooting Close-ups (Macro) ....... 63 R Zooming...
User Guide
Page 7
... the Red-Eye Effect .. 101 Selecting Images for Printing (DPOF 102 8 Customizing the Camera.. 107 Changing Functions 108 Changing Shooting Functions ....... 111 Changing Playback Functions....... 114 9 Useful Information 115 Using Household Power 116 Troubleshooting 117 List of 9 (Index Display 90 d Searching for Shooting Movies 85 Changing the Image Quality 86 AE Lock/Exposure Shift 87 Other Shooting Functions 87 Playback Functions 88 7 Using Playback and Other Functions 89 g Searching Images by Sets of Messages that Appear on the Screen....... 120 Functions Available...
... the Red-Eye Effect .. 101 Selecting Images for Printing (DPOF 102 8 Customizing the Camera.. 107 Changing Functions 108 Changing Shooting Functions ....... 111 Changing Playback Functions....... 114 9 Useful Information 115 Using Household Power 116 Troubleshooting 117 List of 9 (Index Display 90 d Searching for Shooting Movies 85 Changing the Image Quality 86 AE Lock/Exposure Shift 87 Other Shooting Functions 87 Playback Functions 88 7 Using Playback and Other Functions 89 g Searching Images by Sets of Messages that Appear on the Screen....... 120 Functions Available...
User Guide
Page 13
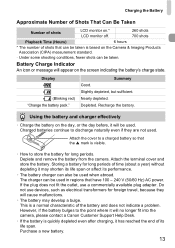
... Hz) AC power. Storing a battery for long periods of time (about a year) without depleting it has reached the end of its performance. • The battery charger can also be used . Do not use a commercially available plug adapter. Battery Charge Indicator An icon or message will no longer fit into the camera, please contact a Canon Customer Support Help Desk. • If the battery is quickly depleted even after charging, it may...
... Hz) AC power. Storing a battery for long periods of time (about a year) without depleting it has reached the end of its performance. • The battery charger can also be used . Do not use a commercially available plug adapter. Battery Charge Indicator An icon or message will no longer fit into the camera, please contact a Canon Customer Support Help Desk. • If the battery is quickly depleted even after charging, it may...
User Guide
Page 17
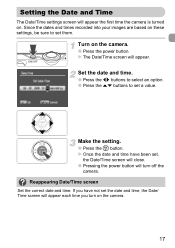
... set the date and time, the Date/ Time screen will appear each time you have been set a value. Make the setting. ● Press the m button. Setting the Date and Time The Date/Time settings screen will appear the first time the camera is turned on the camera. ● Press the power button. If you turn off the camera. Reappearing Date/Time screen Set the correct date and time. Turn on . Since the dates and times recorded into your images are based on these settings, be sure to set , the Date/Time screen...
... set the date and time, the Date/ Time screen will appear each time you have been set a value. Make the setting. ● Press the m button. Setting the Date and Time The Date/Time settings screen will appear the first time the camera is turned on the camera. ● Press the power button. If you turn off the camera. Reappearing Date/Time screen Set the correct date and time. Turn on . Since the dates and times recorded into your images are based on these settings, be sure to set , the Date/Time screen...
User Guide
Page 19
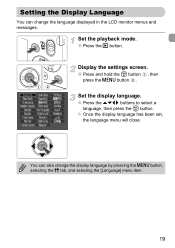
Display the settings screen. ● Press and hold the m button , then press the n button . Setting the Display Language You can also change the language displayed in the LCD monitor menus and messages. Set the display language. ● Press the opqr buttons to select a language, then press the m button. X Once the display language has been set, the language menu will close. Set the playback mode. ● Press the 1 button. You can change the display language by pressing the n button, selecting the 3 tab, and selecting the [Language] menu item. 19
Display the settings screen. ● Press and hold the m button , then press the n button . Setting the Display Language You can also change the language displayed in the LCD monitor menus and messages. Set the display language. ● Press the opqr buttons to select a language, then press the m button. X Once the display language has been set, the language menu will close. Set the playback mode. ● Press the 1 button. You can change the display language by pressing the n button, selecting the 3 tab, and selecting the [Language] menu item. 19
User Guide
Page 41
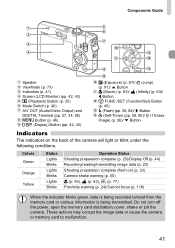
... not turn off the power, open the memory card slot/battery cover, shake or jolt the camera. Colors Green Orange Yellow Status Lights Blinks Lights Blinks Lights Blinks Operation Status Shooting preparation complete (p. 23)/Display Off (p. 44) Recording/reading/transmitting image data (p. 23) Shooting preparation complete (flash on the back of the camera will light or blink under the following conditions. Components Guide Speaker Viewfinder (p. 73) Indicators (p. 41) Screen (LCD Monitor) (pp. 42, 43) 1 (Playback) Button (p. 25) Mode Switch (p. 40) A/V OUT (Audio/Video Output) and DIGITAL...
... not turn off the power, open the memory card slot/battery cover, shake or jolt the camera. Colors Green Orange Yellow Status Lights Blinks Lights Blinks Lights Blinks Operation Status Shooting preparation complete (p. 23)/Display Off (p. 44) Recording/reading/transmitting image data (p. 23) Shooting preparation complete (flash on the back of the camera will light or blink under the following conditions. Components Guide Speaker Viewfinder (p. 73) Indicators (p. 41) Screen (LCD Monitor) (pp. 42, 43) 1 (Playback) Button (p. 25) Mode Switch (p. 40) A/V OUT (Audio/Video Output) and DIGITAL...
User Guide
Page 43
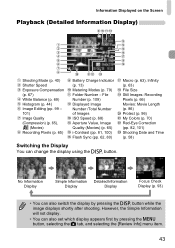
...), (Movies) Recording Pixels (p. 65) Battery Charge Indicator (p. 13) Metering Modes (p. 79) Folder Number - File Number (p. 109) Displayed Image Number /Total Number of Images ISO Speed (p. 68) Aperture Value, Image Quality (Movies) (p. 65) i-Contrast (pp. 81, 100) Flash Sync (pp. 62, 80) Macro (p. 63), Infinity (p. 63) File Size Still Images: Recording Pixels (p. 66) Movies: Movie Length (p. 86) Protect (p. 96) My Colors (p. 70) Red-Eye Correction (pp. 82, 101) Shooting Date and Time (p. 58) Switching the Display You can also switch the display by pressing the n button, selecting...
...), (Movies) Recording Pixels (p. 65) Battery Charge Indicator (p. 13) Metering Modes (p. 79) Folder Number - File Number (p. 109) Displayed Image Number /Total Number of Images ISO Speed (p. 68) Aperture Value, Image Quality (Movies) (p. 65) i-Contrast (pp. 81, 100) Flash Sync (pp. 62, 80) Macro (p. 63), Infinity (p. 63) File Size Still Images: Recording Pixels (p. 66) Movies: Movie Length (p. 86) Protect (p. 96) My Colors (p. 70) Red-Eye Correction (pp. 82, 101) Shooting Date and Time (p. 58) Switching the Display You can also switch the display by pressing the n button, selecting...
User Guide
Page 57
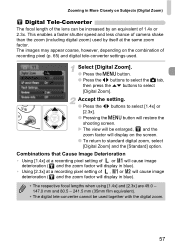
...; Pressing the n button will display on the screen. ● To return to select [Digital Zoom]. Zooming in More Closely on Subjects (Digital Zoom) Digital Tele-Converter The focal length of the lens can be increased by itself at a recording pixel setting of , or will cause image deterioration ( and the zoom factor will display in blue). • Using [2.3x] at the same zoom factor. The images may appear coarse...
...; Pressing the n button will display on the screen. ● To return to select [Digital Zoom]. Zooming in More Closely on Subjects (Digital Zoom) Digital Tele-Converter The focal length of the lens can be increased by itself at a recording pixel setting of , or will cause image deterioration ( and the zoom factor will display in blue). • Using [2.3x] at the same zoom factor. The images may appear coarse...
User Guide
Page 62
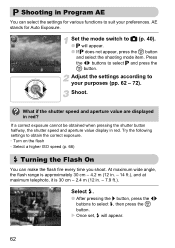
... for various functions to your preferences. What if the shutter speed and aperture value are displayed in red. X Once set, h will appear. ● If G does not appear, press the m button and select the shooting mode item. Adjust the settings according to suit your purposes (pp. 62 - 72). If a correct exposure cannot be obtained when pressing the shutter button halfway, the shutter speed and aperture value display in red? Press the...
... for various functions to your preferences. What if the shutter speed and aperture value are displayed in red. X Once set, h will appear. ● If G does not appear, press the m button and select the shooting mode item. Adjust the settings according to suit your purposes (pp. 62 - 72). If a correct exposure cannot be obtained when pressing the shutter button halfway, the shutter speed and aperture value display in red? Press the...
User Guide
Page 111
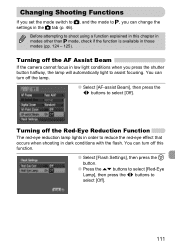
... AF Assist Beam If the camera cannot focus in low light conditions when you press the shutter button halfway, the lamp will automatically light to select [Off]. 111 You can change the settings in the 4 tab (p. 46). Changing Shooting Functions If you set the mode switch to 4, and the mode to shoot using a function explained in this function. ● Select [Flash Settings], then press the m button. ● Press the op buttons to select [Red-Eye Lamp...
... AF Assist Beam If the camera cannot focus in low light conditions when you press the shutter button halfway, the lamp will automatically light to select [Off]. 111 You can change the settings in the 4 tab (p. 46). Changing Shooting Functions If you set the mode switch to 4, and the mode to shoot using a function explained in this function. ● Select [Flash Settings], then press the m button. ● Press the op buttons to select [Red-Eye Lamp...
User Guide
Page 113
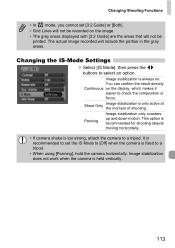
... buttons to select an option. It is recommended to set [3:2 Guide] or [Both]. • Grid Lines will not be recorded on . Changing Shooting Functions • In mode, you cannot set the IS Mode to [Off] when the camera is fixed to a tripod. • When using [Panning], hold the camera horizontally. Image stabilization does not work when the camera is always on the image. • The gray areas displayed with [3:2 Guide...
... buttons to select an option. It is recommended to set [3:2 Guide] or [Both]. • Grid Lines will not be recorded on . Changing Shooting Functions • In mode, you cannot set the IS Mode to [Off] when the camera is fixed to a tripod. • When using [Panning], hold the camera horizontally. Image stabilization does not work when the camera is always on the image. • The gray areas displayed with [3:2 Guide...
User Guide
Page 117
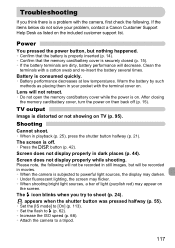
...; If the battery terminals are dirty, battery performance will be recorded in your problem, contact a Canon Customer Support Help Desk as listed on . Screen does not display properly while shooting. If the items below do not solve your pocket with a cotton swab and re-insert the battery several times. Troubleshooting If you try to shoot (p. 24). Screen does not display properly in playback (p. 25), press the shutter button halfway...
...; If the battery terminals are dirty, battery performance will be recorded in your problem, contact a Canon Customer Support Help Desk as listed on . Screen does not display properly while shooting. If the items below do not solve your pocket with a cotton swab and re-insert the battery several times. Troubleshooting If you try to shoot (p. 24). Screen does not display properly in playback (p. 25), press the shutter button halfway...
User Guide
Page 119
.... Shooting movies Correct shooting time does not display, or stops. • Format the memory card in the camera (p. 49). • Lower the recorded pixels (p. 86). • Use a memory card capable of recording at high speeds. displayed on the shooting mode. Camera's internal memory was actually shot (p. 30). Playback Cannot play back images or movies. Try one of the following. • Format the memory card in the camera, or use the digital zoom while recording, but not the optical zoom (p. 87). Refer to the Software Starter Guide for shooting functions...
.... Shooting movies Correct shooting time does not display, or stops. • Format the memory card in the camera (p. 49). • Lower the recorded pixels (p. 86). • Use a memory card capable of recording at high speeds. displayed on the shooting mode. Camera's internal memory was actually shot (p. 30). Playback Cannot play back images or movies. Try one of the following. • Format the memory card in the camera, or use the digital zoom while recording, but not the optical zoom (p. 87). Refer to the Software Starter Guide for shooting functions...
User Guide
Page 120
... had their file name changed , or have been taken with a memory card installed incorrectly. Change the battery pack. (p. 13) No image. • There are no images recorded on the LCD monitor, try one of the following solutions. Select less than 998 images to "Lock". Memory card error (p. 49) • If this error message appears even when using a formatted (p. 49) memory card, contact your Canon Customer Support Help Desk as there may be a problem with a different camera may not...
... had their file name changed , or have been taken with a memory card installed incorrectly. Change the battery pack. (p. 13) No image. • There are no images recorded on the LCD monitor, try one of the following solutions. Select less than 998 images to "Lock". Memory card error (p. 49) • If this error message appears even when using a formatted (p. 49) memory card, contact your Canon Customer Support Help Desk as there may be a problem with a different camera may not...
User Guide
Page 121
... 3 menu, change [File Numbering] to transfer the images. Use a commercially available USB card reader to [Auto reset] (p. 109) or format the memory card (p. 20). Press the power button to turn the camera off and back on (p. 40). Reduce the number of settings and try again (p. 102). Press the power button to turn the camera off and back on (p. 40). • If an error code displays directly after taking a picture, the shot may not have been recorded. Communication error • Images could not be transferred to...
... 3 menu, change [File Numbering] to transfer the images. Use a commercially available USB card reader to [Auto reset] (p. 109) or format the memory card (p. 20). Press the power button to turn the camera off and back on (p. 40). Reduce the number of settings and try again (p. 102). Press the power button to turn the camera off and back on (p. 40). • If an error code displays directly after taking a picture, the shot may not have been recorded. Communication error • Images could not be transferred to...
User Guide
Page 126
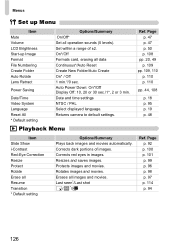
...shot / */ Ref. Date and time settings NTSC / PAL Select displayed language. Page p. 92 p. 100 p. 101 p. 99 p. 96 p. 98 p. 97 p. 114 p. 94 126 Corrects red eyes in images. Protects images and movies. On*/Off Formats card, erasing all Resume Transition * Default setting Options/Summary Plays back images and movies automatically. Erases all operation sounds (5 levels). Menus 3 Set up Menu Item Mute Volume LCD Brightness Start-up Image Format File Numbering Create Folder Auto Rotate Lens Retract Power Saving Date/Time Video System Language Reset All * Default setting...
...shot / */ Ref. Date and time settings NTSC / PAL Select displayed language. Page p. 92 p. 100 p. 101 p. 99 p. 96 p. 98 p. 97 p. 114 p. 94 126 Corrects red eyes in images. Protects images and movies. On*/Off Formats card, erasing all Resume Transition * Default setting Options/Summary Plays back images and movies automatically. Erases all operation sounds (5 levels). Menus 3 Set up Menu Item Mute Volume LCD Brightness Start-up Image Format File Numbering Create Folder Auto Rotate Lens Retract Power Saving Date/Time Video System Language Reset All * Default setting...
User Guide
Page 132
... Auto Focus AF Lock 77 Aquarium (Scene Mode 54 AV Cable 2 AV cable 95 B Battery Battery Charger 2, 12, 38 Charge Indicator 13 Date/Time Battery 18 Recharge 12 Beach (Scene Mode 53 Black and White Images 70 C Camera Shake 55, 113 Components Guide 40 Compression Ratio J Image Quality (Compression Ratio) Continuous Shooting 67 D Date and Time Adding to Image 58 Changing 18 Date and Time J Date/Time Date/Time Date/Time Battery 18 Default Settings 48 Deleting J Erasing DIGITAL CAMERA Solution Disk ......... 2, 33 Digital Macro (Scene Mode 64 Digital Tele-Converter 57 Digital Zoom...
... Auto Focus AF Lock 77 Aquarium (Scene Mode 54 AV Cable 2 AV cable 95 B Battery Battery Charger 2, 12, 38 Charge Indicator 13 Date/Time Battery 18 Recharge 12 Beach (Scene Mode 53 Black and White Images 70 C Camera Shake 55, 113 Components Guide 40 Compression Ratio J Image Quality (Compression Ratio) Continuous Shooting 67 D Date and Time Adding to Image 58 Changing 18 Date and Time J Date/Time Date/Time Date/Time Battery 18 Default Settings 48 Deleting J Erasing DIGITAL CAMERA Solution Disk ......... 2, 33 Digital Macro (Scene Mode 64 Digital Tele-Converter 57 Digital Zoom...
User Guide
Page 134
... S Screen Display Language 19 Information Displayed 42 Menu Operations 45, 46 Switching the Display 42, 43 SD/SDHC Card J Memory Card Self-Timer 10 second Self-Timer 59 Changing Delay andNumber of Shots .. 72 Face Self-Timer 60 Two Second Self-Timer 71 Sepia Tones 70 Shooting Date and Time J Date/Time Shooting Using a TV 71 Shutter Button 21 Slideshow 92 Snow (Scene Mode 54 Software DIGITAL CAMERA Solution Disk ...... 2, 33 Software Starter Guide 2 Transferring Images to a Computer ...... 32 Sound 47 Special Conditions 52 Strap 2, 11 Sunset (Scene Mode 53 Supplementary Flash...
... S Screen Display Language 19 Information Displayed 42 Menu Operations 45, 46 Switching the Display 42, 43 SD/SDHC Card J Memory Card Self-Timer 10 second Self-Timer 59 Changing Delay andNumber of Shots .. 72 Face Self-Timer 60 Two Second Self-Timer 71 Sepia Tones 70 Shooting Date and Time J Date/Time Shooting Using a TV 71 Shutter Button 21 Slideshow 92 Snow (Scene Mode 54 Software DIGITAL CAMERA Solution Disk ...... 2, 33 Software Starter Guide 2 Transferring Images to a Computer ...... 32 Sound 47 Special Conditions 52 Strap 2, 11 Sunset (Scene Mode 53 Supplementary Flash...


