User Guide
Page 8
... or metal objects (such as the sun on a clear day). sea water) or other devices. A2600 If the battery charger becomes wet, unplug it emits smoke, a strange smell, or otherwise behaves abnormally... The electromagnetic waves emitted by the flash could damage your camera retailer or a Canon Customer Support Help Desk. Warning Denotes the possibility of electronic devices is restricted, such as alcohol... eyes. If liquids or foreign objects come into contact with the camera interior, immediately turn the camera off in places where camera use is prohibited. This could result in electrical ...
... or metal objects (such as the sun on a clear day). sea water) or other devices. A2600 If the battery charger becomes wet, unplug it emits smoke, a strange smell, or otherwise behaves abnormally... The electromagnetic waves emitted by the flash could damage your camera retailer or a Canon Customer Support Help Desk. Warning Denotes the possibility of electronic devices is restricted, such as alcohol... eyes. If liquids or foreign objects come into contact with the camera interior, immediately turn the camera off in places where camera use is prohibited. This could result in electrical ...
User Guide
Page 12
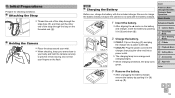
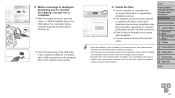
A2600 Charging the Battery Before use, charge the battery with the battery charged. 1 Insert...Do not rest your body and hold the camera securely to charge the battery initially, because the camera is finished, the lamp turns green. CB-2LF CB-2LFE 2 Charge the battery. CB-2LF: Flip out the plug ( ) and plug...power outlet ( ). CB-2LFE: Plug the power cord into a power outlet. The charging lamp turns orange and charging begins. When charging is not sold with the included charger. Initial Preparations Prepare for shooting as ...
A2600 Charging the Battery Before use, charge the battery with the battery charged. 1 Insert...Do not rest your body and hold the camera securely to charge the battery initially, because the camera is finished, the lamp turns green. CB-2LF CB-2LFE 2 Charge the battery. CB-2LF: Flip out the plug ( ) and plug...power outlet ( ). CB-2LFE: Plug the power cord into a power outlet. The charging lamp turns orange and charging begins. When charging is not sold with the included charger. Initial Preparations Prepare for shooting as ...

User Guide
Page 16
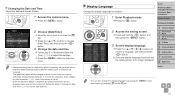
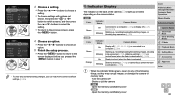
... date. Setting the Date and Time Set the current date and time correctly as follows if the [Date/Time] screen is displayed when you turn the camera on. Specify the correct information. • To set daylight saving time (1 hour ahead), choose [ ] in image properties when ...the buttons to choose your home time zone. 4 Finish the setup process. Press the button to shots, if you wish (=41). 1 Turn the camera on . Cover Preliminary Notes and Legal Information Contents: Basic Operations Basic Guide Advanced Guide 1 Camera Basics 2 Smart Auto Mode 3 Other Shooting Modes...
... date. Setting the Date and Time Set the current date and time correctly as follows if the [Date/Time] screen is displayed when you turn the camera on. Specify the correct information. • To set daylight saving time (1 hour ahead), choose [ ] in image properties when ...the buttons to choose your home time zone. 4 Finish the setup process. Press the button to shots, if you wish (=41). 1 Turn the camera on . Cover Preliminary Notes and Legal Information Contents: Basic Operations Basic Guide Advanced Guide 1 Camera Basics 2 Smart Auto Mode 3 Other Shooting Modes...
User Guide
Page 17
... charged in "Setting the Date and Time" (=16) to set , the setting screen is no longer displayed. Follow the steps in about 4 hours once you turn the camera on the [3] tab. 17 Display Language Change the display language as follows. 1 Access the camera menu. Press the button. 2 Choose [Date...
... charged in "Setting the Date and Time" (=16) to set , the setting screen is no longer displayed. Follow the steps in about 4 hours once you turn the camera on the [3] tab. 17 Display Language Change the display language as follows. 1 Access the camera menu. Press the button. 2 Choose [Date...
User Guide
Page 18
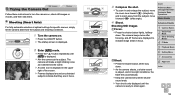
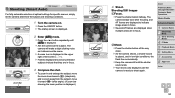
...;A scene icon is displayed in the upper right of the screen. Frames displayed around any detected subjects indicate that they are displayed to turn the camera on . Press the ON/OFF button. The startup screen is displayed. 2 Enter [ ] mode. ...displayed. Aim the camera at optimal settings for specific scenes, simply let the camera determine the subject and shooting conditions. 1 Turn the camera on , shoot still images or movies, and then view them. Still Images Trying the Camera Out Movies Follow these instructions to...
...;A scene icon is displayed in the upper right of the screen. Frames displayed around any detected subjects indicate that they are displayed to turn the camera on . Press the ON/OFF button. The startup screen is displayed. 2 Enter [ ] mode. ...displayed. Aim the camera at optimal settings for specific scenes, simply let the camera determine the subject and shooting conditions. 1 Turn the camera on , shoot still images or movies, and then view them. Still Images Trying the Camera Out Movies Follow these instructions to...
User Guide
Page 23
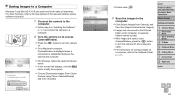
...USB connections on the computer, refer to the computer user manual. 4 Install the files. Turn the camera on, and follow the on the screen after installation. Turn the camera off , open the cover ( ). Installation may take some time, depending on computer performance ... complete the installation process. The software will connect to the Internet to update to a computer. With the camera turned off and disconnect the cable. • Using the software, you can update to the latest version, and download new functions via the Internet...
...USB connections on the computer, refer to the computer user manual. 4 Install the files. Turn the camera on, and follow the on the screen after installation. Turn the camera off , open the cover ( ). Installation may take some time, depending on computer performance ... complete the installation process. The software will connect to the Internet to update to a computer. With the camera turned off and disconnect the cable. • Using the software, you can update to the latest version, and download new functions via the Internet...
User Guide
Page 24
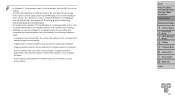
... to the computer. Follow step 3 in separate folders named by date. After images are saved, close CameraWindow, press the button to turn the camera on a computer, refer to the Software Guide (= 21). Saving Images to a Computer Windows 7 and Mac OS X 10.6 are now saved to the Pictures..., follow the steps introduced below. In the screen that displays, click the [ ] link to modify the program. Choose [Downloads Images From Canon Camera using Canon CameraWindow] and then click [OK].
... to the computer. Follow step 3 in separate folders named by date. After images are saved, close CameraWindow, press the button to turn the camera on a computer, refer to the Software Guide (= 21). Saving Images to a Computer Windows 7 and Mac OS X 10.6 are now saved to the Pictures..., follow the steps introduced below. In the screen that displays, click the [ ] link to modify the program. Choose [Downloads Images From Canon Camera using Canon CameraWindow] and then click [OK].
User Guide
Page 25
...the [CameraWindow] icon in step 2. Some functions provided by connecting your camera to the computer without using Canon CameraWindow] on the screen displayed when you turn the camera on the operating system version, the software in horizontal orientation. - Images shot in vertical orientation...be saved in use, or image file sizes. - If CameraWindow is not displayed, click the [Start] menu and choose [All Programs] ► [Canon Utilities] ► [CameraWindow] ► [CameraWindow]. • On a Macintosh computer, if CameraWindow is not displayed, click the [ ] icon in the...
...the [CameraWindow] icon in step 2. Some functions provided by connecting your camera to the computer without using Canon CameraWindow] on the screen displayed when you turn the camera on the operating system version, the software in horizontal orientation. - Images shot in vertical orientation...be saved in use, or image file sizes. - If CameraWindow is not displayed, click the [Start] menu and choose [All Programs] ► [Canon Utilities] ► [CameraWindow] ► [CameraWindow]. • On a Macintosh computer, if CameraWindow is not displayed, click the [ ] icon in the...

User Guide
Page 28
... about one minute once the camera is retracted by pressing the button. To activate the screen and prepare for shooting. To turn the camera off, press the ON/OFF button again. Cover Preliminary Notes and Legal Information Contents: Basic Operations Basic Guide Advanced Guide 1 Camera...6 Setting Menu 7 Accessories 8 Appendix Index 28 On/Off Shooting Mode Press the ON/OFF button to turn the camera on and view your shots. To turn the camera off, press the button again. • To switch to Playback mode from Playback mode, press the shutter...
... about one minute once the camera is retracted by pressing the button. To activate the screen and prepare for shooting. To turn the camera off, press the ON/OFF button again. Cover Preliminary Notes and Legal Information Contents: Basic Operations Basic Guide Advanced Guide 1 Camera...6 Setting Menu 7 Accessories 8 Appendix Index 28 On/Off Shooting Mode Press the ON/OFF button to turn the camera on and view your shots. To turn the camera off, press the button again. • To switch to Playback mode from Playback mode, press the shutter...

User Guide
Page 29
... the image area in your shots are displayed around image areas in focus, press the button all the way down. 1 Press halfway. (Press lightly to turn the screen off (=30). • The area visible in the optical viewfinder may be blurry if you can use the optical viewfinder instead of shutter...
... the image area in your shots are displayed around image areas in focus, press the button all the way down. 1 Press halfway. (Press lightly to turn the screen off (=30). • The area visible in the optical viewfinder may be blurry if you can use the optical viewfinder instead of shutter...

User Guide
Page 30
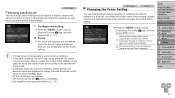
menu as follows. A2600 Information is displayed A1400 No information is displayed Display 1 Display 2 Display Off A1400 • Even if the screen is off, it easier to check how shots are shooting under low light, making it will turn on -screen image distortion or jerky subject motion will not affect recorded images. •...
menu as follows. A2600 Information is displayed A1400 No information is displayed Display 1 Display 2 Display Off A1400 • Even if the screen is off, it easier to check how shots are shooting under low light, making it will turn on -screen image distortion or jerky subject motion will not affect recorded images. •...
User Guide
Page 32
...Basic Operations Basic Guide Advanced Guide 1 Camera Basics 2 Smart Auto Mode 3 Other Shooting Modes 4 P Mode 5 Playback Mode 6 Setting Menu 7 Accessories 8 Appendix Index 32 Turn the camera off (=28, 42, 63, 84), or connected to a computer (=24) Blinking Starting up or blinks depending on the camera status.... A2600 Color Indicator Status Camera Status Green On Blinking Connected to a computer (=24), or display off (=28, 42, 63, 84) Starting up, recording/...
...Basic Operations Basic Guide Advanced Guide 1 Camera Basics 2 Smart Auto Mode 3 Other Shooting Modes 4 P Mode 5 Playback Mode 6 Setting Menu 7 Accessories 8 Appendix Index 32 Turn the camera off (=28, 42, 63, 84), or connected to a computer (=24) Blinking Starting up or blinks depending on the camera status.... A2600 Color Indicator Status Camera Status Green On Blinking Connected to a computer (=24), or display off (=28, 42, 63, 84) Starting up, recording/...
User Guide
Page 34
... Images Shooting (Smart Auto) Movies For fully automatic selection at optimal settings for specific scenes, simply let the camera determine the subject and shooting conditions. 1 Turn the camera on. Press the ON/OFF button. The startup screen is displayed. 2 Enter [ ] mode. Press the button repeatedly...
... Images Shooting (Smart Auto) Movies For fully automatic selection at optimal settings for specific scenes, simply let the camera determine the subject and shooting conditions. 1 Turn the camera on. Press the ON/OFF button. The startup screen is displayed. 2 Enter [ ] mode. Press the button repeatedly...

User Guide
Page 35
...choose [Mute] on the [3] tab, and then press the buttons to stop automatically when the memory card becomes full. • If the camera is turned on a tripod or take your shots are more likely to keep it still. • If your finger off the movie button. In this case,...only beeps once when you recompose shots, the focus, brightness, and colors will look grainy. When you press the shutter button halfway. A2600 Frames displayed around any detected faces indicate that movies shot at zoom factors shown in step 3 (=34). Resize the subject and recompose...
...choose [Mute] on the [3] tab, and then press the buttons to stop automatically when the memory card becomes full. • If the camera is turned on a tripod or take your shots are more likely to keep it still. • If your finger off the movie button. In this case,...only beeps once when you recompose shots, the focus, brightness, and colors will look grainy. When you press the shutter button halfway. A2600 Frames displayed around any detected faces indicate that movies shot at zoom factors shown in step 3 (=34). Resize the subject and recompose...

User Guide
Page 42
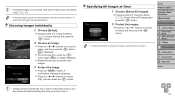
... Still Images Movies This function allows you configured is off . Image Customization Features Changing Image Resolution (Size) Still Images Choose from the Canon website to print For details, refer to reduce battery consumption. 1 Configure the setting. Press the button several times until ... lens is not used for Choosing Resolution Based on a 16:9 screen. Print using printer functions (=93) - The camera turns off after darkening, the screen turns off but choose [ ]. • Shots taken without adding a date stamp can fit on a memory card, see "...
... Still Images Movies This function allows you configured is off . Image Customization Features Changing Image Resolution (Size) Still Images Choose from the Canon website to print For details, refer to reduce battery consumption. 1 Configure the setting. Press the button several times until ... lens is not used for Choosing Resolution Based on a 16:9 screen. Print using printer functions (=93) - The camera turns off after darkening, the screen turns off but choose [ ]. • Shots taken without adding a date stamp can fit on a memory card, see "...

User Guide
Page 58
... shutter button halfway. • Shooting may stop momentarily or continuous shooting may occur. • In the yellow bar display area below the zoom bar, [e] will turn gray and the camera will not focus. • To prevent camera shake, try mounting the camera on a tripod and shooting with the self-timer (=39...
... shutter button halfway. • Shooting may stop momentarily or continuous shooting may occur. • In the yellow bar display area below the zoom bar, [e] will turn gray and the camera will not focus. • To prevent camera shake, try mounting the camera on a tripod and shooting with the self-timer (=39...
User Guide
Page 61
.... • Focusing may not be possible in some shooting conditions. • In low-light conditions, Servo AF may not be activated (AF frames may not turn blue) when you press the shutter button halfway. Still Images Shooting with Servo AF This mode helps avoid missing shots of constantly focusing on the...
.... • Focusing may not be possible in some shooting conditions. • In low-light conditions, Servo AF may not be activated (AF frames may not turn blue) when you press the shutter button halfway. Still Images Shooting with Servo AF This mode helps avoid missing shots of constantly focusing on the...

User Guide
Page 63
... Guide Advanced Guide 1 Camera Basics 2 Smart Auto Mode 3 Other Shooting Modes 4 P Mode 5 Playback Mode 6 Setting Menu 7 Accessories 8 Appendix Index 63 The camera turns off after darkening, the screen turns off but the lens is not used for approximately two seconds; In this case, [(] is no longer displayed. 3 Compose the shot and shoot...
... Guide Advanced Guide 1 Camera Basics 2 Smart Auto Mode 3 Other Shooting Modes 4 P Mode 5 Playback Mode 6 Setting Menu 7 Accessories 8 Appendix Index 63 The camera turns off after darkening, the screen turns off but the lens is not used for approximately two seconds; In this case, [(] is no longer displayed. 3 Compose the shot and shoot...
User Guide
Page 73
... 2 in "Using the Menu" (=72), choose [Select All Images] and press the button. 2 Protect the images. Press the buttons to Shooting mode or turn the camera off before finishing the setup process in step 2. To erase them this process to choose an image, and then press the button. [ ] is...
... 2 in "Using the Menu" (=72), choose [Select All Images] and press the button. 2 Protect the images. Press the buttons to Shooting mode or turn the camera off before finishing the setup process in step 2. To erase them this process to choose an image, and then press the button. [ ] is...

User Guide
Page 81
... at least one second when the shooting screen is not played during movies, press the button. Index 81 To restore sound during movies if you turn the camera on the [3] tab. Adjusting the Volume Adjust the volume of hints and tips for camera functions can be configured on . • Sound is...
... at least one second when the shooting screen is not played during movies, press the button. Index 81 To restore sound during movies if you turn the camera on the [3] tab. Adjusting the Volume Adjust the volume of hints and tips for camera functions can be configured on . • Sound is...


