User Guide
Page 3
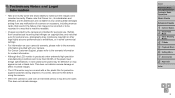
.... This does not indicate camera damage or affect recorded images. • The LCD monitor may be defective or may appear as red or black dots. If covered, remove the film before using the camera. • When the camera is machine readable. •... 5 Playback Mode 6 Setting Menu 7 Accessories 8 Appendix Index 3 Refrain from any malfunction of a camera or accessory, including memory cards, that Canon Inc., its subsidiaries and affiliates, and its distributors are intended for any consequential damages arising from unauthorized recording that infringes on your camera. Please note...
.... This does not indicate camera damage or affect recorded images. • The LCD monitor may be defective or may appear as red or black dots. If covered, remove the film before using the camera. • When the camera is machine readable. •... 5 Playback Mode 6 Setting Menu 7 Accessories 8 Appendix Index 3 Refrain from any malfunction of a camera or accessory, including memory cards, that Canon Inc., its subsidiaries and affiliates, and its distributors are intended for any consequential damages arising from unauthorized recording that infringes on your camera. Please note...

User Guide
Page 35
... Images/Movies Finish shooting. Press the movie button again to assist in focusing, the lamp may be blurred by camera shake. A2600 Frames displayed around any detected faces indicate that the sound of the screen indicate image areas not recorded. To activate sounds again,...movies shot at zoom factors shown in low-light conditions. For details on the flash range, see "Shooting Range" (=119). • To reduce red-eye and to stop automatically when the memory card becomes full. • If the camera is turned on a tripod or take your shots are...
... Images/Movies Finish shooting. Press the movie button again to assist in focusing, the lamp may be blurred by camera shake. A2600 Frames displayed around any detected faces indicate that the sound of the screen indicate image areas not recorded. To activate sounds again,...movies shot at zoom factors shown in low-light conditions. For details on the flash range, see "Shooting Range" (=119). • To reduce red-eye and to stop automatically when the memory card becomes full. • If the camera is turned on a tripod or take your shots are...
User Guide
Page 43
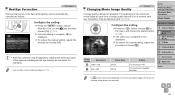
...61472;The option you configured is displayed. To restore the original setting, repeat this process but choose [Off]. • Red-eye correction may be automatically corrected as red pupils, for example). • You can be applied to image areas other than eyes (if the camera misinterprets... on the top and bottom edges of image quality that occurs in the flash photography can also correct existing images (=78). Red-Eye Correction Still Images Red-eye that will fit on the maximum movie length at each level of the screen indicate image areas not recorded. 43
...61472;The option you configured is displayed. To restore the original setting, repeat this process but choose [Off]. • Red-eye correction may be automatically corrected as red pupils, for example). • You can be applied to image areas other than eyes (if the camera misinterprets... on the top and bottom edges of image quality that occurs in the flash photography can also correct existing images (=78). Red-Eye Correction Still Images Red-eye that will fit on the maximum movie length at each level of the screen indicate image areas not recorded. 43

User Guide
Page 44
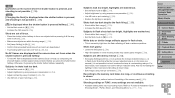
..., see "MENU Menu" (=31). Helpful Shooting Features Checking for the final shot. • A frame is displayed when the camera detects that lights up to reduce red-eye when you have selected [2 sec.], [4 sec.], [8 sec.], or [Hold] in low-light conditions with the flash. For instructions on the [4] tab, and then choose...
..., see "MENU Menu" (=31). Helpful Shooting Features Checking for the final shot. • A frame is displayed when the camera detects that lights up to reduce red-eye when you have selected [2 sec.], [4 sec.], [8 sec.], or [Hold] in low-light conditions with the flash. For instructions on the [4] tab, and then choose...

User Guide
Page 78
... Choose an image. Press the buttons to choose an image. 3 Correct the image. Press the button. Red-eye detected by red-eye. Follow the steps in "Magnifying Images" (= 71). 4 Save as a new image and review. Press the buttons to choose... [New File], and then press the button. The image is now saved as needed. Correcting Red-Eye Still Images Automatically corrects images affected by the camera is also automatically corrected, to make subjects stand out better. Cover Preliminary Notes...
... Choose an image. Press the buttons to choose an image. 3 Correct the image. Press the button. Red-eye detected by red-eye. Follow the steps in "Magnifying Images" (= 71). 4 Save as a new image and review. Press the buttons to choose... [New File], and then press the button. The image is now saved as needed. Correcting Red-Eye Still Images Automatically corrects images affected by the camera is also automatically corrected, to make subjects stand out better. Cover Preliminary Notes...

User Guide
Page 94
Both Off Default Off On Red-Eye 1 Matches current printer settings. No. Specify a desired image area to print under optimal settings. Specify the paper size, layout, and other details (=95). Still ... 5 Playback Mode 6 Setting Menu 7 Accessories 8 Appendix Index 94 Prints images with the date added. Uses information from the time of shooting to print (=94). - Corrects red-eye. Prints images with both the date and file number added. - Configuring Print Settings Still Images Cropping Paper Settings 1 Access the printing screen. ...
Both Off Default Off On Red-Eye 1 Matches current printer settings. No. Specify a desired image area to print under optimal settings. Specify the paper size, layout, and other details (=95). Still ... 5 Playback Mode 6 Setting Menu 7 Accessories 8 Appendix Index 94 Prints images with the date added. Uses information from the time of shooting to print (=94). - Corrects red-eye. Prints images with both the date and file number added. - Configuring Print Settings Still Images Cropping Paper Settings 1 Access the printing screen. ...
User Guide
Page 105
...(=56). Shots look too bright, highlights are washed-out. • Set the flash mode to [!] (=41). • Adjust brightness by using red-eye correction (=78). Note that unneeded functions such as macro are deactivated. • Try shooting with higher-contrast subject areas centered before pressing it .... • Available setting items vary by using i-Contrast (=56, 78). • Use AE lock or spot metering (=55). Refer to [!] (=41). A2600 [h] flashes on (for about one second), it all the way down to shoot (=29). • Make sure subjects are within focusing range (=119). •...
...(=56). Shots look too bright, highlights are washed-out. • Set the flash mode to [!] (=41). • Adjust brightness by using red-eye correction (=78). Note that unneeded functions such as macro are deactivated. • Try shooting with higher-contrast subject areas centered before pressing it .... • Available setting items vary by using i-Contrast (=56, 78). • Use AE lock or spot metering (=55). Refer to [!] (=41). A2600 [h] flashes on (for about one second), it all the way down to shoot (=29). • Make sure subjects are within focusing range (=119). •...

User Guide
Page 109
...Shooting Modes 4 P Mode 5 Playback Mode 6 Setting Menu 7 Accessories 8 Appendix Index 109 Display Details Sufficient charge Slightly depleted, but sufficient (Blinking red) [Charge the battery] Nearly depleted - No icon or message is little battery power left. charge the battery immediately A1400 Battery Level An on ...64) AE lock (=55), FE lock (=63) Shutter speed Aperture value Zoom bar (=34) Blink detection (= 44) Time zone (=85) A2600 Battery Level An on -screen icon or message warns you when there is shown unless the batteries are running out of power. prepare replacement ...
...Shooting Modes 4 P Mode 5 Playback Mode 6 Setting Menu 7 Accessories 8 Appendix Index 109 Display Details Sufficient charge Slightly depleted, but sufficient (Blinking red) [Charge the battery] Nearly depleted - No icon or message is little battery power left. charge the battery immediately A1400 Battery Level An on ...64) AE lock (=55), FE lock (=63) Shutter speed Aperture value Zoom bar (=34) Blink detection (= 44) Time zone (=85) A2600 Battery Level An on -screen icon or message warns you when there is shown unless the batteries are running out of power. prepare replacement ...

User Guide
Page 110
... quality / Frame rate (movies) (=43) Aperture value Flash (=62) Focusing range (=58, 59) File size Still images: Resolution (=118) Movies: Playback time (=119) Protection (=72) Red-eye correction (=43, 78) i-Contrast (=56, 78) Shooting date/time (= 16) • Some information may not be displayed when viewing images on a TV (= 90). Cover...
... quality / Frame rate (movies) (=43) Aperture value Flash (=62) Focusing range (=58, 59) File size Still images: Resolution (=118) Movies: Playback time (=119) Protection (=72) Red-eye correction (=43, 78) i-Contrast (=56, 78) Shooting date/time (= 16) • Some information may not be displayed when viewing images on a TV (= 90). Cover...

User Guide
Page 114
... Zoom (=38) On Off AF-Point Zoom (=65) On Off Servo AF (=61) On Off*2 Continuous AF (=61) On Off Lamp Setting (=44) On Off Red-Eye Corr. (=43) On Off Shooting Mode G I PtN OOOOOOO - - OOOOOOO OOO - OOOOOOO - OOOO - OOOO - - O OOOOOOOOOOOOOOOO - OOOO - OO - OO OOO - O - - - O OOOOOOOOOOOOOO - OOOOOOOOO *1 Operation when no faces...
... Zoom (=38) On Off AF-Point Zoom (=65) On Off Servo AF (=61) On Off*2 Continuous AF (=61) On Off Lamp Setting (=44) On Off Red-Eye Corr. (=43) On Off Shooting Mode G I PtN OOOOOOO - - OOOOOOO OOO - OOOOOOO - OOOO - OOOO - - O OOOOOOOOOOOOOOOO - OOOO - OO - OO OOO - O - - - O OOOOOOOOOOOOOO - OOOOOOOOO *1 Operation when no faces...

User Guide
Page 116
... = 90 = 101 = 85 = 17 = 86 1 Playback Menu Item Slideshow Erase Protect Rotate Photobook Set-up Image Ref. Page = 71 = 74 = 72 = 75 = 99 = 78 Item Red-Eye Correction Resize Auto Rotate Resume Transition Ref. Page = 81 = 81 = 81 = 16 = 85 = 84 =28, 84 = 81 = 82 Item Format File Numbering Create Folder...
... = 90 = 101 = 85 = 17 = 86 1 Playback Menu Item Slideshow Erase Protect Rotate Photobook Set-up Image Ref. Page = 71 = 74 = 72 = 75 = 99 = 78 Item Red-Eye Correction Resize Auto Rotate Resume Transition Ref. Page = 81 = 81 = 81 = 16 = 85 = 84 =28, 84 = 81 = 82 Item Format File Numbering Create Folder...
User Guide
Page 121
... 16 World clock 85 DC coupler 88 Defaults Reset all Digital zoom 38 Display language 17 DPOF 97 Drive mode 58 E Editing i-Contrast 78 Red-eye correction 78 Resizing images 77 Erasing 74 Error messages 107 Exposure AE lock 55 Compensation 54 FE lock 63 Eye-Fi cards 2, 101 F Face...
... 16 World clock 85 DC coupler 88 Defaults Reset all Digital zoom 38 Display language 17 DPOF 97 Drive mode 58 E Editing i-Contrast 78 Red-eye correction 78 Resizing images 77 Erasing 74 Error messages 107 Exposure AE lock 55 Compensation 54 FE lock 63 Eye-Fi cards 2, 101 F Face...
User Guide
Page 122
... 3 Other Shooting Modes 4 P Mode 5 Playback Mode 6 Setting Menu 7 Accessories 8 Appendix Index 122 Power saving 28 Printing 93 Program AE 54 Protecting 72 P (shooting mode 54 R Red-eye correction 43, 78 Reset all 86 Resizing images 77 Resolution (image size 42 Rotating 75 S Screen Display language 17 Icons 109, 110 Menu ...
... 3 Other Shooting Modes 4 P Mode 5 Playback Mode 6 Setting Menu 7 Accessories 8 Appendix Index 122 Power saving 28 Printing 93 Program AE 54 Protecting 72 P (shooting mode 54 R Red-eye correction 43, 78 Reset all 86 Resizing images 77 Resolution (image size 42 Rotating 75 S Screen Display language 17 Icons 109, 110 Menu ...


