User Guide
Page 5
..." represents a page number) • Instructions in this guide, icons are used to represent the corresponding camera buttons on the camera model: A2600 : Functions and precautions for the PowerShot A2600 only A1400 : Functions and precautions for the PowerShot A1400 only • This guide uses PowerShot A2600 illustrations and screenshots for still images, movies, or both. • In this guide apply to the camera under default settings. • For convenience, all supported memory cards are simply referred to indicate functions that differ...
..." represents a page number) • Instructions in this guide, icons are used to represent the corresponding camera buttons on the camera model: A2600 : Functions and precautions for the PowerShot A2600 only A1400 : Functions and precautions for the PowerShot A1400 only • This guide uses PowerShot A2600 illustrations and screenshots for still images, movies, or both. • In this guide apply to the camera under default settings. • For convenience, all supported memory cards are simply referred to indicate functions that differ...
User Guide
Page 6
... ( Mode 54 Image Brightness (Exposure Compensation 54 Color and Continuous Shooting...57 Shooting Range and Focusing ....58 Flash 62 Using Eco Mode 63 Other Settings 64 5 Playback Mode 67 Viewing 68 Browsing and Filtering Images ....69 Image Viewing Options 71 Protecting Images 72 Erasing Images 74 Rotating Images 75 Editing Still Images 77 6 Setting Menu 80 Adjusting Basic Camera Functions 81 7 Accessories 87 Optional Accessories 88 Using Optional Accessories .........90 Printing Images 93 Using an Eye-Fi Card 101 8 Appendix 103 Troubleshooting 104 On-Screen Messages 107...
... ( Mode 54 Image Brightness (Exposure Compensation 54 Color and Continuous Shooting...57 Shooting Range and Focusing ....58 Flash 62 Using Eco Mode 63 Other Settings 64 5 Playback Mode 67 Viewing 68 Browsing and Filtering Images ....69 Image Viewing Options 71 Protecting Images 72 Erasing Images 74 Rotating Images 75 Editing Still Images 77 6 Setting Menu 80 Adjusting Basic Camera Functions 81 7 Accessories 87 Optional Accessories 88 Using Optional Accessories .........90 Printing Images 93 Using an Eye-Fi Card 101 8 Appendix 103 Troubleshooting 104 On-Screen Messages 107...
User Guide
Page 7
... using the flash (Flash Off 41 Include yourself in the shot (Self-Timer 39, 51 Add a date stamp 41 1 View View images (Playback Mode 68 Automatic playback (Slideshow 71 On a TV 90 On a computer 22 Browse through images quickly 69, 70 Erase images 74 E Shoot/View Movies Shoot movies 34 View movies (Playback Mode 68 c Print Print pictures...
... using the flash (Flash Off 41 Include yourself in the shot (Self-Timer 39, 51 Add a date stamp 41 1 View View images (Playback Mode 68 Automatic playback (Slideshow 71 On a TV 90 On a computer 22 Browse through images quickly 69, 70 Erase images 74 E Shoot/View Movies Shoot movies 34 View movies (Playback Mode 68 c Print Print pictures...
User Guide
Page 17
... "Setting the Date and Time" (=16) to close the menu. • Date/time settings can also change the display language by the camera's built-in date/time battery (backup battery) after the battery pack or batteries are removed. • The date/time battery will be charged in "Setting the Date and Time" (=16) to adjust the settings. Press the button to set , the setting screen is depleted, the [Date/Time] screen will be displayed when you insert a sufficiently charged battery/batteries or connect the camera to an AC adapter...
... "Setting the Date and Time" (=16) to close the menu. • Date/time settings can also change the display language by the camera's built-in date/time battery (backup battery) after the battery pack or batteries are removed. • The date/time battery will be charged in "Setting the Date and Time" (=16) to adjust the settings. Press the button to set , the setting screen is depleted, the [Date/Time] screen will be displayed when you insert a sufficiently charged battery/batteries or connect the camera to an AC adapter...
User Guide
Page 24
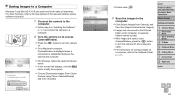
... to the Software Guide (= 21). For other functions, refer to the help system of the relevant software (some software excluded). 1 Connect the camera to the computer. Follow step 3 in separate folders named by date. After images are used here for the sake of illustration. Cover Preliminary Notes and Legal Information Contents: Basic Operations Basic Guide Advanced Guide 1 Camera Basics 2 Smart Auto Mode 3 Other Shooting Modes 4 P Mode 5 Playback Mode 6 Setting Menu 7 Accessories...
... to the Software Guide (= 21). For other functions, refer to the help system of the relevant software (some software excluded). 1 Connect the camera to the computer. Follow step 3 in separate folders named by date. After images are used here for the sake of illustration. Cover Preliminary Notes and Legal Information Contents: Basic Operations Basic Guide Advanced Guide 1 Camera Basics 2 Smart Auto Mode 3 Other Shooting Modes 4 P Mode 5 Playback Mode 6 Setting Menu 7 Accessories...
User Guide
Page 25
..., click [Downloads Images From Canon Camera using the software, the following limitations apply. - • In Windows 7, if the screen in step 2 is not displayed after you connect the camera to the computer until camera images are accessible. - Cover Preliminary Notes and Legal Information Contents: Basic Operations Basic Guide Advanced Guide 1 Camera Basics 2 Smart Auto Mode 3 Other Shooting Modes 4 P Mode 5 Playback Mode 6 Setting Menu 7 Accessories 8 Appendix Index 25 Some functions provided by connecting your camera to the computer without using Canon CameraWindow...
..., click [Downloads Images From Canon Camera using the software, the following limitations apply. - • In Windows 7, if the screen in step 2 is not displayed after you connect the camera to the computer until camera images are accessible. - Cover Preliminary Notes and Legal Information Contents: Basic Operations Basic Guide Advanced Guide 1 Camera Basics 2 Smart Auto Mode 3 Other Shooting Modes 4 P Mode 5 Playback Mode 6 Setting Menu 7 Accessories 8 Appendix Index 25 Some functions provided by connecting your camera to the computer without using Canon CameraWindow...
User Guide
Page 32
Turn the camera off (=28, 42, 63, 84), or connected to a computer (=24) Blinking Starting up or blinks depending on the camera status. Shake or jolt the camera A2600 - A2600 Color Indicator Status Camera Status Green On Blinking Connected to a computer (=24), or display off (=28, 42, 63, 84) Starting up, recording/reading/transmitting images, or shooting long exposures (=52) A1400 Color Green Orange Indicator Status Camera Status On Display off - Open the memory card/battery cover A1400 - 3 Choose a setting. Press...
Turn the camera off (=28, 42, 63, 84), or connected to a computer (=24) Blinking Starting up or blinks depending on the camera status. Shake or jolt the camera A2600 - A2600 Color Indicator Status Camera Status Green On Blinking Connected to a computer (=24), or display off (=28, 42, 63, 84) Starting up, recording/reading/transmitting images, or shooting long exposures (=52) A1400 Color Green Orange Indicator Status Camera Status On Display off - Open the memory card/battery cover A1400 - 3 Choose a setting. Press...
User Guide
Page 51
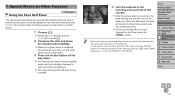
... Contents: Basic Operations Basic Guide Advanced Guide 1 Camera Basics 2 Smart Auto Mode 3 Other Shooting Modes 4 P Mode 5 Playback Mode 6 Setting Menu 7 Accessories 8 Appendix Index 51 Special Modes for Other Purposes Using the Face Self-Timer Still Images The camera will shoot about 15 seconds later. • To change the number of shots, press the button, press the buttons to start count down . The camera now enters shooting standby mode, and [Look straight at camera to choose the number of another...
... Contents: Basic Operations Basic Guide Advanced Guide 1 Camera Basics 2 Smart Auto Mode 3 Other Shooting Modes 4 P Mode 5 Playback Mode 6 Setting Menu 7 Accessories 8 Appendix Index 51 Special Modes for Other Purposes Using the Face Self-Timer Still Images The camera will shoot about 15 seconds later. • To change the number of shots, press the button, press the buttons to start count down . The camera now enters shooting standby mode, and [Look straight at camera to choose the number of another...
User Guide
Page 57
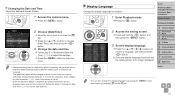
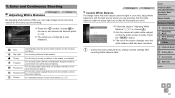
...or coolwhite fluorescent lighting. Fluorescent H For shooting under the light in fair weather. Press the button. The tint of the screen changes once the white balance data has been recorded. • Colors may look unnatural if you are shooting. Color and Continuous Shooting Still Images Adjusting White Balance Movies By adjusting white balance (WB), you can make image colors look more natural for the shooting conditions. Auto Day Light Automatically sets the optimal white balance for the scene you change camera settings after recording white balance data.
...or coolwhite fluorescent lighting. Fluorescent H For shooting under the light in fair weather. Press the button. The tint of the screen changes once the white balance data has been recorded. • Colors may look unnatural if you are shooting. Color and Continuous Shooting Still Images Adjusting White Balance Movies By adjusting white balance (WB), you can make image colors look more natural for the shooting conditions. Auto Day Light Automatically sets the optimal white balance for the scene you change camera settings after recording white balance data.
User Guide
Page 61
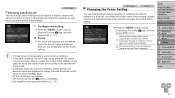
Still Images Changing the Focus Setting Movies You can limit camera focusing to the moment you are displayed in orange. Off Conserves battery power, because the camera does not focus constantly. 1 Camera Basics 2 Smart Auto Mode 3 Other Shooting Modes 4 P Mode 5 Playback Mode 6 Setting Menu 7 Accessories 8 Appendix Index 61 Release the shutter button, and then press it is aimed at, even when the shutter button is not available. • Not available when using the self-timer (=39). Helps avoid missing sudden photo On...
Still Images Changing the Focus Setting Movies You can limit camera focusing to the moment you are displayed in orange. Off Conserves battery power, because the camera does not focus constantly. 1 Camera Basics 2 Smart Auto Mode 3 Other Shooting Modes 4 P Mode 5 Playback Mode 6 Setting Menu 7 Accessories 8 Appendix Index 61 Release the shutter button, and then press it is aimed at, even when the shutter button is not available. • Not available when using the self-timer (=39). Helps avoid missing sudden photo On...
User Guide
Page 83
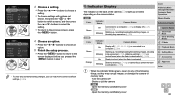
... Operations Basic Guide Advanced Guide 1 Camera Basics 2 Smart Auto Mode 3 Other Shooting Modes 4 P Mode 5 Playback Mode 6 Setting Menu 7 Accessories 8 Appendix Index 83 Low-level formatting erases all storage regions of the memory card. • You can cancel low-level formatting in these cases: [Memory card error] is displayed, the camera is not working correctly, card image reading/writing is slower, continuous shooting is erased from 0001, use an empty (or formatted (=82)) memory card. • Refer to 2,000 images each. Image numbering is reset to continue with the formatting...
... Operations Basic Guide Advanced Guide 1 Camera Basics 2 Smart Auto Mode 3 Other Shooting Modes 4 P Mode 5 Playback Mode 6 Setting Menu 7 Accessories 8 Appendix Index 83 Low-level formatting erases all storage regions of the memory card. • You can cancel low-level formatting in these cases: [Memory card error] is displayed, the camera is not working correctly, card image reading/writing is slower, continuous shooting is erased from 0001, use an empty (or formatted (=82)) memory card. • Refer to 2,000 images each. Image numbering is reset to continue with the formatting...
User Guide
Page 93
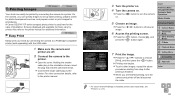
... Shooting Modes 4 P Mode 5 Playback Mode 6 Setting Menu 7 Accessories 8 Appendix Index • For Canon-brand PictBridge-compatible printers (sold separately) with the USB cable. 1 Make sure the camera and printer are finished printing, turn the camera on . Press the button to choose [Print], and then press the button. Printing now begins. To print other images, repeat the above procedures starting from step 5 after printing is used here for the sake of illustration. Screens displayed...
... Shooting Modes 4 P Mode 5 Playback Mode 6 Setting Menu 7 Accessories 8 Appendix Index • For Canon-brand PictBridge-compatible printers (sold separately) with the USB cable. 1 Make sure the camera and printer are finished printing, turn the camera on . Press the button to choose [Print], and then press the button. Printing now begins. To print other images, repeat the above procedures starting from step 5 after printing is used here for the sake of illustration. Screens displayed...

User Guide
Page 97
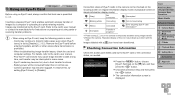
... and index formats are printed per sheet. Smaller versions of copies, as desired (= 31). Images are printed with the shooting date. - Choose up on the camera. All image print list settings are printed with the file number. - Images are cleared after printing. - • Not all images in some Canon-brand PictBridge-compatible printers (sold separately). Cover Preliminary Notes and Legal Information Contents: Basic Operations Basic Guide Advanced Guide 1 Camera Basics 2 Smart Auto Mode 3 Other Shooting Modes 4 P Mode 5 Playback Mode 6 Setting Menu 7 Accessories 8 Appendix...
... and index formats are printed per sheet. Smaller versions of copies, as desired (= 31). Images are printed with the shooting date. - Choose up on the camera. All image print list settings are printed with the file number. - Images are cleared after printing. - • Not all images in some Canon-brand PictBridge-compatible printers (sold separately). Cover Preliminary Notes and Legal Information Contents: Basic Operations Basic Guide Advanced Guide 1 Camera Basics 2 Smart Auto Mode 3 Other Shooting Modes 4 P Mode 5 Playback Mode 6 Setting Menu 7 Accessories 8 Appendix...
User Guide
Page 101
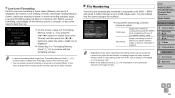
...than in progress*1 Error acquiring Eye-Fi card information*2 *1 Power saving (=28) on the shooting screen (in regular information display mode) or playback screen (in simple information display mode). (Gray) Not connected Interrupted (Blinking white) Connecting Not communicating (White) (Animated) Connected Transfer in normal use is temporarily disabled during image transfer. *2 Restart the camera. Checking Connection Information Check the access point SSID used by the Eye-Fi card. Poor Eye-Fi connections may cause image transfer to take a long time, and transfer may become...
...than in progress*1 Error acquiring Eye-Fi card information*2 *1 Power saving (=28) on the shooting screen (in regular information display mode) or playback screen (in simple information display mode). (Gray) Not connected Interrupted (Blinking white) Connecting Not communicating (White) (Animated) Connected Transfer in normal use is temporarily disabled during image transfer. *2 Restart the camera. Checking Connection Information Check the access point SSID used by the Eye-Fi card. Poor Eye-Fi connections may cause image transfer to take a long time, and transfer may become...
User Guide
Page 104
... your problem, contact a Canon Customer Support Help Desk. Try warming the batteries a little by putting it has reached the end of the correct type are inserted (=14). • Confirm that the batteries are not added in shooting modes (=115) in the camera, contact a Canon Customer Support Help Desk. Cover Preliminary Notes and Legal Information Contents: Basic Operations Basic Guide Advanced Guide 1 Camera Basics 2 Smart Auto Mode 3 Other Shooting Modes 4 P Mode 5 Playback Mode 6 Setting Menu 7 Accessories...
... your problem, contact a Canon Customer Support Help Desk. Try warming the batteries a little by putting it has reached the end of the correct type are inserted (=14). • Confirm that the batteries are not added in shooting modes (=115) in the camera, contact a Canon Customer Support Help Desk. Cover Preliminary Notes and Legal Information Contents: Basic Operations Basic Guide Advanced Guide 1 Camera Basics 2 Smart Auto Mode 3 Other Shooting Modes 4 P Mode 5 Playback Mode 6 Setting Menu 7 Accessories...
User Guide
Page 105
... dark. • Set the flash mode to activate the red-eye reduction lamp (=4) in flash shots. • This is not possible (=36). White dots or similar image artifacts appear in flash shots. Recording to the memory card takes too long, or continuous shooting is slower. • Use the camera to perform low-level formatting of focus. • Press the shutter button halfway to focus on the screen when the shutter button is pressed, and shooting is caused by shooting mode.
... dark. • Set the flash mode to activate the red-eye reduction lamp (=4) in flash shots. • This is not possible (=36). White dots or similar image artifacts appear in flash shots. Recording to the memory card takes too long, or continuous shooting is slower. • Use the camera to perform low-level formatting of focus. • Press the shutter button halfway to focus on the screen when the shutter button is pressed, and shooting is caused by shooting mode.
User Guide
Page 106
... Operations Basic Guide Advanced Guide 1 Camera Basics 2 Smart Auto Mode 3 Other Shooting Modes 4 P Mode 5 Playback Mode 6 Setting Menu 7 Accessories 8 Appendix Index 106 The camera's internal memory buffer filled up as the camera could not record to a computer. Playback Playback is not possible. • Image or movie playback may not be possible if a computer is used to the Software Guide (=21) for movies shot in [ ] mode (=49) because audio is not played during movies. • Adjust the volume (=68) if you press the and buttons...
... Operations Basic Guide Advanced Guide 1 Camera Basics 2 Smart Auto Mode 3 Other Shooting Modes 4 P Mode 5 Playback Mode 6 Setting Menu 7 Accessories 8 Appendix Index 106 The camera's internal memory buffer filled up as the camera could not record to a computer. Playback Playback is not possible. • Image or movie playback may not be possible if a computer is used to the Software Guide (=21) for movies shot in [ ] mode (=49) because audio is not played during movies. • Adjust the volume (=68) if you press the and buttons...
User Guide
Page 107
... number of the memory card is used in the camera. Lens Error • This error may indicate camera damage. Switch to Playback mode to check for images that were edited or renamed on a computer, or images shot with enough free space (=15). Memory card error (=83) • If the same error message is held while it facing the correct way, contact a Canon Customer Support Help Desk (=15). To print, insert the memory card directly into the printer card slot. In the [3] menu, change [File Numbering...
... number of the memory card is used in the camera. Lens Error • This error may indicate camera damage. Switch to Playback mode to check for images that were edited or renamed on a computer, or images shot with enough free space (=15). Memory card error (=83) • If the same error message is held while it facing the correct way, contact a Canon Customer Support Help Desk (=15). To print, insert the memory card directly into the printer card slot. In the [3] menu, change [File Numbering...
User Guide
Page 117
... equivalent: 28 (W) - 140 (T) mm) Real-image type optical zoom viewfinder LCD Monitor File Format Data Type Interface A2600 7.5 cm (3.0 in.) color TFT LCD Effective Pixels: Approx. 230,000 dots A1400 6.8 cm (2.7 in .) Cover Preliminary Notes and Legal Information Contents: Basic Operations Basic Guide Advanced Guide 1 Camera Basics 2 Smart Auto Mode 3 Other Shooting Modes 4 P Mode 5 Playback Mode 6 Setting Menu 7 Accessories 8 Appendix Index 117 A2600 • Before long-term battery storage, use . Do not rub hard or...
... equivalent: 28 (W) - 140 (T) mm) Real-image type optical zoom viewfinder LCD Monitor File Format Data Type Interface A2600 7.5 cm (3.0 in.) color TFT LCD Effective Pixels: Approx. 230,000 dots A1400 6.8 cm (2.7 in .) Cover Preliminary Notes and Legal Information Contents: Basic Operations Basic Guide Advanced Guide 1 Camera Basics 2 Smart Auto Mode 3 Other Shooting Modes 4 P Mode 5 Playback Mode 6 Setting Menu 7 Accessories 8 Appendix Index 117 A2600 • Before long-term battery storage, use . Do not rub hard or...
User Guide
Page 121
... Power saving 28 Battery and charger kit 88 Battery charger 2, 88 Blink detection 44 C Camera Reset all 86 Center (AF frame mode 60 Color (white balance 57 Continuous shooting 58 Custom white balance 57 D Date/time Adding date stamps 41 Changing 17 Date/time battery 17 Settings 16 World clock 85 DC coupler 88 Defaults Reset all Digital zoom 38 Display language 17 DPOF 97 Drive mode 58 E Editing i-Contrast 78 Red-eye correction 78 Resizing images 77 Erasing 74 Error messages 107 Exposure AE lock 55 Compensation 54 FE lock...
... Power saving 28 Battery and charger kit 88 Battery charger 2, 88 Blink detection 44 C Camera Reset all 86 Center (AF frame mode 60 Color (white balance 57 Continuous shooting 58 Custom white balance 57 D Date/time Adding date stamps 41 Changing 17 Date/time battery 17 Settings 16 World clock 85 DC coupler 88 Defaults Reset all Digital zoom 38 Display language 17 DPOF 97 Drive mode 58 E Editing i-Contrast 78 Red-eye correction 78 Resizing images 77 Erasing 74 Error messages 107 Exposure AE lock 55 Compensation 54 FE lock...


