User Guide
Page 23
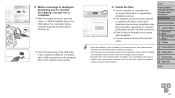
For details about USB connections on the computer, refer to the computer user manual. 4 Install the files. Turn the camera on, and follow the on the screen after installation. Turn the camera off , open the ...
For details about USB connections on the computer, refer to the computer user manual. 4 Install the files. Turn the camera on, and follow the on the screen after installation. Turn the camera off , open the ...

User Guide
Page 29
... scenes, and images will be out of focus if you shoot without initially pressing the shutter button halfway. • Length of the screen. In this manual, shutter button operations are displayed around image areas in focus. 2 Press all the way down. (From the halfway position, press fully to shoot.) ...
... scenes, and images will be out of focus if you shoot without initially pressing the shutter button halfway. • Length of the screen. In this manual, shutter button operations are displayed around image areas in focus. 2 Press all the way down. (From the halfway position, press fully to shoot.) ...
User Guide
Page 57
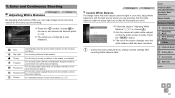
... Automatically sets the optimal white balance for the scene you are shooting. Fluorescent For shooting under daylight fluorescent lighting. fluorescent and similarly colored Custom For manually setting a custom white balance (=57). Color and Continuous Shooting Still Images Adjusting White Balance Movies By adjusting white balance (WB), you can make image colors...
... Automatically sets the optimal white balance for the scene you are shooting. Fluorescent For shooting under daylight fluorescent lighting. fluorescent and similarly colored Custom For manually setting a custom white balance (=57). Color and Continuous Shooting Still Images Adjusting White Balance Movies By adjusting white balance (WB), you can make image colors...

User Guide
Page 85
...], and then press the button. Press the buttons to choose an item, and then press the buttons to change the Date/ Time setting manually. This convenient feature eliminates the need to adjust the setting. Checking Certification Logos Some logos for certification requirements met by the camera can be sure...
...], and then press the button. Press the buttons to choose an item, and then press the buttons to change the Date/ Time setting manually. This convenient feature eliminates the need to adjust the setting. Checking Certification Logos Some logos for certification requirements met by the camera can be sure...
User Guide
Page 90
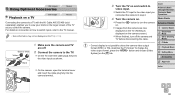
... 3 Other Shooting Modes 4 P Mode 5 Playback Mode 6 Setting Menu 7 Accessories 8 Appendix Index 90 For details on connection or how to switch inputs, refer to the TV manual. • Some information may not be displayed on the [3] tab. Black or white Yellow Yellow Black 1 Make sure the camera and TV are now displayed...
... 3 Other Shooting Modes 4 P Mode 5 Playback Mode 6 Setting Menu 7 Accessories 8 Appendix Index 90 For details on connection or how to switch inputs, refer to the TV manual. • Some information may not be displayed on the [3] tab. Black or white Yellow Yellow Black 1 Make sure the camera and TV are now displayed...
User Guide
Page 93
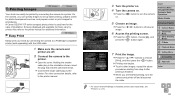
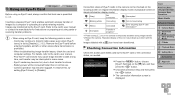
...], and then press the button. Printing now begins. To print other connection details, refer to the printer manual. 3 Turn the printer on. 4 Turn the camera on . Screens displayed and available functions vary by connecting the camera to a PictBridge... 1 Camera Basics 2 Smart Auto Mode 3 Other Shooting Modes 4 P Mode 5 Playback Mode 6 Setting Menu 7 Accessories 8 Appendix Index • For Canon-brand PictBridge-compatible printers (sold separately) with the USB cable. 1 Make sure the camera and printer are finished printing, turn the camera on . ...
...], and then press the button. Printing now begins. To print other connection details, refer to the printer manual. 3 Turn the printer on. 4 Turn the camera on . Screens displayed and available functions vary by connecting the camera to a PictBridge... 1 Camera Basics 2 Smart Auto Mode 3 Other Shooting Modes 4 P Mode 5 Playback Mode 6 Setting Menu 7 Accessories 8 Appendix Index • For Canon-brand PictBridge-compatible printers (sold separately) with the USB cable. 1 Make sure the camera and printer are finished printing, turn the camera on . ...

User Guide
Page 99
... stored in the print list. Any DPOF print job that were configured on the camera to the Software Guide (=21) and the printer manual for further information. Adding Images to a Photobook Still Images Photobooks can be displayed on another camera. Choosing a Selection Method Press the button, choose...
... stored in the print list. Any DPOF print job that were configured on the camera to the Software Guide (=21) and the printer manual for further information. Adding Images to a Photobook Still Images Photobooks can be displayed on another camera. Choosing a Selection Method Press the button, choose...
User Guide
Page 101
Refer to the card's user manual or contact the manufacturer for instructions on the camera is temporarily disabled during image transfer. *2 Restart the camera. For details, refer to [Disable]. Poor Eye-.... - Camera operation may become sluggish. Inserting a prepared Eye-Fi card enables automatic wireless transfer of this , try setting [Eye-Fi trans.] to the card's user manual. - When troubleshooting image transfer issues, check the card and computer settings. Eye-Fi cards may become hot, due to a photo-sharing website. Connection status of...
Refer to the card's user manual or contact the manufacturer for instructions on the camera is temporarily disabled during image transfer. *2 Restart the camera. For details, refer to [Disable]. Poor Eye-.... - Camera operation may become sluggish. Inserting a prepared Eye-Fi card enables automatic wireless transfer of this , try setting [Eye-Fi trans.] to the card's user manual. - When troubleshooting image transfer issues, check the card and computer settings. Eye-Fi cards may become hot, due to a photo-sharing website. Connection status of...

