User Guide
Page 1
... right to access other pages. : Next page : Previous page : Page before you can access topics by clicking their titles. 6 Setting Menu 7 Accessories 8 Appendix Index © CANON INC. 2013 CEL-ST9EA210 1
... right to access other pages. : Next page : Previous page : Page before you can access topics by clicking their titles. 6 Setting Menu 7 Accessories 8 Appendix Index © CANON INC. 2013 CEL-ST9EA210 1
User Guide
Page 2
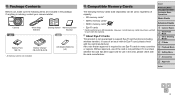
... Auto Mode 3 Other Shooting Modes 4 P Mode 5 Playback Mode 6 Setting Menu 7 Accessories 8 Appendix Index 2 However, not all memory cards have been verified to SD standards. Camera A2600 Wrist Strap WS-800 Getting Started Warranty System Booklet A1400 Battery Pack NB-11L Battery Charger CB-2LF/CB-2LFE • A memory card is missing...
... Auto Mode 3 Other Shooting Modes 4 P Mode 5 Playback Mode 6 Setting Menu 7 Accessories 8 Appendix Index 2 However, not all memory cards have been verified to SD standards. Camera A2600 Wrist Strap WS-800 Getting Started Warranty System Booklet A1400 Battery Pack NB-11L Battery Charger CB-2LF/CB-2LFE • A memory card is missing...
User Guide
Page 3
...Guide Advanced Guide 1 Camera Basics 2 Smart Auto Mode 3 Other Shooting Modes 4 P Mode 5 Playback Mode 6 Setting Menu 7 Accessories 8 Appendix Index 3 For Canon Customer Support, please refer to the warranty information for contact information. • Although the LCD monitor is machine readable. • Images recorded by the camera... 99.99% of an image to be recorded or to be defective or may appear as red or black dots. Please note that Canon Inc., its subsidiaries and affiliates, and its distributors are not liable for any malfunction of a camera or accessory, including memory cards,...
...Guide Advanced Guide 1 Camera Basics 2 Smart Auto Mode 3 Other Shooting Modes 4 P Mode 5 Playback Mode 6 Setting Menu 7 Accessories 8 Appendix Index 3 For Canon Customer Support, please refer to the warranty information for contact information. • Although the LCD monitor is machine readable. • Images recorded by the camera... 99.99% of an image to be recorded or to be defective or may appear as red or black dots. Please note that Canon Inc., its subsidiaries and affiliates, and its distributors are not liable for any malfunction of a camera or accessory, including memory cards,...
User Guide
Page 4
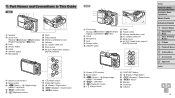
Part Names and Conventions in This Guide A2600 Speaker Zoom lever Shooting: / Playback: / Lens Shutter button Lamp ON/OFF button Microphone Flash Tripod socket Memory card/battery cover Indicator DC coupler cable port ...
Part Names and Conventions in This Guide A2600 Speaker Zoom lever Shooting: / Playback: / Lens Shutter button Lamp ON/OFF button Microphone Flash Tripod socket Memory card/battery cover Indicator DC coupler cable port ...
User Guide
Page 5
... when shooting or viewing still images. Movies : Indicates that the function is used to indicate functions that differ depending on the camera model: A2600 : Functions and precautions for the PowerShot A2600 only A1400 : Functions and precautions for the PowerShot A1400 only • This guide uses PowerShot A2600 illustrations and screenshots for still images, movies, or both.
... when shooting or viewing still images. Movies : Indicates that the function is used to indicate functions that differ depending on the camera model: A2600 : Functions and precautions for the PowerShot A2600 only A1400 : Functions and precautions for the PowerShot A1400 only • This guide uses PowerShot A2600 illustrations and screenshots for still images, movies, or both.
User Guide
Page 6
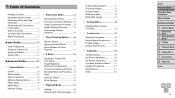
Table of Contents Package Contents 2 Compatible Memory Cards 2 Preliminary Notes and Legal Information 3 Part Names and Conventions in Program AE ( Mode 54 Image Brightness (Exposure Compensation 54 Color and Continuous Shooting...57 Shooting Range and Focusing ....58 Flash 62 Using Eco Mode 63 Other Settings 64 5 Playback Mode 67 Viewing 68 Browsing and Filtering Images ....69 Image Viewing Options 71 Protecting Images 72 Erasing Images 74 Rotating Images 75 Editing Still Images 77 6 Setting Menu 80 Adjusting Basic Camera Functions 81 7 Accessories 87 Optional Accessories...
Table of Contents Package Contents 2 Compatible Memory Cards 2 Preliminary Notes and Legal Information 3 Part Names and Conventions in Program AE ( Mode 54 Image Brightness (Exposure Compensation 54 Color and Continuous Shooting...57 Shooting Range and Focusing ....58 Flash 62 Using Eco Mode 63 Other Settings 64 5 Playback Mode 67 Viewing 68 Browsing and Filtering Images ....69 Image Viewing Options 71 Protecting Images 72 Erasing Images 74 Rotating Images 75 Editing Still Images 77 6 Setting Menu 80 Adjusting Basic Camera Functions 81 7 Accessories 87 Optional Accessories...
User Guide
Page 7
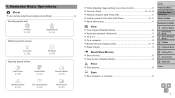
Contents: Basic Operations 4 Shoot Use camera-determined settings (Auto Mode 34 Shooting people well I Portraits (= 46) P Against Snow (= 46) Matching specific scenes Low Light (= 46) Applying special effects t Fireworks (= 46) Vivid Colors (= 48) Poster Effect (= 48) Fish-Eye Effect (= 48) Miniature Effect (= 49) Toy Camera Effect (= 50) Monochrome (= 50) While adjusting image settings (Live View Control 47 Focus on faces 34, 46, 59 Without using the flash (Flash Off 41 Include yourself in the shot...
Contents: Basic Operations 4 Shoot Use camera-determined settings (Auto Mode 34 Shooting people well I Portraits (= 46) P Against Snow (= 46) Matching specific scenes Low Light (= 46) Applying special effects t Fireworks (= 46) Vivid Colors (= 48) Poster Effect (= 48) Fish-Eye Effect (= 48) Miniature Effect (= 49) Toy Camera Effect (= 50) Monochrome (= 50) While adjusting image settings (Live View Control 47 Focus on faces 34, 46, 59 Without using the flash (Flash Off 41 Include yourself in the shot...
User Guide
Page 8
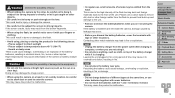
... smoke, a strange smell, or otherwise behaves abnormally. • Do not use organic solvents such as inside airplanes and medical facilities. A2600 • Unplug the power cord periodically, and using a dry cloth, wipe away any separately sold accessories you read the safety precautions ...described below. Strap: Putting the strap around a child's neck could damage your camera retailer or a Canon Customer Support Help Desk. The electromagnetic waves emitted by the flash could cause injury and damage the surroundings. Safety Precautions • ...
... smoke, a strange smell, or otherwise behaves abnormally. • Do not use organic solvents such as inside airplanes and medical facilities. A2600 • Unplug the power cord periodically, and using a dry cloth, wipe away any separately sold accessories you read the safety precautions ...described below. Strap: Putting the strap around a child's neck could damage your camera retailer or a Canon Customer Support Help Desk. The electromagnetic waves emitted by the flash could cause injury and damage the surroundings. Safety Precautions • ...
User Guide
Page 9
A2600 • Do not place the battery near pets. Pets biting the battery could result in burns or damage to malfunction. This could cause leakage, overheating ... front of the battery/ batteries, resulting in electrical shock, fire, burns or other injuries. This may cause deformation of the camera or battery charger casing. A2600 • Unplug the battery charger from the flash to prevent heat build-up and damage to the unit. • Remove and store the battery/batteries...
A2600 • Do not place the battery near pets. Pets biting the battery could result in burns or damage to malfunction. This could cause leakage, overheating ... front of the battery/ batteries, resulting in electrical shock, fire, burns or other injuries. This may cause deformation of the camera or battery charger casing. A2600 • Unplug the battery charger from the flash to prevent heat build-up and damage to the unit. • Remove and store the battery/batteries...

User Guide
Page 10
Cover Preliminary Notes and Legal Information Contents: Basic Operations Basic Guide Advanced Guide 1 Camera Basics 2 Smart Auto Mode 3 Other Shooting Modes 4 P Mode 5 Playback Mode 6 Setting Menu 7 Accessories 8 Appendix Index 10 Doing so may cause malfunctions or damage the screen. • When putting the camera in your bag, ensure that hard objects do not come into contact with the camera in your pocket. Doing so may cause malfunctions or damage the screen. • Do not sit down with the screen. • Do not attach any hard objects to the camera.
Cover Preliminary Notes and Legal Information Contents: Basic Operations Basic Guide Advanced Guide 1 Camera Basics 2 Smart Auto Mode 3 Other Shooting Modes 4 P Mode 5 Playback Mode 6 Setting Menu 7 Accessories 8 Appendix Index 10 Doing so may cause malfunctions or damage the screen. • When putting the camera in your bag, ensure that hard objects do not come into contact with the camera in your pocket. Doing so may cause malfunctions or damage the screen. • Do not sit down with the screen. • Do not attach any hard objects to the camera.

User Guide
Page 11
4 Basic Guide Gives basic instructions, from initial preparations to shooting, playback, and saving on a computer Initial Preparations 12 Trying the Camera Out 18 Using the Software 21 System Map 26 Cover Preliminary Notes and Legal Information Contents: Basic Operations Basic Guide Advanced Guide 1 Camera Basics 2 Smart Auto Mode 3 Other Shooting Modes 4 P Mode 5 Playback Mode 6 Setting Menu 7 Accessories 8 Appendix Index 11
4 Basic Guide Gives basic instructions, from initial preparations to shooting, playback, and saving on a computer Initial Preparations 12 Trying the Camera Out 18 Using the Software 21 System Map 26 Cover Preliminary Notes and Legal Information Contents: Basic Operations Basic Guide Advanced Guide 1 Camera Basics 2 Smart Auto Mode 3 Other Shooting Modes 4 P Mode 5 Playback Mode 6 Setting Menu 7 Accessories 8 Appendix Index 11
User Guide
Page 12
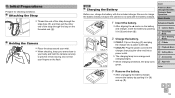
... 6 Setting Menu 7 Accessories 8 Appendix Index 3 Remove the battery. After unplugging the battery charger, remove the battery by pushing it in ( ) and up ( ). 12 A2600 Charging the Battery Before use, charge the battery with the battery charged. 1 Insert the battery. After aligning the marks on the flash...
... 6 Setting Menu 7 Accessories 8 Appendix Index 3 Remove the battery. After unplugging the battery charger, remove the battery by pushing it in ( ) and up ( ). 12 A2600 Charging the Battery Before use, charge the battery with the battery charged. 1 Insert the battery. After aligning the marks on the flash...
User Guide
Page 13
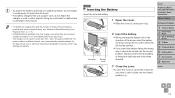
... Information Contents: Basic Operations Basic Guide Advanced Guide 1 Camera Basics 2 Smart Auto Mode 3 Other Shooting Modes 4 P Mode 5 Playback Mode 6 Setting Menu 7 Accessories 8 Appendix Index 13 A2600 Inserting the Battery Insert the included battery. 1 Open the cover. Slide the cover ( ) and open it clicks into the locked position. ...
... Information Contents: Basic Operations Basic Guide Advanced Guide 1 Camera Basics 2 Smart Auto Mode 3 Other Shooting Modes 4 P Mode 5 Playback Mode 6 Setting Menu 7 Accessories 8 Appendix Index 13 A2600 Inserting the Battery Insert the included battery. 1 Open the cover. Slide the cover ( ) and open it clicks into the locked position. ...

User Guide
Page 14
Compatible Batteries Use AA alkaline batteries or Canon AA NiMH batteries (sold separately, = 88). • Due to the variations in performance of other batteries, use of specified batteries only is recommended. • NiMH ...
Compatible Batteries Use AA alkaline batteries or Canon AA NiMH batteries (sold separately, = 88). • Due to the variations in performance of other batteries, use of specified batteries only is recommended. • NiMH ...

User Guide
Page 15
Slide the tab up until it . Label 3 Insert the memory card. Insert the memory card facing as you slide it, until it clicks into the unlocked position. 2 Open the cover. Slide the cover ( ) and open it clicks, and then slowly release the memory card. The memory card will pop up. Cover Preliminary Notes and Legal Information Contents: Basic Operations Basic Guide Advanced Guide 1 Camera Basics 2 Smart Auto Mode 3 Other Shooting Modes 4 P Mode 5 Playback Mode 6 Setting Menu 7 Accessories 8 Appendix Index 15 Removing the Memory Card ...
Slide the tab up until it . Label 3 Insert the memory card. Insert the memory card facing as you slide it, until it clicks into the unlocked position. 2 Open the cover. Slide the cover ( ) and open it clicks, and then slowly release the memory card. The memory card will pop up. Cover Preliminary Notes and Legal Information Contents: Basic Operations Basic Guide Advanced Guide 1 Camera Basics 2 Smart Auto Mode 3 Other Shooting Modes 4 P Mode 5 Playback Mode 6 Setting Menu 7 Accessories 8 Appendix Index 15 Removing the Memory Card ...

User Guide
Page 16
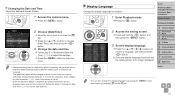
Setting the Date and Time Set the current date and time correctly as follows if the [Date/Time] screen is displayed when you turn the camera on . Cover Preliminary Notes and Legal Information Contents: Basic Operations Basic Guide Advanced Guide 1 Camera Basics 2 Smart Auto Mode 3 Other Shooting Modes 4 P Mode 5 Playback Mode 6 Setting Menu 7 Accessories 8 Appendix Index 16 The setting screen is no longer displayed. Once the date and time have been set, the [Date/Time] screen is no longer displayed. To turn the camera on . Information you specify this ...
Setting the Date and Time Set the current date and time correctly as follows if the [Date/Time] screen is displayed when you turn the camera on . Cover Preliminary Notes and Legal Information Contents: Basic Operations Basic Guide Advanced Guide 1 Camera Basics 2 Smart Auto Mode 3 Other Shooting Modes 4 P Mode 5 Playback Mode 6 Setting Menu 7 Accessories 8 Appendix Index 16 The setting screen is no longer displayed. Once the date and time have been set, the [Date/Time] screen is no longer displayed. To turn the camera on . Information you specify this ...
User Guide
Page 17
Changing the Date and Time Adjust the date and time as needed. 1 Enter Playback mode. Press the button. 2 Access the setting screen. Press and hold the button, and then press the button. 3 Set the display language. Press the buttons to an AC adapter kit (sold separately, =88), even if the camera is left off. • Once the date/time battery is no longer displayed. Cover Preliminary Notes and Legal Information Contents: Basic Operations Basic Guide Advanced Guide 1 Camera Basics 2 Smart Auto Mode 3 Other Shooting Modes 4 P Mode 5 ...
Changing the Date and Time Adjust the date and time as needed. 1 Enter Playback mode. Press the button. 2 Access the setting screen. Press and hold the button, and then press the button. 3 Set the display language. Press the buttons to an AC adapter kit (sold separately, =88), even if the camera is left off. • Once the date/time battery is no longer displayed. Cover Preliminary Notes and Legal Information Contents: Basic Operations Basic Guide Advanced Guide 1 Camera Basics 2 Smart Auto Mode 3 Other Shooting Modes 4 P Mode 5 ...
User Guide
Page 18
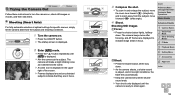
Shooting Still Images Focus. Press the shutter button lightly, halfway down . As the camera shoots, a shutter sound is played, and in low-light conditions, the flash fires automatically. Keep the camera still until the shutter sound ends. Your shot is only displayed until [ ] is displayed. Aim the camera at optimal settings for specific scenes, simply let the camera determine the subject and shooting conditions. 1 Turn the camera on , shoot still images or movies, and then view them. Cover Preliminary Notes ...
Shooting Still Images Focus. Press the shutter button lightly, halfway down . As the camera shoots, a shutter sound is played, and in low-light conditions, the flash fires automatically. Keep the camera still until the shutter sound ends. Your shot is only displayed until [ ] is displayed. Aim the camera at optimal settings for specific scenes, simply let the camera determine the subject and shooting conditions. 1 Turn the camera on , shoot still images or movies, and then view them. Cover Preliminary Notes ...
User Guide
Page 19
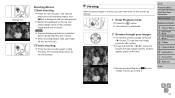
... areas not recorded. The camera beeps twice as recording begins, and [ Rec] is displayed. 2 Browse through images quickly. The camera beeps once as recording stops. A2600 Frames displayed around any detected faces indicate that they are identified by a [ To play movies, go to browse through your finger off the...
... areas not recorded. The camera beeps twice as recording begins, and [ Rec] is displayed. 2 Browse through images quickly. The camera beeps once as recording stops. A2600 Frames displayed around any detected faces indicate that they are identified by a [ To play movies, go to browse through your finger off the...
User Guide
Page 20
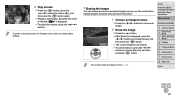
Erasing the Images You can also erase all images at once (=74). 3 Play movies. Press the button, press the buttons to choose [ ], and then press the button again. Playback now begins, and after the movie is finished, [ ] is now erased. To cancel erasure, press the buttons to Shooting mode from Playback mode, press the shutter button halfway. Cover Preliminary Notes and Legal Information Contents: Basic Operations Basic Guide Advanced Guide 1 Camera Basics 2 Smart Auto Mode 3 Other Shooting Modes 4 P Mode 5 Playback Mode 6 Setting ...
Erasing the Images You can also erase all images at once (=74). 3 Play movies. Press the button, press the buttons to choose [ ], and then press the button again. Playback now begins, and after the movie is finished, [ ] is now erased. To cancel erasure, press the buttons to Shooting mode from Playback mode, press the shutter button halfway. Cover Preliminary Notes and Legal Information Contents: Basic Operations Basic Guide Advanced Guide 1 Camera Basics 2 Smart Auto Mode 3 Other Shooting Modes 4 P Mode 5 Playback Mode 6 Setting ...
