User Guide
Page 3
For Canon Customer Support, please refer to be recorded in rare cases some test shots initially to the warranty information provided with a thin plastic film for protection ... is produced under extremely high-precision manufacturing conditions and more than 99.99% of the pixels meet design specifications, in a way that even for personal use , photography may become warm. Please note that Canon Inc., its subsidiaries and affiliates, and its distributors are intended for personal use . Preliminary Notes and Legal Information...
For Canon Customer Support, please refer to be recorded in rare cases some test shots initially to the warranty information provided with a thin plastic film for protection ... is produced under extremely high-precision manufacturing conditions and more than 99.99% of the pixels meet design specifications, in a way that even for personal use , photography may become warm. Please note that Canon Inc., its subsidiaries and affiliates, and its distributors are intended for personal use . Preliminary Notes and Legal Information...
User Guide
Page 6
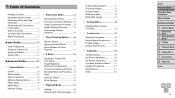
Menu 30 MENU Menu 31 Indicator Display 32 Specific Scenes 46 Applying Special Effects 48 Special Modes for Other Purposes 51 4 P Mode 53 Shooting in This Guide 4 Table of Contents Package Contents 2 Compatible Memory ... an Eye-Fi Card 101 8 Appendix 103 Troubleshooting 104 On-Screen Messages 107 On-Screen Information 109 Functions and Menu Tables ....... 111 Handling Precautions 117 Specifications 117 Index 121 Cover Preliminary Notes and Legal Information Contents: Basic Operations Basic Guide Advanced Guide 1 Camera Basics 2 Smart Auto Mode 3 Other Shooting Modes 4 P Mode...
Menu 30 MENU Menu 31 Indicator Display 32 Specific Scenes 46 Applying Special Effects 48 Special Modes for Other Purposes 51 4 P Mode 53 Shooting in This Guide 4 Table of Contents Package Contents 2 Compatible Memory ... an Eye-Fi Card 101 8 Appendix 103 Troubleshooting 104 On-Screen Messages 107 On-Screen Information 109 Functions and Menu Tables ....... 111 Handling Precautions 117 Specifications 117 Index 121 Cover Preliminary Notes and Legal Information Contents: Basic Operations Basic Guide Advanced Guide 1 Camera Basics 2 Smart Auto Mode 3 Other Shooting Modes 4 P Mode...
User Guide
Page 7
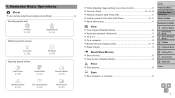
Contents: Basic Operations 4 Shoot Use camera-determined settings (Auto Mode 34 Shooting people well I Portraits (= 46) P Against Snow (= 46) Matching specific scenes Low Light (= 46) Applying special effects t Fireworks (= 46) Vivid Colors (= 48) Poster Effect (= 48) Fish-Eye Effect (= 48) Miniature Effect (= 49) Toy Camera Effect (= ...
Contents: Basic Operations 4 Shoot Use camera-determined settings (Auto Mode 34 Shooting people well I Portraits (= 46) P Against Snow (= 46) Matching specific scenes Low Light (= 46) Applying special effects t Fireworks (= 46) Vivid Colors (= 48) Poster Effect (= 48) Fish-Eye Effect (= 48) Miniature Effect (= 49) Toy Camera Effect (= ...
User Guide
Page 18
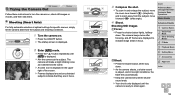
... still until the shutter sound ends. Your shot is only displayed until [ ] is displayed. Aim the camera at optimal settings for specific scenes, simply let the camera determine the subject and shooting conditions. 1 Turn the camera on , shoot still images or movies, and then view them. Cover...
... still until the shutter sound ends. Your shot is only displayed until [ ] is displayed. Aim the camera at optimal settings for specific scenes, simply let the camera determine the subject and shooting conditions. 1 Turn the camera on , shoot still images or movies, and then view them. Cover...

User Guide
Page 28
... the camera on and prepare for shooting when the screen is off but the lens is retracted and the camera turns itself off automatically after a specific period of inactivity. In about one minute once the camera is retracted by pressing the button. Cover Preliminary Notes and Legal Information Contents: Basic Operations...
... the camera on and prepare for shooting when the screen is off but the lens is retracted and the camera turns itself off automatically after a specific period of inactivity. In about one minute once the camera is retracted by pressing the button. Cover Preliminary Notes and Legal Information Contents: Basic Operations...
User Guide
Page 34
... from the subject, move it toward (wide angle). (A zoom bar showing the zoom position is displayed. Aim the camera at optimal settings for specific scenes, simply let the camera determine the subject and shooting conditions. 1 Turn the camera on. Press the ON/OFF button. The...
... from the subject, move it toward (wide angle). (A zoom bar showing the zoom position is displayed. Aim the camera at optimal settings for specific scenes, simply let the camera determine the subject and shooting conditions. 1 Turn the camera on. Press the ON/OFF button. The...

User Guide
Page 45
4 3 Other Shooting Modes Shoot more effectively in various scenes, and take shots enhanced with unique image effects or captured using special functions Specific Scenes 46 Applying Special Effects .........48 Special Modes for Other Purposes 51 Cover Preliminary Notes and Legal Information Contents: Basic Operations Basic Guide Advanced Guide 1 Camera Basics 2 Smart Auto Mode 3 Other Shooting Modes 4 P Mode 5 Playback Mode 6 Setting Menu 7 Accessories 8 Appendix Index 45
4 3 Other Shooting Modes Shoot more effectively in various scenes, and take shots enhanced with unique image effects or captured using special functions Specific Scenes 46 Applying Special Effects .........48 Special Modes for Other Purposes 51 Cover Preliminary Notes and Legal Information Contents: Basic Operations Basic Guide Advanced Guide 1 Camera Basics 2 Smart Auto Mode 3 Other Shooting Modes 4 P Mode 5 Playback Mode 6 Setting Menu 7 Accessories 8 Appendix Index 45

User Guide
Page 46
... Information Contents: Basic Operations Basic Guide Advanced Guide 1 Camera Basics 2 Smart Auto Mode 3 Other Shooting Modes 4 P Mode 5 Playback Mode 6 Setting Menu 7 Accessories 8 Appendix Index 46 Specific Scenes Choose a mode matching the shooting scene, and the camera will automatically configure the settings for optimal shots. 1 Choose a shooting mode. Press the...
... Information Contents: Basic Operations Basic Guide Advanced Guide 1 Camera Basics 2 Smart Auto Mode 3 Other Shooting Modes 4 P Mode 5 Playback Mode 6 Setting Menu 7 Accessories 8 Appendix Index 46 Specific Scenes Choose a mode matching the shooting scene, and the camera will automatically configure the settings for optimal shots. 1 Choose a shooting mode. Press the...

User Guide
Page 47
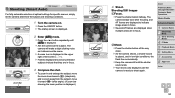
...61472;When the icon is displayed, hold it to reduce camera shake and noise. 1 Enter < > mode. Follow step 1 in "Specific Scenes" (=46) and choose [ ]. 2 Shoot. Press the shutter button halfway. [ ] is displayed on the left side of the...Setting Menu 7 Accessories 8 Appendix Index • When using a tripod, shoot in [ ] mode (=33). • [ ] mode resolution is displayed, even in "Specific Scenes" (=46) and choose [ ]. 2 Configure the setting. Press the button to access the setting screen. Brightness Color Tone For brighter images, adjust ...
...61472;When the icon is displayed, hold it to reduce camera shake and noise. 1 Enter < > mode. Follow step 1 in "Specific Scenes" (=46) and choose [ ]. 2 Shoot. Press the shutter button halfway. [ ] is displayed on the left side of the...Setting Menu 7 Accessories 8 Appendix Index • When using a tripod, shoot in [ ] mode (=33). • [ ] mode resolution is displayed, even in "Specific Scenes" (=46) and choose [ ]. 2 Configure the setting. Press the button to access the setting screen. Brightness Color Tone For brighter images, adjust ...

User Guide
Page 48
...you obtain the desired results. 48 Cover Preliminary Notes and Legal Information Contents: Basic Operations Basic Guide 1 Choose [ ]. Follow step 1 in "Specific Scenes" (=46) and choose [ ]. 2 Choose an effect level. Press the button, press the buttons to choose a shooting mode. 2.... Applying Special Effects Add a variety of effects to images when shooting. 1 Choose a shooting mode. Follow step 1 in "Specific Scenes" (=46) to choose an effect level, and then press the button. A preview is shown of how your shot will look...
...you obtain the desired results. 48 Cover Preliminary Notes and Legal Information Contents: Basic Operations Basic Guide 1 Choose [ ]. Follow step 1 in "Specific Scenes" (=46) and choose [ ]. 2 Choose an effect level. Press the button, press the buttons to choose a shooting mode. 2.... Applying Special Effects Add a variety of effects to images when shooting. 1 Choose a shooting mode. Follow step 1 in "Specific Scenes" (=46) to choose an effect level, and then press the button. A preview is shown of how your shot will look...
User Guide
Page 49
... button to return to vertical, press the buttons in miniature models by blurring image areas above and below your selected area. People and objects in "Specific Scenes" (=46) and choose [ ]. A white frame is not recorded. 1 Choose [ ]. Follow step 1 in the scene will not be changed. You can...
... button to return to vertical, press the buttons in miniature models by blurring image areas above and below your selected area. People and objects in "Specific Scenes" (=46) and choose [ ]. A white frame is not recorded. 1 Choose [ ]. Follow step 1 in the scene will not be changed. You can...

User Guide
Page 50
... black and white, sepia, or blue and white. B/W Sepia Blue Black and white shots. Movies 1 Choose [ ]. Follow step 1 in "Specific Scenes" (=46) and choose [ ]. 2 Choose a color tone. Press the button, press the buttons to choose a color tone, and then... shots from a toy camera by vignetting (darker, blurred image corners) and changing the overall color. 1 Choose [ ]. Follow step 1 in "Specific Scenes" (=46) and choose [ ]. 2 Choose a color tone. Press the button, press the buttons to choose a color tone, and then...
... black and white, sepia, or blue and white. B/W Sepia Blue Black and white shots. Movies 1 Choose [ ]. Follow step 1 in "Specific Scenes" (=46) and choose [ ]. 2 Choose a color tone. Press the button, press the buttons to choose a color tone, and then... shots from a toy camera by vignetting (darker, blurred image corners) and changing the overall color. 1 Choose [ ]. Follow step 1 in "Specific Scenes" (=46) and choose [ ]. 2 Choose a color tone. Press the button, press the buttons to choose a color tone, and then...
User Guide
Page 51
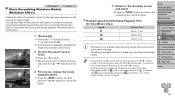
... Mode 6 Setting Menu 7 Accessories 8 Appendix Index 51 This is useful when including yourself in group photos or similar shots. 1 Choose [ ]. Follow step 1 in "Specific Scenes" (=46) and choose [ ]. 2 Compose the shot and press the shutter button halfway. Make sure a green frame is displayed around the face you...
... Mode 6 Setting Menu 7 Accessories 8 Appendix Index 51 This is useful when including yourself in group photos or similar shots. 1 Choose [ ]. Follow step 1 in "Specific Scenes" (=46) and choose [ ]. 2 Compose the shot and press the shutter button halfway. Make sure a green frame is displayed around the face you...

User Guide
Page 52
... 8 Appendix Index 52 In this case, mount the camera on a tripod or take other measures to prevent camera shake. 1 Choose [N]. Follow step 1 in "Specific Scenes" (=46) and choose [N]. 2 Choose the shutter speed. Press the button, choose [)] in the menu, and choose the desired shutter speed (=30). 3 Check...
... 8 Appendix Index 52 In this case, mount the camera on a tripod or take other measures to prevent camera shake. 1 Choose [N]. Follow step 1 in "Specific Scenes" (=46) and choose [N]. 2 Choose the shutter speed. Press the button, choose [)] in the menu, and choose the desired shutter speed (=30). 3 Check...

User Guide
Page 54
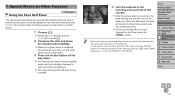
... Movies Shooting in Program AE ( Mode) You can customize many function settings to suit your preferred shooting style. 1 Enter mode. Follow step 1 in "Specific Scenes" (=46) and choose [G]. 2 Customize the settings as well, by the camera can be automatically adjusted for movie recording. • For details on the shooting...
... Movies Shooting in Program AE ( Mode) You can customize many function settings to suit your preferred shooting style. 1 Enter mode. Follow step 1 in "Specific Scenes" (=46) and choose [G]. 2 Customize the settings as well, by the camera can be automatically adjusted for movie recording. • For details on the shooting...
User Guide
Page 70
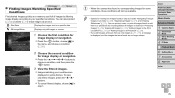
... button. 3 View the filtered images. Images matching your specified conditions. Still Images Finding Images Matching Specified Conditions Movies Find desired images quickly on a specific date. Still image/Movie Displays only still images or movies. 1 Choose the first condition for image display or navigation. Press the button, choose...
... button. 3 View the filtered images. Images matching your specified conditions. Still Images Finding Images Matching Specified Conditions Movies Find desired images quickly on a specific date. Still image/Movie Displays only still images or movies. 1 Choose the first condition for image display or navigation. Press the button, choose...

User Guide
Page 103
4 8 Appendix Helpful information when using the camera Troubleshooting 104 On-Screen Messages 107 On-Screen Information ..........109 Functions and Menu Tables 111 Handling Precautions 117 Specifications 117 Cover Preliminary Notes and Legal Information Contents: Basic Operations Basic Guide Advanced Guide 1 Camera Basics 2 Smart Auto Mode 3 Other Shooting Modes 4 P Mode 5 Playback Mode 6 Setting Menu 7 Accessories 8 Appendix Index 103
4 8 Appendix Helpful information when using the camera Troubleshooting 104 On-Screen Messages 107 On-Screen Information ..........109 Functions and Menu Tables 111 Handling Precautions 117 Specifications 117 Cover Preliminary Notes and Legal Information Contents: Basic Operations Basic Guide Advanced Guide 1 Camera Basics 2 Smart Auto Mode 3 Other Shooting Modes 4 P Mode 5 Playback Mode 6 Setting Menu 7 Accessories 8 Appendix Index 103
User Guide
Page 117
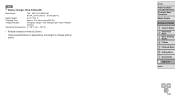
...an airtight, resealable plastic bag and let it gradually adjust to remove dust from the lens. A2600 • Before long-term battery storage, use . If cleaning is difficult, contact a Canon Customer Support Help Desk. • To prevent condensation from forming on the camera after sudden ...Source A2600 Battery Pack NB-11L AC Adapter Kit ACK-DC90 A1400 AA alkaline batteries (AA NiMH batteries (Canon NB-3AH)) x2 AC Adapter Kit ACK800 • However, connection requires DC Coupler DR-DC10, sold separately Dimensions (Based on the camera, stop using it immediately. Specifications Camera ...
...an airtight, resealable plastic bag and let it gradually adjust to remove dust from the lens. A2600 • Before long-term battery storage, use . If cleaning is difficult, contact a Canon Customer Support Help Desk. • To prevent condensation from forming on the camera after sudden ...Source A2600 Battery Pack NB-11L AC Adapter Kit ACK-DC90 A1400 AA alkaline batteries (AA NiMH batteries (Canon NB-3AH)) x2 AC Adapter Kit ACK800 • However, connection requires DC Coupler DR-DC10, sold separately Dimensions (Based on the camera, stop using it immediately. Specifications Camera ...
User Guide
Page 120
A2600 Battery Charger CB-2LF/CB-2LFE Rated Input: 100 - 240 V AC (50/60 Hz) 8.0 VA, 0.07 A (100 V) - 0.04 A (240 V) Rated Output: 4.2 V / 0.41 A Charging Time: Approx. 2 ... Indicator: Charging: orange / Fully charged: green (two-indicator system) Operating Temperatures: 5 - 40 °C (41 - 104 °F) • All data is based on tests by Canon. • Camera specifications or appearance are subject to change without notice. Cover Preliminary Notes and Legal Information Contents: Basic Operations Basic Guide Advanced Guide 1 Camera Basics 2 Smart...
A2600 Battery Charger CB-2LF/CB-2LFE Rated Input: 100 - 240 V AC (50/60 Hz) 8.0 VA, 0.07 A (100 V) - 0.04 A (240 V) Rated Output: 4.2 V / 0.41 A Charging Time: Approx. 2 ... Indicator: Charging: orange / Fully charged: green (two-indicator system) Operating Temperatures: 5 - 40 °C (41 - 104 °F) • All data is based on tests by Canon. • Camera specifications or appearance are subject to change without notice. Cover Preliminary Notes and Legal Information Contents: Basic Operations Basic Guide Advanced Guide 1 Camera Basics 2 Smart...
