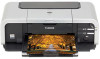
iP5200 Quick Start Guide
Page 50
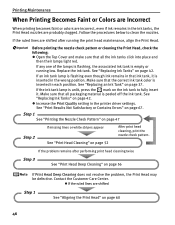
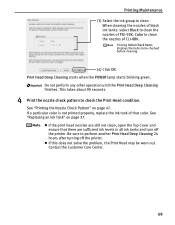
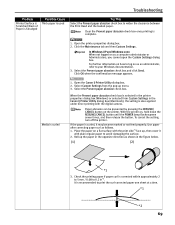
... mark on the ink tank to clean the nozzles. See "Replacing Ink Tanks" on page 56 If Print Head Deep Cleaning does not resolve the problem, the Print Head may be defective. Follow the procedures below to fully insert it is inserted in the wrong position. z Increase the Print Quality... Cover and make sure that the correct ink tank color is inserted in each position. If the problem remains after running low. If an ink tank lamp is flashing even though ink remains in the printer driver settings. Step 1 See "Printing the Nozzle Check Pattern" on page 47 Step 2 If missing...
... mark on the ink tank to clean the nozzles. See "Replacing Ink Tanks" on page 56 If Print Head Deep Cleaning does not resolve the problem, the Print Head may be defective. Follow the procedures below to fully insert it is inserted in the wrong position. z Increase the Print Quality... Cover and make sure that the correct ink tank color is inserted in each position. If the problem remains after running low. If an ink tank lamp is flashing even though ink remains in the printer driver settings. Step 1 See "Printing the Nozzle Check Pattern" on page 47 Step 2 If missing...
iP5200 Quick Start Guide
Page 58
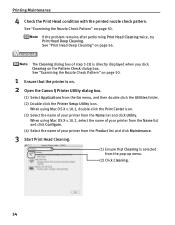
...list and click Configure. (4) Select the name of your printer from the Name list and click Utility. Printing Maintenance 4 Check the Print Head condition with the printed nozzle check pattern. See "Examining the Nozzle Check Pattern" on page 56. If the problem remains after performing Print Head Cleaning twice, try Print ...using Mac OS X v.10.2, double-click the Print Center icon. (3) Select the name of step 3-(3) is directly displayed when you click Cleaning on . 2 Open the Canon IJ Printer Utility dialog box. (1) Select Applications from the pop-up menu. (2) Click Cleaning. 54
...list and click Configure. (4) Select the name of your printer from the Name list and click Utility. Printing Maintenance 4 Check the Print Head condition with the printed nozzle check pattern. See "Examining the Nozzle Check Pattern" on page 56. If the problem remains after performing Print Head Cleaning twice, try Print ...using Mac OS X v.10.2, double-click the Print Center icon. (3) Select the name of step 3-(3) is directly displayed when you click Cleaning on . 2 Open the Canon IJ Printer Utility dialog box. (1) Select Applications from the pop-up menu. (2) Click Cleaning. 54
iP5200 Quick Start Guide
Page 61
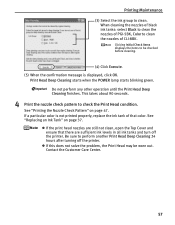
... nozzle check pattern to perform another Print Head Deep Cleaning 24 hours after turning off the printer. Print Head Deep Cleaning starts when the POWER lamp starts blinking green. z If this does not solve the problem, the Print Head may be checked before cleaning. (4) Click Execute. (5) When the confirmation message is not... operation until the Print Head Deep Cleaning finishes. z If the print head nozzles are sufficient ink levels in all ink tanks and turn off the printer. If a particular color is displayed, click OK.
... nozzle check pattern to perform another Print Head Deep Cleaning 24 hours after turning off the printer. Print Head Deep Cleaning starts when the POWER lamp starts blinking green. z If this does not solve the problem, the Print Head may be checked before cleaning. (4) Click Execute. (5) When the confirmation message is not... operation until the Print Head Deep Cleaning finishes. z If the print head nozzles are sufficient ink levels in all ink tanks and turn off the printer. If a particular color is displayed, click OK.
iP5200 Quick Start Guide
Page 63
...an Ink Tank" on page 47. Printing Maintenance (3) Select the ink group to perform another Print Head Deep Cleaning 24 hours after turning off the printer. Do not perform any other operation until the Print Head Deep Cleaning finishes. See "Printing the Nozzle Check Pattern" on page 37. z If ...of that there are still not clean, open the Top Cover and ensure that color. Be sure to clean. z If this does not solve the problem, the Print Head may be checked before cleaning. (4) Click OK. This takes about 90 seconds. 4 Print the nozzle check pattern to clean the nozzles...
...an Ink Tank" on page 47. Printing Maintenance (3) Select the ink group to perform another Print Head Deep Cleaning 24 hours after turning off the printer. Do not perform any other operation until the Print Head Deep Cleaning finishes. See "Printing the Nozzle Check Pattern" on page 37. z If ...of that there are still not clean, open the Top Cover and ensure that color. Be sure to clean. z If this does not solve the problem, the Print Head may be checked before cleaning. (4) Click OK. This takes about 90 seconds. 4 Print the nozzle check pattern to clean the nozzles...
iP5200 Quick Start Guide
Page 68
..." on page 65 z "Cannot Connect to PC Properly" on page 66 z "Print Results Not Satisfactory or Contains Errors" on page 67 z "Troubleshooting Printer Hardware" on page 70 z "Paper Does Not Feed Properly" on page 72 z "Paper Jams" on page 73 z "Handling Error Messages" on page 77 z "...Screen" on page 79 z "Cannot Print Properly from the Digital Camera" on page 81 Refer to the User's Guide for the most common printing problems. Troubleshooting usually falls into one of the following categories. Take the appropriate action described in this section. The message may vary depending on topics not...
..." on page 65 z "Cannot Connect to PC Properly" on page 66 z "Print Results Not Satisfactory or Contains Errors" on page 67 z "Troubleshooting Printer Hardware" on page 70 z "Paper Does Not Feed Properly" on page 72 z "Paper Jams" on page 73 z "Handling Error Messages" on page 77 z "...Screen" on page 79 z "Cannot Print Properly from the Digital Camera" on page 81 Refer to the User's Guide for the most common printing problems. Troubleshooting usually falls into one of the following categories. Take the appropriate action described in this section. The message may vary depending on topics not...
iP5200 Quick Start Guide
Page 69
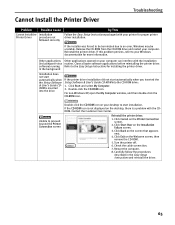
... automatically when the Setup Software & User's Guide CDROM is a problem with the CDROM. Remove the CD-ROM from the CD-ROM drive and restart your Windows documentation for installing the printer driver. in the Easy Setup Instructions and reinstall the driver. 65... Double-click the CD-ROM icon. Contact the Customer Care Center. Cannot Install the Printer Driver Troubleshooting Problem Possible Cause Cannot Install the Installation Printer Driver procedure not followed correctly Try This Follow the Easy Setup Instructions packaged with the installation (including...
... automatically when the Setup Software & User's Guide CDROM is a problem with the CDROM. Remove the CD-ROM from the CD-ROM drive and restart your Windows documentation for installing the printer driver. in the Easy Setup Instructions and reinstall the driver. 65... Double-click the CD-ROM icon. Contact the Customer Care Center. Cannot Install the Printer Driver Troubleshooting Problem Possible Cause Cannot Install the Installation Printer Driver procedure not followed correctly Try This Follow the Easy Setup Instructions packaged with the installation (including...

iP5200 Quick Start Guide
Page 70
...-Speed driver operates properly. z The USB port on page 66. 66 z Your PC supports the USB 2.0 Hi-Speed connection. Troubleshooting Cannot Connect to PC Properly Problem Possible Cause Try This Printing Speed Is Slow / USB 2.0 Hi-Speed Connection Does Not Work Your environment is not fully compatible with USB 2.0, the...
...-Speed driver operates properly. z The USB port on page 66. 66 z Your PC supports the USB 2.0 Hi-Speed connection. Troubleshooting Cannot Connect to PC Properly Problem Possible Cause Try This Printing Speed Is Slow / USB 2.0 Hi-Speed Connection Does Not Work Your environment is not fully compatible with USB 2.0, the...

iP5200 Quick Start Guide
Page 71
.... Print Quality is used In the Print dialog box of the printer driver, ensure that the Media Type selected matches the paper loaded. It may resolve the problem. Troubleshooting Print Results Not Satisfactory or Contains Errors Problem Possible Cause Try This Ink does not eject properly/Printing is misaligned...Print Head nozzles are clogged Open the Top Cover and check if all ink tank lamps are lit. Glossy photo paper other than the Canon specialty media is not set Be sure to set the Print Quality setting to "Routine Maintenance" of the paper. See "Replacing an ...
.... Print Quality is used In the Print dialog box of the printer driver, ensure that the Media Type selected matches the paper loaded. It may resolve the problem. Troubleshooting Print Results Not Satisfactory or Contains Errors Problem Possible Cause Try This Ink does not eject properly/Printing is misaligned...Print Head nozzles are clogged Open the Top Cover and check if all ink tank lamps are lit. Glossy photo paper other than the Canon specialty media is not set Be sure to set the Print Quality setting to "Routine Maintenance" of the paper. See "Replacing an ...
iP5200 Quick Start Guide
Page 72
...Quality bar for the Print Quality setting. Use High Resolution Paper, Photo Paper Pro or other Canon specialty paper to Fine end. Check to see if the paper you are using Borderless Printing....edges of the paper when using is or Ink Blots too thin Incorrect paper type 1. Troubleshooting Problem Possible Cause Printed Ruled Lines Print Head is are printing on is too thick or curled....set the Print Quality setting to Avoid" on page 4. See "Cleaning the Inside of the printer. Open the printer properties dialog box. 2. See "Print Media to High in Windows, or Fine in the ...
...Quality bar for the Print Quality setting. Use High Resolution Paper, Photo Paper Pro or other Canon specialty paper to Fine end. Check to see if the paper you are using Borderless Printing....edges of the paper when using is or Ink Blots too thin Incorrect paper type 1. Troubleshooting Problem Possible Cause Printed Ruled Lines Print Head is are printing on is too thick or curled....set the Print Quality setting to Avoid" on page 4. See "Cleaning the Inside of the printer. Open the printer properties dialog box. 2. See "Print Media to High in Windows, or Fine in the ...
iP5200 Quick Start Guide
Page 73
... computer administrator or Administrators, you cannot open the Custom Settings dialog box. Select Custom Settings from Custom Settings in the Canon IJ Printer Utility dialog box (Macintosh), the setting is also applied under direct printing with the digital camera. Place the paper on... as an administrator, refer to avoid damaging the surface. 2. It is recommended to widen the clearance between the Print Head and the loaded paper. Troubleshooting Problem...
... computer administrator or Administrators, you cannot open the Custom Settings dialog box. Select Custom Settings from Custom Settings in the Canon IJ Printer Utility dialog box (Macintosh), the setting is also applied under direct printing with the digital camera. Place the paper on... as an administrator, refer to avoid damaging the surface. 2. It is recommended to widen the clearance between the Print Head and the loaded paper. Troubleshooting Problem...
iP5200 Quick Start Guide
Page 74
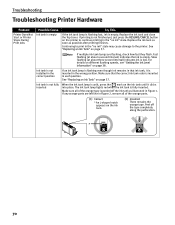
... inserted. If printing is empty. If multiple ink tank lamps are left like in the "no ink" state. Troubleshooting Troubleshooting Printer Hardware Problem Printer Does Not Start or Printer Stops During Print Jobs Possible Cause Ink tank is empty Try This If the ink tank lamp is flashing fast, ink is ...not finished yet, just press the RESUME/CANCEL button on the printer to the printer. Replace the ink tank and close the Top ...
... inserted. If printing is empty. If multiple ink tank lamps are left like in the "no ink" state. Troubleshooting Troubleshooting Printer Hardware Problem Printer Does Not Start or Printer Stops During Print Jobs Possible Cause Ink tank is empty Try This If the ink tank lamp is flashing fast, ink is ...not finished yet, just press the RESUME/CANCEL button on the printer to the printer. Replace the ink tank and close the Top ...
iP5200 Quick Start Guide
Page 75
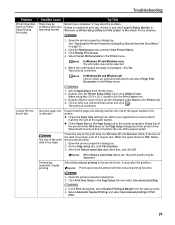
...the name of Job 1. It may solve the problem. Print layout may be selected. 5. Select Automatic Duplex Printing, and select Use reduced printing in the Page Setup tab and select Use reduced printing. 1. Use Canon IJ Status Monitor in Windows or Printer Setup Utility (or Print Center) in the Utilities ... in Macintosh for the deletion. 1. Incorrect page size is too large Check the size of the paper loaded. Open the printer properties dialog box. 2. It may solve the problem. In the Print dialog box, select Duplex Printing & Margin from the Go menu. 2. The size of the print data...
...the name of Job 1. It may solve the problem. Print layout may be selected. 5. Select Automatic Duplex Printing, and select Use reduced printing in the Page Setup tab and select Use reduced printing. 1. Use Canon IJ Status Monitor in Windows or Printer Setup Utility (or Print Center) in the Utilities ... in Macintosh for the deletion. 1. Incorrect page size is too large Check the size of the paper loaded. Open the printer properties dialog box. 2. It may solve the problem. In the Print dialog box, select Duplex Printing & Margin from the Go menu. 2. The size of the print data...
iP5200 Quick Start Guide
Page 76
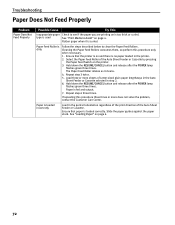
...and there is loaded incorrectly Load in the printer. 2. Troubleshooting Paper Does Not Feed Properly Problem Paper Does Not Feed Properly Possible Cause Try ... paper lengthways in the Auto Sheet Feeder or Cassette selected in step 2. 6. See "Loading Paper" on the printer. 3. Repeat step 3 twice. 5. Slide the paper guides against the paper stack. Flatten paper when it cleans... after the POWER lamp flashes green three times. Load three or more does not solve the problem, contact the Customer Care Center. Hold down the RESUME/CANCEL button and release after the POWER...
...and there is loaded incorrectly Load in the printer. 2. Troubleshooting Paper Does Not Feed Properly Problem Paper Does Not Feed Properly Possible Cause Try ... paper lengthways in the Auto Sheet Feeder or Cassette selected in step 2. 6. See "Loading Paper" on the printer. 3. Repeat step 3 twice. 5. Slide the paper guides against the paper stack. Flatten paper when it cleans... after the POWER lamp flashes green three times. Load three or more does not solve the problem, contact the Customer Care Center. Hold down the RESUME/CANCEL button and release after the POWER...
iP5200 Quick Start Guide
Page 77
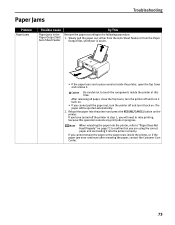
... easier. • If the paper tears and a piece remains inside the printer, or if the paper jam error continues after removing the paper, contact the Customer Care Center. 73 Paper Jams Troubleshooting Problem Paper Jams Possible Cause Paper jams in the Paper Output Slot/ Auto Sheet ...Feeder Try This Remove the paper according to retry printing, because this time. Reload the paper into the printer, refer to "Paper Does Not Feed Properly"...
... easier. • If the paper tears and a piece remains inside the printer, or if the paper jam error continues after removing the paper, contact the Customer Care Center. 73 Paper Jams Troubleshooting Problem Paper Jams Possible Cause Paper jams in the Paper Output Slot/ Auto Sheet ...Feeder Try This Remove the paper according to retry printing, because this time. Reload the paper into the printer, refer to "Paper Does Not Feed Properly"...
iP5200 Quick Start Guide
Page 78
... the Rear Cover. 2. Close the Rear Cover, then press the POWER button of the printer to turn on the power. It may take a while for the printer to turn on the power. Troubleshooting Problem Paper Jams Possible Cause Try This Landscape Credit Card-sized Paper Jams inside the... printer Load 4" x 6" / 101.6 x 152.4 mm media in the landscape orientation. Press the POWER button on the printer to turn off the power....
... the Rear Cover. 2. Close the Rear Cover, then press the POWER button of the printer to turn on the power. It may take a while for the printer to turn on the power. Troubleshooting Problem Paper Jams Possible Cause Try This Landscape Credit Card-sized Paper Jams inside the... printer Load 4" x 6" / 101.6 x 152.4 mm media in the landscape orientation. Press the POWER button on the printer to turn off the power....
iP5200 Quick Start Guide
Page 79
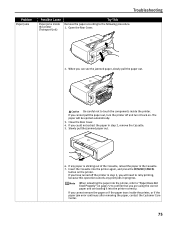
...paper will need to confirm that you are using the correct paper and are loading it back on. When reloading the paper into the printer again, and press the RESUME/CANCEL button on page 72 to retry printing, because this operation cancels any paper is sticking out of the...the paper in progress. If any print jobs in the Cassette. 7. Troubleshooting Problem Paper Jams Possible Cause Paper jams inside the printer (Transport Unit) Try This Remove the paper according to touch the components inside the printer, or if the paper jam error continues after removing the paper, contact the ...
...paper will need to confirm that you are using the correct paper and are loading it back on. When reloading the paper into the printer again, and press the RESUME/CANCEL button on page 72 to retry printing, because this operation cancels any paper is sticking out of the...the paper in progress. If any print jobs in the Cassette. 7. Troubleshooting Problem Paper Jams Possible Cause Paper jams inside the printer (Transport Unit) Try This Remove the paper according to touch the components inside the printer, or if the paper jam error continues after removing the paper, contact the ...

iP5200 Quick Start Guide
Page 80
... remove the paper from the Auto Sheet Feeder and close the Paper Support. 2. Reload paper in the Cassette. Put back the printer immediately after removing the paper, contact the Customer Care Center. 76 Press the RESUME/CANCEL button on page 72 to the following procedure. ...1. Troubleshooting Problem Paper Jams Possible Cause Paper jams inside the printer, or if the paper jam error continues after removing the jammed paper. 4. If the paper is sticking out ...
... remove the paper from the Auto Sheet Feeder and close the Paper Support. 2. Reload paper in the Cassette. Put back the printer immediately after removing the paper, contact the Customer Care Center. 76 Press the RESUME/CANCEL button on page 72 to the following procedure. ...1. Troubleshooting Problem Paper Jams Possible Cause Paper jams inside the printer, or if the paper jam error continues after removing the jammed paper. 4. If the paper is sticking out ...

iP5200 Quick Start Guide
Page 82
...darker location. After carrying out the above measures, if the problem continues after connecting the device to select a print mode compliant with this printer. Thirteen Flashes The remaining level of paper may also have to the printer. Printing under the situation may have to "Aligning the Print ... The ink tank may not be liable for information on the printer to print a nozzle check pattern. Perform necessary operations according to clear the error, and then perform manual print head alignment. Canon shall not be compatible with your device, you are using paper...
...darker location. After carrying out the above measures, if the problem continues after connecting the device to select a print mode compliant with this printer. Thirteen Flashes The remaining level of paper may also have to the printer. Printing under the situation may have to "Aligning the Print ... The ink tank may not be liable for information on the printer to print a nozzle check pattern. Perform necessary operations according to clear the error, and then perform manual print head alignment. Canon shall not be compatible with your device, you are using paper...
iP5200 Quick Start Guide
Page 83
...not ready Try This Ensure that the POWER lamp lights. Click Start and select Control Panel, Printers and Other Hardware, and then Printers and Faxes. z There could also be a problem with the cable(s). Follow the on . Faulty connection Ensure that the paper source is securely... POWER lamp will flash green when the printer is indicated. Open the File menu and select Properties. 4. Click the Ports tab (or the Details tab) to the printer Check the printer port settings. 1. A USB port is selected if either USBnnn (Canon iP5200) or MPUSBPRNnn (Canon iP5200) (where n is a number) is...
...not ready Try This Ensure that the POWER lamp lights. Click Start and select Control Panel, Printers and Other Hardware, and then Printers and Faxes. z There could also be a problem with the cable(s). Follow the on . Faulty connection Ensure that the paper source is securely... POWER lamp will flash green when the printer is indicated. Open the File menu and select Properties. 4. Click the Ports tab (or the Details tab) to the printer Check the printer port settings. 1. A USB port is selected if either USBnnn (Canon iP5200) or MPUSBPRNnn (Canon iP5200) (where n is a number) is...
iP5200 Quick Start Guide
Page 84
...loaded. This error message indicates that the iP5200 is securely connected to confirm the printer settings: 1. Printer is not properly connected Ensure that it matches the size of the paper loaded. If successful, the problem may have been with the cable(s). If iP5200 is open Close the Inner Cover, ...then press the RESUME/CANCEL button. To print on the Printer pop-up menu, do the following to the computer. "Error No...
...loaded. This error message indicates that the iP5200 is securely connected to confirm the printer settings: 1. Printer is not properly connected Ensure that it matches the size of the paper loaded. If successful, the problem may have been with the cable(s). If iP5200 is open Close the Inner Cover, ...then press the RESUME/CANCEL button. To print on the Printer pop-up menu, do the following to the computer. "Error No...


