
iP5200 Quick Start Guide
Page 2
... an intuitively guided interactive troubleshooting environment, the place to start is a cost-attractive and easy-to-use extended service program that provides up to your Canon service and support, call (1-800-385-2155), or visit our Web site at www.canontechsupport.com. * Support program specifics are found here. 2. Toll-... issue, try emailing our friendly technical engineers, specially trained to communicate quick, easy, and logical solutions to three full years of the printer): Printer Driver CD-ROM number (located on the CD-ROM): Purchase Date: Customer Technical Support Sequence* 1.
... an intuitively guided interactive troubleshooting environment, the place to start is a cost-attractive and easy-to-use extended service program that provides up to your Canon service and support, call (1-800-385-2155), or visit our Web site at www.canontechsupport.com. * Support program specifics are found here. 2. Toll-... issue, try emailing our friendly technical engineers, specially trained to communicate quick, easy, and logical solutions to three full years of the printer): Printer Driver CD-ROM number (located on the CD-ROM): Purchase Date: Customer Technical Support Sequence* 1.
iP5200 Quick Start Guide
Page 5
... 18 Printing with Windows 20 Printing with Macintosh 23 Canceling Printing 26 Advanced Printing Printing Photographs Directly from a PictBridge Compliant Device 28 Accessing the Printer Driver (Windows 35 Using the Bundled Software 36 Printing Maintenance Replacing an Ink Tank 37 When Printing Becomes Faint or Colors are Incorrect 46 Printing the... An Error Message Appears on the Screen 79 Cannot Print Properly from the Digital Camera 81 Appendix Specifications 86 Safety Precautions 90 Regulatory Information 92 CANON U.S.A., INC. LIMITED WARRANTY --- (USA Only 93 Index 95 1
... 18 Printing with Windows 20 Printing with Macintosh 23 Canceling Printing 26 Advanced Printing Printing Photographs Directly from a PictBridge Compliant Device 28 Accessing the Printer Driver (Windows 35 Using the Bundled Software 36 Printing Maintenance Replacing an Ink Tank 37 When Printing Becomes Faint or Colors are Incorrect 46 Printing the... An Error Message Appears on the Screen 79 Cannot Print Properly from the Digital Camera 81 Appendix Specifications 86 Safety Precautions 90 Regulatory Information 92 CANON U.S.A., INC. LIMITED WARRANTY --- (USA Only 93 Index 95 1
iP5200 Quick Start Guide
Page 6
...detailed information about , or click the Help button when displayed. Then click the feature you want to use the online help within your printer driver interface: While in the printer's properties window, press the F1 key, or click in the lower left corner. The POWER lamp flashes ...) when the printer is ready. When the Help window appears, select your printer and how to know more information, view the iP5200 User's Guide and Printer Driver Guide installed on the Printer 1 Press the POWER button. Basic Printing Basic Printing This Quick Start Guide describes some of the features...
...detailed information about , or click the Help button when displayed. Then click the feature you want to use the online help within your printer driver interface: While in the printer's properties window, press the F1 key, or click in the lower left corner. The POWER lamp flashes ...) when the printer is ready. When the Help window appears, select your printer and how to know more information, view the iP5200 User's Guide and Printer Driver Guide installed on the Printer 1 Press the POWER button. Basic Printing Basic Printing This Quick Start Guide describes some of the features...

iP5200 Quick Start Guide
Page 9
... fed from the Cassette for loading a certain type of paper. You can switch between paper loaded in both types of paper to the Printer Driver Guide. Loading paper in the Cassette allows you to and print on both the Auto Sheet Feeder and Cassette. To change the paper source, ...use with the printer driver. You can also specify the type/size of paper without reloading paper for each job. For information on the printer or printer driver. This is convenient for regular use the Paper Feed Switch on the printer...
... fed from the Cassette for loading a certain type of paper. You can switch between paper loaded in both types of paper to the Printer Driver Guide. Loading paper in the Cassette allows you to and print on both the Auto Sheet Feeder and Cassette. To change the paper source, ...use with the printer driver. You can also specify the type/size of paper without reloading paper for each job. For information on the printer or printer driver. This is convenient for regular use the Paper Feed Switch on the printer...

iP5200 Quick Start Guide
Page 10
...; Choosing the paper source to match the location of paper. Basic Printing • Continuous printing on the printer driver settings, refer to the Printer Driver Guide. For example, if you need to configure the printer driver beforehand. Legal-sized paper and 2.13" x 3.39"/ 54.0 x 86.0 mm size paper, and Photo Stickers are not...
...; Choosing the paper source to match the location of paper. Basic Printing • Continuous printing on the printer driver settings, refer to the Printer Driver Guide. For example, if you need to configure the printer driver beforehand. Legal-sized paper and 2.13" x 3.39"/ 54.0 x 86.0 mm size paper, and Photo Stickers are not...
iP5200 Quick Start Guide
Page 11
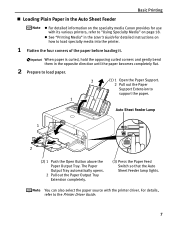
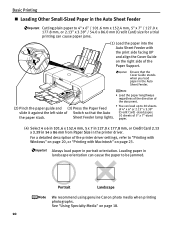
z See "Printing Media" in the Auto Sheet Feeder z For detailed information on the specialty media Canon provides for detailed instructions on page 18. You can also select the paper source with its various printers, refer to "Using Specialty Media" on how ... Lamp 1 2 (2) 1 Push the Open Button above the Paper Output Tray. Basic Printing „ Loading Plain Paper in the User's Guide for use with the printer driver. The Paper Output Tray automatically opens. 2 Pull out the Paper Output Tray Extension completely. (3) Press the Paper Feed Switch so that the Auto Sheet Feeder...
z See "Printing Media" in the Auto Sheet Feeder z For detailed information on the specialty media Canon provides for detailed instructions on page 18. You can also select the paper source with its various printers, refer to "Using Specialty Media" on how ... Lamp 1 2 (2) 1 Push the Open Button above the Paper Output Tray. Basic Printing „ Loading Plain Paper in the User's Guide for use with the printer driver. The Paper Output Tray automatically opens. 2 Pull out the Paper Output Tray Extension completely. (3) Press the Paper Feed Switch so that the Auto Sheet Feeder...

iP5200 Quick Start Guide
Page 13
... Use either European DL Env. If you do not, the address will be loaded at once. (4) Select Envelope in the printer driver according to match the direction of the printer driver settings, refer to "Printing with Windows" on page 20, "Printing with embossed or treated surfaces, a double flap, pressure seals or sticker...
... Use either European DL Env. If you do not, the address will be loaded at once. (4) Select Envelope in the printer driver according to match the direction of the printer driver settings, refer to "Printing with Windows" on page 20, "Printing with embossed or treated surfaces, a double flap, pressure seals or sticker...
iP5200 Quick Start Guide
Page 14
... paper in portrait orientation. Always load paper in landscape orientation can load up to be jammed. Portrait Landscape We recommend using genuine Canon photo media when printing photographs. Ensure that the Auto (Credit Card) -sized paper; Sheet Feeder lamp lights. 10 sheets of 5" x 7"-sized paper. (4) Select 4 x 6 in... • You can cause the paper to 20 sheets of 4" x 6" or 2.13" x 3.39" slide it against the left side of the printer driver settings, refer to "Printing with Windows" on page 20, or "Printing with the print side facing UP and align the Cover Guide on page 18...
... paper in portrait orientation. Always load paper in landscape orientation can load up to be jammed. Portrait Landscape We recommend using genuine Canon photo media when printing photographs. Ensure that the Auto (Credit Card) -sized paper; Sheet Feeder lamp lights. 10 sheets of 5" x 7"-sized paper. (4) Select 4 x 6 in... • You can cause the paper to 20 sheets of 4" x 6" or 2.13" x 3.39" slide it against the left side of the printer driver settings, refer to "Printing with Windows" on page 20, or "Printing with the print side facing UP and align the Cover Guide on page 18...
iP5200 Quick Start Guide
Page 18
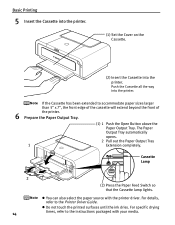
For specific drying times, refer to the instructions packaged with the printer driver. Cassette Lamp 2 14 (2) Press the Paper Feed Switch so that the Cassette lamp lights. Basic Printing 5 Insert the Cassette into the printer. (1) Set the Cover ... Cassette. (2) Insert the Cassette into the printer. Push the Cassette all the way into the printer. If the Cassette has been extended to the Printer Driver Guide. z You can also select the paper source with your media. z Do not touch the printed surfaces until the ink dries. For details, refer to...
For specific drying times, refer to the instructions packaged with the printer driver. Cassette Lamp 2 14 (2) Press the Paper Feed Switch so that the Cassette lamp lights. Basic Printing 5 Insert the Cassette into the printer. (1) Set the Cover ... Cassette. (2) Insert the Cassette into the printer. Push the Cassette all the way into the printer. If the Cassette has been extended to the Printer Driver Guide. z You can also select the paper source with your media. z Do not touch the printed surfaces until the ink dries. For details, refer to...

iP5200 Quick Start Guide
Page 19
... Switch so that the Cassette lamp lights. (4) Select Envelope in Page Size. For a detailed description of the printer driver settings, refer to match the direction of 5 envelopes can be printed in the printer driver according to the envelope size you do not, the address will appear with its flap facing UP on...
... Switch so that the Cassette lamp lights. (4) Select Envelope in Page Size. For a detailed description of the printer driver settings, refer to match the direction of 5 envelopes can be printed in the printer driver according to the envelope size you do not, the address will appear with its flap facing UP on...

iP5200 Quick Start Guide
Page 21
Always load paper in the printer driver. See "Using Specialty Media" on page 23. Portrait Landscape We recommend using genuine Canon photo media when printing photographs. For a detailed description of the printer driver settings, refer to be jammed. Loading paper in landscape orientation can cause the paper to "Printing with Windows" on page 20, or "Printing with Macintosh" on page 18. 17 Basic Printing (5) Select 4 x 6 in 101.6 x 152.4 mm or 5 x 7 in 127.0 x 177.8 mm from Paper Size in portrait orientation.
Always load paper in the printer driver. See "Using Specialty Media" on page 23. Portrait Landscape We recommend using genuine Canon photo media when printing photographs. For a detailed description of the printer driver settings, refer to be jammed. Loading paper in landscape orientation can cause the paper to "Printing with Windows" on page 20, or "Printing with Macintosh" on page 18. 17 Basic Printing (5) Select 4 x 6 in 101.6 x 152.4 mm or 5 x 7 in 127.0 x 177.8 mm from Paper Size in portrait orientation.

iP5200 Quick Start Guide
Page 23
„ Canon Specialty Media Media Type Paper Support Load Limit Auto Sheet Feeder Cassette High Resolution Paper Up to 80 sheets Up to 80 sheets Super White ... to 10 sheets 4" x 6": up to 20 sheets Not loadable*3 Transparencies T-Shirt Transfers Up to 30 sheets 1 sheet Up to 30 sheets 1 sheet Basic Printing Printer Driver Setting for Media Type High Resolution Paper Plain Paper Glossy Photo Paper Matte Photo Paper Photo Paper Plus Double Sided Photo Paper Plus Glossy Photo...
„ Canon Specialty Media Media Type Paper Support Load Limit Auto Sheet Feeder Cassette High Resolution Paper Up to 80 sheets Up to 80 sheets Super White ... to 10 sheets 4" x 6": up to 20 sheets Not loadable*3 Transparencies T-Shirt Transfers Up to 30 sheets 1 sheet Up to 30 sheets 1 sheet Basic Printing Printer Driver Setting for Media Type High Resolution Paper Plain Paper Glossy Photo Paper Matte Photo Paper Photo Paper Plus Double Sided Photo Paper Plus Glossy Photo...
iP5200 Quick Start Guide
Page 24
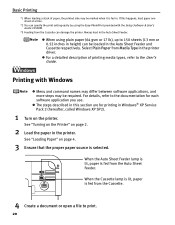
... proper paper source is fed in Windows® XP Service Pack 2 (hereafter, called Windows XP SP2). 1 Turn on page 2. 2 Load the paper in the printer driver. Select Plain Paper from the Cassette can specify the print setting easily by using plain paper (64 gsm or 17 lb), up to 150 sheets...
... proper paper source is fed in Windows® XP Service Pack 2 (hereafter, called Windows XP SP2). 1 Turn on page 2. 2 Load the paper in the printer driver. Select Plain Paper from the Cassette can specify the print setting easily by using plain paper (64 gsm or 17 lb), up to 150 sheets...

iP5200 Quick Start Guide
Page 26
... simply pressing the RESUME/ CANCEL button on page 26. 22 For a detailed description of the Paper Source settings, refer to view the Help or Printer Driver Guide. z For details about other printer driver functions, click Help or Instructions to the Printer...
... simply pressing the RESUME/ CANCEL button on page 26. 22 For a detailed description of the Paper Source settings, refer to view the Help or Printer Driver Guide. z For details about other printer driver functions, click Help or Instructions to the Printer...
iP5200 Quick Start Guide
Page 29
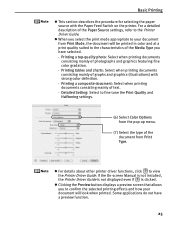
... documents consisting mainly of the Media Type you select the print mode appropriate to the Printer Driver Guide. If the On-screen Manual is not installed, the Printer Driver Guide is not displayed even if is clicked. Printing a top-quality photo: Select when printing... Select when printing documents consisting mainly of the Paper Source settings, refer to your document from Print Type. z For details about other printer driver functions, click to the characteristics of graphs and graphics (illustrations) with the Paper Feed Switch on the printer. For a detailed description of...
... documents consisting mainly of the Media Type you select the print mode appropriate to the Printer Driver Guide. If the On-screen Manual is not installed, the Printer Driver Guide is not displayed even if is clicked. Printing a top-quality photo: Select when printing... Select when printing documents consisting mainly of the Paper Source settings, refer to your document from Print Type. z For details about other printer driver functions, click to the characteristics of graphs and graphics (illustrations) with the Paper Feed Switch on the printer. For a detailed description of...

iP5200 Quick Start Guide
Page 39
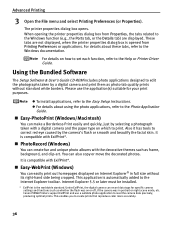
Advanced Printing Accessing the Printer Driver (Windows) The printer properties dialog box can usually be opened from either within an application, or directly from the Windows Start menu. The Print dialog ...
Advanced Printing Accessing the Printer Driver (Windows) The printer properties dialog box can usually be opened from either within an application, or directly from the Windows Start menu. The Print dialog ...
iP5200 Quick Start Guide
Page 40
...which to correct red eye caused by selecting a photograph taken with the decorative themes such as frame, background, and clip-art. Canon PIXMA Printers support ExifPrint and use the application(s) suitable for specific camera settings and functions such as photo-lab quality prints without its ...® in portrait or night scene mode, etc. It is opened from Properties, the tabs related to the Help or Printer Driver Guide. When opening the printer properties dialog box from Printing Preferences or applications. The printer properties dialog box opens. This enables you...
...which to correct red eye caused by selecting a photograph taken with the decorative themes such as frame, background, and clip-art. Canon PIXMA Printers support ExifPrint and use the application(s) suitable for specific camera settings and functions such as photo-lab quality prints without its ...® in portrait or night scene mode, etc. It is opened from Properties, the tabs related to the Help or Printer Driver Guide. When opening the printer properties dialog box from Printing Preferences or applications. The printer properties dialog box opens. This enables you...

iP5200 Quick Start Guide
Page 42
.... Printing Maintenance „ Getting the Ink Level Information Ink Level Indication on the Printer You can also display the Canon IJ Status Monitor by clicking the Canon IJ Status Monitor button which appears on the taskbar during printing. Open the Top Cover of the printer to "Handling...therefore the printer is low: The ink tank lamp flashes slowly (at about three second interval). Prepare a new ink tank. See "Accessing the Printer Driver (Windows)" on the Maintenance tab. Click View Printer Status on page 35. 2. Repeats * When the ALARM lamp on page 77. Ink is out:...
.... Printing Maintenance „ Getting the Ink Level Information Ink Level Indication on the Printer You can also display the Canon IJ Status Monitor by clicking the Canon IJ Status Monitor button which appears on the taskbar during printing. Open the Top Cover of the printer to "Handling...therefore the printer is low: The ink tank lamp flashes slowly (at about three second interval). Prepare a new ink tank. See "Accessing the Printer Driver (Windows)" on the Maintenance tab. Click View Printer Status on page 35. 2. Repeats * When the ALARM lamp on page 77. Ink is out:...
iP5200 Quick Start Guide
Page 50
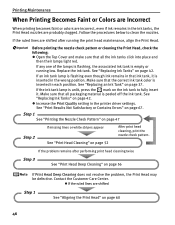
... are shifted Step 1 See "Aligning the Print Head" on page 60 46 Follow the procedures below to fully insert it is inserted in the printer driver settings. See "Replacing Ink Tanks" on page 67. Step 1 See "Printing the Nozzle Check Pattern" on page 47 Step 2 If missing lines or white stripes...
... are shifted Step 1 See "Aligning the Print Head" on page 60 46 Follow the procedures below to fully insert it is inserted in the printer driver settings. See "Replacing Ink Tanks" on page 67. Step 1 See "Printing the Nozzle Check Pattern" on page 47 Step 2 If missing lines or white stripes...

iP5200 Quick Start Guide
Page 64
Aligning the Print Head positions allows you to print without shifts in the Auto Sheet Feeder. If the printer driver is closed. Hold down the RESUME/CANCEL button until the POWER lamp flashes green four times, and then release it immediately. 1 With the printer on ...
Aligning the Print Head positions allows you to print without shifts in the Auto Sheet Feeder. If the printer driver is closed. Hold down the RESUME/CANCEL button until the POWER lamp flashes green four times, and then release it immediately. 1 With the printer on ...


