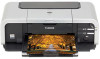

iP5200 Quick Start Guide
Page 41
With this printer, the ink tanks must be installed in the order (from left to right) indicated below: z Black: CLI-8BK z Black: PGI-5BK z Yellow: CLI-8Y z Magenta: CLI-8M z Cyan: CLI-8C Should missing characters or white streaks appear despite sufficient ink levels, refer to "When Printing Becomes Faint or Colors are out of ink. When replacing them, check the model numbers and their installation positions. Printing Maintenance Printing Maintenance Replacing an Ink Tank Replace ink tank(s) if they are Incorrect" on page 46. 37
With this printer, the ink tanks must be installed in the order (from left to right) indicated below: z Black: CLI-8BK z Black: PGI-5BK z Yellow: CLI-8Y z Magenta: CLI-8M z Cyan: CLI-8C Should missing characters or white streaks appear despite sufficient ink levels, refer to "When Printing Becomes Faint or Colors are out of ink. When replacing them, check the model numbers and their installation positions. Printing Maintenance Printing Maintenance Replacing an Ink Tank Replace ink tank(s) if they are Incorrect" on page 46. 37
iP5200 Quick Start Guide
Page 49
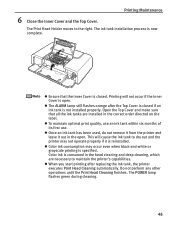
... tank to dry out and the printer may occur even when black-and-white or grayscale printing is specified. Open the Top Cover and make sure that the...consumed in the head cleaning and deep cleaning, which are installed in the open . z To maintain optimal print quality, use an ink tank within six months of its first use. z Once an ink tank has... during cleaning. 45 z The ALARM lamp still flashes orange after replacing the ink tank, the printer executes Print Head Cleaning automatically. The ink tank installation process is closed . z Color ink consumption may not operate properly...
... tank to dry out and the printer may occur even when black-and-white or grayscale printing is specified. Open the Top Cover and make sure that the...consumed in the head cleaning and deep cleaning, which are installed in the open . z To maintain optimal print quality, use an ink tank within six months of its first use. z Once an ink tank has... during cleaning. 45 z The ALARM lamp still flashes orange after replacing the ink tank, the printer executes Print Head Cleaning automatically. The ink tank installation process is closed . z Color ink consumption may not operate properly...

iP5200 Quick Start Guide
Page 54
...should appear as follows when ink is not enough ink. The nozzle check pattern will not be printed correctly if there is discharged properly. Example: When line are missing, the "Black" print head nozzle needs cleaning. Replace the ink tank if the remaining amount of this pattern are ...missing (2) If these patterns have white stripes, the "Color" print head nozzle needs cleaning. Example: When white stripes appear 50...
...should appear as follows when ink is not enough ink. The nozzle check pattern will not be printed correctly if there is discharged properly. Example: When line are missing, the "Black" print head nozzle needs cleaning. Replace the ink tank if the remaining amount of this pattern are ...missing (2) If these patterns have white stripes, the "Color" print head nozzle needs cleaning. Example: When white stripes appear 50...
iP5200 Quick Start Guide
Page 57
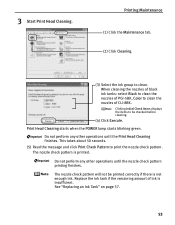
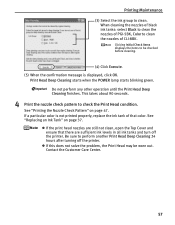
... Execute. This takes about 50 seconds. (5) Read the message and click Print Check Pattern to clean. Do not perform any other operations until the nozzle check pattern printing finishes. 3 Start Print Head Cleaning. Clicking Initial Check Items displays the items to clean the nozzles... insufficient. Printing Maintenance (1) Click the Maintenance tab. (2) Click Cleaning. (3) Select the ink group to print the nozzle check pattern. When cleaning the nozzles of black ink tanks: select Black to clean the nozzles of PGI-5BK, Color to be printed correctly if there is printed. Replace...
... Execute. This takes about 50 seconds. (5) Read the message and click Print Check Pattern to clean. Do not perform any other operations until the nozzle check pattern printing finishes. 3 Start Print Head Cleaning. Clicking Initial Check Items displays the items to clean the nozzles... insufficient. Printing Maintenance (1) Click the Maintenance tab. (2) Click Cleaning. (3) Select the ink group to print the nozzle check pattern. When cleaning the nozzles of black ink tanks: select Black to clean the nozzles of PGI-5BK, Color to be printed correctly if there is printed. Replace...
iP5200 Quick Start Guide
Page 59
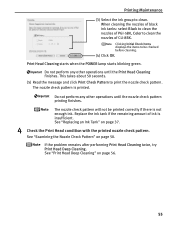
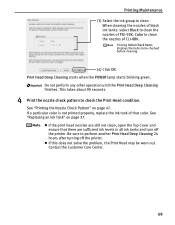
... nozzle check pattern. If the problem remains after performing Print Head Cleaning twice, try Print Head Deep Cleaning. Printing Maintenance (3) Select the ink group to clean the nozzles of CLI-8BK. When cleaning the nozzles of black ink tanks: select Black to clean the nozzles of ink is insufficient. See "Replacing... an Ink Tank" on page 56. 55 Print Head Cleaning starts when the POWER lamp starts blinking green. See "Print Head Deep Cleaning" on page 37. 4 ...
... nozzle check pattern. If the problem remains after performing Print Head Cleaning twice, try Print Head Deep Cleaning. Printing Maintenance (3) Select the ink group to clean the nozzles of CLI-8BK. When cleaning the nozzles of black ink tanks: select Black to clean the nozzles of ink is insufficient. See "Replacing... an Ink Tank" on page 56. 55 Print Head Cleaning starts when the POWER lamp starts blinking green. See "Print Head Deep Cleaning" on page 37. 4 ...
iP5200 Quick Start Guide
Page 61
... there are still not clean, open the Top Cover and ensure that color. When cleaning the nozzles of black ink tanks: select Black to clean the nozzles of PGI-5BK, Color to perform another Print Head Deep Cleaning 24 hours after turning off the printer. Contact the Customer Care Center. 57 If a particular...
... there are still not clean, open the Top Cover and ensure that color. When cleaning the nozzles of black ink tanks: select Black to clean the nozzles of PGI-5BK, Color to perform another Print Head Deep Cleaning 24 hours after turning off the printer. Contact the Customer Care Center. 57 If a particular...
iP5200 Quick Start Guide
Page 63
...check the Print Head condition. See "Printing the Nozzle Check Pattern" on page 37. Be sure to clean the nozzles of PGI-5BK, Color to perform another Print Head Deep Cleaning 24 hours after turning off the printer. Contact the Customer Care Center. 59 When cleaning the nozzles of black ink tanks...: select Black to clean the nozzles of CLI-8BK.
...check the Print Head condition. See "Printing the Nozzle Check Pattern" on page 37. Be sure to clean the nozzles of PGI-5BK, Color to perform another Print Head Deep Cleaning 24 hours after turning off the printer. Contact the Customer Care Center. 59 When cleaning the nozzles of black ink tanks...: select Black to clean the nozzles of CLI-8BK.
iP5200 Quick Start Guide
Page 65
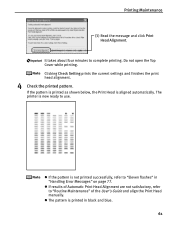
... "Handling Error Messages" on page 77. z The pattern is not printed successfully, refer to use. Printing Maintenance (3) Read the message and click Print Head Alignment. If the pattern is printed as shown below, the Print Head is now ready to "Eleven flashes" in black and blue. 61 It takes about four minutes to "Routine Maintenance" of...
... "Handling Error Messages" on page 77. z The pattern is not printed successfully, refer to use. Printing Maintenance (3) Read the message and click Print Head Alignment. If the pattern is printed as shown below, the Print Head is now ready to "Eleven flashes" in black and blue. 61 It takes about four minutes to "Routine Maintenance" of...
iP5200 Quick Start Guide
Page 67
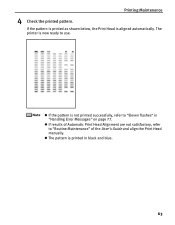
The printer is not printed successfully, refer to "Eleven flashes" in black and blue. 63 z If the pattern is now ready to "Routine Maintenance" of the User's Guide and align the Print Head manually. z The pattern is aligned automatically. z If results of Automatic Print Head Alignment are not satisfactory, refer to use. If the pattern is printed as shown below, the Print Head is printed in "Handling Error Messages" on page 77. Printing Maintenance 4 Check the printed pattern.
The printer is not printed successfully, refer to "Eleven flashes" in black and blue. 63 z If the pattern is now ready to "Routine Maintenance" of the User's Guide and align the Print Head manually. z The pattern is aligned automatically. z If results of Automatic Print Head Alignment are not satisfactory, refer to use. If the pattern is printed as shown below, the Print Head is printed in "Handling Error Messages" on page 77. Printing Maintenance 4 Check the printed pattern.

iP5200 Quick Start Guide
Page 90
... vary depending on system configuration, software, document complexity, print mode and page coverage. Black printing (text pattern) Max Speed (Custom Setting 5): 30 ppm Standard: 15.0 ppm Color printing Max Speed (Custom Setting 5): 24 ppm Standard: 11.7 ppm 203.2 mm max. (8.0 inches) (for Borderless Printing: 215.9 mm / 8.5 inches) Canon extended mode 42 KB USB 2.0 Hi-Speed / Direct...
... vary depending on system configuration, software, document complexity, print mode and page coverage. Black printing (text pattern) Max Speed (Custom Setting 5): 30 ppm Standard: 15.0 ppm Color printing Max Speed (Custom Setting 5): 24 ppm Standard: 11.7 ppm 203.2 mm max. (8.0 inches) (for Borderless Printing: 215.9 mm / 8.5 inches) Canon extended mode 42 KB USB 2.0 Hi-Speed / Direct...
iP5200 Quick Start Guide
Page 99
... Semi-gloss 19 Photo Paper Pro 19 Photo Stickers 19 PhotoRecord 36 95 LIMITED WARRANTY --- (USA Only).. 93 Cleaning 53, 54 CLI-8BK Black 37 CLI-8C Cyan 37 CLI-8M Magenta 37 CLI-8Y Yellow 37 Cover Guide 8 D Deep Cleaning 56, 58 Driver settings (Macintosh 24... Nozzle Check 48, 49 Nozzle Check Pattern examining 50 printing 47 O Open Button 7 Opening the Printer Properties Dialog Box Directly from the Start Menu (Windows 35 Opening the Printer Properties Dialog Box from the Digital Camera 81 Canon IJ Printer Utility dialog box (Macintosh 49 Canon IJ Status Monitor (Windows 71...
... Semi-gloss 19 Photo Paper Pro 19 Photo Stickers 19 PhotoRecord 36 95 LIMITED WARRANTY --- (USA Only).. 93 Cleaning 53, 54 CLI-8BK Black 37 CLI-8C Cyan 37 CLI-8M Magenta 37 CLI-8Y Yellow 37 Cover Guide 8 D Deep Cleaning 56, 58 Driver settings (Macintosh 24... Nozzle Check 48, 49 Nozzle Check Pattern examining 50 printing 47 O Open Button 7 Opening the Printer Properties Dialog Box Directly from the Start Menu (Windows 35 Opening the Printer Properties Dialog Box from the Digital Camera 81 Canon IJ Printer Utility dialog box (Macintosh 49 Canon IJ Status Monitor (Windows 71...

iP5200 Quick Start Guide
Page 103
... registered trademark or trademarks in other product and brand names are trademarks of Canon Inc. All other countries. has determined that this product meets the ENERGY STAR® guidelines for Borderless Printing (4" x 6"/75 sheets) Photo Paper Pro (8.5" x 11"/15 sheets...Ordering Information For additional supplies, use the following descriptions and order numbers. Canon is a registered trademark of their respective owners. Description Ink Tanks PGI-5 Black CLI-8 Black CLI-8 Cyan CLI-8 Magenta CLI-8 Yellow Canon Specialty Papers Photo Paper Plus Glossy (4" x 6"/20 sheets) Photo Paper...
... registered trademark or trademarks in other product and brand names are trademarks of Canon Inc. All other countries. has determined that this product meets the ENERGY STAR® guidelines for Borderless Printing (4" x 6"/75 sheets) Photo Paper Pro (8.5" x 11"/15 sheets...Ordering Information For additional supplies, use the following descriptions and order numbers. Canon is a registered trademark of their respective owners. Description Ink Tanks PGI-5 Black CLI-8 Black CLI-8 Cyan CLI-8 Magenta CLI-8 Yellow Canon Specialty Papers Photo Paper Plus Glossy (4" x 6"/20 sheets) Photo Paper...
iP5200 Easy Setup Instructions
Page 1
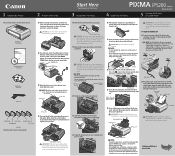
... lock lever. Open the top cover and make sure that ink tank lamps light red. PIXMA iP5200 Photo Printer Documentation and Software Kit PIXMA iP5200 Print Head Power Cord CLI-8BK Black CLI-8Y Yellow PGI-5BK Black CLI-8M Magenta CLI-8C Cyan Ink Tanks 2 Remove the tape from the printer. 1 Before turning on the printer...
... lock lever. Open the top cover and make sure that ink tank lamps light red. PIXMA iP5200 Photo Printer Documentation and Software Kit PIXMA iP5200 Print Head Power Cord CLI-8BK Black CLI-8Y Yellow PGI-5BK Black CLI-8M Magenta CLI-8C Cyan Ink Tanks 2 Remove the tape from the printer. 1 Before turning on the printer...
iP5200 Easy Setup Instructions
Page 2
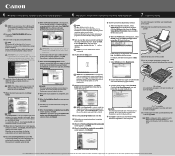
... the instructions in black and blue. 9 After print head alignment is completed, click Next. 10 When the Installation Results screen appears, click Next. 11 Follow the on the operating system you are using . 1 Be sure to register your confirmation to add the printer. Select iP5200 and click Maintenance....of the printer. The system is selected, then click Restart. 6 Read the License Agreement and click Yes. QA7-3502-V01 © 2005 Canon Inc. If the CD-ROM folder does not open automatically, double-click the on the Printer List, click Add to restart your confirmation to...
... the instructions in black and blue. 9 After print head alignment is completed, click Next. 10 When the Installation Results screen appears, click Next. 11 Follow the on the operating system you are using . 1 Be sure to register your confirmation to add the printer. Select iP5200 and click Maintenance....of the printer. The system is selected, then click Restart. 6 Read the License Agreement and click Yes. QA7-3502-V01 © 2005 Canon Inc. If the CD-ROM folder does not open automatically, double-click the on the Printer List, click Add to restart your confirmation to...
Service Manual
Page 7
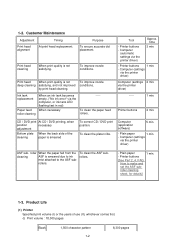
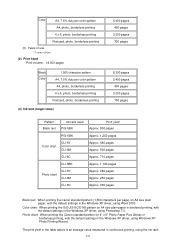
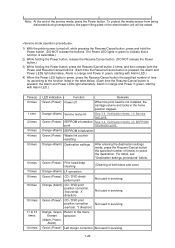
... the paper feed rollers. time 3 min. - Computer (application software) 5 min. - cleaning ASF is smeared To correct CD / DVD print position. Printer buttons [See Part 2, 4. Printer buttons 2 min. rollers. - roller cleaning sheet, for details] 1-3. Ink tank replacement Paper...LED flashing fast in red) When necessary ----- CD / DVD print At CD / DVD printing, when position necessary adjustment Bottom plate When the back side of use (II), whichever comes first. (I) Print volume : 18,000 pages Black 1,500 character pattern 1-2 8,300 pages Computer (settings via the ...
... the paper feed rollers. time 3 min. - Computer (application software) 5 min. - cleaning ASF is smeared To correct CD / DVD print position. Printer buttons [See Part 2, 4. Printer buttons 2 min. rollers. - roller cleaning sheet, for details] 1-3. Ink tank replacement Paper...LED flashing fast in red) When necessary ----- CD / DVD print At CD / DVD printing, when position necessary adjustment Bottom plate When the back side of use (II), whichever comes first. (I) Print volume : 18,000 pages Black 1,500 character pattern 1-2 8,300 pages Computer (settings via the ...
Service Manual
Page 8
.... 1,250 pages Approx. 480 pages Approx. 500 pages Approx. 710 pages Approx. 1,100 pages Approx. 280 pages Approx. 250 pages Approx. 390 pages Black text: When printing the Canon standard pattern (1,500 characters per page) on A4 size plain paper, with the default settings in the Windows XP driver, using the ink tank...
.... 1,250 pages Approx. 480 pages Approx. 500 pages Approx. 710 pages Approx. 1,100 pages Approx. 280 pages Approx. 250 pages Approx. 390 pages Black text: When printing the Canon standard pattern (1,500 characters per page) on A4 size plain paper, with the default settings in the Windows XP driver, using the ink tank...
Service Manual
Page 15
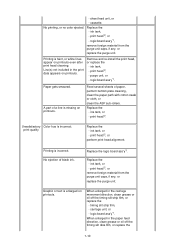
... grease or oil off the timing slit disk film, or replace the 1-10 - cassette. Remove and re-install the print head, or replace the - logic board ass'y*1. Paper gets smeared. Feed several sheets of black ink. ink tank, or - Replace the - ink tank, or - carriage unit, or - logic board ass'y*1. Replace the...
... grease or oil off the timing slit disk film, or replace the 1-10 - cassette. Remove and re-install the print head, or replace the - logic board ass'y*1. Paper gets smeared. Feed several sheets of black ink. ink tank, or - Replace the - ink tank, or - carriage unit, or - logic board ass'y*1. Replace the...

Service Manual
Page 29
...kit). Adjustment / Settings, (5) Service mode, for ink tank replacement. (Open the access cover. Print head deep cleaning - Cleaning black or color separately, or both black and color: Perform from the printer driver Maintenance tab. Perform from the printer driver Maintenance tab....of the printer driver Maintenance tab, manual print head alignment (by service test print or EEPROM information print. [See 3.3. Cleaning black or color separately, or both black and color: Perform from the printer driver Maintenance tab. Cleaning both black and color: See "Standalone printer operation"...
...kit). Adjustment / Settings, (5) Service mode, for ink tank replacement. (Open the access cover. Print head deep cleaning - Cleaning black or color separately, or both black and color: Perform from the printer driver Maintenance tab. Perform from the printer driver Maintenance tab....of the printer driver Maintenance tab, manual print head alignment (by service test print or EEPROM information print. [See 3.3. Cleaning black or color separately, or both black and color: Perform from the printer driver Maintenance tab. Cleaning both black and color: See "Standalone printer operation"...
Service Manual
Page 31
... of the service mode, press the Power button. Note: At the end of time(s) to select the destination. Verification Items, (1) Service test print. Green (Power) Print head deep cleaning (Cleaning of both the Power and Resume/Cancel buttons. (Each time the Resume/Cancel button is pressed, the Alarm and Power.../Cancel button. (DO NOT release the Power button.) 3) While holding the Power button, press the Resume/Cancel button 2 times, and then release both black and color) Orange (Alarm) LF correction Green (Power) CD / DVD check pattern print Not used in the home position capped.
... of the service mode, press the Power button. Note: At the end of time(s) to select the destination. Verification Items, (1) Service test print. Green (Power) Print head deep cleaning (Cleaning of both the Power and Resume/Cancel buttons. (Each time the Resume/Cancel button is pressed, the Alarm and Power.../Cancel button. (DO NOT release the Power button.) 3) While holding the Power button, press the Resume/Cancel button 2 times, and then release both black and color) Orange (Alarm) LF correction Green (Power) CD / DVD check pattern print Not used in the home position capped.

Service Manual
Page 33
... No. Pattern No. 1 0 2 Number of time(s) as the selected Pattern No., then press the Power button. in which streaks or lines (white or black) are the least noticeable, press the Resume/Cancel button the same number of times the Resume/Cancel button is used in the LF correction mode... times or more, then the Power button is pressed, the printer returns to the service mode menu selection. 2) The LF correction pattern for LF correction printing (Canon HR-101 is pressed 1 0 2 1-28 The High Resolution Paper is the most desirable for the selected paper is used, select any one of plain ...
... No. Pattern No. 1 0 2 Number of time(s) as the selected Pattern No., then press the Power button. in which streaks or lines (white or black) are the least noticeable, press the Resume/Cancel button the same number of times the Resume/Cancel button is used in the LF correction mode... times or more, then the Power button is pressed, the printer returns to the service mode menu selection. 2) The LF correction pattern for LF correction printing (Canon HR-101 is pressed 1 0 2 1-28 The High Resolution Paper is the most desirable for the selected paper is used, select any one of plain ...


