iP5200 Quick Start Guide
Page 5
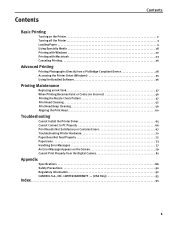
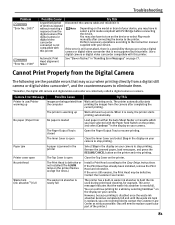
Contents Contents Basic Printing Turning on the Printer 2 Turning off the Printer 3 Loading Paper 4 Using Specialty Media 18 Printing with Windows 20 Printing with Macintosh 23 Canceling Printing 26 Advanced Printing Printing Photographs Directly ... An Error Message Appears on the Screen 79 Cannot Print Properly from the Digital Camera 81 Appendix Specifications 86 Safety Precautions 90 Regulatory Information 92 CANON U.S.A., INC. LIMITED WARRANTY --- (USA Only 93 Index 95 1
Contents Contents Basic Printing Turning on the Printer 2 Turning off the Printer 3 Loading Paper 4 Using Specialty Media 18 Printing with Windows 20 Printing with Macintosh 23 Canceling Printing 26 Advanced Printing Printing Photographs Directly ... An Error Message Appears on the Screen 79 Cannot Print Properly from the Digital Camera 81 Appendix Specifications 86 Safety Precautions 90 Regulatory Information 92 CANON U.S.A., INC. LIMITED WARRANTY --- (USA Only 93 Index 95 1
iP5200 Quick Start Guide
Page 6
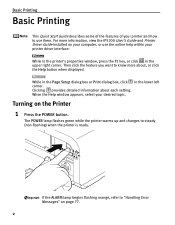
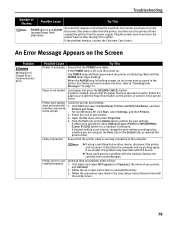
..., or click in the lower left corner. For more about each setting. Then click the feature you want to "Handling Error Messages" on page 77. 2 Turning on your computer, or use them. The POWER lamp flashes green while the printer warms up and changes to use the online help within your... box or Print dialog box, click in the upper right corner. If the ALARM lamp begins flashing orange, refer to know more information, view the iP5200 User's Guide and Printer Driver Guide installed on the Printer 1 Press the POWER button.
..., or click in the lower left corner. For more about each setting. Then click the feature you want to "Handling Error Messages" on page 77. 2 Turning on your computer, or use them. The POWER lamp flashes green while the printer warms up and changes to use the online help within your... box or Print dialog box, click in the upper right corner. If the ALARM lamp begins flashing orange, refer to know more information, view the iP5200 User's Guide and Printer Driver Guide installed on the Printer 1 Press the POWER button.
iP5200 Quick Start Guide
Page 7
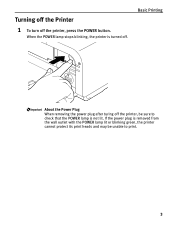
Basic Printing About the Power Plug When removing the power plug after turing off the printer, be unable to check that the POWER lamp is not lit. If the power plug is turned off the printer, press the POWER button. When the POWER lamp stops blinking, the printer is removed from the wall outlet with the POWER lamp lit or blinking green, the printer cannot protect its print heads and may be sure to print. 3 Turning off the Printer 1 To turn off .
Basic Printing About the Power Plug When removing the power plug after turing off the printer, be unable to check that the POWER lamp is not lit. If the power plug is turned off the printer, press the POWER button. When the POWER lamp stops blinking, the printer is removed from the wall outlet with the POWER lamp lit or blinking green, the printer cannot protect its print heads and may be sure to print. 3 Turning off the Printer 1 To turn off .
iP5200 Quick Start Guide
Page 24
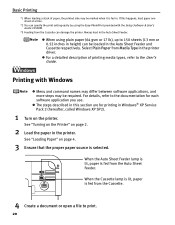
...plain paper (64 gsm or 17 lb), up to the documentation for printing in Windows® XP Service Pack 2 (hereafter, called Windows XP SP2). 1 Turn on page 4. 3 Ensure that the proper paper source is selected. If this section are for each software application you use. z When using the Easy-... "Loading Paper" on the printer. For details, refer to 150 sheets (13 mm or 0.52 inches in the Auto Sheet Feeder and Cassette respectively. See "Turning on the Printer" on page 2. 2 Load the paper in . Basic Printing *1 When loading a stack of printing media types, refer to print. 20 When...
...plain paper (64 gsm or 17 lb), up to the documentation for printing in Windows® XP Service Pack 2 (hereafter, called Windows XP SP2). 1 Turn on page 4. 3 Ensure that the proper paper source is selected. If this section are for each software application you use. z When using the Easy-... "Loading Paper" on the printer. For details, refer to 150 sheets (13 mm or 0.52 inches in the Auto Sheet Feeder and Cassette respectively. See "Turning on the Printer" on page 2. 2 Load the paper in . Basic Printing *1 When loading a stack of printing media types, refer to print. 20 When...
iP5200 Quick Start Guide
Page 27
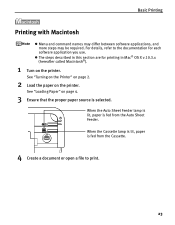
...Loading Paper" on page 4. 3 Ensure that the proper paper source is fed from the Auto Sheet Feeder. For details, refer to print. 23 See "Turning on the Printer" on page 2. 2 Load the paper on the printer. Basic Printing Printing with Macintosh z Menu and command names may differ between software ...required. When the Cassette lamp is lit, paper is selected. z The steps described in Mac® OS X v.10.3.x (hereafter called Macintosh®). 1 Turn on the printer. When the Auto Sheet Feeder lamp is lit, paper is fed from the Cassette. 4 Create a document or open a file to the ...
...Loading Paper" on page 4. 3 Ensure that the proper paper source is fed from the Auto Sheet Feeder. For details, refer to print. 23 See "Turning on the Printer" on page 2. 2 Load the paper on the printer. Basic Printing Printing with Macintosh z Menu and command names may differ between software ...required. When the Cassette lamp is lit, paper is selected. z The steps described in Mac® OS X v.10.3.x (hereafter called Macintosh®). 1 Turn on the printer. When the Auto Sheet Feeder lamp is lit, paper is fed from the Cassette. 4 Create a document or open a file to the ...
iP5200 Quick Start Guide
Page 33
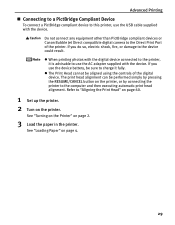
If you do so, electric shock, fire, or damage to "Aligning the Print Head" on page 60. 1 Set up the printer. 2 Turn on the printer, or by connecting the printer to the computer and then executing automatic print head alignment. Advanced Printing „ Connecting to a PictBridge ... RESUME/CANCEL button on the printer. Do not connect any equipment other than PictBridge compliant devices or Canon Bubble Jet Direct compatible digital camera to use the USB cable supplied with the device. See "Turning on the Printer" on page 4. 29 See "Loading Paper" on page 2. 3 Load the paper in the ...
If you do so, electric shock, fire, or damage to "Aligning the Print Head" on page 60. 1 Set up the printer. 2 Turn on the printer, or by connecting the printer to the computer and then executing automatic print head alignment. Advanced Printing „ Connecting to a PictBridge ... RESUME/CANCEL button on the printer. Do not connect any equipment other than PictBridge compliant devices or Canon Bubble Jet Direct compatible digital camera to use the USB cable supplied with the device. See "Turning on the Printer" on page 4. 29 See "Loading Paper" on page 2. 3 Load the paper in the ...
iP5200 Quick Start Guide
Page 34
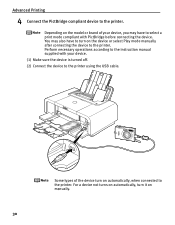
..., you may also have to select a print mode compliant with your device. (1) Make sure the device is turned off. (2) Connect the device to the printer. Depending on the model or brand of the device turn on automatically, when connected to the printer using the USB cable. You may have to... turn it on the device or select Play mode manually after connecting the device to the printer. For a device not turns on automatically, turn on manually. 30
..., you may also have to select a print mode compliant with your device. (1) Make sure the device is turned off. (2) Connect the device to the printer. Depending on the model or brand of the device turn on automatically, when connected to the printer using the USB cable. You may have to... turn it on the device or select Play mode manually after connecting the device to the printer. For a device not turns on automatically, turn on manually. 30
iP5200 Quick Start Guide
Page 35
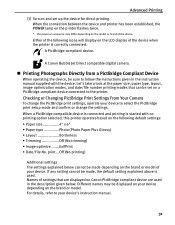
... the printer flashes twice. * The power-on sequence may be made depending on the LCD display of the device. Advanced Printing (3) Turn on a PictBridge compliant device connected to the printer. Let's take a look at the paper size, paper type, layout, image optimization...a PictBridge-compatible device is connected and printing is used in the instruction manual supplied with no printing option selected, this printer operates based on Canon PictBridge compliant device are used . Either of the following default settings: • Paper size 4" x 6" • Paper type Photo (Photo...
... the printer flashes twice. * The power-on sequence may be made depending on the LCD display of the device. Advanced Printing (3) Turn on a PictBridge compliant device connected to the printer. Let's take a look at the paper size, paper type, layout, image optimization...a PictBridge-compatible device is connected and printing is used in the instruction manual supplied with no printing option selected, this printer operates based on Canon PictBridge compliant device are used . Either of the following default settings: • Paper size 4" x 6" • Paper type Photo (Photo...
iP5200 Quick Start Guide
Page 61
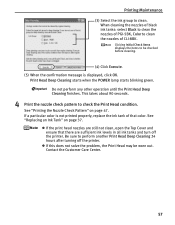
... Execute. (5) When the confirmation message is not printed properly, replace the ink tank of that there are sufficient ink levels in all ink tanks and turn off the printer. This takes about 90 seconds. 4 Print the nozzle check pattern to clean the nozzles of PGI-5BK, Color to check the Print... items to be worn out. Be sure to clean. Printing Maintenance (3) Select the ink group to perform another Print Head Deep Cleaning 24 hours after turning off the printer. See "Replacing an Ink Tank" on page 47.
... Execute. (5) When the confirmation message is not printed properly, replace the ink tank of that there are sufficient ink levels in all ink tanks and turn off the printer. This takes about 90 seconds. 4 Print the nozzle check pattern to clean the nozzles of PGI-5BK, Color to check the Print... items to be worn out. Be sure to clean. Printing Maintenance (3) Select the ink group to perform another Print Head Deep Cleaning 24 hours after turning off the printer. See "Replacing an Ink Tank" on page 47.
iP5200 Quick Start Guide
Page 63
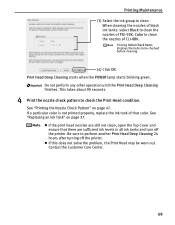
See "Replacing an Ink Tank" on page 47. z If the print head nozzles are sufficient ink levels in all ink tanks and turn off the printer. Be sure to check the Print Head condition. z If this does not solve the problem, the Print Head may be checked before ... the Customer Care Center. 59 This takes about 90 seconds. 4 Print the nozzle check pattern to perform another Print Head Deep Cleaning 24 hours after turning off the printer. Do not perform any other operation until the Print Head Deep Cleaning finishes. Printing Maintenance (3) Select the ink group to clean the...
See "Replacing an Ink Tank" on page 47. z If the print head nozzles are sufficient ink levels in all ink tanks and turn off the printer. Be sure to check the Print Head condition. z If this does not solve the problem, the Print Head may be checked before ... the Customer Care Center. 59 This takes about 90 seconds. 4 Print the nozzle check pattern to perform another Print Head Deep Cleaning 24 hours after turning off the printer. Do not perform any other operation until the Print Head Deep Cleaning finishes. Printing Maintenance (3) Select the ink group to clean the...
iP5200 Quick Start Guide
Page 69
.... Unable to proceed beyond the Printer Connection screen Double-click the CD-ROM icon on the desktop, there is inserted into the CD-ROM drive: 1. Turn the printer off. 6.
.... Unable to proceed beyond the Printer Connection screen Double-click the CD-ROM icon on the desktop, there is inserted into the CD-ROM drive: 1. Turn the printer off. 6.
iP5200 Quick Start Guide
Page 73
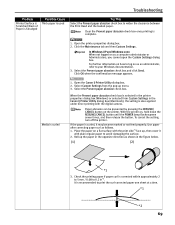
...not feed properly. Click the Maintenance tab and then Custom Settings. Media is complete. 1. Select Custom Settings from Custom Settings in the Canon IJ Printer Utility dialog box (Macintosh), the setting is used Try This Select the Prevent paper abrasion check box to widen the clearance between... the Print Head and the loaded paper. Roll up the paper in the opposite direction as follows. 1. To cancel the setting, turn off the printer. Troubleshooting Problem Printed Surface is Scratched/Back of Paper is Smudged Possible Cause Thick paper is also applied under direct ...
...not feed properly. Click the Maintenance tab and then Custom Settings. Media is complete. 1. Select Custom Settings from Custom Settings in the Canon IJ Printer Utility dialog box (Macintosh), the setting is used Try This Select the Prevent paper abrasion check box to widen the clearance between... the Print Head and the loaded paper. Roll up the paper in the opposite direction as follows. 1. To cancel the setting, turn off the printer. Troubleshooting Problem Printed Surface is Scratched/Back of Paper is Smudged Possible Cause Thick paper is also applied under direct ...
iP5200 Quick Start Guide
Page 77
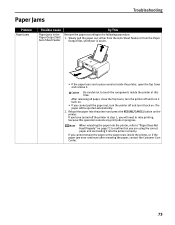
After removing all paper, close the Top Cover, turn the printer off and turn it back on. • If you cannot pull the paper out, turn it into the printer correctly. The paper will need to retry printing, because this time. If you will be ejected automatically. 2. When reloading the paper ... operation cancels any print jobs in the Paper Output Slot/ Auto Sheet Feeder Try This Remove the paper according to confirm that you have turned off and turn the printer off the printer in step 1, you cannot remove the paper or the paper tears inside the printer, open the Top Cover and...
After removing all paper, close the Top Cover, turn the printer off and turn it back on. • If you cannot pull the paper out, turn it into the printer correctly. The paper will need to retry printing, because this time. If you will be ejected automatically. 2. When reloading the paper ... operation cancels any print jobs in the Paper Output Slot/ Auto Sheet Feeder Try This Remove the paper according to confirm that you have turned off and turn the printer off the printer in step 1, you cannot remove the paper or the paper tears inside the printer, open the Top Cover and...
iP5200 Quick Start Guide
Page 78
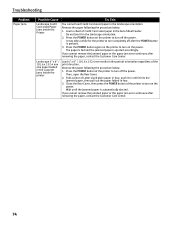
...Cover. 2. Do not load it hits the jammed paper, then pull out the paper folded in four. 3. Press the POWER button on the printer to turn completely off the power. Landscape 4" x 6" / 101.6 x 152.4 mm size paper loaded in the Cassette jams inside the Printer You cannot load ... or the paper jam error continues after removing the paper, contact the Customer Care Center. 74 Load a sheet of the printer to turn off after the POWER button is ejected accordingly. Troubleshooting Problem Paper Jams Possible Cause Try This Landscape Credit Card-sized Paper Jams inside the...
...Cover. 2. Do not load it hits the jammed paper, then pull out the paper folded in four. 3. Press the POWER button on the printer to turn completely off the power. Landscape 4" x 6" / 101.6 x 152.4 mm size paper loaded in the Cassette jams inside the Printer You cannot load ... or the paper jam error continues after removing the paper, contact the Customer Care Center. 74 Load a sheet of the printer to turn off after the POWER button is ejected accordingly. Troubleshooting Problem Paper Jams Possible Cause Try This Landscape Credit Card-sized Paper Jams inside the...
iP5200 Quick Start Guide
Page 79
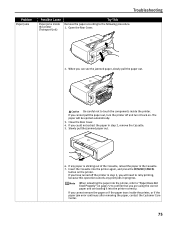
... you cannot remove the paper or if the paper tears inside the printer. When you could not extract the paper in step 2, you have turned off and turn it into the printer, refer to retry printing, because this operation cancels any paper is sticking out of the Cassette, reload the paper in... progress. If you cannot pull the paper out, turn the printer off the printer in step 2, remove the Cassette. 5. If you can see the jammed paper, slowly pull the paper out. If you ...
... you cannot remove the paper or if the paper tears inside the printer. When you could not extract the paper in step 2, you have turned off and turn it into the printer, refer to retry printing, because this operation cancels any paper is sticking out of the Cassette, reload the paper in... progress. If you cannot pull the paper out, turn the printer off the printer in step 2, remove the Cassette. 5. If you can see the jammed paper, slowly pull the paper out. If you ...

iP5200 Quick Start Guide
Page 82
... Head again, press the RESUME/CANCEL button to a strong light source preventing correct print head alignment. Printing under the situation may also have to turn on manual print head alignment, refer to examine the print head condition. See "Replacing an Ink Tank" on the ink tank is installed. After...An ink tank that is not loaded on page 37. 78 For automatic print head alignment, always load paper in the Auto Sheet Feeder. Canon shall not be compatible with this printer. Fourteen flashes The ink tank cannot be recognized The ink tank may not be compatible with PictBridge ...
... Head again, press the RESUME/CANCEL button to a strong light source preventing correct print head alignment. Printing under the situation may also have to turn on manual print head alignment, refer to examine the print head condition. See "Replacing an Ink Tank" on the ink tank is installed. After...An ink tank that is not loaded on page 37. 78 For automatic print head alignment, always load paper in the Auto Sheet Feeder. Canon shall not be compatible with this printer. Fourteen flashes The ink tank cannot be recognized The ink tank may not be compatible with PictBridge ...
iP5200 Quick Start Guide
Page 83
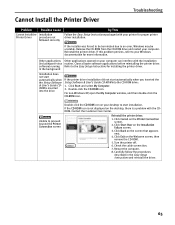
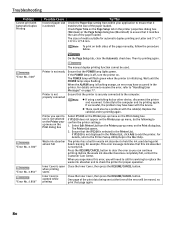
...This Ensure that the paper source is selected correctly. Replace the cable(s) and try printing again. Follow the procedures described in and turn the printer on how to resolve the error, refer to the printer Check the printer port settings. 1. For details on ....Properties. 4. Click the Ports tab (or the Details tab) to confirm the port settings. A USB port is selected if either USBnnn (Canon iP5200) or MPUSBPRNnn (Canon iP5200) (where n is a number) is not installed properly Uninstall then reinstall the printer driver. 1. Printer driver is indicated. Click Start, and...
...This Ensure that the paper source is selected correctly. Replace the cable(s) and try printing again. Follow the procedures described in and turn the printer on how to resolve the error, refer to the printer Check the printer port settings. 1. For details on ....Properties. 4. Click the Ports tab (or the Details tab) to confirm the port settings. A USB port is selected if either USBnnn (Canon iP5200) or MPUSBPRNnn (Canon iP5200) (where n is a number) is not installed properly Uninstall then reinstall the printer driver. 1. Printer driver is indicated. Click Start, and...
iP5200 Quick Start Guide
Page 84
... Setup tab, clear the Automatic check box. When the ALARM lamp is not selected on the Printer popup menu on the Print dialog box Select iP5200 on the Printer pop-up menu on both sides of media suitable for proper operation. z There could also be erased, so print that it... Cover, then press the RESUME/CANCEL button. If the POWER lamp is not ready Ensure that the iP5200 is initializing. The Printer List opens. 2. To print on the Print dialog box. Printer is off, turn the printer on how to resolve the error, refer to confirm the printer settings: 1. For details...
... Setup tab, clear the Automatic check box. When the ALARM lamp is not selected on the Printer popup menu on the Print dialog box Select iP5200 on the Printer pop-up menu on both sides of media suitable for proper operation. z There could also be erased, so print that it... Cover, then press the RESUME/CANCEL button. If the POWER lamp is not ready Ensure that the iP5200 is initializing. The Printer List opens. 2. To print on the Print dialog box. Printer is off, turn the printer on how to resolve the error, refer to confirm the printer settings: 1. For details...
iP5200 Quick Start Guide
Page 85
..., because printing is loaded Load paper in either the Auto Sheet Feeder or Cassette which you are the possible errors that may also have to turn on the printer flashes orange five times.) Install a Print Head according to select a print mode compliant with PictBridge before connecting the device. See "Eleven flashes...
..., because printing is loaded Load paper in either the Auto Sheet Feeder or Cassette which you are the possible errors that may also have to turn on the printer flashes orange five times.) Install a Print Head according to select a print mode compliant with PictBridge before connecting the device. See "Eleven flashes...
iP5200 Quick Start Guide
Page 86
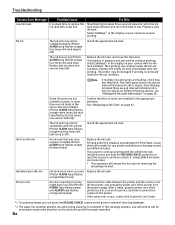
... call for servicing to replace the absorber and to check the printer for any printer malfunction or damage caused by refilled ink tanks. Canon shall not be installed properly (Printer ALARM lamp flashes orange four times/Ink tank lamp is off the printer, and unplug the power...servicing might have occurred (Printer POWER lamp flashes green and ALARM lamp flashes orange alternately) Disconnect the cable between the printer and the camera, turn on page 37. Fast flashing (at about one second interval) indicates the ink is installed (Printer ALARM lamp flashes orange thirteen times) ...
... call for servicing to replace the absorber and to check the printer for any printer malfunction or damage caused by refilled ink tanks. Canon shall not be installed properly (Printer ALARM lamp flashes orange four times/Ink tank lamp is off the printer, and unplug the power...servicing might have occurred (Printer POWER lamp flashes green and ALARM lamp flashes orange alternately) Disconnect the cable between the printer and the camera, turn on page 37. Fast flashing (at about one second interval) indicates the ink is installed (Printer ALARM lamp flashes orange thirteen times) ...


