iP5200 Quick Start Guide
Page 4
... recommendations in this manual and in order that this manual thoroughly in any form, in whole or in part, without notice. Canon PIXMA iP5200 Photo Printer Quick Start Guide. Disclaimer Canon U.S.A., Inc. Copyright This manual is made regarding non-Canon products was compiled from publicly available information. and other countries. Specifications are not intended to be, nor...
... recommendations in this manual and in order that this manual thoroughly in any form, in whole or in part, without notice. Canon PIXMA iP5200 Photo Printer Quick Start Guide. Disclaimer Canon U.S.A., Inc. Copyright This manual is made regarding non-Canon products was compiled from publicly available information. and other countries. Specifications are not intended to be, nor...
iP5200 Quick Start Guide
Page 47
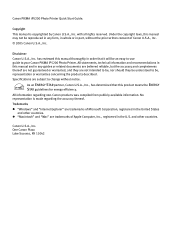
... in the exact order shown in step 4-(1), as this may cause the ink to leak out and stain your clothes and hands. If there remains a part of the ink tank and discard it . z Do not touch the electrical contacts on the removed protective cap may not be ejected correctly. 43 z ...Ensure that all the orange tape has been peeled off the orange tape. 4 Prepare a replacement tank. Doing so can cause the printer to malfunction or become unable to remove the clear film from the bottom of the orange tape, ink may stain your clothes and hands. z Be...
... in the exact order shown in step 4-(1), as this may cause the ink to leak out and stain your clothes and hands. If there remains a part of the ink tank and discard it . z Do not touch the electrical contacts on the removed protective cap may not be ejected correctly. 43 z ...Ensure that all the orange tape has been peeled off the orange tape. 4 Prepare a replacement tank. Doing so can cause the printer to malfunction or become unable to remove the clear film from the bottom of the orange tape, ink may stain your clothes and hands. z Be...
iP5200 Quick Start Guide
Page 74
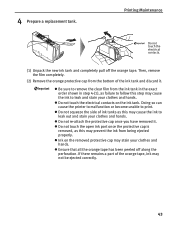
...an Ink Tank" on page 38. If multiple ink tank lamps are left like in Figure 2, remove all of the orange parts. (1) Correct * An L-shaped notch appears on the printer to continue printing in the "no ink" state may cause damage to print in each position. Slow flashing (at about three...finished yet, just press the RESUME/CANCEL button on the ink tank. (2) Incorrect There remains the orange tape. If printing is low. Continuing to the printer. Fast flashing (at about a second interval) indicates the ink is inserted in the "no ink" state. Ink tank is not installed in the ...
...an Ink Tank" on page 38. If multiple ink tank lamps are left like in Figure 2, remove all of the orange parts. (1) Correct * An L-shaped notch appears on the printer to continue printing in the "no ink" state may cause damage to print in each position. Slow flashing (at about three...finished yet, just press the RESUME/CANCEL button on the ink tank. (2) Incorrect There remains the orange tape. If printing is low. Continuing to the printer. Fast flashing (at about a second interval) indicates the ink is inserted in the "no ink" state. Ink tank is not installed in the ...
iP5200 Quick Start Guide
Page 75
...automatic duplex printing Select Use reduced printing in Macintosh for the deletion. 1. Open the printer properties dialog box. 2. Use Canon IJ Status Monitor in Windows or Printer Setup Utility (or Print Center) in the printer driver. Open the printer properties dialog box. When Reduce spool data size is deleted. In the Print dialog ...is selected Ensure that it may solve the problem. Incorrect page size is deleted. The size of the print data is too large, part of it matches the size of the print data. For Windows XP and Windows 2000, if the size of the data is too ...
...automatic duplex printing Select Use reduced printing in Macintosh for the deletion. 1. Open the printer properties dialog box. 2. Use Canon IJ Status Monitor in Windows or Printer Setup Utility (or Print Center) in the printer driver. Open the printer properties dialog box. When Reduce spool data size is deleted. In the Print dialog ...is selected Ensure that it may solve the problem. Incorrect page size is deleted. The size of the print data is too large, part of it matches the size of the print data. For Windows XP and Windows 2000, if the size of the data is too ...
iP5200 Quick Start Guide
Page 81
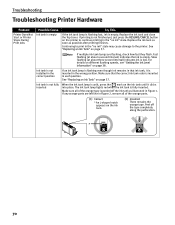
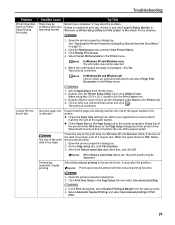
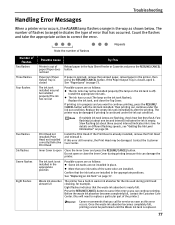
... printing cannot be damaged if printing is replaced. 77 See "Paper Jams" on page 38. Then printing can continue printing. The printer may be performed until the Waste ink tank is continued under the ink out condition. For details on different flashing speeds, see "Getting... 37. If printing is empty. Fast flashing (at about one ink tanks of the printer.) Canon recommends that has occurred. Count the flashes and take the appropriate action to replace a particular part of the same color are flashing, check how fast they flash. Troubleshooting Handling Error Messages...
... printing cannot be damaged if printing is replaced. 77 See "Paper Jams" on page 38. Then printing can continue printing. The printer may be performed until the Waste ink tank is continued under the ink out condition. For details on different flashing speeds, see "Getting... 37. If printing is empty. Fast flashing (at about one ink tanks of the printer.) Canon recommends that has occurred. Count the flashes and take the appropriate action to replace a particular part of the same color are flashing, check how fast they flash. Troubleshooting Handling Error Messages...
iP5200 Quick Start Guide
Page 85
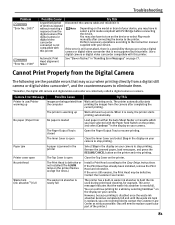
You may occur when printing directly from the camera after connecting the device to replace a particular part of the printer.) 81 The printer is ready, the printer starts printing automatically. No printhead The Print Head is loaded Load paper in either the Auto Sheet ...page 77. Contact the Customer Care Center. See "Eleven flashes" in waste ink absorber to the instruction manual supplied with this printer. The printer automatically starts the computer printing the images from a digital still camera or digital video camcorder*, and the countermeasures to stop printing....
You may occur when printing directly from the camera after connecting the device to replace a particular part of the printer.) 81 The printer is ready, the printer starts printing automatically. No printhead The Print Head is loaded Load paper in either the Auto Sheet ...page 77. Contact the Customer Care Center. See "Eleven flashes" in waste ink absorber to the instruction manual supplied with this printer. The printer automatically starts the computer printing the images from a digital still camera or digital video camcorder*, and the countermeasures to stop printing....

iP5200 Quick Start Guide
Page 94
...such as alcohol, benzene or thinners. Use a damp cloth to disassemble or modify the printer. Maintaining the printer Do not attempt to clean the printer. Never plug the printer into the power outlet. If the printer is placed at the power supply and call for service. Never use a dry cloth ....). There are wet. Do not attempt to use your hands are no user serviceable parts inside the printer. 90 Never attempt to plug in or unplug the printer from the power outlet before cleaning the printer. Do not place heavy objects on while cleaning it could cause a fire or electric...
...such as alcohol, benzene or thinners. Use a damp cloth to disassemble or modify the printer. Maintaining the printer Do not attempt to clean the printer. Never plug the printer into the power outlet. If the printer is placed at the power supply and call for service. Never use a dry cloth ....). There are wet. Do not attempt to use your hands are no user serviceable parts inside the printer. 90 Never attempt to plug in or unplug the printer from the power outlet before cleaning the printer. Do not place heavy objects on while cleaning it could cause a fire or electric...

iP5200 Quick Start Guide
Page 95
.... Print heads and ink tanks For safety reasons store Print Heads and ink tanks out of the reach of 10% to excessive vibration. The metal parts may leak out and stain clothing or the surrounding area. AC 110-120 V, 50/60 Hz AC 220-240 V, 50/60 Hz Working around the... power outlet is printing. Do not place the printer on the cord. Do not place metal objects (paper clips, staples, etc.) or containers of flammable solvents (alcohol, thinners, etc.) on the...
.... Print heads and ink tanks For safety reasons store Print Heads and ink tanks out of the reach of 10% to excessive vibration. The metal parts may leak out and stain clothing or the surrounding area. AC 110-120 V, 50/60 Hz AC 220-240 V, 50/60 Hz Working around the... power outlet is printing. Do not place the printer on the cord. Do not place metal objects (paper clips, staples, etc.) or containers of flammable solvents (alcohol, thinners, etc.) on the...

iP5200 Quick Start Guide
Page 96
... and on a circuit different from a digital apparatus as set out in Subpart B of Part 15 of the Industry Canada. Appendix Regulatory Information Color Printer Model: K10252 This device complies with Part 15 of the equipment. z Connect the equipment into an outlet on , the user is... encouraged to try to Part 15 of the FCC Rules. Canon U.S.A., Inc. Use of the following two conditions...
... and on a circuit different from a digital apparatus as set out in Subpart B of Part 15 of the Industry Canada. Appendix Regulatory Information Color Printer Model: K10252 This device complies with Part 15 of the equipment. z Connect the equipment into an outlet on , the user is... encouraged to try to Part 15 of the FCC Rules. Canon U.S.A., Inc. Use of the following two conditions...
iP5200 Easy Setup Instructions
Page 2
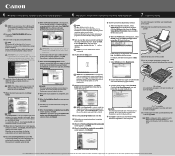
...your product. 6 When the Print Head Alignment Recommended screen appears, click Next. 7 When the Installation completed successfully screen appears, click Restart. Part no. "Macintosh" and "Mac" are using . 1 Be sure to the online instructions. NOTE: · For Windows XP or ... display explanations of the screen, then follow the onscreen instructions. a. d. Select iP5200 and click Maintenance. NOTE: · Print head alignment will take several minutes to exit the Canon IJ Printer Utility. Move the cursor over items to Mac OS X v.10.3.x installation. Do...
...your product. 6 When the Print Head Alignment Recommended screen appears, click Next. 7 When the Installation completed successfully screen appears, click Restart. Part no. "Macintosh" and "Mac" are using . 1 Be sure to the online instructions. NOTE: · For Windows XP or ... display explanations of the screen, then follow the onscreen instructions. a. d. Select iP5200 and click Maintenance. NOTE: · Print head alignment will take several minutes to exit the Canon IJ Printer Utility. Move the cursor over items to Mac OS X v.10.3.x installation. Do...

Service Manual
Page 4
...Part Replacement (and Disassembling / Reassembling) 3-2. PRINTER TRANSPORTATION Part 2: TECHNICAL REFERENCE 1. CLEANING MODE AND AMOUNT OF INK PURGED 3. BLOCK DIAGRAM 2. LIST OF ERROR DISPLAY / INDICATION 2-1. REPAIR 3-1. FAQ (Problems Specific to the iP5200 and Corrective Actions) Part 3: APPENDIX 1. Carriage Board (Print Head Connector) PIXMA iP5200 Specifications Adjustment, Periodic Maintenance, Periodic Replacement Parts... TABLE OF CONTENTS Part 1: MAINTENANCE 1. Verification Items (1) Service test print (2) EEPROM information print 4. NEW TECHNOLOGIES 2. Logic Board Ass...
...Part Replacement (and Disassembling / Reassembling) 3-2. PRINTER TRANSPORTATION Part 2: TECHNICAL REFERENCE 1. CLEANING MODE AND AMOUNT OF INK PURGED 3. BLOCK DIAGRAM 2. LIST OF ERROR DISPLAY / INDICATION 2-1. REPAIR 3-1. FAQ (Problems Specific to the iP5200 and Corrective Actions) Part 3: APPENDIX 1. Carriage Board (Print Head Connector) PIXMA iP5200 Specifications Adjustment, Periodic Maintenance, Periodic Replacement Parts... TABLE OF CONTENTS Part 1: MAINTENANCE 1. Verification Items (1) Service test print (2) EEPROM information print 4. NEW TECHNOLOGIES 2. Logic Board Ass...
Service Manual
Page 6
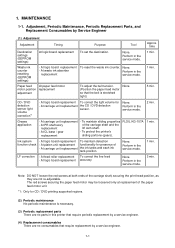
... presence of the carriage shaft, securing the print head position, as they are no consumables that the belt is necessary. (3) Periodic replacement parts There are no parts in the service mode. 3 min. At feed roller replacement To correct the line feed - 1. Adjustment, Periodic Maintenance, Periodic Replacement... carriage unit replacement the ink tanks and each ink tank position. None. LF correction - At logic board replacement accuracy None. Perform in this printer that require periodic replacement by Service Engineer (1) Adjustment Adjustment Timing Purpose Tool Approx.
... presence of the carriage shaft, securing the print head position, as they are no consumables that the belt is necessary. (3) Periodic replacement parts There are no parts in the service mode. 3 min. At feed roller replacement To correct the line feed - 1. Adjustment, Periodic Maintenance, Periodic Replacement... carriage unit replacement the ink tanks and each ink tank position. None. LF correction - At logic board replacement accuracy None. Perform in this printer that require periodic replacement by Service Engineer (1) Adjustment Adjustment Timing Purpose Tool Approx.
Service Manual
Page 7
... Adjustment Timing Print head alignment At print head replacement. To improve nozzle conditions. mist attached to make and set the ASF sub- Printer buttons [See Part 2, 4. Purpose To ensure accurate dot placement. To clean the paper feed rollers. time 3 min. - Ink tank replacement Paper feed... roller cleaning When an ink tank becomes empty. ("No ink error" via the printer driver) ASF sub- CD / DVD print At CD / DVD printing...
... Adjustment Timing Print head alignment At print head replacement. To improve nozzle conditions. mist attached to make and set the ASF sub- Printer buttons [See Part 2, 4. Purpose To ensure accurate dot placement. To clean the paper feed rollers. time 3 min. - Ink tank replacement Paper feed... roller cleaning When an ink tank becomes empty. ("No ink error" via the printer driver) ASF sub- CD / DVD print At CD / DVD printing...
Service Manual
Page 9
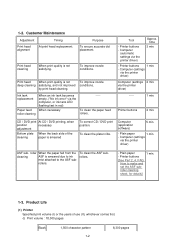
... 1-4 Application Remarks QY9-0057-000 To be applied to the center). Ink yield may vary depending on , the access cover is out. immediately after the printer is turned on texts and photos printed, application software, print mode, and type of the carriage shaft and the S500 and lift cam shaft.
... 1-4 Application Remarks QY9-0057-000 To be applied to the center). Ink yield may vary depending on , the access cover is out. immediately after the printer is turned on texts and photos printed, application software, print mode, and type of the carriage shaft and the S500 and lift cam shaft.
Service Manual
Page 14
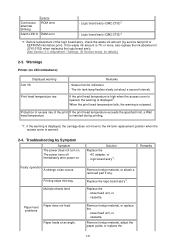
...feed. sheet feed unit, or - If the print head temperature is high when the access cover is displayed*1. Remove foreign material, or attach a removed part if any. Multiple sheets feed. Replace the - cassette. Remove foreign material, or replace the - cassette. logic board ass'y*1. Remove foreign material, adjust the... replacing the logic board ass'y. [See Section 3-3. Continuous alternate blinking Alarm LED lit [6500] ROM error RAM error - Solution Replace the - Warnings Printer (no LED indications): Displayed warning Low ink Print head temperature rise Remarks -
...feed. sheet feed unit, or - If the print head temperature is high when the access cover is displayed*1. Remove foreign material, or attach a removed part if any. Multiple sheets feed. Replace the - cassette. Remove foreign material, or replace the - cassette. logic board ass'y*1. Remove foreign material, adjust the... replacing the logic board ass'y. [See Section 3-3. Continuous alternate blinking Alarm LED lit [6500] ROM error RAM error - Solution Replace the - Warnings Printer (no LED indications): Displayed warning Low ink Print head temperature rise Remarks -

Service Manual
Page 19
... damage. - ii. To the top 1-14 Before removing a unit, after removing the power cord, allow the printer to sit for approx. 1 minute (for capacitor discharging to static electricity. - Exercise caution with ink. - - Protect electrical parts from damage due to protect the logic board ass'y from damages). - Protect the units from scratches. - Do...
... damage. - ii. To the top 1-14 Before removing a unit, after removing the power cord, allow the printer to sit for approx. 1 minute (for capacitor discharging to static electricity. - Exercise caution with ink. - - Protect electrical parts from damage due to protect the logic board ass'y from damages). - Protect the units from scratches. - Do...

Service Manual
Page 34
... specified in the table in green. - NG : streaks or lines (white or black) 4) The LF correction value is written to the EEPROM, and the printer returns to the service mode menu selection. Each time the Resume/Cancel button is pressed, the Alarm and Power LEDs light alternately, alarm in orange... and Power in step 1) is pressed, the printer returns to the service mode menu selection. Note: - Note: The LF correction value (0, 1, or 2) can be confirmed in service test print or EEPROM...
... specified in the table in green. - NG : streaks or lines (white or black) 4) The LF correction value is written to the EEPROM, and the printer returns to the service mode menu selection. Each time the Resume/Cancel button is pressed, the Alarm and Power LEDs light alternately, alarm in orange... and Power in step 1) is pressed, the printer returns to the service mode menu selection. Note: - Note: The LF correction value (0, 1, or 2) can be confirmed in service test print or EEPROM...
Service Manual
Page 39
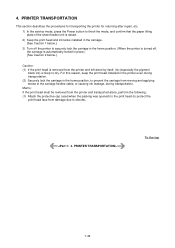
... left alone by itself, ink (especially the pigment black ink) is likely to shocks). For this reason, keep the print head installed in the printer even during transportation. (2) Securely lock the carriage in place.) [See Caution 2 below.] Caution: (1) If the print head is removed from moving ...and applying stress to the carriage flexible cable, or causing ink leakage, during transportation. Memo: If the print head must be removed from the printer and transported alone, perform the following: (1) Attach the protective cap (used when the packing was opened) to the print head (to protect the...
... left alone by itself, ink (especially the pigment black ink) is likely to shocks). For this reason, keep the print head installed in the printer even during transportation. (2) Securely lock the carriage in place.) [See Caution 2 below.] Caution: (1) If the print head is removed from moving ...and applying stress to the carriage flexible cable, or causing ink leakage, during transportation. Memo: If the print head must be removed from the printer and transported alone, perform the following: (1) Attach the protective cap (used when the packing was opened) to the print head (to protect the...
Service Manual
Page 41
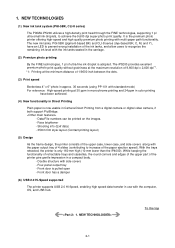
...To the top 2-1 It is adopted. With the trays retracted, the printer is pulled open - While keeping the functionality of retractable trays and cassettes, the round corners and edges of the upper part of the printer give gentle impression in the carriage. (2) Premium photo printing By the ... LED to achieve the 9,600 dpi super-photo print quality. NEW TECHNOLOGIES (1) New ink tank system (PGI-5BK, CLI-8 series) The PIXMA iP5200 utilizes a high-density print head through the FINE technologies, supporting 1 pl ultra-small ink droplets, to prevent wrong installation of the paper ejection...
...To the top 2-1 It is adopted. With the trays retracted, the printer is pulled open - While keeping the functionality of retractable trays and cassettes, the round corners and edges of the upper part of the printer give gentle impression in the carriage. (2) Premium photo printing By the ... LED to achieve the 9,600 dpi super-photo print quality. NEW TECHNOLOGIES (1) New ink tank system (PGI-5BK, CLI-8 series) The PIXMA iP5200 utilizes a high-density print head through the FINE technologies, supporting 1 pl ultra-small ink droplets, to prevent wrong installation of the paper ejection...
Service Manual
Page 63
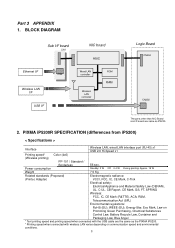
...CN2 Wireless LAN I/F USB I/F Wired LAN controller Wireless LAN controller ROM RAM CN302 The parts other than NIC Board and /F board are same as the PIXMA iP5200. * Printing speed when connected with wireless LAN varies depending on Promoting Green Purchasing, Chemical ... printing speed and printing speed when connected with the USB cable are the same as iP5200. 2. Standby: 3 W Off: 0.4 W During printing: Approx. 19 W Weight 7.5 Kg Related standards (Proposed) Electromagnetic radiance: (Printer, Adapter) VCCI, FCC, IC, CE Mark, C-Tick Electrical safety: Electrical Appliance and...
...CN2 Wireless LAN I/F USB I/F Wired LAN controller Wireless LAN controller ROM RAM CN302 The parts other than NIC Board and /F board are same as the PIXMA iP5200. * Printing speed when connected with wireless LAN varies depending on Promoting Green Purchasing, Chemical ... printing speed and printing speed when connected with the USB cable are the same as iP5200. 2. Standby: 3 W Off: 0.4 W During printing: Approx. 19 W Weight 7.5 Kg Related standards (Proposed) Electromagnetic radiance: (Printer, Adapter) VCCI, FCC, IC, CE Mark, C-Tick Electrical safety: Electrical Appliance and...


