Quick Start Guide
Page 2
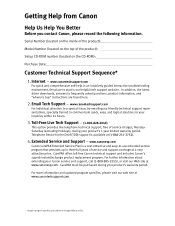
...Service and Support - www.canonesp.com Canon CarePAK Extended Service Plan is a cost-attractive and easy-to-use extended service program that provides up to change without notice. Email Tech Support - In addition, the latest driver downloads, answers to frequently asked questions, ...our Web site at www.canontechsupport.com. * Support program specifics are found here. 2. CarePAK offers toll-free Canon technical support and includes Canon's superb InstantExchange product replacement program. www.canontechsupport.com For quick and comprehensive self-help in an intuitively guided ...
...Service and Support - www.canonesp.com Canon CarePAK Extended Service Plan is a cost-attractive and easy-to-use extended service program that provides up to change without notice. Email Tech Support - In addition, the latest driver downloads, answers to frequently asked questions, ...our Web site at www.canontechsupport.com. * Support program specifics are found here. 2. CarePAK offers toll-free Canon technical support and includes Canon's superb InstantExchange product replacement program. www.canontechsupport.com For quick and comprehensive self-help in an intuitively guided ...
Quick Start Guide
Page 5
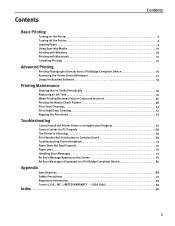
...15 Printing with Windows 18 Printing with Macintosh 21 Canceling Printing 25 Advanced Printing Printing Photographs Directly from a PictBridge Compliant Device 26 Accessing the Printer Driver (Windows 32 Using the Bundled Software 33 Printing Maintenance Shaking the Ink Tanks Periodically 34 Replacing an Ink Tank 35 When Printing Becomes Faint or... Appears on the Screen 81 An Error Message is Displayed on a PictBridge Compliant Device 85 Appendix Specifications 88 Safety Precautions 91 Regulatory Information 93 Canon U.S.A., INC. LIMITED WARRANTY --- (USA Only 94 Index 96 1
...15 Printing with Windows 18 Printing with Macintosh 21 Canceling Printing 25 Advanced Printing Printing Photographs Directly from a PictBridge Compliant Device 26 Accessing the Printer Driver (Windows 32 Using the Bundled Software 33 Printing Maintenance Shaking the Ink Tanks Periodically 34 Replacing an Ink Tank 35 When Printing Becomes Faint or... Appears on the Screen 81 An Error Message is Displayed on a PictBridge Compliant Device 85 Appendix Specifications 88 Safety Precautions 91 Regulatory Information 93 Canon U.S.A., INC. LIMITED WARRANTY --- (USA Only 94 Index 96 1
Quick Start Guide
Page 6
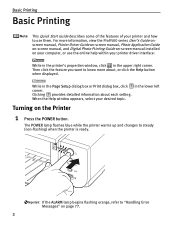
For more about each setting. Then click the feature you want to use the online help within your printer driver interface: While in the printer's properties window, click in the lower left corner. The POWER lamp flashes blue while the printer warms up and ... the Help button when displayed. When the Help window appears, select your printer and how to know more information, view the Pro9500 series User's Guide onscreen manual, Printer Driver Guide on-screen manual, Photo Application Guide on-screen manual, and Digital Photo Printing Guide on-screen manual installed on your computer...
For more about each setting. Then click the feature you want to use the online help within your printer driver interface: While in the printer's properties window, click in the lower left corner. The POWER lamp flashes blue while the printer warms up and ... the Help button when displayed. When the Help window appears, select your printer and how to know more information, view the Pro9500 series User's Guide onscreen manual, Printer Driver Guide on-screen manual, Photo Application Guide on-screen manual, and Digital Photo Printing Guide on-screen manual installed on your computer...
Quick Start Guide
Page 12
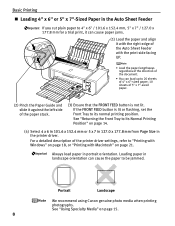
...printing position. See "Using Specialty Media" on page 14. (4) Select 4 x 6 in 101.6 x 152.4 mm or 5 x 7 in 127.0 x 177.8 mm from Page Size in the printer driver. Basic Printing „ Loading 4" x 6" or 5" x 7"-Sized Paper in the Auto Sheet Feeder If you cut plain paper to 4" x 6" / 101.6 x 152.4 mm, 5" x 7" ..., set the Front Tray to be jammed. If the FRONT FEED button is not lit. Portrait Landscape We recommend using Canon genuine photo media when printing photographs. Loading paper in portrait orientation. See "Returning the Front Tray to Its Normal Printing Position" ...
...printing position. See "Using Specialty Media" on page 14. (4) Select 4 x 6 in 101.6 x 152.4 mm or 5 x 7 in 127.0 x 177.8 mm from Page Size in the printer driver. Basic Printing „ Loading 4" x 6" or 5" x 7"-Sized Paper in the Auto Sheet Feeder If you cut plain paper to 4" x 6" / 101.6 x 152.4 mm, 5" x 7" ..., set the Front Tray to be jammed. If the FRONT FEED button is not lit. Portrait Landscape We recommend using Canon genuine photo media when printing photographs. Loading paper in portrait orientation. See "Returning the Front Tray to Its Normal Printing Position" ...
Quick Start Guide
Page 19
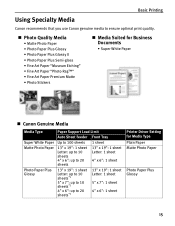
... Paper "Photo Rag™" • Fine Art Paper Premium Matte • Photo Stickers „ Media Suited for Business Documents • Super White Paper „ Canon Genuine Media Media Type Super White Paper Matte Photo Paper Photo Paper Plus Glossy Paper Support Load Limit Auto Sheet Feeder Front Tray Up to... x 6": 1 sheet 13" x 19": 1 sheet Letter: up to 10 sheets*1 5" x 7": up to 10 sheets*1 4" x 6": up to 20 sheets*1 13" x 19": 1 sheet Letter: 1 sheet 5" x 7": 1 sheet 4" x 6": 1 sheet Printer Driver Setting for Media Type Plain Paper Matte Photo Paper Photo Paper Plus Glossy 15
... Paper "Photo Rag™" • Fine Art Paper Premium Matte • Photo Stickers „ Media Suited for Business Documents • Super White Paper „ Canon Genuine Media Media Type Super White Paper Matte Photo Paper Photo Paper Plus Glossy Paper Support Load Limit Auto Sheet Feeder Front Tray Up to... x 6": 1 sheet 13" x 19": 1 sheet Letter: up to 10 sheets*1 5" x 7": up to 10 sheets*1 4" x 6": up to 20 sheets*1 13" x 19": 1 sheet Letter: 1 sheet 5" x 7": 1 sheet 4" x 6": 1 sheet Printer Driver Setting for Media Type Plain Paper Matte Photo Paper Photo Paper Plus Glossy 15
Quick Start Guide
Page 20
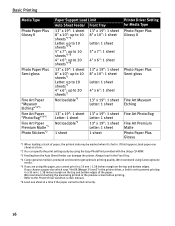
... sheets*1 4" x 6": up to 20 sheets*1 Not loadable*3 13" x 19": 1 sheet 8" x 10": 1 sheet Letter: 1 sheet 4" x 6": 1 sheet 13" x 19": 1 sheet Letter: 1 sheet Printer Driver Setting for Media Type Photo Paper Plus Glossy II Photo Paper Plus Semi-gloss Fine Art Museum Etching 13" x 19": 1 sheet Letter: 1 sheet Not loadable...in a 35 mm / 1.38 inches margin on the top and bottom edges. We recommend using Canon genuine media. *5 If you cannot print in the printer driver, a limit is set to the Printer Driver Guide on-screen manual. *6 Load one sheet at a time if the paper cannot be marked ...
... sheets*1 4" x 6": up to 20 sheets*1 Not loadable*3 13" x 19": 1 sheet 8" x 10": 1 sheet Letter: 1 sheet 4" x 6": 1 sheet 13" x 19": 1 sheet Letter: 1 sheet Printer Driver Setting for Media Type Photo Paper Plus Glossy II Photo Paper Plus Semi-gloss Fine Art Museum Etching 13" x 19": 1 sheet Letter: 1 sheet Not loadable...in a 35 mm / 1.38 inches margin on the top and bottom edges. We recommend using Canon genuine media. *5 If you cannot print in the printer driver, a limit is set to the Printer Driver Guide on-screen manual. *6 Load one sheet at a time if the paper cannot be marked ...

Quick Start Guide
Page 21
Basic Printing The following Canon genuine papers cannot be loaded in the printer driver. Select Plain Paper from Media Type in the Auto Sheet Feeder. z For a detailed description of printing media types, refer to 150 sheets (13 mm or 0.52 inches in height) can be used: High Resolution Paper, Glossy Photo Paper, Photo Paper Glossy, Photo Paper Plus Double Sided, Photo Paper Pro, Transparencies, and T-Shirt Transfers z When using plain paper (64 gsm or 17 lb), up to the User's Guide on-screen manual. 17
Basic Printing The following Canon genuine papers cannot be loaded in the printer driver. Select Plain Paper from Media Type in the Auto Sheet Feeder. z For a detailed description of printing media types, refer to 150 sheets (13 mm or 0.52 inches in height) can be used: High Resolution Paper, Glossy Photo Paper, Photo Paper Glossy, Photo Paper Plus Double Sided, Photo Paper Pro, Transparencies, and T-Shirt Transfers z When using plain paper (64 gsm or 17 lb), up to the User's Guide on-screen manual. 17
Quick Start Guide
Page 24
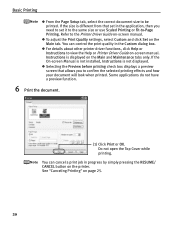
... size to confirm the selected printing effects and how your document will look when printed. z For details about other printer driver functions, click Help or Instructions to view the Help or Printer Driver Guide on -screen manual. Some applications do not have a preview function. 6 Print the document. (1) Click Print or OK. Do... the Preview before printing check box displays a preview screen that set it to the same size or use Scaled Printing or Fit-to the Printer Driver Guide on -screen manual. You can cancel a print job in the application, then you to be printed.
... size to confirm the selected printing effects and how your document will look when printed. z For details about other printer driver functions, click Help or Instructions to view the Help or Printer Driver Guide on -screen manual. Some applications do not have a preview function. 6 Print the document. (1) Click Print or OK. Do... the Preview before printing check box displays a preview screen that set it to the same size or use Scaled Printing or Fit-to the Printer Driver Guide on -screen manual. You can cancel a print job in the application, then you to be printed.
Quick Start Guide
Page 27
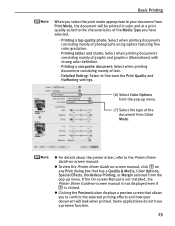
...Select to fine-tune the Print Quality and Halftoning settings. (6) Select Color Options from the pop-up menu. z To view the Printer Driver Guide on-screen manual, click on any Print dialog box that allows you have a preview function. 23 Printing tables and charts: Select ...mainly of graphs and graphics (illustrations) with strong color definition. - Some applications do not have selected. - z For details about the printer driver, refer to confirm the selected printing effects and how your document from Color Mode. Printing a top-quality photo: Select when printing documents consisting...
...Select to fine-tune the Print Quality and Halftoning settings. (6) Select Color Options from the pop-up menu. z To view the Printer Driver Guide on-screen manual, click on any Print dialog box that allows you have a preview function. 23 Printing tables and charts: Select ...mainly of graphs and graphics (illustrations) with strong color definition. - Some applications do not have selected. - z For details about the printer driver, refer to confirm the selected printing effects and how your document from Color Mode. Printing a top-quality photo: Select when printing documents consisting...
Quick Start Guide
Page 34
...vividly. When Natural M is selected for what you want to achieve. When Warm tone is selected, the photo is selected, natural colors are using a Canon-brand PictBridge compliant device, the following additional options may be printed. * If the images already have occurred on -screen manual or Photo Application Guide onscreen...or file number will be available, depending on how to print in grayscale from ; You can select from the computer, refer to the Printer Driver Guide on the top and/or bottom edges of the paper such as the sky, and dark portions. When you select On, the shooting ...
...vividly. When Natural M is selected for what you want to achieve. When Warm tone is selected, the photo is selected, natural colors are using a Canon-brand PictBridge compliant device, the following additional options may be printed. * If the images already have occurred on -screen manual or Photo Application Guide onscreen...or file number will be available, depending on how to print in grayscale from ; You can select from the computer, refer to the Printer Driver Guide on the top and/or bottom edges of the paper such as the sky, and dark portions. When you select On, the shooting ...
Quick Start Guide
Page 36
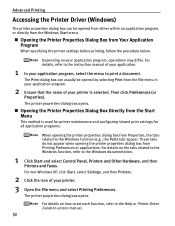
Advanced Printing Accessing the Printer Driver (Windows) The printer properties dialog box can usually be opened by selecting Print from Properties, the tabs related to the Windows function (e.g., the Ports tab) ... your application program, operations may differ. Then click Preferences (or Properties). For details on how to set each function, refer to the Help or Printer Driver Guide on your application program, select the menu to the Windows documentation. 1 Click Start and select Control Panel, Printers and Other Hardware, and then Printers...
Advanced Printing Accessing the Printer Driver (Windows) The printer properties dialog box can usually be opened by selecting Print from Properties, the tabs related to the Windows function (e.g., the Ports tab) ... your application program, operations may differ. Then click Preferences (or Properties). For details on how to set each function, refer to the Help or Printer Driver Guide on your application program, select the menu to the Windows documentation. 1 Click Start and select Control Panel, Printers and Other Hardware, and then Printers...
Quick Start Guide
Page 40
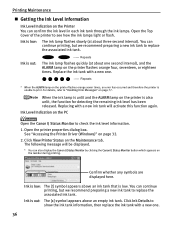
... When the ink lamp is unlit and the ALARM lamp on the printer is unable to check the ink level information. 1. See "Accessing the Printer Driver (Windows)" on the Maintenance tab. Ink is low: The [!] symbol appears above an empty ink tank. Ink is low: The ink lamp flashes...ink tank. Printing Maintenance „ Getting the Ink Level Information Ink Level Indication on the Printer You can also display the Canon IJ Status Monitor by clicking the Canon IJ Status Monitor button which appears on the taskbar during printing. Repeats * When the ALARM lamp on the printer flashes ...
... When the ink lamp is unlit and the ALARM lamp on the printer is unable to check the ink level information. 1. See "Accessing the Printer Driver (Windows)" on the Maintenance tab. Ink is low: The [!] symbol appears above an empty ink tank. Ink is low: The ink lamp flashes...ink tank. Printing Maintenance „ Getting the Ink Level Information Ink Level Indication on the Printer You can also display the Canon IJ Status Monitor by clicking the Canon IJ Status Monitor button which appears on the taskbar during printing. Repeats * When the ALARM lamp on the printer flashes ...
Quick Start Guide
Page 50
... the ruled lines are probably clogged. If any one of the ink lamps is flashing slowly, the associated ink tank is inserted in the printer driver settings.
... the ruled lines are probably clogged. If any one of the ink lamps is flashing slowly, the associated ink tank is inserted in the printer driver settings.
Quick Start Guide
Page 65
If the printer driver is loaded, you to print without shifts in the color registration. Gently press the mark on the Front Tray to open the Front Tray, then ...
If the printer driver is loaded, you to print without shifts in the color registration. Gently press the mark on the Front Tray to open the Front Tray, then ...
Quick Start Guide
Page 67
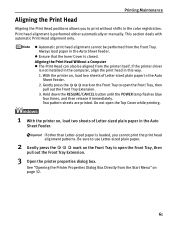
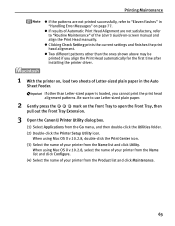
If other than Letter-sized paper is loaded, you align the Print Head automatically for the first time after installing the printer driver. 1 With the printer on, load two sheets of Letter-sized plain paper in "Handling Error Messages" on page 77. When using Mac OS ...of Automatic Print Head Alignment are not printed successfully, refer to open the Front Tray, then pull out the Front Tray Extension. 3 Open the Canon IJ Printer Utility dialog box. (1) Select Applications from the Product list and click Maintenance. 63 Printing Maintenance z If the patterns are not satisfactory,...
If other than Letter-sized paper is loaded, you align the Print Head automatically for the first time after installing the printer driver. 1 With the printer on, load two sheets of Letter-sized plain paper in "Handling Error Messages" on page 77. When using Mac OS ...of Automatic Print Head Alignment are not printed successfully, refer to open the Front Tray, then pull out the Front Tray Extension. 3 Open the Canon IJ Printer Utility dialog box. (1) Select Applications from the Product list and click Maintenance. 63 Printing Maintenance z If the patterns are not satisfactory,...
Quick Start Guide
Page 69
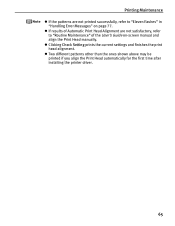
Printing Maintenance z If the patterns are not satisfactory, refer to "Eleven flashes" in "Handling Error Messages" on -screen manual and align the Print Head manually. z Two different patterns other than the ones shown above may be printed if you align the Print Head automatically for the first time after installing the printer driver. 65 z If results of Automatic Print Head Alignment are not printed successfully, refer to "Routine Maintenance" of the User's Guide on page 77. z Clicking Check Setting prints the current settings and finishes the print head alignment.
Printing Maintenance z If the patterns are not satisfactory, refer to "Eleven flashes" in "Handling Error Messages" on -screen manual and align the Print Head manually. z Two different patterns other than the ones shown above may be printed if you align the Print Head automatically for the first time after installing the printer driver. 65 z If results of Automatic Print Head Alignment are not printed successfully, refer to "Routine Maintenance" of the User's Guide on page 77. z Clicking Check Setting prints the current settings and finishes the print head alignment.
Quick Start Guide
Page 70
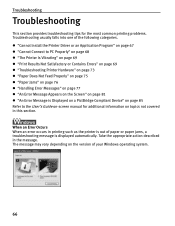
z "Cannot Install the Printer Driver or an Application Program" on page 67 z "Cannot Connect to PC Properly" on page 68 z "The Printer Is Vibrating" on page 69 z "Print Results Not ...
z "Cannot Install the Printer Driver or an Application Program" on page 67 z "Cannot Connect to PC Properly" on page 68 z "The Printer Is Vibrating" on page 69 z "Print Results Not ...
Quick Start Guide
Page 71
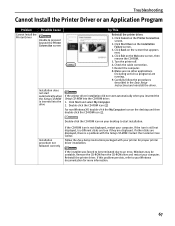
... Setup CD-ROM. If this problem persists, refer to start automatically when you inserted the Setup CD-ROM into the drive If the printer driver installation did not start installation. Click Cancel on the Installation Failure screen. 3. Click Start Over on the Printer Connection screen. 2. Make sure...CD-ROM is not displayed, restart your computer. Remove the CD-ROM from the CD-ROM drive and restart your Windows documentation for proper printer driver installation. If the CD-ROM icon is inserted into the CD-ROM drive: 1. Click Back on the Welcome screen, then remove the CD...
... Setup CD-ROM. If this problem persists, refer to start automatically when you inserted the Setup CD-ROM into the drive If the printer driver installation did not start installation. Click Cancel on the Installation Failure screen. 3. Click Start Over on the Printer Connection screen. 2. Make sure...CD-ROM is not displayed, restart your computer. Remove the CD-ROM from the CD-ROM drive and restart your Windows documentation for proper printer driver installation. If the CD-ROM icon is inserted into the CD-ROM drive: 1. Click Back on the Welcome screen, then remove the CD...
Quick Start Guide
Page 72
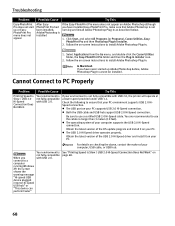
...on -screen instructions to use a certified USB 2.0 Hi-Speed cable. z The USB 2.0 Hi-Speed driver operates properly. Follow the on checking the above, contact the maker of the USB 2.0 Hi-Speed driver and install it on page 68. 68 You are recommended to install Adobe Photoshop Plug-In. 1. ...to use the cable no longer than 3 meters (10 feet). Try This If your PC. Click Start, and select All Programs (or Programs), Canon Utilities, EasyPhotoPrint Pro and then Photoshop Plug-In Installer. 2. Be sure to a computer running and install Adobe Photoshop Plug-In as described below....
...on -screen instructions to use a certified USB 2.0 Hi-Speed cable. z The USB 2.0 Hi-Speed driver operates properly. Follow the on checking the above, contact the maker of the USB 2.0 Hi-Speed driver and install it on page 68. 68 You are recommended to install Adobe Photoshop Plug-In. 1. ...to use the cable no longer than 3 meters (10 feet). Try This If your PC. Click Start, and select All Programs (or Programs), Canon Utilities, EasyPhotoPrint Pro and then Photoshop Plug-In Installer. 2. Be sure to a computer running and install Adobe Photoshop Plug-In as described below....
Quick Start Guide
Page 73
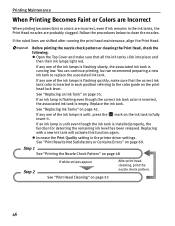
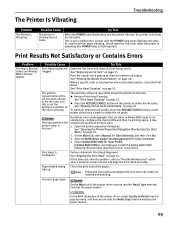
...tab, select Manual for Color Correction. 4. See "Aligning the Print Head" on page 32. 2. In the Print dialog box of the printer driver, ensure that the Media Type selected matches the paper loaded. 69 Print Results Not Satisfactory or Contains Errors Problem Printing is misaligned Paper loaded wrong... the Top Cover and check if all ink lamps are taken in your specialty media for printing The input profile in the printer driver is incorrect Print Head is Blurred/ Colors are Wrong/ White Streaks appear Possible Cause Print Head nozzles are clogged The particle concentration ...
...tab, select Manual for Color Correction. 4. See "Aligning the Print Head" on page 32. 2. In the Print dialog box of the printer driver, ensure that the Media Type selected matches the paper loaded. 69 Print Results Not Satisfactory or Contains Errors Problem Printing is misaligned Paper loaded wrong... the Top Cover and check if all ink lamps are taken in your specialty media for printing The input profile in the printer driver is incorrect Print Head is Blurred/ Colors are Wrong/ White Streaks appear Possible Cause Print Head nozzles are clogged The particle concentration ...


