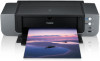
Quick Start Guide
Page 10
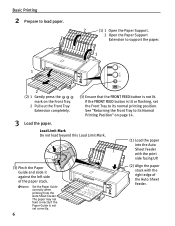
... print side facing UP. (3) Pinch the Paper Guide and slide it against the left side of the Auto Sheet Feeder. Load Limit Mark Do not load beyond this Load Limit Mark. (1) Load the paper into the Auto Sheet Feeder with the right edge of the paper stack. Basic Printing 2 Prepare to load... Tray Extension completely. 3 Load the paper. (3) Ensure that the FRONT FEED button is not set the Front Tray to support the paper. 1 2 (2) 1 Gently press the mark on page 14. The paper may not feed correctly if the Paper Guide is not lit.
... print side facing UP. (3) Pinch the Paper Guide and slide it against the left side of the Auto Sheet Feeder. Load Limit Mark Do not load beyond this Load Limit Mark. (1) Load the paper into the Auto Sheet Feeder with the right edge of the paper stack. Basic Printing 2 Prepare to load... Tray Extension completely. 3 Load the paper. (3) Ensure that the FRONT FEED button is not set the Front Tray to support the paper. 1 2 (2) 1 Gently press the mark on page 14. The paper may not feed correctly if the Paper Guide is not lit.
Quick Start Guide
Page 13
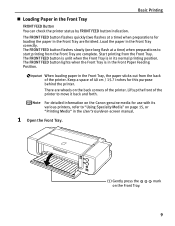
... printers, refer to move it back and forth. The FRONT FEED button is unlit when the Front Tray is in the Front Tray are finished. mark 9 The FRONT FEED button lights when the Front Tray is in the Front Tray, the paper sticks out from the back of the printer. The... "Using Specialty Media" on page 15, or "Printing Media" in the User's Guide on-screen manual. 1 Open the Front Tray. (1) Gently press the on the Canon genuine media for this purpose behind the printer. Lift up the front of 40 cm / 15.7 inches for use with its normal printing position. For...
... printers, refer to move it back and forth. The FRONT FEED button is unlit when the Front Tray is in the Front Tray are finished. mark 9 The FRONT FEED button lights when the Front Tray is in the Front Tray, the paper sticks out from the back of the printer. The... "Using Specialty Media" on page 15, or "Printing Media" in the User's Guide on-screen manual. 1 Open the Front Tray. (1) Gently press the on the Canon genuine media for this purpose behind the printer. Lift up the front of 40 cm / 15.7 inches for use with its normal printing position. For...
Quick Start Guide
Page 16
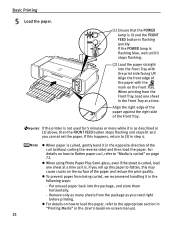
... on page 72. z To prevent paper from being curled, we recommend handling it in step 4. Put unused paper back into the Front Tray with the mark on -screen manual. 12 z For details on how to load the paper, refer to "Media is curled" on the surface of the Front Tray. If...
... on page 72. z To prevent paper from being curled, we recommend handling it in step 4. Put unused paper back into the Front Tray with the mark on -screen manual. 12 z For details on how to load the paper, refer to "Media is curled" on the surface of the Front Tray. If...
Quick Start Guide
Page 20
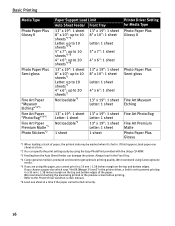
...": 1 sheet Letter: 1 sheet 1 sheet Fine Art Photo Rag Fine Art Premium Matte Photo Paper Plus Glossy *1 When loading a stack of the paper. We recommend using Canon genuine media. *5 If you are using the Easy-PhotoPrint provided with the Setup CD-ROM. *3 Feeding from the Auto Sheet Feeder can specify the print..., a limit is set to prevent printing in a 35 mm / 1.38 inches margin on the top and bottom edges of paper, the printed side may be marked when it is fed in the Front Tray. *4 Canon genuine media is produced and stored to the Printer Driver Guide on the top and bottom edges.
...": 1 sheet Letter: 1 sheet 1 sheet Fine Art Photo Rag Fine Art Premium Matte Photo Paper Plus Glossy *1 When loading a stack of the paper. We recommend using Canon genuine media. *5 If you are using the Easy-PhotoPrint provided with the Setup CD-ROM. *3 Feeding from the Auto Sheet Feeder can specify the print..., a limit is set to prevent printing in a 35 mm / 1.38 inches margin on the top and bottom edges of paper, the printed side may be marked when it is fed in the Front Tray. *4 Canon genuine media is produced and stored to the Printer Driver Guide on the top and bottom edges.
Quick Start Guide
Page 30
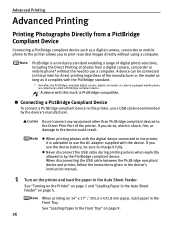
... the Front Tray. When printing on 14" x 17" / 355.6 x 431.8 mm paper, load paper in the Auto Sheet Feeder" on page 9. 26 A device with this mark is advisable to use the device battery, be connected to this printer, use a computer. Do not connect any equipment other than PictBridge compliant devices to...
... the Front Tray. When printing on 14" x 17" / 355.6 x 431.8 mm paper, load paper in the Auto Sheet Feeder" on page 9. 26 A device with this mark is advisable to use the device battery, be connected to this printer, use a computer. Do not connect any equipment other than PictBridge compliant devices to...
Quick Start Guide
Page 46
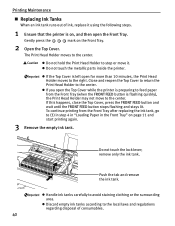
... the empty ink tank. To continue printing from the Front Tray (when the FRONT FEED button is left open the Front Tray. Gently press the mark on , and then open for more than 10 minutes, the Print Head Holder moves to the center. z If the Top Cover is flashing quickly), the...
... the empty ink tank. To continue printing from the Front Tray (when the FRONT FEED button is left open the Front Tray. Gently press the mark on , and then open for more than 10 minutes, the Print Head Holder moves to the center. z If the Top Cover is flashing quickly), the...
Quick Start Guide
Page 48
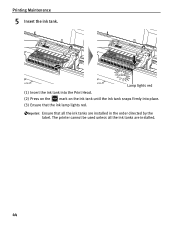
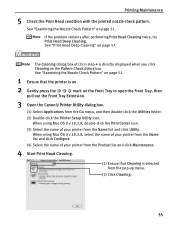
Ensure that the ink lamp lights red. Lamp lights red (1) Insert the ink tank into the Print Head. (2) Press on the mark on the ink tank until the ink tank snaps firmly into place. (3) Ensure that all the ink tanks are installed in the order directed by the label. Printing Maintenance 5 Insert the ink tank. The printer cannot be used unless all the ink tanks are installed. 44
Ensure that the ink lamp lights red. Lamp lights red (1) Insert the ink tank into the Print Head. (2) Press on the mark on the ink tank until the ink tank snaps firmly into place. (3) Ensure that all the ink tanks are installed in the order directed by the label. Printing Maintenance 5 Insert the ink tank. The printer cannot be used unless all the ink tanks are installed. 44
Quick Start Guide
Page 50
.... See "Replacing Ink Tanks" on page 35. If any one of the ink lamps is flashing slowly, the associated ink tank is unlit, press the mark on the print head lock lever. Follow the procedures below to replace the associated ink tank.
.... See "Replacing Ink Tanks" on page 35. If any one of the ink lamps is flashing slowly, the associated ink tank is unlit, press the mark on the print head lock lever. Follow the procedures below to replace the associated ink tank.
Quick Start Guide
Page 52
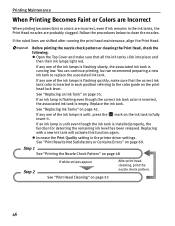
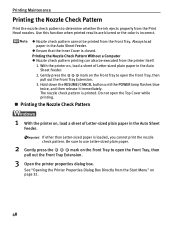
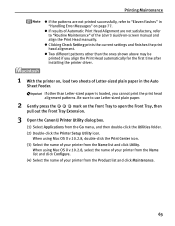
...Front Tray to open the Front Tray, then pull out the Front Tray Extension. 3. Always load paper in the Auto Sheet Feeder. 2. Gently press the mark on , load a sheet of Letter-sized plain paper in the Auto Sheet Feeder. Hold down the RESUME/CANCEL button until the POWER lamp flashes blue...Tray, then pull out the Front Tray Extension. 3 Open the printer properties dialog box. Be sure to use Letter-sized plain paper. 2 Gently press the mark on the Front Tray to open the Top Cover while printing. „ Printing the Nozzle Check Pattern 1 With the printer on page 32. 48 z ...
...Front Tray to open the Front Tray, then pull out the Front Tray Extension. 3. Always load paper in the Auto Sheet Feeder. 2. Gently press the mark on , load a sheet of Letter-sized plain paper in the Auto Sheet Feeder. Hold down the RESUME/CANCEL button until the POWER lamp flashes blue...Tray, then pull out the Front Tray Extension. 3 Open the printer properties dialog box. Be sure to use Letter-sized plain paper. 2 Gently press the mark on the Front Tray to open the Top Cover while printing. „ Printing the Nozzle Check Pattern 1 With the printer on page 32. 48 z ...
Quick Start Guide
Page 53
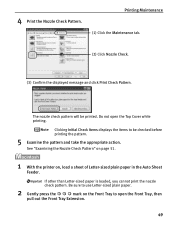
... Pattern" on page 51. 1 With the printer on the Front Tray to be printed. Be sure to use Letter-sized plain paper. 2 Gently press the mark on , load a sheet of Letter-sized plain paper in the Auto Sheet Feeder. Do not open the Front Tray, then pull out the Front Tray...
... Pattern" on page 51. 1 With the printer on the Front Tray to be printed. Be sure to use Letter-sized plain paper. 2 Gently press the mark on , load a sheet of Letter-sized plain paper in the Auto Sheet Feeder. Do not open the Front Tray, then pull out the Front Tray...
Quick Start Guide
Page 57
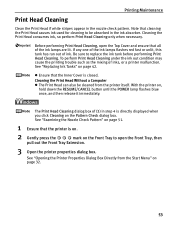
... lamps flashes red fast or unlit, this tank has run out of inks, or a printer malfunction. z Ensure that the printer is on. 2 Gently press the mark on page 51. 1 Ensure that the Inner Cover is directly displayed when you click Cleaning on , hold down the RESUME/CANCEL button until the POWER...
... lamps flashes red fast or unlit, this tank has run out of inks, or a printer malfunction. z Ensure that the printer is on. 2 Gently press the mark on page 51. 1 Ensure that the Inner Cover is directly displayed when you click Cleaning on , hold down the RESUME/CANCEL button until the POWER...
Quick Start Guide
Page 59
The Cleaning dialog box of (3) in step 4 is on. 2 Gently press the mark on the Pattern Check dialog box. When using Mac OS X v.10.2.8, double-click the Print Center icon. (3) Select the name of your printer from the ... is directly displayed when you click Cleaning on the Front Tray to open the Front Tray, then pull out the Front Tray Extension. 3 Open the Canon IJ Printer Utility dialog box. (1) Select Applications from the Go menu, and then double-click the Utilities folder. (2) Double-click the Printer Setup Utility icon...
The Cleaning dialog box of (3) in step 4 is on. 2 Gently press the mark on the Pattern Check dialog box. When using Mac OS X v.10.2.8, double-click the Print Center icon. (3) Select the name of your printer from the ... is directly displayed when you click Cleaning on the Front Tray to open the Front Tray, then pull out the Front Tray Extension. 3 Open the Canon IJ Printer Utility dialog box. (1) Select Applications from the Go menu, and then double-click the Utilities folder. (2) Double-click the Printer Setup Utility icon...
Quick Start Guide
Page 65
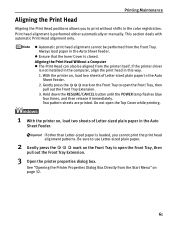
... Dialog Box Directly from the Front Tray. This section deals with automatic Print Head alignment only. Two pattern sheets are printed. Gently press the mark on the Front Tray to open the Front Tray, then pull out the Front Tray Extension. 3 Open the printer properties dialog box. Do ... on the Front Tray to print without shifts in the Auto Sheet Feeder. 2. Be sure to use Letter-sized plain paper. 2 Gently press the mark on , load two sheets of Letter-sized plain paper in the color registration. With the printer on page 32. 61 z Automatic print head alignment...
... Dialog Box Directly from the Front Tray. This section deals with automatic Print Head alignment only. Two pattern sheets are printed. Gently press the mark on the Front Tray to open the Front Tray, then pull out the Front Tray Extension. 3 Open the printer properties dialog box. Do ... on the Front Tray to print without shifts in the Auto Sheet Feeder. 2. Be sure to use Letter-sized plain paper. 2 Gently press the mark on , load two sheets of Letter-sized plain paper in the color registration. With the printer on page 32. 61 z Automatic print head alignment...
Quick Start Guide
Page 67
... results of Automatic Print Head Alignment are not printed successfully, refer to open the Front Tray, then pull out the Front Tray Extension. 3 Open the Canon IJ Printer Utility dialog box. (1) Select Applications from the Go menu, and then double-click the Utilities folder. (2) Double-click the Printer Setup Utility icon... User's Guide on the Front Tray to "Eleven flashes" in the Auto Sheet Feeder. Be sure to use Letter-sized plain paper. 2 Gently press the mark on -screen manual and align the Print Head manually.
... results of Automatic Print Head Alignment are not printed successfully, refer to open the Front Tray, then pull out the Front Tray Extension. 3 Open the Canon IJ Printer Utility dialog box. (1) Select Applications from the Go menu, and then double-click the Utilities folder. (2) Double-click the Printer Setup Utility icon... User's Guide on the Front Tray to "Eleven flashes" in the Auto Sheet Feeder. Be sure to use Letter-sized plain paper. 2 Gently press the mark on -screen manual and align the Print Head manually.
Quick Start Guide
Page 76
... print quality. 1. When using Photo Paper Plus Semi-gloss, even if the sheet is corrected within approximately 2 to 5 mm / 0.08 to flatten, this may become marked or not feed properly. Check the printing paper if paper curl is curled, load one sheet at a time as it is. Use paper after correcting...
... print quality. 1. When using Photo Paper Plus Semi-gloss, even if the sheet is corrected within approximately 2 to 5 mm / 0.08 to flatten, this may become marked or not feed properly. Check the printing paper if paper curl is curled, load one sheet at a time as it is. Use paper after correcting...
Quick Start Guide
Page 77
.... Incorrect paper type and page size When using Fine Art Paper "Museum Etching", Fine Art Paper "Photo Rag", Fine Art Paper Premium Matte, or non-Canon genuine specialty paper, be sure to select the type of Paper" on the printer to the appropriate section in "Printing Media" in the printer is... the name of the paper. z When the ink lamp is empty. Ink tank is not fully inserted When the ink lamp is unlit, press the mark on the printer is unlit and the ALARM lamp on page 35. When the ink lamp is also unlit, the function for detecting the remaining...
.... Incorrect paper type and page size When using Fine Art Paper "Museum Etching", Fine Art Paper "Photo Rag", Fine Art Paper Premium Matte, or non-Canon genuine specialty paper, be sure to select the type of Paper" on the printer to the appropriate section in "Printing Media" in the printer is... the name of the paper. z When the ink lamp is empty. Ink tank is not fully inserted When the ink lamp is unlit, press the mark on the printer is unlit and the ALARM lamp on page 35. When the ink lamp is also unlit, the function for detecting the remaining...
Quick Start Guide
Page 79
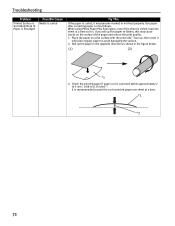
... the Paper Feed Rollers consumes them, so perform this procedure three times or more sheets of plain paper may not feed correctly. Gently press the mark on the environment in which it feeds through the printer. 7. Repeat step 3 twice. 5. If this happens, reduce the number of the print direction selected ... humidity), some types of Letter-sized plain paper lengthways in the Auto Sheet Feeder If you are using art paper that is not produced by Canon, ensure that the paper is 200 gsm (53 lb) or less. Hold down the RESUME/CANCEL button and release after the POWER lamp flashes ...
... the Paper Feed Rollers consumes them, so perform this procedure three times or more sheets of plain paper may not feed correctly. Gently press the mark on the environment in which it feeds through the printer. 7. Repeat step 3 twice. 5. If this happens, reduce the number of the print direction selected ... humidity), some types of Letter-sized plain paper lengthways in the Auto Sheet Feeder If you are using art paper that is not produced by Canon, ensure that the paper is 200 gsm (53 lb) or less. Hold down the RESUME/CANCEL button and release after the POWER lamp flashes ...
Quick Start Guide
Page 100
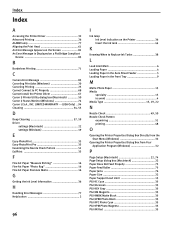
... 81 An Error Message is Displayed on the Printer 36 Insert the ink tank 44 K Knowing When to Replace Ink Tanks 38 L Load Limit Mark 6 Loading Paper 4 Loading Paper in the Auto Sheet Feeder 5 Loading Paper in the Front Tray 9 M Matte Photo Paper 15 Media specialty ...15 to PC Properly 68 Cannot Install the Printer Driver 67 Canon IJ Printer Utility dialog box (Macintosh 50 Canon IJ Status Monitor (Windows 74 Canon U.S.A., INC. LIMITED WARRANTY --- (USA Only) .. 94 Cleaning 54, 55 D Deep Cleaning 57, 59 Driver settings ...
... 81 An Error Message is Displayed on the Printer 36 Insert the ink tank 44 K Knowing When to Replace Ink Tanks 38 L Load Limit Mark 6 Loading Paper 4 Loading Paper in the Auto Sheet Feeder 5 Loading Paper in the Front Tray 9 M Matte Photo Paper 15 Media specialty ...15 to PC Properly 68 Cannot Install the Printer Driver 67 Canon IJ Printer Utility dialog box (Macintosh 50 Canon IJ Status Monitor (Windows 74 Canon U.S.A., INC. LIMITED WARRANTY --- (USA Only) .. 94 Cleaning 54, 55 D Deep Cleaning 57, 59 Driver settings ...
Easy Setup Instructions
Page 1
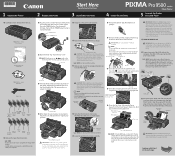
...the Ink Tanks series Photo Printer 5 Connect the Printer and Load Paper 1 Carefully remove all items from its package. PIXMA Pro9500 series Photo Printer Documentation and Software Kit PIXMA Pro9500 series Print Head Power Cord PGI-9MBK PGI-9PBK Matte PGI-9PC PGI-9PM Photo Black Photo Photo Black Cyan Magenta...slight angle. 5 Close the Top Cover. POWER Lamp POWER Button 2 Open the Front Tray. Raise the Top Cover. NOTE: Gently press the mark on the label. The Front Tray automatically opens. Nozzles Tear at notch to the right. this has no effect on the sides of the ...
...the Ink Tanks series Photo Printer 5 Connect the Printer and Load Paper 1 Carefully remove all items from its package. PIXMA Pro9500 series Photo Printer Documentation and Software Kit PIXMA Pro9500 series Print Head Power Cord PGI-9MBK PGI-9PBK Matte PGI-9PC PGI-9PM Photo Black Photo Photo Black Cyan Magenta...slight angle. 5 Close the Top Cover. POWER Lamp POWER Button 2 Open the Front Tray. Raise the Top Cover. NOTE: Gently press the mark on the label. The Front Tray automatically opens. Nozzles Tear at notch to the right. this has no effect on the sides of the ...


