Quick Start Guide
Page 5
...2 Turning off the Printer 3 Loading Paper 4 Using Specialty Media 15 Printing with Windows 18 Printing with Macintosh 21 Canceling Printing 25 Advanced Printing Printing Photographs Directly from a PictBridge Compliant Device 26 Accessing the Printer Driver (Windows 32 Using the Bundled Software 33 Printing Maintenance Shaking the Ink Tanks Periodically 34 Replacing an Ink Tank 35 When Printing Becomes Faint or Colors are Incorrect 46 Printing the Nozzle Check Pattern 48 Print Head Cleaning 53 Print Head Deep Cleaning 57 Aligning the Print Head 61 Troubleshooting Cannot Install...
...2 Turning off the Printer 3 Loading Paper 4 Using Specialty Media 15 Printing with Windows 18 Printing with Macintosh 21 Canceling Printing 25 Advanced Printing Printing Photographs Directly from a PictBridge Compliant Device 26 Accessing the Printer Driver (Windows 32 Using the Bundled Software 33 Printing Maintenance Shaking the Ink Tanks Periodically 34 Replacing an Ink Tank 35 When Printing Becomes Faint or Colors are Incorrect 46 Printing the Nozzle Check Pattern 48 Print Head Cleaning 53 Print Head Deep Cleaning 57 Aligning the Print Head 61 Troubleshooting Cannot Install...
Quick Start Guide
Page 24
... button on -screen manual. z To adjust the Print Quality settings, select Custom and click Set on the Main and Maintenance tabs only. Do not open the Top Cover while printing. z For details about other printer driver functions, click Help or Instructions to -Page Printing. Some applications do not have a preview function. 6 Print the document. (1) Click Print or OK. See "Canceling Printing" on -screen manual. If the size is not displayed. Refer to be printed...
... button on -screen manual. z To adjust the Print Quality settings, select Custom and click Set on the Main and Maintenance tabs only. Do not open the Top Cover while printing. z For details about other printer driver functions, click Help or Instructions to -Page Printing. Some applications do not have a preview function. 6 Print the document. (1) Click Print or OK. See "Canceling Printing" on -screen manual. If the size is not displayed. Refer to be printed...
Quick Start Guide
Page 27
Printing a composite document: Select when printing documents consisting mainly of photographs and graphics featuring fine color gradation. - Detailed Setting: Select to the Printer Driver Guide on-screen manual. If the On-screen Manual is clicked. z Clicking the Preview button displays a preview screen that has a Quality & Media, Color Options, Special Effects, Borderless Printing, or Margin selected from the pop-up menu. (7) Select the type of the document from Color Mode. Printing a top-quality photo: Select...
Printing a composite document: Select when printing documents consisting mainly of photographs and graphics featuring fine color gradation. - Detailed Setting: Select to the Printer Driver Guide on-screen manual. If the On-screen Manual is clicked. z Clicking the Preview button displays a preview screen that has a Quality & Media, Color Options, Special Effects, Borderless Printing, or Margin selected from the pop-up menu. (7) Select the type of the document from Color Mode. Printing a top-quality photo: Select...
Quick Start Guide
Page 30
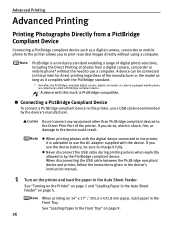
... the USB cable between the PictBridge compliant device and printer, follow the instructions given in the device's instruction manual. 1 Turn on the printer and load the paper in the Auto Sheet Feeder" on page 2 and "Loading Paper in the Auto Sheet Feeder. If you use the AC adapter supplied with this printer for direct printing regardless of the printer. See "Turning on the Printer" on page 5. A device can be sure to this mark is an industry standard enabling...
... the USB cable between the PictBridge compliant device and printer, follow the instructions given in the device's instruction manual. 1 Turn on the printer and load the paper in the Auto Sheet Feeder" on page 2 and "Loading Paper in the Auto Sheet Feeder. If you use the AC adapter supplied with this printer for direct printing regardless of the printer. See "Turning on the Printer" on page 5. A device can be sure to this mark is an industry standard enabling...
Quick Start Guide
Page 32
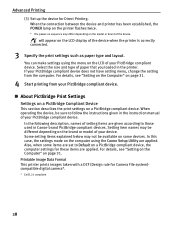
... using the menu on the LCD of paper that you loaded in the printer. For details, see "Setting on the Computer" on a PictBridge compliant device, the computer settings for these items are applied. Printable Image Data Format This printer prints images taken with a DCF (Design rule for Direct Printing. You can make settings using the Canon Setup Utility are set to those used in the instruction manual of setting items are given according to Default...
... using the menu on the LCD of paper that you loaded in the printer. For details, see "Setting on the Computer" on a PictBridge compliant device, the computer settings for these items are applied. Printable Image Data Format This printer prints images taken with a DCF (Design rule for Direct Printing. You can make settings using the Canon Setup Utility are set to those used in the instruction manual of setting items are given according to Default...
Quick Start Guide
Page 67
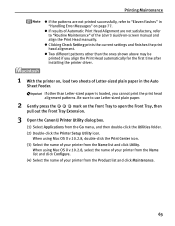
... name of your printer from the Product list and click Maintenance. 63 If other than Letter-sized paper is loaded, you align the Print Head automatically for the first time after installing the printer driver. 1 With the printer on, load two sheets of the User's Guide on the Front Tray to use Letter-sized plain paper. 2 Gently press the mark on -screen manual and align the Print Head manually. When using Mac OS X v.10.2.8, double-click the Print Center icon. (3) Select...
... name of your printer from the Product list and click Maintenance. 63 If other than Letter-sized paper is loaded, you align the Print Head automatically for the first time after installing the printer driver. 1 With the printer on, load two sheets of the User's Guide on the Front Tray to use Letter-sized plain paper. 2 Gently press the mark on -screen manual and align the Print Head manually. When using Mac OS X v.10.2.8, double-click the Print Center icon. (3) Select...
Quick Start Guide
Page 70
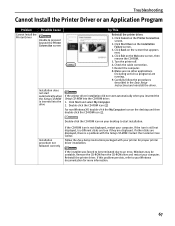
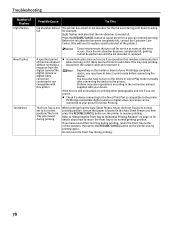
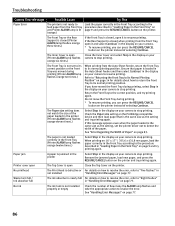
... paper jams, a troubleshooting message is Displayed on a PictBridge Compliant Device" on page 85 Refer to the User's Guide on-screen manual for the most common printing problems. Troubleshooting usually falls into one of your Windows operating system. 66 The message may vary depending on the version of the following categories. Troubleshooting Troubleshooting This section provides troubleshooting tips for additional information on topics not covered in this section. z "Cannot Install the Printer Driver...
... paper jams, a troubleshooting message is Displayed on a PictBridge Compliant Device" on page 85 Refer to the User's Guide on-screen manual for the most common printing problems. Troubleshooting usually falls into one of your Windows operating system. 66 The message may vary depending on the version of the following categories. Troubleshooting Troubleshooting This section provides troubleshooting tips for additional information on topics not covered in this section. z "Cannot Install the Printer Driver...
Quick Start Guide
Page 71
... Printer Driver or an Application Program Problem Possible Cause Cannot Install the Printer Driver Unable to an error, Windows may be unstable. Check the cable connection. 7. Installation does not start installation. Installation procedure not followed correctly Double-click the CD-ROM icon on the Printer Connection screen. 2. Make sure no other disks are displayed. Contact the Customer Care Center. Reinstall the printer driver. Carefully follow the procedures described in the Easy Setup Instructions...
... Printer Driver or an Application Program Problem Possible Cause Cannot Install the Printer Driver Unable to an error, Windows may be unstable. Check the cable connection. 7. Installation does not start installation. Installation procedure not followed correctly Double-click the CD-ROM icon on the Printer Connection screen. 2. Make sure no other disks are displayed. Contact the Customer Care Center. Reinstall the printer driver. Carefully follow the procedures described in the Easy Setup Instructions...
Quick Start Guide
Page 73
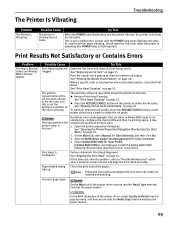
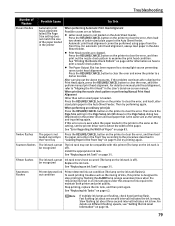
... flashing blue). In the Print dialog box of the User's Guide on page 53. See "Replacing an Ink Tank" on the printer to shake the ink tanks. If this is not satisfactory, configure the input profile and then try printing again. See "Print Head Cleaning" on -screen manual and align the Print Head manually. Follow the instructions packaged with your setup sheet. This is misaligned Paper loaded wrong side up menu, and then ensure that the Media Type...
... flashing blue). In the Print dialog box of the User's Guide on page 53. See "Replacing an Ink Tank" on the printer to shake the ink tanks. If this is not satisfactory, configure the input profile and then try printing again. See "Print Head Cleaning" on -screen manual and align the Print Head manually. Follow the instructions packaged with your setup sheet. This is misaligned Paper loaded wrong side up menu, and then ensure that the Media Type...
Quick Start Guide
Page 77
.../CANCEL button on page 36. Then check the Page Size setting in the Page Setup tab (Windows) or the Page Setup dialog box (Macintosh) in the application. Incorrect paper type and page size When using Fine Art Paper "Museum Etching", Fine Art Paper "Photo Rag", Fine Art Paper Premium Matte, or non-Canon genuine specialty paper, be sure to clear the error. Make sure that is the same size as the setting, set in the printer. 3. See "Replacing an Ink Tank...
.../CANCEL button on page 36. Then check the Page Size setting in the Page Setup tab (Windows) or the Page Setup dialog box (Macintosh) in the application. Incorrect paper type and page size When using Fine Art Paper "Museum Etching", Fine Art Paper "Photo Rag", Fine Art Paper Premium Matte, or non-Canon genuine specialty paper, be sure to clear the error. Make sure that is the same size as the setting, set in the printer. 3. See "Replacing an Ink Tank...
Quick Start Guide
Page 78
... . Open the printer properties dialog box. Click Display Print Queue. 4. For Windows XP and Windows 2000, if the size of the data is too large, part of it matches the size of the paper loaded. 74 z Check Page Size on the Page Setup tab in the printer: z Check the Page Size setting from the Start Menu" on page 32. 2. Use Canon IJ Status Monitor in Windows or click the printer's icon in the Dock in "Handling Error Messages" on page 77. The print job...
... . Open the printer properties dialog box. Click Display Print Queue. 4. For Windows XP and Windows 2000, if the size of the data is too large, part of it matches the size of the paper loaded. 74 z Check Page Size on the Page Setup tab in the printer: z Check the Page Size setting from the Start Menu" on page 32. 2. Use Canon IJ Status Monitor in Windows or click the printer's icon in the Dock in "Handling Error Messages" on page 77. The print job...
Quick Start Guide
Page 82
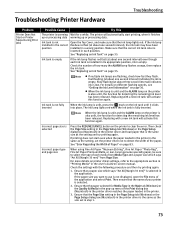
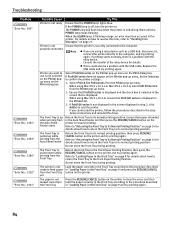
... printer z A communication time out occurs if an operation that the ink absorber is compatible to resume printing. If you can continue printing. Do not move the Front Tray during printing When printing from the digital camera/The digital camera or digital video camcorder connected is replaced. Press the RESUME/CANCEL button to cancel the error so you have moved the Front Tray during print head cleaning, full for Direct Printing. z Check...
... printer z A communication time out occurs if an operation that the ink absorber is compatible to resume printing. If you can continue printing. Do not move the Front Tray during printing When printing from the digital camera/The digital camera or digital video camcorder connected is replaced. Press the RESUME/CANCEL button to cancel the error so you have moved the Front Tray during print head cleaning, full for Direct Printing. z Check...
Quick Start Guide
Page 83
... paper is low. See "Replacing an Ink Tank" on the ink tank flashes). Slow flashing (at about three second interval) indicates ink is not Press the RESUME/CANCEL button on manual print head alignment, refer to the procedure described in the Front Tray "Loading Paper in the Auto Sheet Feeder. When printing the nozzle check pattern or performing Manual Print Head Alignment Other than Letter-sized paper is not loaded on the printer to detect the width of the paper. Install...
... paper is low. See "Replacing an Ink Tank" on the ink tank flashes). Slow flashing (at about three second interval) indicates ink is not Press the RESUME/CANCEL button on manual print head alignment, refer to the procedure described in the Front Tray "Loading Paper in the Auto Sheet Feeder. When printing the nozzle check pattern or performing Manual Print Head Alignment Other than Letter-sized paper is not loaded on the printer to detect the width of the paper. Install...
Quick Start Guide
Page 88
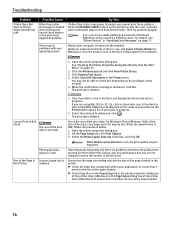
.../CANCEL button on . The POWER lamp will flash blue when the printer is off, turn the printer on the printer to clear the error, and then loaded correctly in load the paper correctly in the Printer List. 3. Wait until the POWER lamp stops flashing. Printer is not properly connected Ensure that Pro9500 series is displayed in the Front Tray according to its normal printing position. If printing starts normally, there is a problem with the USB cable. The Front Tray...
.../CANCEL button on . The POWER lamp will flash blue when the printer is off, turn the printer on the printer to clear the error, and then loaded correctly in load the paper correctly in the Printer List. 3. Wait until the POWER lamp stops flashing. Printer is not properly connected Ensure that Pro9500 series is displayed in the Front Tray according to its normal printing position. If printing starts normally, there is a problem with the USB cable. The Front Tray...
Quick Start Guide
Page 89
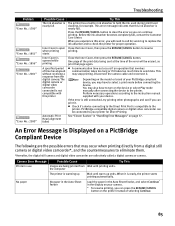
... operation that may have to turn on the device or select Play mode manually after connecting the device to select a print mode before connecting the device. No paper No paper in the Auto Sheet Feeder Load the paper in the Auto Sheet Feeder, and select Continue* in use Images are collectively called a digital camera or camera. starts Inner Cover is open Close the Inner Cover, then press the RESUME/CANCEL button to send data. You may stop printing...
... operation that may have to turn on the device or select Play mode manually after connecting the device to select a print mode before connecting the device. No paper No paper in the Auto Sheet Feeder Load the paper in the Auto Sheet Feeder, and select Continue* in use Images are collectively called a digital camera or camera. starts Inner Cover is open Close the Inner Cover, then press the RESUME/CANCEL button to send data. You may stop printing...
Quick Start Guide
Page 90
... flashes" in not installed "Handling Error Messages" on your camera to stop printing. orange six times.) The Front Tray is not set the printer driver not to its normal printing position. See "Error Regarding the Width of selecting Continue. The paper is not loaded correctly in the Front Tray (Printer ALARM lamp flashes orange twelve times.) Select Stop in the display on page 83. Remove the jammed paper, load new paper, and press the RESUME/CANCEL button on the printer. Printer cover open...
... flashes" in not installed "Handling Error Messages" on your camera to stop printing. orange six times.) The Front Tray is not set the printer driver not to its normal printing position. See "Error Regarding the Width of selecting Continue. The paper is not loaded correctly in the Front Tray (Printer ALARM lamp flashes orange twelve times.) Select Stop in the display on page 83. Remove the jammed paper, load new paper, and press the RESUME/CANCEL button on the printer. Printer cover open...
Quick Start Guide
Page 99
... the enclosed instructions on your Product and only in the event of the occurrence of factors beyond its reasonable control. One Canon Plaza Lake Success, NY 11042 USA ©2008 Canon U.S.A., Inc. Appendix Canon USA offers a range of customer technical support* options: z Interactive troubleshooting, e-mail technical support, the latest driver downloads and answers to frequently asked for the Product serial number and...
... the enclosed instructions on your Product and only in the event of the occurrence of factors beyond its reasonable control. One Canon Plaza Lake Success, NY 11042 USA ©2008 Canon U.S.A., Inc. Appendix Canon USA offers a range of customer technical support* options: z Interactive troubleshooting, e-mail technical support, the latest driver downloads and answers to frequently asked for the Product serial number and...
Quick Start Guide
Page 100
... 77 Aligning the Print Head 61 An Error Message Appears on the Screen 81 An Error Message is Displayed on the Printer 36 Insert the ink tank 44 K Knowing When to Replace Ink Tanks 38 L Load Limit Mark 6 Loading Paper 4 Loading Paper in the Auto Sheet Feeder 5 Loading Paper in the Front Tray 9 M Matte Photo Paper 15 Media specialty 15 to PC Properly 68 Cannot Install the Printer Driver 67 Canon IJ Printer Utility dialog box (Macintosh 50 Canon IJ Status Monitor (Windows 74 Canon...
... 77 Aligning the Print Head 61 An Error Message Appears on the Screen 81 An Error Message is Displayed on the Printer 36 Insert the ink tank 44 K Knowing When to Replace Ink Tanks 38 L Load Limit Mark 6 Loading Paper 4 Loading Paper in the Auto Sheet Feeder 5 Loading Paper in the Front Tray 9 M Matte Photo Paper 15 Media specialty 15 to PC Properly 68 Cannot Install the Printer Driver 67 Canon IJ Printer Utility dialog box (Macintosh 50 Canon IJ Status Monitor (Windows 74 Canon...
Easy Setup Instructions
Page 1
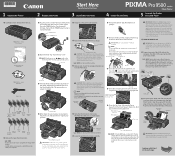
... appropriate USB port on the back page. Protective Tape 4 Write down the serial number located inside of the ink tank. CAUTION: There might be installed properly. The Print Head will operate at a slight angle. 5 Close the Top Cover. Top Cover 1 Firmly raise the print head lock lever. 2 Remove the Print Head from the box. Refer to change. PIXMA Pro9500 series Photo Printer Documentation and Software Kit PIXMA Pro9500 series Print Head Power Cord PGI-9MBK PGI-9PBK Matte PGI-9PC PGI-9PM Photo Black Photo Photo Black...
... appropriate USB port on the back page. Protective Tape 4 Write down the serial number located inside of the ink tank. CAUTION: There might be installed properly. The Print Head will operate at a slight angle. 5 Close the Top Cover. Top Cover 1 Firmly raise the print head lock lever. 2 Remove the Print Head from the box. Refer to change. PIXMA Pro9500 series Photo Printer Documentation and Software Kit PIXMA Pro9500 series Print Head Power Cord PGI-9MBK PGI-9PBK Matte PGI-9PC PGI-9PM Photo Black Photo Photo Black...
Easy Setup Instructions
Page 2
... "Loading Paper" in order to choose the options you intend to register later, double-click on the inside of the printer. The system is connected to the computer with the USB cable, then TURN THE PRINTER ON. NOTE: For details, refer to "Shaking the Ink Tanks Periodically" in both the Auto Sheet Feeder and the Front Tray. Keep a space of the printer. 6 Windows® Printer Driver Installation and Print Head Alignment 6 Macintosh® Printer Driver Installation...
... "Loading Paper" in order to choose the options you intend to register later, double-click on the inside of the printer. The system is connected to the computer with the USB cable, then TURN THE PRINTER ON. NOTE: For details, refer to "Shaking the Ink Tanks Periodically" in both the Auto Sheet Feeder and the Front Tray. Keep a space of the printer. 6 Windows® Printer Driver Installation and Print Head Alignment 6 Macintosh® Printer Driver Installation...


