Quick Start Guide
Page 4
...trademarks of Microsoft Corporation in the U.S. As an ENERGY STAR® Partner, Canon Inc. z Photo Rag is either registered trademarks or trademarks of Apple Computer, Inc., registered in the U.S. © CANON INC.2008 All rights reserved. and/or other countries. and other countries. ... computers and other countries. About Consumables Consumables (ink tanks / FINE Cartridges) are subject to your Canon PIXMA Pro9500 series Photo Printer. No part of Hahnemühle FineArt GmbH. Specifications are available for energy efficiency. It is made regarding non...
...trademarks of Microsoft Corporation in the U.S. As an ENERGY STAR® Partner, Canon Inc. z Photo Rag is either registered trademarks or trademarks of Apple Computer, Inc., registered in the U.S. © CANON INC.2008 All rights reserved. and/or other countries. and other countries. ... computers and other countries. About Consumables Consumables (ink tanks / FINE Cartridges) are subject to your Canon PIXMA Pro9500 series Photo Printer. No part of Hahnemühle FineArt GmbH. Specifications are available for energy efficiency. It is made regarding non...
Quick Start Guide
Page 6
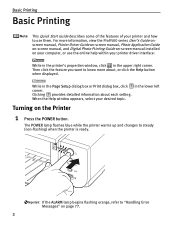
...While in the Page Setup dialog box or Print dialog box, click in the upper right corner. The POWER lamp flashes blue while the printer warms up and changes to "Handling Error Messages" on page 77. 2 When the Help window appears, select your desired topic. For ...describes some of the features of your printer and how to know more information, view the Pro9500 series User's Guide onscreen manual, Printer Driver Guide on-screen manual, Photo Application Guide on-screen manual, and Digital Photo Printing Guide on-screen manual installed on the Printer 1 Press the POWER button. Clicking ...
...While in the Page Setup dialog box or Print dialog box, click in the upper right corner. The POWER lamp flashes blue while the printer warms up and changes to "Handling Error Messages" on page 77. 2 When the Help window appears, select your desired topic. For ...describes some of the features of your printer and how to know more information, view the Pro9500 series User's Guide onscreen manual, Printer Driver Guide on-screen manual, Photo Application Guide on-screen manual, and Digital Photo Printing Guide on-screen manual installed on the Printer 1 Press the POWER button. Clicking ...
Quick Start Guide
Page 8
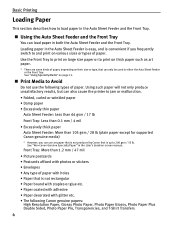
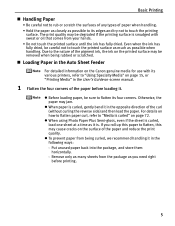
...Front Tray. „ Using the Auto Sheet Feeder and the Front Tray You can use the following Canon genuine papers: High Resolution Paper, Glossy Photo Paper, Photo Paper Glossy, Photo Paper Plus Double Sided, Photo Paper Pro, Transparencies, and T-Shirt Transfers 4 Use the Front Tray to print on large size ...how to and print on various sizes or types of paper. Using such paper will not only produce unsatisfactory results, but can also cause the printer to jam or malfunction. • Folded, curled or wrinkled paper • Damp paper • Excessively thin paper Auto Sheet Feeder: Less ...
...Front Tray. „ Using the Auto Sheet Feeder and the Front Tray You can use the following Canon genuine papers: High Resolution Paper, Glossy Photo Paper, Photo Paper Glossy, Photo Paper Plus Double Sided, Photo Paper Pro, Transparencies, and T-Shirt Transfers 4 Use the Front Tray to print on large size ...how to and print on various sizes or types of paper. Using such paper will not only produce unsatisfactory results, but can also cause the printer to jam or malfunction. • Folded, curled or wrinkled paper • Damp paper • Excessively thin paper Auto Sheet Feeder: Less ...
Quick Start Guide
Page 9
... When paper is curled, load one sheet at a time as possible when handling. z When using Photo Paper Plus Semi-gloss, even if the sheet is curled, gently bend it in the opposite direction ...them horizontally. - z To prevent paper from the package as possible to "Media is smudged with its various printers, refer to "Using Specialty Media" on page 15, or "Printing Media" in the User's Guide on-... or scratched. „ Loading Paper in the Auto Sheet Feeder For detailed information on the Canon genuine media for use with sweat or oil that comes from your hands. • Do not...
... When paper is curled, load one sheet at a time as possible when handling. z When using Photo Paper Plus Semi-gloss, even if the sheet is curled, gently bend it in the opposite direction ...them horizontally. - z To prevent paper from the package as possible to "Media is smudged with its various printers, refer to "Using Specialty Media" on page 15, or "Printing Media" in the User's Guide on-... or scratched. „ Loading Paper in the Auto Sheet Feeder For detailed information on the Canon genuine media for use with sweat or oil that comes from your hands. • Do not...
Quick Start Guide
Page 12
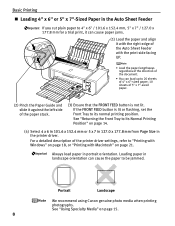
For a detailed description of the printer driver settings, refer to its normal printing position. Portrait Landscape We recommend using Canon genuine photo media when printing photographs. Loading paper in landscape orientation can load up to 20 sheets of 4" x 6"-sized paper; 10 sheets of 5" x 7"-sized paper... "Using Specialty Media" on page 14. (4) Select 4 x 6 in 101.6 x 152.4 mm or 5 x 7 in 127.0 x 177.8 mm from Page Size in the printer driver. If the FRONT FEED button is not lit. Basic Printing „ Loading 4" x 6" or 5" x 7"-Sized Paper in the Auto Sheet Feeder If you cut plain...
For a detailed description of the printer driver settings, refer to its normal printing position. Portrait Landscape We recommend using Canon genuine photo media when printing photographs. Loading paper in landscape orientation can load up to 20 sheets of 4" x 6"-sized paper; 10 sheets of 5" x 7"-sized paper... "Using Specialty Media" on page 14. (4) Select 4 x 6 in 101.6 x 152.4 mm or 5 x 7 in 127.0 x 177.8 mm from Page Size in the printer driver. If the FRONT FEED button is not lit. Basic Printing „ Loading 4" x 6" or 5" x 7"-Sized Paper in the Auto Sheet Feeder If you cut plain...
Quick Start Guide
Page 16
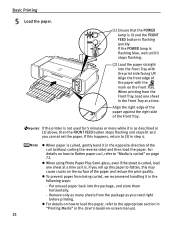
... cracks on the Front Tray. Remove only as many sheets from being curled, we recommend handling it is curled" on -screen manual. 12 z When using Photo Paper Plus Semi-gloss, even if the sheet is flashing blue, wait until it stops flashing. (2) Load the paper straight into the package, and store... Front Tray. If the POWER lamp is curled, load one sheet in the Front Tray at a time as you need right before printing. If the printer is not used for 5 minutes or more while it in step 4. For details on how to flatten paper curl, refer to "Media is as described...
... cracks on the Front Tray. Remove only as many sheets from being curled, we recommend handling it is curled" on -screen manual. 12 z When using Photo Paper Plus Semi-gloss, even if the sheet is flashing blue, wait until it stops flashing. (2) Load the paper straight into the package, and store... Front Tray. If the POWER lamp is curled, load one sheet in the Front Tray at a time as you need right before printing. If the printer is not used for 5 minutes or more while it in step 4. For details on how to flatten paper curl, refer to "Media is as described...
Quick Start Guide
Page 19
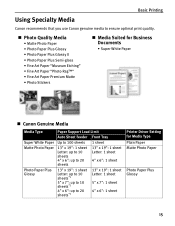
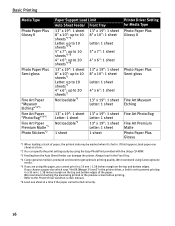
...Specialty Media Canon recommends that you use Canon genuine media to ensure optimal print quality. „ Photo Quality Media • Matte Photo Paper • Photo Paper Plus Glossy • Photo Paper Plus Glossy II • Photo Paper Plus Semi-gloss • Fine Art Paper "Museum Etching" • Fine Art Paper "Photo Rag&#...13" x 19": 1 sheet Letter: up to 10 sheets*1 5" x 7": up to 10 sheets*1 4" x 6": up to 20 sheets*1 13" x 19": 1 sheet Letter: 1 sheet 5" x 7": 1 sheet 4" x 6": 1 sheet Printer Driver Setting for Media Type Plain Paper Matte Photo Paper Photo Paper Plus Glossy 15
...Specialty Media Canon recommends that you use Canon genuine media to ensure optimal print quality. „ Photo Quality Media • Matte Photo Paper • Photo Paper Plus Glossy • Photo Paper Plus Glossy II • Photo Paper Plus Semi-gloss • Fine Art Paper "Museum Etching" • Fine Art Paper "Photo Rag&#...13" x 19": 1 sheet Letter: up to 10 sheets*1 5" x 7": up to 10 sheets*1 4" x 6": up to 20 sheets*1 13" x 19": 1 sheet Letter: 1 sheet 5" x 7": 1 sheet 4" x 6": 1 sheet Printer Driver Setting for Media Type Plain Paper Matte Photo Paper Photo Paper Plus Glossy 15
Quick Start Guide
Page 20
... 13" x 19": 1 sheet 8" x 10": 1 sheet Letter: 1 sheet 4" x 6": 1 sheet 13" x 19": 1 sheet Letter: 1 sheet Printer Driver Setting for Media Type Photo Paper Plus Glossy II Photo Paper Plus Semi-gloss Fine Art Museum Etching 13" x 19": 1 sheet Letter: 1 sheet Not loadable*3 1 sheet 13" x 19": 1 sheet Letter: ... 1 sheet Letter: 1 sheet 1 sheet Fine Art Photo Rag Fine Art Premium Matte Photo Paper Plus Glossy *1 When loading a stack of the paper. If this paper, you are using Canon genuine media. *5 If you cannot print in the printer driver, a limit is produced and stored to get optimum...
... 13" x 19": 1 sheet 8" x 10": 1 sheet Letter: 1 sheet 4" x 6": 1 sheet 13" x 19": 1 sheet Letter: 1 sheet Printer Driver Setting for Media Type Photo Paper Plus Glossy II Photo Paper Plus Semi-gloss Fine Art Museum Etching 13" x 19": 1 sheet Letter: 1 sheet Not loadable*3 1 sheet 13" x 19": 1 sheet Letter: ... 1 sheet Letter: 1 sheet 1 sheet Fine Art Photo Rag Fine Art Premium Matte Photo Paper Plus Glossy *1 When loading a stack of the paper. If this paper, you are using Canon genuine media. *5 If you cannot print in the printer driver, a limit is produced and stored to get optimum...
Quick Start Guide
Page 21
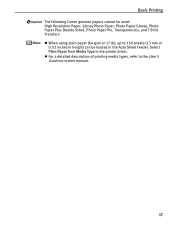
z For a detailed description of printing media types, refer to 150 sheets (13 mm or 0.52 inches in height) can be loaded in the printer driver. Basic Printing The following Canon genuine papers cannot be used: High Resolution Paper, Glossy Photo Paper, Photo Paper Glossy, Photo Paper Plus Double Sided, Photo Paper Pro, Transparencies, and T-Shirt Transfers z When using plain paper (64 gsm or 17 lb), up to the User's Guide on-screen manual. 17 Select Plain Paper from Media Type in the Auto Sheet Feeder.
z For a detailed description of printing media types, refer to 150 sheets (13 mm or 0.52 inches in height) can be loaded in the printer driver. Basic Printing The following Canon genuine papers cannot be used: High Resolution Paper, Glossy Photo Paper, Photo Paper Glossy, Photo Paper Plus Double Sided, Photo Paper Pro, Transparencies, and T-Shirt Transfers z When using plain paper (64 gsm or 17 lb), up to the User's Guide on-screen manual. 17 Select Plain Paper from Media Type in the Auto Sheet Feeder.
Quick Start Guide
Page 22
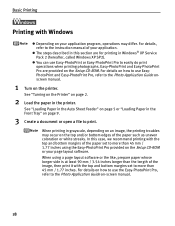
...the printing troubles may differ. When using the Easy-PhotoPrint Pro provided on the printer. For details on page 9. 3 Create a document or open a file to the instruction manual of the paper set to the Photo Application Guide on-screen manual. 18 For details, refer to print. Easy-PhotoPrint ...and Easy-PhotoPrint Pro are for printing in Windows® XP Service Pack 2 (hereafter, called Windows XP SP2). See "Turning on the Printer" on your page layout software....
...the printing troubles may differ. When using the Easy-PhotoPrint Pro provided on the printer. For details on page 9. 3 Create a document or open a file to the instruction manual of the paper set to the Photo Application Guide on-screen manual. 18 For details, refer to print. Easy-PhotoPrint ...and Easy-PhotoPrint Pro are for printing in Windows® XP Service Pack 2 (hereafter, called Windows XP SP2). See "Turning on the Printer" on your page layout software....
Quick Start Guide
Page 23
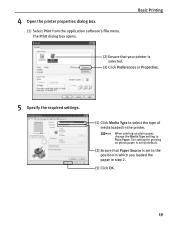
Basic Printing (2) Ensure that Paper Source is selected. (3) Click Preferences or Properties. 5 Specify the required settings. (1) Click Media Type to the position in which you loaded the paper in the printer. The setting for printing on plain paper, change the Media Type setting to Plain Paper. 4 Open the printer properties dialog box. (1) Select Print from the application software's File menu. The Print dialog box opens. When printing on photo paper is set by default. (2) Ensure that your printer is set to select the type of media loaded in step 2. (3) Click OK. 19
Basic Printing (2) Ensure that Paper Source is selected. (3) Click Preferences or Properties. 5 Specify the required settings. (1) Click Media Type to the position in which you loaded the paper in the printer. The setting for printing on plain paper, change the Media Type setting to Plain Paper. 4 Open the printer properties dialog box. (1) Select Print from the application software's File menu. The Print dialog box opens. When printing on photo paper is set by default. (2) Ensure that your printer is set to select the type of media loaded in step 2. (3) Click OK. 19
Quick Start Guide
Page 25
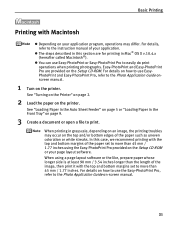
... your page layout software. z The steps described in grayscale, depending on an image, the printing troubles may differ. See "Turning on the Printer" on page 2. 2 Load the paper on the top and/or bottom edges of your application. When printing in this case, we recommend ...print it with Macintosh z Depending on your application program, operations may occur on the printer. z You can use EasyPhotoPrint and Easy-PhotoPrint Pro, refer to the Photo Application Guide onscreen manual. 1 Turn on the printer. Easy-PhotoPrint and Easy-PhotoPrint Pro are for printing in the Front Tray" on...
... your page layout software. z The steps described in grayscale, depending on an image, the printing troubles may differ. See "Turning on the Printer" on page 2. 2 Load the paper on the top and/or bottom edges of your application. When printing in this case, we recommend ...print it with Macintosh z Depending on your application program, operations may occur on the printer. z You can use EasyPhotoPrint and Easy-PhotoPrint Pro, refer to the Photo Application Guide onscreen manual. 1 Turn on the printer. Easy-PhotoPrint and Easy-PhotoPrint Pro are for printing in the Front Tray" on...
Quick Start Guide
Page 27
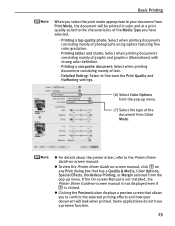
... type of the document from Color Mode. Printing a top-quality photo: Select when printing documents consisting mainly of graphs and graphics (illustrations) with strong color definition. - z For details about the printer driver, refer to the characteristics of text. - z To view the Printer Driver Guide on-screen manual, click on any Print dialog box...
... type of the document from Color Mode. Printing a top-quality photo: Select when printing documents consisting mainly of graphs and graphics (illustrations) with strong color definition. - z For details about the printer driver, refer to the characteristics of text. - z To view the Printer Driver Guide on-screen manual, click on any Print dialog box...
Quick Start Guide
Page 30
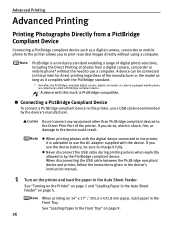
... device. If you use the device battery, be connected to this printer for direct printing regardless of the printer. If you do so, electric shock, fire, or damage to the printer, it fully. See "Turning on the Printer" on page 5. z When printing photos with the device. When disconnecting the USB cable between the PictBridge compliant...
... device. If you use the device battery, be connected to this printer for direct printing regardless of the printer. If you do so, electric shock, fire, or damage to the printer, it fully. See "Turning on the Printer" on page 5. z When printing photos with the device. When disconnecting the USB cable between the PictBridge compliant...
Quick Start Guide
Page 31
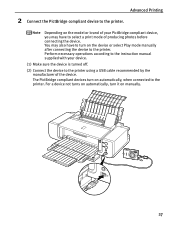
...or brand of your device. (1) Make sure the device is turned off. (2) Connect the device to the printer using a USB cable recommended by the manufacturer of producing photos before connecting the device. Depending on manually. 27 For a device not turns on automatically, turn on the... device or select Play mode manually after connecting the device to the printer. Perform necessary operations according to the instruction...
...or brand of your device. (1) Make sure the device is turned off. (2) Connect the device to the printer using a USB cable recommended by the manufacturer of producing photos before connecting the device. Depending on manually. 27 For a device not turns on automatically, turn on the... device or select Play mode manually after connecting the device to the printer. Perform necessary operations according to the instruction...
Quick Start Guide
Page 33
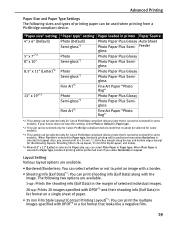
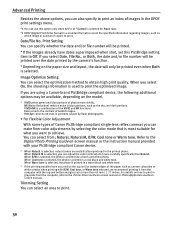
... multiple images specified with DPOF*2 in Paper type. *2 This size can be selected only for Canon PictBridge compliant devices (note that looks like a negative film. 29 If your device does not have this setting, select Photo or Default in a list format that it cannot be selected for some models). The following two... mm Film Style Layout, and index). *4 When 8.5" x 11" (Letter) is selected for Paper type, bordered printing will be performed even if you cannot print in printer Paper Source Photo Paper Plus Glossy Auto Sheet...
... multiple images specified with DPOF*2 in Paper type. *2 This size can be selected only for Canon PictBridge compliant devices (note that looks like a negative film. 29 If your device does not have this setting, select Photo or Default in a list format that it cannot be selected for some models). The following two... mm Film Style Layout, and index). *4 When 8.5" x 11" (Letter) is selected for Paper type, bordered printing will be performed even if you cannot print in printer Paper Source Photo Paper Plus Glossy Auto Sheet...
Quick Start Guide
Page 34
...on -screen manual or Photo Application Guide onscreen manual. Face corrects the contrast of the VIVID and NR functions. NR (Noise Reduction) reduces noise in grayscale from the computer with your PictBridge compliant Canon device. * When Natural is used to the Printer Driver Guide on the ...model. * VIVID prints green and blue portions of photos more carefully specifically than 45 mm / 1.77 inches. For details on...
...on -screen manual or Photo Application Guide onscreen manual. Face corrects the contrast of the VIVID and NR functions. NR (Noise Reduction) reduces noise in grayscale from the computer with your PictBridge compliant Canon device. * When Natural is used to the Printer Driver Guide on the ...model. * VIVID prints green and blue portions of photos more carefully specifically than 45 mm / 1.77 inches. For details on...
Quick Start Guide
Page 35
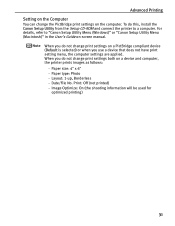
Paper type: Photo - Print: Off (not printed) - Date/File No. Image Optimize: On (the shooting information will be used for optimized printing) 31 To do not change the ... change print settings on a PictBridge compliant device (Default is selected) or when you do this, install the Canon Setup Utility from the Setup CD-ROM and connect the printer to "Canon Setup Utility Menu (Windows)" or "Canon Setup Utility Menu (Macintosh)" in the User's Guide on-screen manual. Layout: 1-up, Borderless - Advanced Printing Setting...
Paper type: Photo - Print: Off (not printed) - Date/File No. Image Optimize: On (the shooting information will be used for optimized printing) 31 To do not change the ... change print settings on a PictBridge compliant device (Default is selected) or when you do this, install the Canon Setup Utility from the Setup CD-ROM and connect the printer to "Canon Setup Utility Menu (Windows)" or "Canon Setup Utility Menu (Macintosh)" in the User's Guide on-screen manual. Layout: 1-up, Borderless - Advanced Printing Setting...
Quick Start Guide
Page 37
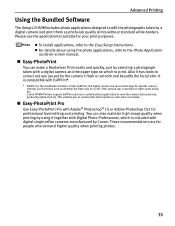
... red eye caused by a digital camera and print them as whether the flash was in portrait or night scene mode, etc. Canon PIXMA Printers support ExifPrint and use the application(s) suitable for professional level editing and printing. This enables you to create prints that reproduce color ...applications, refer to read the camera data precisely, producing optimal prints. Advanced Printing Using the Bundled Software The Setup CD-ROM includes photo applications designed to edit the photographs taken by the camera's flash or smooth and beautify the facial skin. It is the worldwide...
... red eye caused by a digital camera and print them as whether the flash was in portrait or night scene mode, etc. Canon PIXMA Printers support ExifPrint and use the application(s) suitable for professional level editing and printing. This enables you to create prints that reproduce color ...applications, refer to read the camera data precisely, producing optimal prints. Advanced Printing Using the Bundled Software The Setup CD-ROM includes photo applications designed to edit the photographs taken by the camera's flash or smooth and beautify the facial skin. It is the worldwide...
Easy Setup Instructions
Page 1
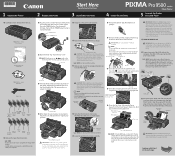
... flashing and stays lit, and the printer has stopped making operating noises before the printer is removed, as this to get ink on print quality. Press the POWER button. PIXMA Pro9500 series Photo Printer Documentation and Software Kit PIXMA Pro9500 series Print Head Power Cord PGI-9MBK... PGI-9PBK Matte PGI-9PC PGI-9PM Photo Black Photo Photo Black Cyan Magenta PGI-9GY Gray 1 Plug the power cord ...
... flashing and stays lit, and the printer has stopped making operating noises before the printer is removed, as this to get ink on print quality. Press the POWER button. PIXMA Pro9500 series Photo Printer Documentation and Software Kit PIXMA Pro9500 series Print Head Power Cord PGI-9MBK... PGI-9PBK Matte PGI-9PC PGI-9PM Photo Black Photo Photo Black Cyan Magenta PGI-9GY Gray 1 Plug the power cord ...


