Quick Start Guide
Page 4
... or warranties concerning the products described. and/or other countries. and other countries. As an ENERGY STAR® Partner, Canon Inc. Disclaimer Canon U.S.A., Inc. z Macintosh and Mac are trademarks of energy efficient computers and other office equipment. All statements, technical information ... thereof are not guaranteed or warranted, and they are not intended to be, nor should they be understood to your Canon PIXMA Pro9500 series Photo Printer. z Windows Vista is a trademark of Adobe Systems Incorporated in the United States and/or other countries. Their ...
... or warranties concerning the products described. and/or other countries. and other countries. As an ENERGY STAR® Partner, Canon Inc. Disclaimer Canon U.S.A., Inc. z Macintosh and Mac are trademarks of energy efficient computers and other office equipment. All statements, technical information ... thereof are not guaranteed or warranted, and they are not intended to be, nor should they be understood to your Canon PIXMA Pro9500 series Photo Printer. z Windows Vista is a trademark of Adobe Systems Incorporated in the United States and/or other countries. Their ...
Quick Start Guide
Page 6
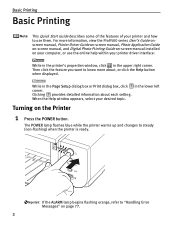
... describes some of the features of your printer and how to know more information, view the Pro9500 series User's Guide onscreen manual, Printer Driver Guide on-screen manual, Photo Application Guide on-screen manual, and Digital Photo Printing Guide on-screen manual installed on your computer, or use them. Then click the feature...
... describes some of the features of your printer and how to know more information, view the Pro9500 series User's Guide onscreen manual, Printer Driver Guide on-screen manual, Photo Application Guide on-screen manual, and Digital Photo Printing Guide on-screen manual installed on your computer, or use them. Then click the feature...
Quick Start Guide
Page 8
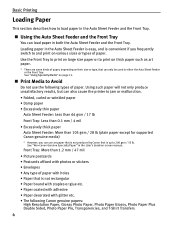
... Sheet Feeder: More than 1.2 mm / 47 mil • Picture postcards • Postcards affixed with photos or stickers • Envelopes • Any type of paper. See "Non-Canon Genuine Specialty Paper" in either the Auto Sheet Feeder or the Front Tray. Loading paper in the Auto... • Paper coated with adhesive • Paper decorated with glitter etc. • The following Canon genuine papers: High Resolution Paper, Glossy Photo Paper, Photo Paper Glossy, Photo Paper Plus Double Sided, Photo Paper Pro, Transparencies, and T-Shirt Transfers 4 Use the Front Tray to print on large size ...
... Sheet Feeder: More than 1.2 mm / 47 mil • Picture postcards • Postcards affixed with photos or stickers • Envelopes • Any type of paper. See "Non-Canon Genuine Specialty Paper" in either the Auto Sheet Feeder or the Front Tray. Loading paper in the Auto... • Paper coated with adhesive • Paper decorated with glitter etc. • The following Canon genuine papers: High Resolution Paper, Glossy Photo Paper, Photo Paper Glossy, Photo Paper Plus Double Sided, Photo Paper Pro, Transparencies, and T-Shirt Transfers 4 Use the Front Tray to print on large size ...
Quick Start Guide
Page 9
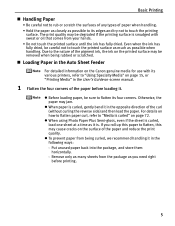
... them horizontally. - Remove only as many sheets from being rubbed or scratched. „ Loading Paper in the Auto Sheet Feeder For detailed information on the Canon genuine media for use with sweat or oil that comes from your hands. • Do not touch the printed surface until the ink has fully... Media" on page 15, or "Printing Media" in the User's Guide on-screen manual. 1 Flatten the four corners of the paper before printing. 5 z When using Photo Paper Plus Semi-gloss, even if the sheet is curled" on the surface of the paper and reduce the print quality.
... them horizontally. - Remove only as many sheets from being rubbed or scratched. „ Loading Paper in the Auto Sheet Feeder For detailed information on the Canon genuine media for use with sweat or oil that comes from your hands. • Do not touch the printed surface until the ink has fully... Media" on page 15, or "Printing Media" in the User's Guide on-screen manual. 1 Flatten the four corners of the paper before printing. 5 z When using Photo Paper Plus Semi-gloss, even if the sheet is curled" on the surface of the paper and reduce the print quality.
Quick Start Guide
Page 12
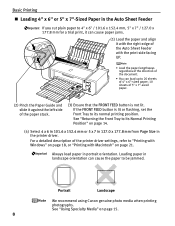
See "Returning the Front Tray to be jammed. Portrait Landscape We recommend using Canon genuine photo media when printing photographs. Loading paper in landscape orientation can cause the paper to Its Normal Printing Position" on page 14. (4) Select 4 x 6 in 101.6 x 152.4 ...
See "Returning the Front Tray to be jammed. Portrait Landscape We recommend using Canon genuine photo media when printing photographs. Loading paper in landscape orientation can cause the paper to Its Normal Printing Position" on page 14. (4) Select 4 x 6 in 101.6 x 152.4 ...
Quick Start Guide
Page 16
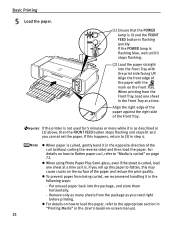
... curl, refer to "Media is flashing quickly. Remove only as many sheets from the package as it in the Front Tray at a time. z When using Photo Paper Plus Semi-gloss, even if the sheet is . Put unused paper back into the Front Tray with the mark on the Front Tray. Align...
... curl, refer to "Media is flashing quickly. Remove only as many sheets from the package as it in the Front Tray at a time. z When using Photo Paper Plus Semi-gloss, even if the sheet is . Put unused paper back into the Front Tray with the mark on the Front Tray. Align...
Quick Start Guide
Page 19
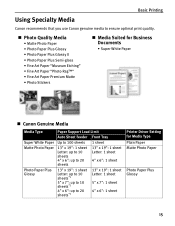
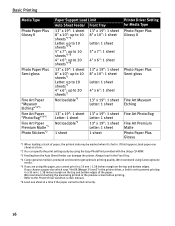
Basic Printing Using Specialty Media Canon recommends that you use Canon genuine media to ensure optimal print quality. „ Photo Quality Media • Matte Photo Paper • Photo Paper Plus Glossy • Photo Paper Plus Glossy II • Photo Paper Plus Semi-gloss • Fine Art Paper "Museum Etching" • Fine Art Paper "Photo Rag™" • Fine Art...
Basic Printing Using Specialty Media Canon recommends that you use Canon genuine media to ensure optimal print quality. „ Photo Quality Media • Matte Photo Paper • Photo Paper Plus Glossy • Photo Paper Plus Glossy II • Photo Paper Plus Semi-gloss • Fine Art Paper "Museum Etching" • Fine Art Paper "Photo Rag™" • Fine Art...
Quick Start Guide
Page 20
... before printing. If you are using this happens, load paper one sheet at a time. *2 You can specify the print setting easily by using Canon genuine media. *5 If you choose a paper size which says "Art XX [Margin 35 mm]" in the printer driver, a limit is set ... 13" x 19": 1 sheet 8" x 10": 1 sheet Letter: 1 sheet 4" x 6": 1 sheet 13" x 19": 1 sheet Letter: 1 sheet Printer Driver Setting for Media Type Photo Paper Plus Glossy II Photo Paper Plus Semi-gloss Fine Art Museum Etching 13" x 19": 1 sheet Letter: 1 sheet Not loadable*3 1 sheet 13" x 19": 1 sheet Letter: 1 sheet 13" x 19...
... before printing. If you are using this happens, load paper one sheet at a time. *2 You can specify the print setting easily by using Canon genuine media. *5 If you choose a paper size which says "Art XX [Margin 35 mm]" in the printer driver, a limit is set ... 13" x 19": 1 sheet 8" x 10": 1 sheet Letter: 1 sheet 4" x 6": 1 sheet 13" x 19": 1 sheet Letter: 1 sheet Printer Driver Setting for Media Type Photo Paper Plus Glossy II Photo Paper Plus Semi-gloss Fine Art Museum Etching 13" x 19": 1 sheet Letter: 1 sheet Not loadable*3 1 sheet 13" x 19": 1 sheet Letter: 1 sheet 13" x 19...
Quick Start Guide
Page 21
Select Plain Paper from Media Type in the Auto Sheet Feeder. Basic Printing The following Canon genuine papers cannot be used: High Resolution Paper, Glossy Photo Paper, Photo Paper Glossy, Photo Paper Plus Double Sided, Photo Paper Pro, Transparencies, and T-Shirt Transfers z When using plain paper (64 gsm or 17 lb), up to the User's Guide on-screen manual. 17 z For a detailed description of printing media types, refer to 150 sheets (13 mm or 0.52 inches in height) can be loaded in the printer driver.
Select Plain Paper from Media Type in the Auto Sheet Feeder. Basic Printing The following Canon genuine papers cannot be used: High Resolution Paper, Glossy Photo Paper, Photo Paper Glossy, Photo Paper Plus Double Sided, Photo Paper Pro, Transparencies, and T-Shirt Transfers z When using plain paper (64 gsm or 17 lb), up to the User's Guide on-screen manual. 17 z For a detailed description of printing media types, refer to 150 sheets (13 mm or 0.52 inches in height) can be loaded in the printer driver.
Quick Start Guide
Page 22
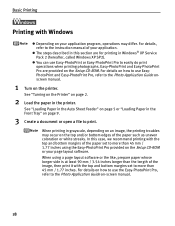
... CD-ROM. See "Turning on the Printer" on page 2. 2 Load the paper in the Front Tray" on page 9. 3 Create a document or open a file to the Photo Application Guide on the printer. For details on your page layout software. In this section are provided on the Setup CD-ROM or your application... mm / 3.54 inches longer than the length of the image, then print it with the top and bottom margins of the paper set to the Photo Application Guide onscreen manual. 1 Turn on -screen manual. 18
... CD-ROM. See "Turning on the Printer" on page 2. 2 Load the paper in the Front Tray" on page 9. 3 Create a document or open a file to the Photo Application Guide on the printer. For details on your page layout software. In this section are provided on the Setup CD-ROM or your application... mm / 3.54 inches longer than the length of the image, then print it with the top and bottom margins of the paper set to the Photo Application Guide onscreen manual. 1 Turn on -screen manual. 18
Quick Start Guide
Page 23
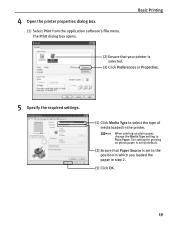
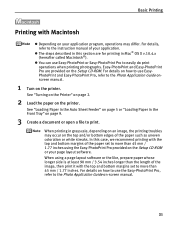
The Print dialog box opens. The setting for printing on plain paper, change the Media Type setting to select the type of media loaded in step 2. (3) Click OK. 19 Basic Printing (2) Ensure that Paper Source is selected. (3) Click Preferences or Properties. 5 Specify the required settings. (1) Click Media Type to Plain Paper. When printing on photo paper is set by default. (2) Ensure that your printer is set to the position in which you loaded the paper in the printer. 4 Open the printer properties dialog box. (1) Select Print from the application software's File menu.
The Print dialog box opens. The setting for printing on plain paper, change the Media Type setting to select the type of media loaded in step 2. (3) Click OK. 19 Basic Printing (2) Ensure that Paper Source is selected. (3) Click Preferences or Properties. 5 Specify the required settings. (1) Click Media Type to Plain Paper. When printing on photo paper is set by default. (2) Ensure that your printer is set to the position in which you loaded the paper in the printer. 4 Open the printer properties dialog box. (1) Select Print from the application software's File menu.
Quick Start Guide
Page 25
... for printing in Mac® OS X v.10.4.x (hereafter called Macintosh®). For details on how to use EasyPhotoPrint and Easy-PhotoPrint Pro, refer to the Photo Application Guide on your page layout software. Basic Printing Printing with the top and bottom margins of the paper set to more than 45 mm... top and bottom margins set to more than 45 mm / 1.77 inches. For details on how to use the Easy-PhotoPrint Pro, refer to the Photo Application Guide onscreen manual. 1 Turn on the top and/or bottom edges of the paper such as uneven coloration or white streaks. When using the...
... for printing in Mac® OS X v.10.4.x (hereafter called Macintosh®). For details on how to use EasyPhotoPrint and Easy-PhotoPrint Pro, refer to the Photo Application Guide on your page layout software. Basic Printing Printing with the top and bottom margins of the paper set to more than 45 mm... top and bottom margins set to more than 45 mm / 1.77 inches. For details on how to use the Easy-PhotoPrint Pro, refer to the Photo Application Guide onscreen manual. 1 Turn on the top and/or bottom edges of the paper such as uneven coloration or white streaks. When using the...
Quick Start Guide
Page 26
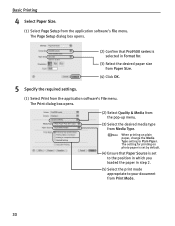
... opens. (2) Select Quality & Media from the pop-up menu. (3) Select the desired media type from the application software's File menu. When printing on photo paper is selected in step 2. (5) Select the print mode appropriate to Plain Paper. The setting for . (3) Select the desired paper size from Paper Size...(1) Select Print from Print Mode. 22 The Page Setup dialog box opens. (2) Confirm that Paper Source is set by default. (4) Ensure that Pro9500 series is set to the position in which you loaded the paper in Format for printing on plain paper, change the Media Type setting to...
... opens. (2) Select Quality & Media from the pop-up menu. (3) Select the desired media type from the application software's File menu. When printing on photo paper is selected in step 2. (5) Select the print mode appropriate to Plain Paper. The setting for . (3) Select the desired paper size from Paper Size...(1) Select Print from Print Mode. 22 The Page Setup dialog box opens. (2) Confirm that Paper Source is set by default. (4) Ensure that Pro9500 series is set to the position in which you loaded the paper in Format for printing on plain paper, change the Media Type setting to...
Quick Start Guide
Page 27
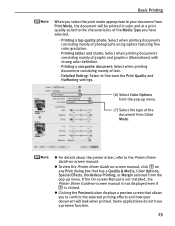
Printing a top-quality photo: Select when printing documents consisting mainly of the document from the pop-up menu. z To view the Printer Driver Guide on-screen manual, click on ...
Printing a top-quality photo: Select when printing documents consisting mainly of the document from the pop-up menu. z To view the Printer Driver Guide on-screen manual, click on ...
Quick Start Guide
Page 30
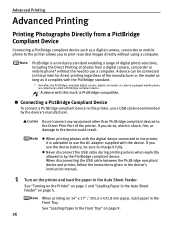
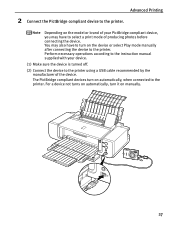
... device. If you do so, electric shock, fire, or damage to the printer, it is an industry standard enabling a range of digital photo solutions, including the Direct Printing of the printer. z Never disconnect the USB cable during printing unless when explicitly allowed to this printer for direct... Tray. Advanced Printing Advanced Printing Printing Photographs Directly from a digital camera, camcorder or mobile phone* without using a computer. z When printing photos with the device. Do not connect any equipment other than PictBridge compliant devices to the Direct Print Port of...
... device. If you do so, electric shock, fire, or damage to the printer, it is an industry standard enabling a range of digital photo solutions, including the Direct Printing of the printer. z Never disconnect the USB cable during printing unless when explicitly allowed to this printer for direct... Tray. Advanced Printing Advanced Printing Printing Photographs Directly from a digital camera, camcorder or mobile phone* without using a computer. z When printing photos with the device. Do not connect any equipment other than PictBridge compliant devices to the Direct Print Port of...
Quick Start Guide
Page 31
... the printer using a USB cable recommended by the manufacturer of the device. Advanced Printing 2 Connect the PictBridge compliant device to select a print mode of producing photos before connecting the device. You may have to turn on the device or select Play mode manually after connecting the device to the printer. Depending...
... the printer using a USB cable recommended by the manufacturer of the device. Advanced Printing 2 Connect the PictBridge compliant device to select a print mode of producing photos before connecting the device. You may have to turn on the device or select Play mode manually after connecting the device to the printer. Depending...
Quick Start Guide
Page 33
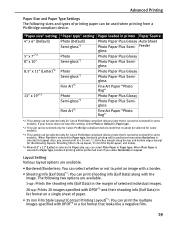
...PictBridge compliant device. Feeder gloss Photo Paper Plus Glossy Photo Paper Plus Semigloss Photo Paper Plus Glossy Photo Paper Plus Semigloss Fine Art Paper "Photo Rag" Photo Paper Plus Glossy Photo Paper Plus Semigloss Fine Art Paper "Photo Rag" *1 This setting can be selected only for Canon PictBridge compliant devices (note ...*3 Paper loaded in Paper type. If your device does not have this setting, select Photo or Default in Paper type. *2 This size can be selected only for Canon PictBridge compliant devices (note that it cannot be selected for some models). Advanced Printing Paper...
...PictBridge compliant device. Feeder gloss Photo Paper Plus Glossy Photo Paper Plus Semigloss Photo Paper Plus Glossy Photo Paper Plus Semigloss Fine Art Paper "Photo Rag" Photo Paper Plus Glossy Photo Paper Plus Semigloss Fine Art Paper "Photo Rag" *1 This setting can be selected only for Canon PictBridge compliant devices (note ...*3 Paper loaded in Paper type. If your device does not have this setting, select Photo or Default in Paper type. *2 This size can be selected only for Canon PictBridge compliant devices (note that it cannot be selected for some models). Advanced Printing Paper...
Quick Start Guide
Page 34
... you can adjust the color (contrast etc.) more vividly. For details on the model. * VIVID prints green and blue portions of photos more carefully specifically than 45 mm / 1.77 inches. Red-Eye corrects red eyes in portraits caused by flash photography. • For ...Adjustment With some types of Canon PictBridge compliant single-lens reflex cameras you can make finer color adjustments by the camera's function. * Depending on -screen manual or Photo Application Guide onscreen manual. When B/W is selected, the photo is printed like a black and white photo. Natural, Natural M, B/W,...
... you can adjust the color (contrast etc.) more vividly. For details on the model. * VIVID prints green and blue portions of photos more carefully specifically than 45 mm / 1.77 inches. Red-Eye corrects red eyes in portraits caused by flash photography. • For ...Adjustment With some types of Canon PictBridge compliant single-lens reflex cameras you can make finer color adjustments by the camera's function. * Depending on -screen manual or Photo Application Guide onscreen manual. When B/W is selected, the photo is printed like a black and white photo. Natural, Natural M, B/W,...
Quick Start Guide
Page 35
... Utility from the Setup CD-ROM and connect the printer to "Canon Setup Utility Menu (Windows)" or "Canon Setup Utility Menu (Macintosh)" in the User's Guide on-screen manual. Print: Off (not printed) - Paper type: Photo - Date/File No. When you use a device that does not have print setting menu, the computer settings...
... Utility from the Setup CD-ROM and connect the printer to "Canon Setup Utility Menu (Windows)" or "Canon Setup Utility Menu (Macintosh)" in the User's Guide on-screen manual. Print: Off (not printed) - Paper type: Photo - Date/File No. When you use a device that does not have print setting menu, the computer settings...
Quick Start Guide
Page 37
... camera's flash or smooth and beautify the facial skin. Also it together with Digital Photo Professional, which to the Easy Setup Instructions. Canon PIXMA Printers support ExifPrint and use the application(s) suitable for specific camera settings and functions such as photo-lab quality prints without standard white borders. You can make a Borderless Print easily...
... camera's flash or smooth and beautify the facial skin. Also it together with Digital Photo Professional, which to the Easy Setup Instructions. Canon PIXMA Printers support ExifPrint and use the application(s) suitable for specific camera settings and functions such as photo-lab quality prints without standard white borders. You can make a Borderless Print easily...


