Quick Start Guide
Page 4
... a registered trademark or trademark of products with functions that it will be an easy-to-use guide to your Canon PIXMA Pro9500 series Photo Printer. z Adobe, Adobe Photoshop and Adobe RGB(1998) are uniform among participating nations. has determined that promotes energy ...concerning the products described. About Consumables Consumables (ink tanks / FINE Cartridges) are office equipment such as computers, monitors, printers, facsimiles, copiers, scanners, and multifunction devices. The targeted products are available for energy efficiency. No part of Hahnemühle...
... a registered trademark or trademark of products with functions that it will be an easy-to-use guide to your Canon PIXMA Pro9500 series Photo Printer. z Adobe, Adobe Photoshop and Adobe RGB(1998) are uniform among participating nations. has determined that promotes energy ...concerning the products described. About Consumables Consumables (ink tanks / FINE Cartridges) are office equipment such as computers, monitors, printers, facsimiles, copiers, scanners, and multifunction devices. The targeted products are available for energy efficiency. No part of Hahnemühle...
Quick Start Guide
Page 5
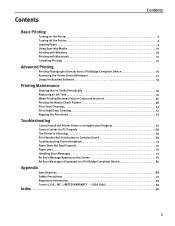
...18 Printing with Macintosh 21 Canceling Printing 25 Advanced Printing Printing Photographs Directly from a PictBridge Compliant Device 26 Accessing the Printer Driver (Windows 32 Using the Bundled Software 33 Printing Maintenance Shaking the Ink Tanks Periodically 34 Replacing an Ink Tank 35... Printer Hardware 73 Paper Does Not Feed Properly 75 Paper Jams 76 Handling Error Messages 77 An Error Message Appears on the Screen 81 An Error Message is Displayed on a PictBridge Compliant Device 85 Appendix Specifications 88 Safety Precautions 91 Regulatory Information 93 Canon ...
...18 Printing with Macintosh 21 Canceling Printing 25 Advanced Printing Printing Photographs Directly from a PictBridge Compliant Device 26 Accessing the Printer Driver (Windows 32 Using the Bundled Software 33 Printing Maintenance Shaking the Ink Tanks Periodically 34 Replacing an Ink Tank 35... Printer Hardware 73 Paper Does Not Feed Properly 75 Paper Jams 76 Handling Error Messages 77 An Error Message Appears on the Screen 81 An Error Message is Displayed on a PictBridge Compliant Device 85 Appendix Specifications 88 Safety Precautions 91 Regulatory Information 93 Canon ...
Quick Start Guide
Page 6
..., or click the Help button when displayed. When the Help window appears, select your printer driver interface: While in the printer's properties window, click in the lower left corner. Turning on the Printer 1 Press the POWER button. While in the Page Setup dialog box or Print dialog ...77. 2 Basic Printing Basic Printing This Quick Start Guide describes some of the features of your printer and how to know more information, view the Pro9500 series User's Guide onscreen manual, Printer Driver Guide on-screen manual, Photo Application Guide on-screen manual, and Digital Photo Printing Guide...
..., or click the Help button when displayed. When the Help window appears, select your printer driver interface: While in the printer's properties window, click in the lower left corner. Turning on the Printer 1 Press the POWER button. While in the Page Setup dialog box or Print dialog ...77. 2 Basic Printing Basic Printing This Quick Start Guide describes some of the features of your printer and how to know more information, view the Pro9500 series User's Guide onscreen manual, Printer Driver Guide on-screen manual, Photo Application Guide on-screen manual, and Digital Photo Printing Guide...
Quick Start Guide
Page 7
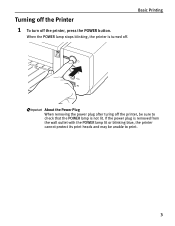
When the POWER lamp stops blinking, the printer is removed from the wall outlet with the POWER lamp lit or blinking blue, the printer cannot protect its print heads and may be sure to print. 3 Turning off the Printer 1 To turn off . Basic Printing About the Power Plug When removing the power plug after turing off the printer, be unable to check that the POWER lamp is not lit. If the power plug is turned off the printer, press the POWER button.
When the POWER lamp stops blinking, the printer is removed from the wall outlet with the POWER lamp lit or blinking blue, the printer cannot protect its print heads and may be sure to print. 3 Turning off the Printer 1 To turn off . Basic Printing About the Power Plug When removing the power plug after turing off the printer, be unable to check that the POWER lamp is not lit. If the power plug is turned off the printer, press the POWER button.
Quick Start Guide
Page 8
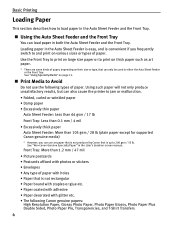
...etc. • Paper coated with adhesive • Paper decorated with holes • Paper that is up to Avoid Do not use the following Canon genuine papers: High Resolution Paper, Glossy Photo Paper, Photo Paper Glossy, Photo Paper Plus Double Sided, Photo Paper Pro, Transparencies, and T-Shirt ...paper with glitter etc. • The following types of paper. Using such paper will not only produce unsatisfactory results, but can also cause the printer to jam or malfunction. • Folded, curled or wrinkled paper • Damp paper • Excessively thin paper Auto Sheet Feeder: Less ...
...etc. • Paper coated with adhesive • Paper decorated with holes • Paper that is up to Avoid Do not use the following Canon genuine papers: High Resolution Paper, Glossy Photo Paper, Photo Paper Glossy, Photo Paper Plus Double Sided, Photo Paper Pro, Transparencies, and T-Shirt ...paper with glitter etc. • The following types of paper. Using such paper will not only produce unsatisfactory results, but can also cause the printer to jam or malfunction. • Folded, curled or wrinkled paper • Damp paper • Excessively thin paper Auto Sheet Feeder: Less ...
Quick Start Guide
Page 9
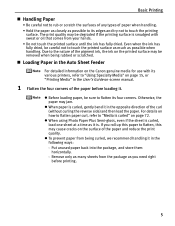
For details on the Canon genuine media for use with sweat or oil that comes from your hands. • Do not touch the printed surface until the ink has fully ... paper, be careful not to touch the printing surface. z When using Photo Paper Plus Semi-gloss, even if the sheet is smudged with its various printers, refer to "Using Specialty Media" on page 15, or "Printing Media" in the Auto Sheet Feeder For detailed information on how to flatten paper curl...
For details on the Canon genuine media for use with sweat or oil that comes from your hands. • Do not touch the printed surface until the ink has fully ... paper, be careful not to touch the printing surface. z When using Photo Paper Plus Semi-gloss, even if the sheet is smudged with its various printers, refer to "Using Specialty Media" on page 15, or "Printing Media" in the Auto Sheet Feeder For detailed information on how to flatten paper curl...
Quick Start Guide
Page 11
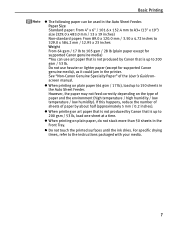
... the number of sheets of paper by Canon that is up to 105 gsm / 28 lb (plain paper except for supported Canon genuine media), as it could jam in the printer. z When printing on art paper that...lb to 200 gsm / 53 lb. Do not use art paper that is not produced by Canon that is not produced by about half (approximately 5 mm / 0.2 inches). z Do not touch the printed surfaces until ...the ink dries. See "Non-Canon Genuine Specialty Paper" of paper and the environment (high temperature / high humidity / low temperature / low humidity...
... the number of sheets of paper by Canon that is up to 105 gsm / 28 lb (plain paper except for supported Canon genuine media), as it could jam in the printer. z When printing on art paper that...lb to 200 gsm / 53 lb. Do not use art paper that is not produced by Canon that is not produced by about half (approximately 5 mm / 0.2 inches). z Do not touch the printed surfaces until ...the ink dries. See "Non-Canon Genuine Specialty Paper" of paper and the environment (high temperature / high humidity / low temperature / low humidity...
Quick Start Guide
Page 12
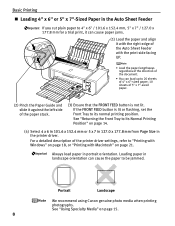
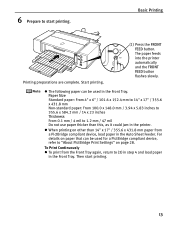
... load paper in landscape orientation can load up to be jammed. If the FRONT FEED button is not lit. For a detailed description of the printer driver settings, refer to "Printing with Windows" on page 18, or "Printing with the print side facing UP. • Load the paper ... on page 14. (4) Select 4 x 6 in 101.6 x 152.4 mm or 5 x 7 in 127.0 x 177.8 mm from Page Size in the printer driver. Portrait Landscape We recommend using Canon genuine photo media when printing photographs. See "Using Specialty Media" on page 21. See "Returning the Front Tray to its normal printing...
... load paper in landscape orientation can load up to be jammed. If the FRONT FEED button is not lit. For a detailed description of the printer driver settings, refer to "Printing with Windows" on page 18, or "Printing with the print side facing UP. • Load the paper ... on page 14. (4) Select 4 x 6 in 101.6 x 152.4 mm or 5 x 7 in 127.0 x 177.8 mm from Page Size in the printer driver. Portrait Landscape We recommend using Canon genuine photo media when printing photographs. See "Using Specialty Media" on page 21. See "Returning the Front Tray to its normal printing...
Quick Start Guide
Page 13
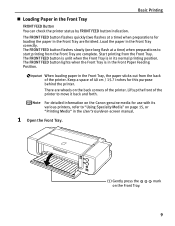
... the Front Tray. (1) Gently press the on the back corners of the printer. Lift up the front of the printer to start printing from the Front Tray are wheels on the Front Tray. For detailed information on the Canon genuine media for use with its normal printing position. Start printing from the... Front Tray. The FRONT FEED button lights when the Front Tray is in its various printers, refer to "Using Specialty Media" on page 15, or ...
... the Front Tray. (1) Gently press the on the back corners of the printer. Lift up the front of the printer to start printing from the Front Tray are wheels on the Front Tray. For detailed information on the Canon genuine media for use with its normal printing position. Start printing from the... Front Tray. The FRONT FEED button lights when the Front Tray is in its various printers, refer to "Using Specialty Media" on page 15, or ...
Quick Start Guide
Page 14
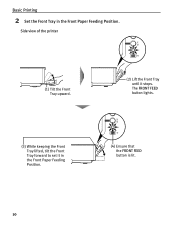
The FRONT FEED button lights. (3) While keeping the Front Tray lifted, tilt the Front Tray forward to set it stops. Side view of the printer (1) Tilt the Front Tray upward. (2) Lift the Front Tray until it in the Front Paper Feeding Position. Basic Printing 2 Set the Front Tray in the Front Paper Feeding Position. (4) Ensure that the FRONT FEED button is lit. 10
The FRONT FEED button lights. (3) While keeping the Front Tray lifted, tilt the Front Tray forward to set it stops. Side view of the printer (1) Tilt the Front Tray upward. (2) Lift the Front Tray until it in the Front Paper Feeding Position. Basic Printing 2 Set the Front Tray in the Front Paper Feeding Position. (4) Ensure that the FRONT FEED button is lit. 10
Quick Start Guide
Page 15
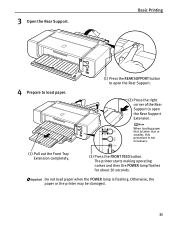
Do not load paper when the POWER lamp is not necessary. (1) Pull out the Front Tray Extension completely. (3) Press the FRONT FEED button. Basic Printing 4 Prepare to load paper. (1) Press the REAR SUPPORT button to open the Rear Support. (2) Press the right corner of the Rear Support to open the Rear Support Extension. The printer starts making operating noises and then the POWER lamp flashes for about 20 seconds. 3 Open the Rear Support. Otherwise, the paper or the printer may be damaged. 11 When loading paper that is Letter size or smaller, this procedure is flashing.
Do not load paper when the POWER lamp is not necessary. (1) Pull out the Front Tray Extension completely. (3) Press the FRONT FEED button. Basic Printing 4 Prepare to load paper. (1) Press the REAR SUPPORT button to open the Rear Support. (2) Press the right corner of the Rear Support to open the Rear Support Extension. The printer starts making operating noises and then the POWER lamp flashes for about 20 seconds. 3 Open the Rear Support. Otherwise, the paper or the printer may be damaged. 11 When loading paper that is Letter size or smaller, this procedure is flashing.
Quick Start Guide
Page 16
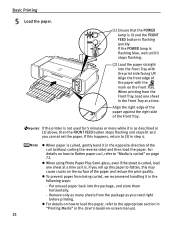
... the package as described in the User's Guide on-screen manual. 12 If the POWER lamp is flashing blue, wait until it is . If the printer is curled, gently bend it in step 4. Basic Printing 5 Load the paper. (1) Ensure that the POWER lamp is lit and the FRONT FEED button is...
... the package as described in the User's Guide on-screen manual. 12 If the POWER lamp is flashing blue, wait until it is . If the printer is curled, gently bend it in step 4. Basic Printing 5 Load the paper. (1) Ensure that the POWER lamp is lit and the FRONT FEED button is...
Quick Start Guide
Page 17
Basic Printing Printing preparations are complete. The paper feeds into the printer automatically and the FRONT FEED button flashes slowly. To Print Continuously z To print from a PictBridge compliant device, load paper in the Front Tray. z The following .... z When printing on paper that can be used in the Auto Sheet Feeder. For details on other than this, as it could jam in the printer. Then start printing. Start printing. (1) Press the FRONT FEED button.
Basic Printing Printing preparations are complete. The paper feeds into the printer automatically and the FRONT FEED button flashes slowly. To Print Continuously z To print from a PictBridge compliant device, load paper in the Front Tray. z The following .... z When printing on paper that can be used in the Auto Sheet Feeder. For details on other than this, as it could jam in the printer. Then start printing. Start printing. (1) Press the FRONT FEED button.
Quick Start Guide
Page 18
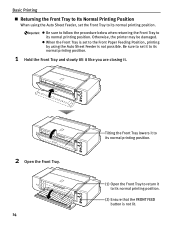
... Position, printing by using the Auto Sheet Feeder, set to its normal printing position. (2) Ensure that the FRONT FEED button is not possible. Otherwise, the printer may be damaged.
... Position, printing by using the Auto Sheet Feeder, set to its normal printing position. (2) Ensure that the FRONT FEED button is not possible. Otherwise, the printer may be damaged.
Quick Start Guide
Page 19
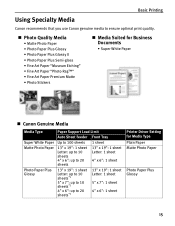
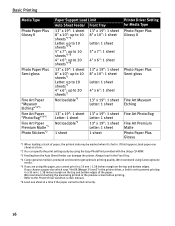
... "Photo Rag™" • Fine Art Paper Premium Matte • Photo Stickers „ Media Suited for Business Documents • Super White Paper „ Canon Genuine Media Media Type Super White Paper Matte Photo Paper Photo Paper Plus Glossy Paper Support Load Limit Auto Sheet Feeder Front Tray Up to... 4" x 6": 1 sheet 13" x 19": 1 sheet Letter: up to 10 sheets*1 5" x 7": up to 10 sheets*1 4" x 6": up to 20 sheets*1 13" x 19": 1 sheet Letter: 1 sheet 5" x 7": 1 sheet 4" x 6": 1 sheet Printer Driver Setting for Media Type Plain Paper Matte Photo Paper Photo Paper Plus Glossy 15
... "Photo Rag™" • Fine Art Paper Premium Matte • Photo Stickers „ Media Suited for Business Documents • Super White Paper „ Canon Genuine Media Media Type Super White Paper Matte Photo Paper Photo Paper Plus Glossy Paper Support Load Limit Auto Sheet Feeder Front Tray Up to... 4" x 6": 1 sheet 13" x 19": 1 sheet Letter: up to 10 sheets*1 5" x 7": up to 10 sheets*1 4" x 6": up to 20 sheets*1 13" x 19": 1 sheet Letter: 1 sheet 5" x 7": 1 sheet 4" x 6": 1 sheet Printer Driver Setting for Media Type Plain Paper Matte Photo Paper Photo Paper Plus Glossy 15
Quick Start Guide
Page 20
We recommend using Canon genuine media. *5 If you are using the Easy-PhotoPrint provided with the Setup CD-ROM. *3 Feeding from the Auto Sheet Feeder can damage the printer. If you cannot print in . We recommend checking the area being printed in a 35 mm / 1.38 inches margin on the top and bottom ...edges of paper, the printed side may be fed correctly. 16 Always load in the Front Tray. *4 Canon genuine media is fed in...
We recommend using Canon genuine media. *5 If you are using the Easy-PhotoPrint provided with the Setup CD-ROM. *3 Feeding from the Auto Sheet Feeder can damage the printer. If you cannot print in . We recommend checking the area being printed in a 35 mm / 1.38 inches margin on the top and bottom ...edges of paper, the printed side may be fed correctly. 16 Always load in the Front Tray. *4 Canon genuine media is fed in...
Quick Start Guide
Page 21
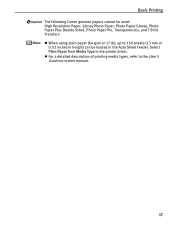
z For a detailed description of printing media types, refer to 150 sheets (13 mm or 0.52 inches in height) can be loaded in the printer driver. Select Plain Paper from Media Type in the Auto Sheet Feeder. Basic Printing The following Canon genuine papers cannot be used: High Resolution Paper, Glossy Photo Paper, Photo Paper Glossy, Photo Paper Plus Double Sided, Photo Paper Pro, Transparencies, and T-Shirt Transfers z When using plain paper (64 gsm or 17 lb), up to the User's Guide on-screen manual. 17
z For a detailed description of printing media types, refer to 150 sheets (13 mm or 0.52 inches in height) can be loaded in the printer driver. Select Plain Paper from Media Type in the Auto Sheet Feeder. Basic Printing The following Canon genuine papers cannot be used: High Resolution Paper, Glossy Photo Paper, Photo Paper Glossy, Photo Paper Plus Double Sided, Photo Paper Pro, Transparencies, and T-Shirt Transfers z When using plain paper (64 gsm or 17 lb), up to the User's Guide on-screen manual. 17
Quick Start Guide
Page 22
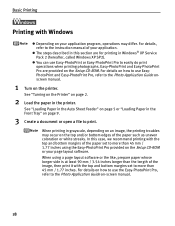
..., then print it with the top and bottom margins of your page layout software. Easy-PhotoPrint and Easy-PhotoPrint Pro are for printing in the printer. See "Loading Paper in the Auto Sheet Feeder" on page 5 or "Loading Paper in grayscale, depending on an image, the printing troubles ... 3 Create a document or open a file to print. For details, refer to easily do print operations when printing photographs. See "Turning on the Printer" on the printer. When using a page layout software or the like, prepare paper whose longer side is at least 90 mm / 3.54 inches longer than 45 mm...
..., then print it with the top and bottom margins of your page layout software. Easy-PhotoPrint and Easy-PhotoPrint Pro are for printing in the printer. See "Loading Paper in the Auto Sheet Feeder" on page 5 or "Loading Paper in grayscale, depending on an image, the printing troubles ... 3 Create a document or open a file to print. For details, refer to easily do print operations when printing photographs. See "Turning on the Printer" on the printer. When using a page layout software or the like, prepare paper whose longer side is at least 90 mm / 3.54 inches longer than 45 mm...
Quick Start Guide
Page 23
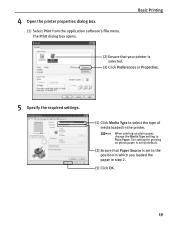
The setting for printing on plain paper, change the Media Type setting to the position in which you loaded the paper in the printer. Basic Printing (2) Ensure that Paper Source is selected. (3) Click Preferences or Properties. 5 Specify the required settings. (1) Click Media Type to select the type of media loaded in step 2. (3) Click OK. 19 The Print dialog box opens. When printing on photo paper is set by default. (2) Ensure that your printer is set to Plain Paper. 4 Open the printer properties dialog box. (1) Select Print from the application software's File menu.
The setting for printing on plain paper, change the Media Type setting to the position in which you loaded the paper in the printer. Basic Printing (2) Ensure that Paper Source is selected. (3) Click Preferences or Properties. 5 Specify the required settings. (1) Click Media Type to select the type of media loaded in step 2. (3) Click OK. 19 The Print dialog box opens. When printing on photo paper is set by default. (2) Ensure that your printer is set to Plain Paper. 4 Open the printer properties dialog box. (1) Select Print from the application software's File menu.
Quick Start Guide
Page 24
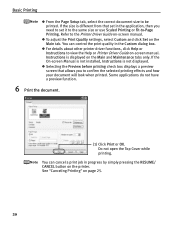
... the Main and Maintenance tabs only. You can control the print quality in the Custom dialog box. z For details about other printer driver functions, click Help or Instructions to confirm the selected printing effects and how your document will look when printed. Instructions is... printing. z Selecting the Preview before printing check box displays a preview screen that set in progress by simply pressing the RESUME/ CANCEL button on the printer. Some applications do not have a preview function. 6 Print the document. (1) Click Print or OK. See "Canceling Printing" on -screen manual....
... the Main and Maintenance tabs only. You can control the print quality in the Custom dialog box. z For details about other printer driver functions, click Help or Instructions to confirm the selected printing effects and how your document will look when printed. Instructions is... printing. z Selecting the Preview before printing check box displays a preview screen that set in progress by simply pressing the RESUME/ CANCEL button on the printer. Some applications do not have a preview function. 6 Print the document. (1) Click Print or OK. See "Canceling Printing" on -screen manual....


