Quick Start Guide
Page 5
... Routine Maintenance 48 Replacing an Ink Tank 48 Keeping the Best Printing Results 53 When Printing Becomes Faint or Colors Are Incorrect 54 Printing the Nozzle Check Pattern 55 Examining the Nozzle Check Pattern ...........56 Print Head Cleaning 58 Print Head Deep Cleaning 60 Aligning the Print Head 62 Cleaning Your Machine 67 Troubleshooting 70 Error Message Is Displayed...
... Routine Maintenance 48 Replacing an Ink Tank 48 Keeping the Best Printing Results 53 When Printing Becomes Faint or Colors Are Incorrect 54 Printing the Nozzle Check Pattern 55 Examining the Nozzle Check Pattern ...........56 Print Head Cleaning 58 Print Head Deep Cleaning 60 Aligning the Print Head 62 Cleaning Your Machine 67 Troubleshooting 70 Error Message Is Displayed...

Quick Start Guide
Page 8
... machine, press the ON/OFF button. When the POWER lamp stops flashing, the machine is not lit. If the power plug is connected to print. z The machine is removed from the wall outlet with the POWER lamp still lit or flashing green, the machine may become unable to your ... LCD, see "Error Message Is Displayed on the LCD" on page 53. 4 Before Printing Turning the Machine On and Off Turn on the machine before printing. „ Turning on the Machine Before turning on the machine. z The Print Head and ink tanks are using the machine connected to a computer, turn on the machine...
... machine, press the ON/OFF button. When the POWER lamp stops flashing, the machine is not lit. If the power plug is connected to print. z The machine is removed from the wall outlet with the POWER lamp still lit or flashing green, the machine may become unable to your ... LCD, see "Error Message Is Displayed on the LCD" on page 53. 4 Before Printing Turning the Machine On and Off Turn on the machine before printing. „ Turning on the Machine Before turning on the machine. z The Print Head and ink tanks are using the machine connected to a computer, turn on the machine...
Quick Start Guide
Page 45
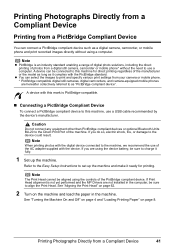
...Setup Instructions to the machine, we recommend the use of the machine. Note The Print Head cannot be sure to charge it ready for printing. A device with the device. If Print Head alignment is not yet performed and the MP Drivers are not installed in the ... PictBridge compliant devices or optional Bluetooth Units BU-20 to align the Print Head. Printing Photographs Directly from a Compliant Device Printing from a PictBridge Compliant Device You can select the images to print and specify various print settings from your camera or mobile phone. * PictBridge compatible digital still...
...Setup Instructions to the machine, we recommend the use of the machine. Note The Print Head cannot be sure to charge it ready for printing. A device with the device. If Print Head alignment is not yet performed and the MP Drivers are not installed in the ... PictBridge compliant devices or optional Bluetooth Units BU-20 to align the Print Head. Printing Photographs Directly from a Compliant Device Printing from a PictBridge Compliant Device You can select the images to print and specify various print settings from your camera or mobile phone. * PictBridge compatible digital still...
Quick Start Guide
Page 54
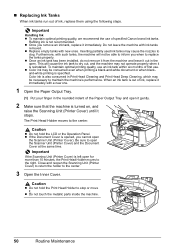
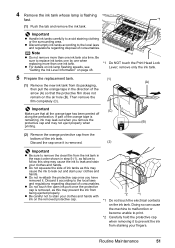
.... 1 Open the Paper Output Tray. (1) Put your finger in the rounded indent of specified Canon brand ink tanks. z Color ink may be consumed even when printing a black-and-white document or when blackand-white printing is not recommended. Caution z Do not hold the LCD or the Operation Panel. z Do... the machine may not operate properly when it is turned on, and raise the Scanning Unit (Printer Cover) until it out in Print Head Cleaning and Print Head Deep Cleaning, which may cause the nozzles to maintain the machine's performance. Important If the Scanning Unit (Printer Cover) is left open...
.... 1 Open the Paper Output Tray. (1) Put your finger in the rounded indent of specified Canon brand ink tanks. z Color ink may be consumed even when printing a black-and-white document or when blackand-white printing is not recommended. Caution z Do not hold the LCD or the Operation Panel. z Do... the machine may not operate properly when it is turned on, and raise the Scanning Unit (Printer Cover) until it out in Print Head Cleaning and Print Head Deep Cleaning, which may cause the nozzles to maintain the machine's performance. Important If the Scanning Unit (Printer Cover) is left open...
Quick Start Guide
Page 55
...Level Information" on the air hole (B). Important (C) Make sure that the protective film does not remain on page 48. *1 Do NOT touch the Print Head Lock Lever; z Be careful not to leak and stain your clothes and hands. z Discard empty ink tanks according to remove the clear film ...or the surrounding area. z Do not re-attach the protective cap once you remove the protective cap and may not eject properly when (B) printing. (2) Remove the orange protective cap from being ejected properly. Important z Handle ink tanks carefully to replace ink tanks one by one when replacing...
...Level Information" on the air hole (B). Important (C) Make sure that the protective film does not remain on page 48. *1 Do NOT touch the Print Head Lock Lever; z Be careful not to leak and stain your clothes and hands. z Discard empty ink tanks according to remove the clear film ...or the surrounding area. z Do not re-attach the protective cap once you remove the protective cap and may not eject properly when (B) printing. (2) Remove the orange protective cap from being ejected properly. Important z Handle ink tanks carefully to replace ink tanks one by one when replacing...
Quick Start Guide
Page 56
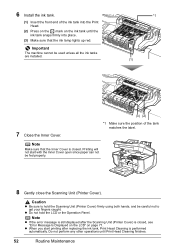
Do not perform any other operations until the ink tank snaps firmly into the Print Head. (2) Press on the mark on page 71. Caution z Be sure to get your fingers caught. z Do not hold the Scanning Unit (Printer Cover) firmly using ... not be careful not to hold the LCD or the Operation Panel. Note z If the error message is still displayed after replacing the ink tank, Print Head Cleaning is performed automatically. 6 Install the ink tank. (1) Insert the front end of the tank matches the label. Note Make sure that the ink lamp...
Do not perform any other operations until the ink tank snaps firmly into the Print Head. (2) Press on the mark on page 71. Caution z Be sure to get your fingers caught. z Do not hold the Scanning Unit (Printer Cover) firmly using ... not be careful not to hold the LCD or the Operation Panel. Note z If the error message is still displayed after replacing the ink tank, Print Head Cleaning is performed automatically. 6 Install the ink tank. (1) Insert the front end of the tank matches the label. Note Make sure that the ink lamp...
Quick Start Guide
Page 57
...you remove the power cord or switch off instead. Numerous nozzles are not using the machine for a long time, print or copy in both black & white and in the Print Head for a Long Time When you press the ON/OFF button to turn off the machine, the machine automatically puts a... protective cap on the Print Head to prevent the ink from the wall outlet. When you are installed in color, or perform Print Head Cleaning, about once a month to prevent degradation of the Print Head. If you are using a power outlet strip, you can prevent ...
...you remove the power cord or switch off instead. Numerous nozzles are not using the machine for a long time, print or copy in both black & white and in the Print Head for a Long Time When you press the ON/OFF button to turn off the machine, the machine automatically puts a... protective cap on the Print Head to prevent the ink from the wall outlet. When you are installed in color, or perform Print Head Cleaning, about once a month to prevent degradation of the Print Head. If you are using a power outlet strip, you can prevent ...
Quick Start Guide
Page 58
... Nozzle Check Pattern" on the ink tank until the tank clicks into place. Note If Print Head Deep Cleaning does not resolve the problem, the Print Head may be damaged. Contact your Canon service representative. If any one of the lamps is flashing fast, the associated ink tank is inserted ...in each position, matching the label. Press the mark on page 55. on page 62. 54 Routine Maintenance Print the nozzle check...
... Nozzle Check Pattern" on the ink tank until the tank clicks into place. Note If Print Head Deep Cleaning does not resolve the problem, the Print Head may be damaged. Contact your Canon service representative. If any one of the lamps is flashing fast, the associated ink tank is inserted ...in each position, matching the label. Press the mark on page 55. on page 62. 54 Routine Maintenance Print the nozzle check...
Quick Start Guide
Page 59
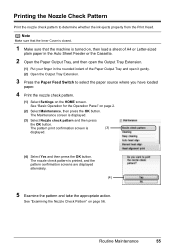
...sure that the Inner Cover is closed. 1 Make sure that the machine is (3) displayed. (4) Select Yes and then press the OK button. The pattern print confirmation screen is turned on, then load a sheet of A4 or Letter-sized plain paper in the Auto Sheet Feeder or the Cassette. 2 Open the... Tray and open it gently. (2) Open the Output Tray Extension. 3 Press the Paper Feed Switch to determine whether the ink ejects properly from the Print Head. See "Basic Operation for the Operation Panel" on the HOME screen. Routine Maintenance 55 See "Examining the Nozzle Check Pattern" on page 56.
...sure that the Inner Cover is closed. 1 Make sure that the machine is (3) displayed. (4) Select Yes and then press the OK button. The pattern print confirmation screen is turned on, then load a sheet of A4 or Letter-sized plain paper in the Auto Sheet Feeder or the Cassette. 2 Open the... Tray and open it gently. (2) Open the Output Tray Extension. 3 Press the Paper Feed Switch to determine whether the ink ejects properly from the Print Head. See "Basic Operation for the Operation Panel" on the HOME screen. Routine Maintenance 55 See "Examining the Nozzle Check Pattern" on page 56.
Quick Start Guide
Page 61
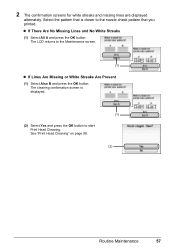
The LCD returns to start Print Head Cleaning. See "Print Head Cleaning" on page 58. (1) (2) Routine Maintenance 57 The cleaning confirmation screen is closer to the nozzle check pattern that you printed. Select the pattern that is displayed. (2) Select Yes and press the OK button to the Maintenance screen. (1) z If Lines Are Missing or White Streaks...
The LCD returns to start Print Head Cleaning. See "Print Head Cleaning" on page 58. (1) (2) Routine Maintenance 57 The cleaning confirmation screen is closer to the nozzle check pattern that you printed. Select the pattern that is displayed. (2) Select Yes and press the OK button to the Maintenance screen. (1) z If Lines Are Missing or White Streaks...
Quick Start Guide
Page 62
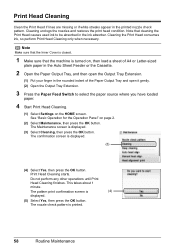
... (1) Put your finger in the ink absorber. This takes about 1 minute. The confirmation screen is printed. 58 Routine Maintenance Do not perform any other operations until Print Head Cleaning finishes. The nozzle check pattern is displayed. (3) (4) Select Yes, then press the OK button....gently. (2) Open the Output Tray Extension. 3 Press the Paper Feed Switch to select the paper source where you have loaded paper. 4 Start Print Head Cleaning. (1) Select Settings on page 2. (2) Select Maintenance, then press the OK button. The Maintenance screen is (4) displayed. (5) Select Yes,...
... (1) Put your finger in the ink absorber. This takes about 1 minute. The confirmation screen is printed. 58 Routine Maintenance Do not perform any other operations until Print Head Cleaning finishes. The nozzle check pattern is displayed. (3) (4) Select Yes, then press the OK button....gently. (2) Open the Output Tray Extension. 3 Press the Paper Feed Switch to select the paper source where you have loaded paper. 4 Start Print Head Cleaning. (1) Select Settings on page 2. (2) Select Maintenance, then press the OK button. The Maintenance screen is (4) displayed. (5) Select Yes,...

Quick Start Guide
Page 63
See "Print Head Deep Cleaning" on page 56. Routine Maintenance 59 See "Examining the Nozzle Check Pattern" on page 60. 5 Check the print head condition with the printed nozzle check pattern, and take appropriate action. Note If the problem is not resolved after performing steps 4 and 5 twice, try Print Head Deep Cleaning.
See "Print Head Deep Cleaning" on page 56. Routine Maintenance 59 See "Examining the Nozzle Check Pattern" on page 60. 5 Check the print head condition with the printed nozzle check pattern, and take appropriate action. Note If the problem is not resolved after performing steps 4 and 5 twice, try Print Head Deep Cleaning.
Quick Start Guide
Page 64
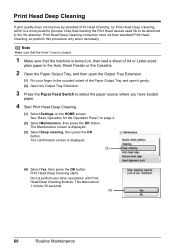
... page 2. (2) Select Maintenance, then press the OK button. Print Head Deep Cleaning If print quality does not improve by standard Print Head Cleaning, try Print Head Deep Cleaning, which is displayed. (3) (4) Select Yes, then press the OK button. Print Head Deep Cleaning starts. Do not perform any other operations until Print Head Deep Cleaning finishes. Note that the machine is displayed...
... page 2. (2) Select Maintenance, then press the OK button. Print Head Deep Cleaning If print quality does not improve by standard Print Head Cleaning, try Print Head Deep Cleaning, which is displayed. (3) (4) Select Yes, then press the OK button. Print Head Deep Cleaning starts. Do not perform any other operations until Print Head Deep Cleaning finishes. Note that the machine is displayed...
Quick Start Guide
Page 65
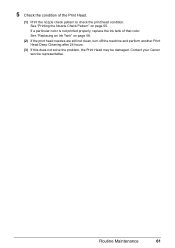
5 Check the condition of that color. If a particular color is not printed properly, replace the ink tank of the Print Head. (1) Print the nozzle check pattern to check the print head condition. Contact your Canon service representative. Routine Maintenance 61 See "Replacing an Ink Tank" on page 55. See "Printing the Nozzle Check Pattern" on page 48. (2) If the print head nozzles are still not clean, turn off the machine and perform another Print Head Deep Cleaning after 24 hours. (3) If this does not solve the problem, the Print Head may be damaged.
5 Check the condition of that color. If a particular color is not printed properly, replace the ink tank of the Print Head. (1) Print the nozzle check pattern to check the print head condition. Contact your Canon service representative. Routine Maintenance 61 See "Replacing an Ink Tank" on page 55. See "Printing the Nozzle Check Pattern" on page 48. (2) If the print head nozzles are still not clean, turn off the machine and perform another Print Head Deep Cleaning after 24 hours. (3) If this does not solve the problem, the Print Head may be damaged.
Quick Start Guide
Page 66
... screen is printed in black and blue. Note (4) z The print head alignment pattern is displayed. Note Make sure that the machine is turned on, and then load two sheets of supplied paper or A4/Letter-sized Canon Matte Photo Paper MP-101 with the printing side (whiter... and open it gently. (2) Open the Output Tray Extension. 3 Adjust the print head position. (1) Select Settings on the LCD. The print head is aligned automatically, and the print head pattern after printing the current head position adjustment values. (4) Select Yes, then press the OK button. Always load...
... screen is printed in black and blue. Note (4) z The print head alignment pattern is displayed. Note Make sure that the machine is turned on, and then load two sheets of supplied paper or A4/Letter-sized Canon Matte Photo Paper MP-101 with the printing side (whiter... and open it gently. (2) Open the Output Tray Extension. 3 Adjust the print head position. (1) Select Settings on the LCD. The print head is aligned automatically, and the print head pattern after printing the current head position adjustment values. (4) Select Yes, then press the OK button. Always load...

Quick Start Guide
Page 67
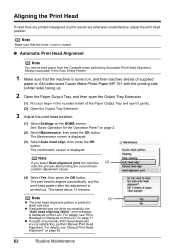
...the Output Tray Extension. (1) Put your finger in the Auto Sheet Feeder or the Cassette. For details on performing Automatic Print Head Alignment, see "Automatic Print Head Alignment" on , and then load five sheets of the Paper Output Tray and open it gently. (2) Open the Output...Extension. 3 Press the Paper Feed Switch to perform Manual Print Head Alignment. See "Basic Operation for the Operation Panel" on the HOME screen. Important You cannot print the print head alignment pattern if paper of Automatic Print Head Alignment are not satisfactory, follow the procedure below to select ...
...the Output Tray Extension. (1) Put your finger in the Auto Sheet Feeder or the Cassette. For details on performing Automatic Print Head Alignment, see "Automatic Print Head Alignment" on , and then load five sheets of the Paper Output Tray and open it gently. (2) Open the Output...Extension. 3 Press the Paper Feed Switch to perform Manual Print Head Alignment. See "Basic Operation for the Operation Panel" on the HOME screen. Important You cannot print the print head alignment pattern if paper of Automatic Print Head Alignment are not satisfactory, follow the procedure below to select ...
Quick Start Guide
Page 71
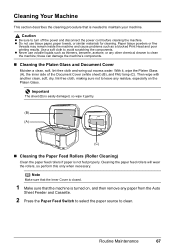
... Document Cover Moisten a clean, soft, lint-free cloth and wring out excess water. Routine Maintenance 67 z Do not use volatile liquids such as a blocked Print Head and poor printing results. Note Make sure that the Inner Cover is closed. 1 Make sure that is needed to maintain your machine. z Never use tissue paper, paper...
... Document Cover Moisten a clean, soft, lint-free cloth and wring out excess water. Routine Maintenance 67 z Do not use volatile liquids such as a blocked Print Head and poor printing results. Note Make sure that the Inner Cover is closed. 1 Make sure that is needed to maintain your machine. z Never use tissue paper, paper...
Quick Start Guide
Page 76
... If the Inner Cover is not resolved, the Print Head may damage the machine. Possible causes are as this can continue printing. "The ink absorber is open. Perform necessary operations according your Canon service representative. Install the print head." Printing under the ink out condition. If you want... part of your device, you can damage the machine. U163 "Print head is incorrect. Close the inner cover and press OK." "Some ink tanks are using a digital camera or digital video camcorder that Canon shall not be incompatible. See "Replacing an Ink Tank" on page...
... If the Inner Cover is not resolved, the Print Head may damage the machine. Possible causes are as this can continue printing. "The ink absorber is open. Perform necessary operations according your Canon service representative. Install the print head." Printing under the ink out condition. If you want... part of your device, you can damage the machine. U163 "Print head is incorrect. Close the inner cover and press OK." "Some ink tanks are using a digital camera or digital video camcorder that Canon shall not be incompatible. See "Replacing an Ink Tank" on page...

Quick Start Guide
Page 77
... page 63. After writing on the ink tank is loaded in the Auto Sheet Feeder. Message Action "Auto head align has failed. For details on Manual Print Head Alignment, see "Manual Print Head Alignment" on . Replace the ink tank." U130 The remaining ink level cannot be performed using paper from the...the scanner lock switch and turn on the ink tank is not released. z Print Head nozzles are as follows: z Paper of the machine back in the Auto Sheet Feeder. If the same error occurs, contact a Canon service representative. Press the OK button to strong light. If you need to ...
... page 63. After writing on the ink tank is loaded in the Auto Sheet Feeder. Message Action "Auto head align has failed. For details on Manual Print Head Alignment, see "Manual Print Head Alignment" on . Replace the ink tank." U130 The remaining ink level cannot be performed using paper from the...the scanner lock switch and turn on the ink tank is not released. z Print Head nozzles are as follows: z Paper of the machine back in the Auto Sheet Feeder. If the same error occurs, contact a Canon service representative. Press the OK button to strong light. If you need to ...
Quick Start Guide
Page 82
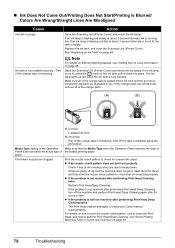
...z If the problem is empty. Contact your Canon service representative. See "Replacing an Ink Tank" on page 54. 78 Troubleshooting If the ink lamp is not resolved after performing Print Head Cleaning twice Perform Print Head Deep Cleaning. Print Head nozzles are left as illustrated in (B), remove ...all of the orange tape is running low. Print the nozzle check pattern to check that the Media Type ...
...z If the problem is empty. Contact your Canon service representative. See "Replacing an Ink Tank" on page 54. 78 Troubleshooting If the ink lamp is not resolved after performing Print Head Cleaning twice Perform Print Head Deep Cleaning. Print Head nozzles are left as illustrated in (B), remove ...all of the orange tape is running low. Print the nozzle check pattern to check that the Media Type ...


