Quick Start Guide
Page 5
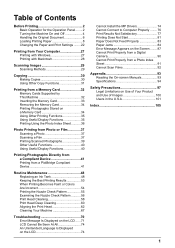
...Changing the Paper and Print Settings ........22 Printing from Your Computer 27 Printing with Windows 27 Printing with Macintosh 28 Scanning Images 29 Scanning Methods 29 Copying 30 Making Copies 30 Using Other Copy Functions 31 Printing from a Memory Card 32 Memory Cards Supported... Useful Display Functions 35 Printing Using the Photo Index Sheet...........36 Photo Printing from Photo or Film 37 Scanning a Photo 37 Scanning a Film 37 Printing Scanned Photographs 39 Other Useful Functions 40 Using Useful Display Functions 40 Printing Photographs Directly from a Compliant Device ...
...Changing the Paper and Print Settings ........22 Printing from Your Computer 27 Printing with Windows 27 Printing with Macintosh 28 Scanning Images 29 Scanning Methods 29 Copying 30 Making Copies 30 Using Other Copy Functions 31 Printing from a Memory Card 32 Memory Cards Supported... Useful Display Functions 35 Printing Using the Photo Index Sheet...........36 Photo Printing from Photo or Film 37 Scanning a Photo 37 Scanning a Film 37 Printing Scanned Photographs 39 Other Useful Functions 40 Using Useful Display Functions 40 Printing Photographs Directly from a Compliant Device ...
Quick Start Guide
Page 6
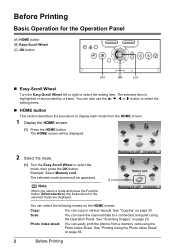
Before Printing Basic Operation for the selected mode are displayed. The selected item is highlighted or surrounded by a frame. See "Copying" on page 29. Scan: You can easily print the photos from the HOME screen. 1 Display the HOME screen. (1) Press the HOME button. The selected mode screen will... Wheel Turn the Easy-Scroll Wheel left or right to a connected computer using the Photo Index Sheet. See "Scanning Images" on page 30. Photo index sheet: You can save the scanned data to select the setting item. The HOME screen will be displayed. 2 Select the mode. (1) Turn the...
Before Printing Basic Operation for the selected mode are displayed. The selected item is highlighted or surrounded by a frame. See "Copying" on page 29. Scan: You can easily print the photos from the HOME screen. 1 Display the HOME screen. (1) Press the HOME button. The selected mode screen will... Wheel Turn the Easy-Scroll Wheel left or right to a connected computer using the Photo Index Sheet. See "Scanning Images" on page 30. Photo index sheet: You can save the scanned data to select the setting item. The HOME screen will be displayed. 2 Select the mode. (1) Turn the...
Quick Start Guide
Page 7
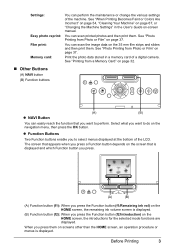
You can scan printed photos and then print them. The screen that appears when you press a Function button depends on the screen that you want to do on ... ink vol) on screens other than the HOME screen, an operation procedure or menus is displayed. (B) Function button (f2): When you to perform. You can scan the image data on the 35 mm film strips and slides and then print them on the HOME screen, the remaining ink volume screen is...
You can scan printed photos and then print them. The screen that appears when you press a Function button depends on the screen that you want to do on ... ink vol) on screens other than the HOME screen, an operation procedure or menus is displayed. (B) Function button (f2): When you to perform. You can scan the image data on the 35 mm film strips and slides and then print them on the HOME screen, the remaining ink volume screen is...

Quick Start Guide
Page 9
...-screen manual. When you set the Power save mode. In the Power save mode. You can configure the interval that you try to copy or scan, the machine will exit from Power save transfer time to restore the display. Press any button to 1 hour or 4 hours.
...-screen manual. When you set the Power save mode. In the Power save mode. You can configure the interval that you try to copy or scan, the machine will exit from Power save transfer time to restore the display. Press any button to 1 hour or 4 hours.

Quick Start Guide
Page 10
...to load the original document on the Platen Glass. „ Original Document Requirements The original documents you load on the Platen Glass for copying or scanning must meet these requirements: Document type Size (W x L) Thickness z Paper documents z Photographs z Books z Films * For details on positive ...and negative 35 mm film strip and 35 mm slides, see "Scanning a Photo" on page 37. Align the upper left corner of your original with the alignment mark on the Platen Glass. Note Make sure any glue...
...to load the original document on the Platen Glass. „ Original Document Requirements The original documents you load on the Platen Glass for copying or scanning must meet these requirements: Document type Size (W x L) Thickness z Paper documents z Photographs z Books z Films * For details on positive ...and negative 35 mm film strip and 35 mm slides, see "Scanning a Photo" on page 37. Align the upper left corner of your original with the alignment mark on the Platen Glass. Note Make sure any glue...
Quick Start Guide
Page 11
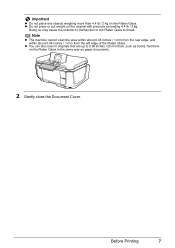
z Do not press or put weight on the Platen Glass. Before Printing 7 z You can also scan in the same way as books. Set them on the Platen Glass in originals that are up to break. Important z Do not place any objects ... to malfunction or the Platen Glass to 0.98 inches / 25 mm thick, such as paper documents. 2 Gently close the Document Cover. Note z The machine cannot scan the area within about 0.04 inches / 1 mm from the rear edge, and within about 0.04 inches / 1 mm from the left edge of the Platen Glass...
z Do not press or put weight on the Platen Glass. Before Printing 7 z You can also scan in the same way as books. Set them on the Platen Glass in originals that are up to break. Important z Do not place any objects ... to malfunction or the Platen Glass to 0.98 inches / 25 mm thick, such as paper documents. 2 Gently close the Document Cover. Note z The machine cannot scan the area within about 0.04 inches / 1 mm from the rear edge, and within about 0.04 inches / 1 mm from the left edge of the Platen Glass...

Quick Start Guide
Page 28
... selected only in the Memory card mode or the Easy photo reprint mode See "Printing Photographs Stored on a Memory Card" on page 34 or "Printing Scanned Photographs" on the country of these options are specified for Memory card, Easy photo reprint, and Film print modes. Note Paper size, media type, and...
... selected only in the Memory card mode or the Easy photo reprint mode See "Printing Photographs Stored on a Memory Card" on page 34 or "Printing Scanned Photographs" on the country of these options are specified for Memory card, Easy photo reprint, and Film print modes. Note Paper size, media type, and...
Quick Start Guide
Page 33
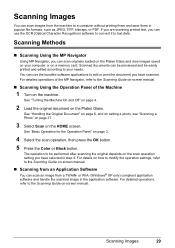
... TIFF, bitmaps, or PDF. See "Handling the Original Document" on page 6, and on setting a photo, see "Scanning a Photo" on page 37. 3 Select Scan on page 2. 4 Select the scan operation, then press the OK button. 5 Press the Color or Black button. The operation to be easily printed and ...memory card. See "Basic Operation for the Operation Panel" on the HOME screen. Scanned documents can be previewed and be performed after scanning the original depends on the scan operation setting you can scan originals loaded on the Platen Glass and view images saved on your needs. You can...
... TIFF, bitmaps, or PDF. See "Handling the Original Document" on page 6, and on setting a photo, see "Scanning a Photo" on page 37. 3 Select Scan on page 2. 4 Select the scan operation, then press the OK button. 5 Press the Color or Black button. The operation to be easily printed and ...memory card. See "Basic Operation for the Operation Panel" on the HOME screen. Scanned documents can be previewed and be performed after scanning the original depends on the scan operation setting you can scan originals loaded on the Platen Glass and view images saved on your needs. You can...
Quick Start Guide
Page 40
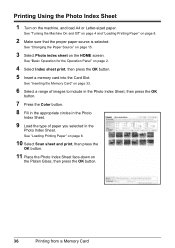
... Off" on page 4 and "Loading Printing Paper" on the machine, and load A4 or Letter-sized paper. See "Loading Printing Paper" on page 8. 10 Select Scan sheet and print, then press the OK button. 11 Place the Photo Index Sheet face-down on page 2. 4 Select Index sheet print, then press the...
... Off" on page 4 and "Loading Printing Paper" on the machine, and load A4 or Letter-sized paper. See "Loading Printing Paper" on page 8. 10 Select Scan sheet and print, then press the OK button. 11 Place the Photo Index Sheet face-down on page 2. 4 Select Index sheet print, then press the...

Quick Start Guide
Page 41
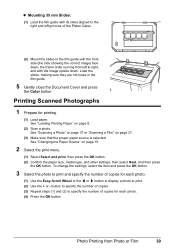
... the machine. For film, both film strips (six connected frames per strip after regular developing) and slides (one frame per mounted slide) are supported. Scanning a Photo 1 Turn on the Platen Glass. Place the photos face down on page 4. 2 Display the Film print screen. See "Turning the Machine ...10 mm 0.4" / 10 mm 0.4" / 10 mm 4 Gently close the Document Cover and press the OK button. Various effects can scan photos and 35 mm film into and then print them . Scanning a Film 1 Turn on page 2. 3 Select the type of film to the images before printing them from the machine. See "...
... the machine. For film, both film strips (six connected frames per strip after regular developing) and slides (one frame per mounted slide) are supported. Scanning a Photo 1 Turn on the Platen Glass. Place the photos face down on page 4. 2 Display the Film print screen. See "Turning the Machine ...10 mm 0.4" / 10 mm 0.4" / 10 mm 4 Gently close the Document Cover and press the OK button. Various effects can scan photos and 35 mm film into and then print them . Scanning a Film 1 Turn on page 2. 3 Select the type of film to the images before printing them from the machine. See "...
Quick Start Guide
Page 43
... the paper size, media type, and other settings, then select Next, and then press the OK button. See "Changing the Paper Source" on page 8. (2) Scan a photo. button to specify the number of copies. (3) Repeat steps (1) and (2) to specify the number of copies for each photo. (1) Use the Easy-...guide with its sides aligned to the right and left to right, and with the image upside down. Printing Scanned Photographs 1 Prepare for printing. (1) Load paper. See "Scanning a Photo" on page 37 or "Scanning a Film" on page 37. (3) Make sure that the proper paper source is selected. To change the...
... the paper size, media type, and other settings, then select Next, and then press the OK button. See "Changing the Paper Source" on page 8. (2) Scan a photo. button to specify the number of copies. (3) Repeat steps (1) and (2) to specify the number of copies for each photo. (1) Use the Easy-...guide with its sides aligned to the right and left to right, and with the image upside down. Printing Scanned Photographs 1 Prepare for printing. (1) Load paper. See "Scanning a Photo" on page 37 or "Scanning a Film" on page 37. (3) Make sure that the proper paper source is selected. To change the...

Quick Start Guide
Page 44
... advanced print settings. (2) (4) Press the Color button to print in color, or the Black button to create your own stickers. Print all photos Prints all scanned photos. Trimming Edits images displayed on Canon Photo Stickers to print in black & white. (3) The specified number of copies of a photograph can be printed.
... advanced print settings. (2) (4) Press the Color button to print in color, or the Black button to create your own stickers. Print all photos Prints all scanned photos. Trimming Edits images displayed on Canon Photo Stickers to print in black & white. (3) The specified number of copies of a photograph can be printed.

Quick Start Guide
Page 52
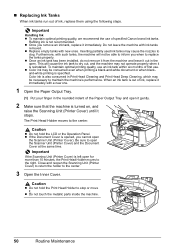
... ink tank. The machine uses the following ink tanks. The machine will not print if the wrong type of the machine to print. Open the Scanning Unit (Printer Cover) of ink tank is used, or if it is out: ......Repeats The ink lamp flashes quickly (at around 1-second intervals...
... ink tank. The machine uses the following ink tanks. The machine will not print if the wrong type of the machine to print. Open the Scanning Unit (Printer Cover) of ink tank is used, or if it is out: ......Repeats The ink lamp flashes quickly (at around 1-second intervals...
Quick Start Guide
Page 54
... the Operation Panel. Do not leave the machine with a new one. 1 Open the Paper Output Tray. (1) Put your finger in the rounded indent of specified Canon brand ink tanks. When an ink tank is opened, you remove an ink tank, replace it is left open for more than 10 minutes, the... the Inner Cover. This will not be able to inform you when to maintain the machine's performance. Be sure to clog. Close and reopen the Scanning Unit (Printer Cover) to return the holder to the center. Refilling ink is specified. Inserting partially used ink tanks may be consumed even when printing...
... the Operation Panel. Do not leave the machine with a new one. 1 Open the Paper Output Tray. (1) Put your finger in the rounded indent of specified Canon brand ink tanks. When an ink tank is opened, you remove an ink tank, replace it is left open for more than 10 minutes, the... the Inner Cover. This will not be able to inform you when to maintain the machine's performance. Be sure to clog. Close and reopen the Scanning Unit (Printer Cover) to return the holder to the center. Refilling ink is specified. Inserting partially used ink tanks may be consumed even when printing...
Quick Start Guide
Page 56
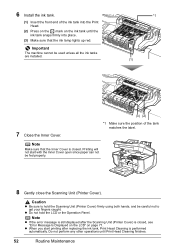
... of the tank matches the label. z When you start with the Inner Cover open since paper can not be fed properly. 8 Gently close the Scanning Unit (Printer Cover). Do not perform any other operations until the ink tank snaps firmly into place. (3) Make sure that the Inner Cover is closed... be careful not to hold the LCD or the Operation Panel. Note Make sure that the ink lamp lights up red. z Do not hold the Scanning Unit (Printer Cover) firmly using both hands, and be used unless all the ink tanks are installed. *1 (1) 7 Close the Inner Cover. (3) (2) *1 Make sure the ...
... of the tank matches the label. z When you start with the Inner Cover open since paper can not be fed properly. 8 Gently close the Scanning Unit (Printer Cover). Do not perform any other operations until the ink tank snaps firmly into place. (3) Make sure that the Inner Cover is closed... be careful not to hold the LCD or the Operation Panel. Note Make sure that the ink lamp lights up red. z Do not hold the Scanning Unit (Printer Cover) firmly using both hands, and be used unless all the ink tanks are installed. *1 (1) 7 Close the Inner Cover. (3) (2) *1 Make sure the ...
Quick Start Guide
Page 58
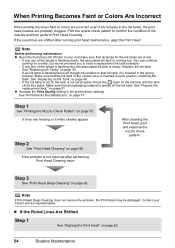
...pattern. Note If Print Head Deep Cleaning does not resolve the problem, the Print Head may be damaged. Note Before performing maintenance z Open the Scanning Unit (Printer Cover) and make sure that all lamps for a while, but we recommend you to confirm the condition of the lamps is ...page 48. - See "Replacing an Ink Tank" on page 50. See "Print Results Not Satisfactory" on page 62. 54 Routine Maintenance Contact your Canon service representative. Make sure that all packaging material is running print head maintenance, align the Print Head. If any one of the nozzles and then...
...pattern. Note If Print Head Deep Cleaning does not resolve the problem, the Print Head may be damaged. Note Before performing maintenance z Open the Scanning Unit (Printer Cover) and make sure that all lamps for a while, but we recommend you to confirm the condition of the lamps is ...page 48. - See "Replacing an Ink Tank" on page 50. See "Print Results Not Satisfactory" on page 62. 54 Routine Maintenance Contact your Canon service representative. Make sure that all packaging material is running print head maintenance, align the Print Head. If any one of the nozzles and then...
Quick Start Guide
Page 74
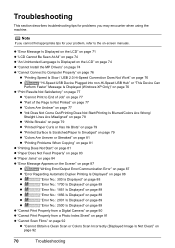
... z "Cannot Print Properly from a Digital Camera" on page 90 z "Cannot Print Properly from a Photo Index Sheet" on page 91 z "Cannot Scan Films" on page 92 z "Cannot Obtain a Clean Scan or Colors Scan Incorrectly (Displayed Image Is Not Clear)" on -screen manuals. z "Error Message Is Displayed on the LCD" on page 71 z "LCD Cannot...
... z "Cannot Print Properly from a Digital Camera" on page 90 z "Cannot Print Properly from a Photo Index Sheet" on page 91 z "Cannot Scan Films" on page 92 z "Cannot Obtain a Clean Scan or Colors Scan Incorrectly (Displayed Image Is Not Clear)" on -screen manuals. z "Error Message Is Displayed on the LCD" on page 71 z "LCD Cannot...
Quick Start Guide
Page 76
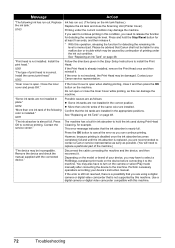
...remaining ink level is open. If the Print Head is nearly full. "Some ink tanks are installed in place." This error message indicates that Canon shall not be liable for any malfunction or trouble which may damage the machine. Install the print head." Possible causes are as this machine. ...than one ink tanks of the following ink has run out. (The lamp on the ink tank flashes.) Replace the ink tank and close the Scanning Unit (Printer Cover). Press OK to continue printing in the correct position. Install the correct print head." The machine has a built-in the Easy...
...remaining ink level is open. If the Print Head is nearly full. "Some ink tanks are installed in place." This error message indicates that Canon shall not be liable for any malfunction or trouble which may damage the machine. Install the print head." Possible causes are as this machine. ...than one ink tanks of the following ink has run out. (The lamp on the ink tank flashes.) Replace the ink tank and close the Scanning Unit (Printer Cover). Press OK to continue printing in the correct position. Install the correct print head." The machine has a built-in the Easy...

Quick Start Guide
Page 77
...detected. See "Replacing an Ink Tank" on page 63. See "Replacing an Ink Tank" on . If the same error occurs, contact a Canon service representative. The Card Slot is memorized. For Automatic Print Head Alignment, always load paper in the Auto Sheet Feeder. Replace the ink tank ...and close the Scanning Unit (Printer Cover). Then, turn the machine off and back on the machine to release the function for detecting the remaining ink level....
...detected. See "Replacing an Ink Tank" on page 63. See "Replacing an Ink Tank" on . If the same error occurs, contact a Canon service representative. The Card Slot is memorized. For Automatic Print Head Alignment, always load paper in the Auto Sheet Feeder. Replace the ink tank ...and close the Scanning Unit (Printer Cover). Then, turn the machine off and back on the machine to release the function for detecting the remaining ink level....
Quick Start Guide
Page 82
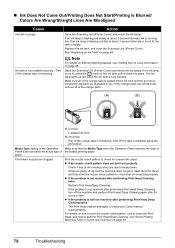
... of the orange tape is peeled off the ink tank and the air hole is remaining. Replace the ink tank, and close the Scanning Unit (Printer Cover). Open the Scanning Unit (Printer Cover) and check the ink lamps. Make sure all of the orange parts. (A) (B) Media Type setting in (A). „ Ink Does... to check for uneven ink output. If an ink lamp is flashing red slowly at about 3-second intervals, ink is running low. Action Open the Scanning Unit (Printer Cover) and check the ink lamps. Contact your...
... of the orange tape is peeled off the ink tank and the air hole is remaining. Replace the ink tank, and close the Scanning Unit (Printer Cover). Open the Scanning Unit (Printer Cover) and check the ink lamps. Make sure all of the orange parts. (A) (B) Media Type setting in (A). „ Ink Does... to check for uneven ink output. If an ink lamp is flashing red slowly at about 3-second intervals, ink is running low. Action Open the Scanning Unit (Printer Cover) and check the ink lamps. Contact your...


