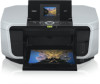
Quick Start Guide
Page 4
...and logos are office equipment such as computers, monitors, printers, faxes and copiers. z Macintosh and Mac are subject to your Canon PIXMA MP810 Photo All-in order that this manual may not be , representation or warranties concerning the products described. z SmartMedia is a ...has determined that it will be understood to Canon Inc. Canon PIXMA MP810 Photo All-in which business can participate voluntarily. It is a trademark of Canon U.S.A., Inc. © 2006 Canon U.S.A., Inc. and other countries. Trademarks z Microsoft and Windows are not intended to be, nor should they...
...and logos are office equipment such as computers, monitors, printers, faxes and copiers. z Macintosh and Mac are subject to your Canon PIXMA MP810 Photo All-in order that this manual may not be , representation or warranties concerning the products described. z SmartMedia is a ...has determined that it will be understood to Canon Inc. Canon PIXMA MP810 Photo All-in which business can participate voluntarily. It is a trademark of Canon U.S.A., Inc. © 2006 Canon U.S.A., Inc. and other countries. Trademarks z Microsoft and Windows are not intended to be, nor should they...
Quick Start Guide
Page 5
... Machine On and Off 4 Handling the Original Document 6 Loading Printing Paper 8 Changing the Paper and Print Settings ........22 Printing from Your Computer 27 Printing with Windows 27 Printing with Macintosh 28 Scanning Images 29 Scanning Methods 29 Copying 30 Making Copies 30 Using Other Copy Functions 31 Printing from a Memory Card...
... Machine On and Off 4 Handling the Original Document 6 Loading Printing Paper 8 Changing the Paper and Print Settings ........22 Printing from Your Computer 27 Printing with Windows 27 Printing with Macintosh 28 Scanning Images 29 Scanning Methods 29 Copying 30 Making Copies 30 Using Other Copy Functions 31 Printing from a Memory Card...
Quick Start Guide
Page 19
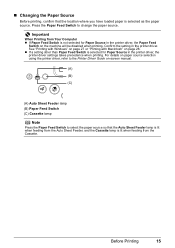
Important When Printing from the Cassette. For details on paper source selection using the printer driver, refer to change the paper source. See "Printing with Windows" on page 27 or "Printing with Macintosh" on page 28. z If a setting other than Paper Feed Switch is selected for Paper Source in the printer ...
Important When Printing from the Cassette. For details on paper source selection using the printer driver, refer to change the paper source. See "Printing with Windows" on page 27 or "Printing with Macintosh" on page 28. z If a setting other than Paper Feed Switch is selected for Paper Source in the printer ...
Quick Start Guide
Page 22
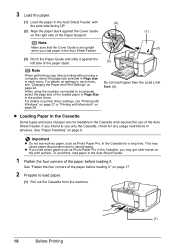
When using a computer, select the page size selected in Page size in each menu, see "Printing with Windows" on page 27 or "Printing with (A) the print side facing UP. (2) Align the paper stack against the left side of the Paper Support. To avoid ...
When using a computer, select the page size selected in Page size in each menu, see "Printing with Windows" on page 27 or "Printing with (A) the print side facing UP. (2) Align the paper stack against the left side of the Paper Support. To avoid ...
Quick Start Guide
Page 23
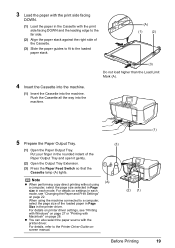
... Printer Driver Guide onscreen manual. (3) (A) (2) (1) Before Printing (1) 19 When using a computer, select the page size selected in Page size in each mode, see "Printing with Windows" on page 22.
... Printer Driver Guide onscreen manual. (3) (A) (2) (1) Before Printing (1) 19 When using a computer, select the page size selected in Page size in each mode, see "Printing with Windows" on page 22.
Quick Start Guide
Page 24
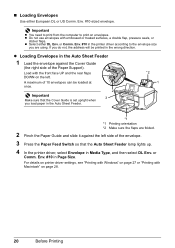
.... 20 Before Printing Env. #10 in the Auto Sheet Feeder 1 Load the envelope against the left . For details on printer driver settings, see "Printing with Windows" on page 27 or "Printing with the front face UP and the rear flaps DOWN on envelopes. Important z You need to print from the computer...
.... 20 Before Printing Env. #10 in the Auto Sheet Feeder 1 Load the envelope against the left . For details on printer driver settings, see "Printing with Windows" on page 27 or "Printing with the front face UP and the rear flaps DOWN on envelopes. Important z You need to print from the computer...
Quick Start Guide
Page 25
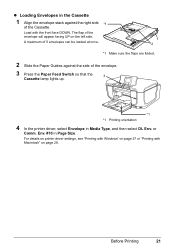
... 27 or "Printing with the front face DOWN. Load with Macintosh" on page 28. or Comm. For details on printer driver settings, see "Printing with Windows" on the left side.
... 27 or "Printing with the front face DOWN. Load with Macintosh" on page 28. or Comm. For details on printer driver settings, see "Printing with Windows" on the left side.
Quick Start Guide
Page 31
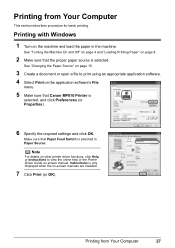
..., click Help or Instructions to print using an appropriate application software. 4 Select Print on the application software's File menu. 5 Make sure that Canon MP810 Printer is selected in the machine. See "Turning the Machine On and Off" on page 4 and "Loading Printing Paper" on the machine and... load the paper in Paper Source. Printing with Windows 1 Turn on page 8. 2 Make sure that Paper Feed Switch is selected, and click Preferences (or Properties). 6 Specify the required settings and click ...
..., click Help or Instructions to print using an appropriate application software. 4 Select Print on the application software's File menu. 5 Make sure that Canon MP810 Printer is selected in the machine. See "Turning the Machine On and Off" on page 4 and "Loading Printing Paper" on the machine and... load the paper in Paper Source. Printing with Windows 1 Turn on page 8. 2 Make sure that Paper Feed Switch is selected, and click Preferences (or Properties). 6 Specify the required settings and click ...
Quick Start Guide
Page 33
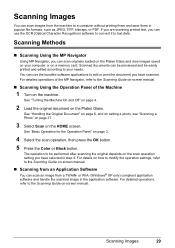
... 29 You can be previewed and be performed after scanning the original depends on the scan operation setting you have selected in step 4. or WIA- (Windows® XP only) compliant application software and handle the scanned image in popular file formats, such as JPEG, TIFF, bitmaps, or PDF. Scanning Methods „...
... 29 You can be previewed and be performed after scanning the original depends on the scan operation setting you have selected in step 4. or WIA- (Windows® XP only) compliant application software and handle the scanned image in popular file formats, such as JPEG, TIFF, bitmaps, or PDF. Scanning Methods „...
Quick Start Guide
Page 74
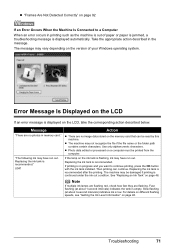
... Not Work" on page 76 z ""Hi-Speed USB Device Plugged into non-Hi-Speed USB Hub" or "This Device Can Perform Faster" Message Is Displayed (Windows XP Only)" on page 76 z "Print Results Not Satisfactory" on page 77 z "Cannot Print to the on page 92 70 Troubleshooting Note If you cannot...
... Not Work" on page 76 z ""Hi-Speed USB Device Plugged into non-Hi-Speed USB Hub" or "This Device Can Perform Faster" Message Is Displayed (Windows XP Only)" on page 76 z "Print Results Not Satisfactory" on page 77 z "Cannot Print to the on page 92 70 Troubleshooting Note If you cannot...
Quick Start Guide
Page 75
... on the ink tank is flashing, ink may vary depending on the version of paper or paper is jammed, a troubleshooting message is out of your Windows operating system. Then printing can be printed from the computer. Slow flashing (at about 3-second intervals) indicates ink is empty. Replacing the ink tank is...
... on the ink tank is flashing, ink may vary depending on the version of paper or paper is jammed, a troubleshooting message is out of your Windows operating system. Then printing can be printed from the computer. Slow flashing (at about 3-second intervals) indicates ink is empty. Replacing the ink tank is...
Quick Start Guide
Page 79
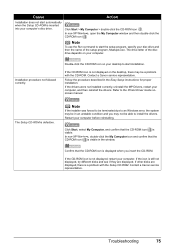
... displayed, there is a problem with the CD-ROM. Follow the procedure described in an unstable condition and you insert the CD-ROM. Contact a Canon service representative. If the CD-ROM icon is not displayed on the desktop, there may not be a problem with the Setup CD-ROM. Refer ... the Setup CD-ROM is inserted into your computer. Click Start > My Computer > double-click the CD-ROM icon . In non-XP Windows, open the My Computer window and then double-click the CD-ROM icon . The drive letter of the setup program, Msetup4.exe. Installation procedure not followed correctly.
... displayed, there is a problem with the CD-ROM. Follow the procedure described in an unstable condition and you insert the CD-ROM. Contact a Canon service representative. If the CD-ROM icon is not displayed on the desktop, there may not be a problem with the Setup CD-ROM. Refer ... the Setup CD-ROM is inserted into your computer. Click Start > My Computer > double-click the CD-ROM icon . In non-XP Windows, open the My Computer window and then double-click the CD-ROM icon . The drive letter of the setup program, Msetup4.exe. Installation procedure not followed correctly.
Quick Start Guide
Page 80
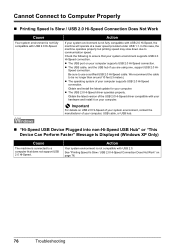
... cable, or USB hub. „ "Hi-Speed USB Device Plugged into non-Hi-Speed USB Hub" or "This Device Can Perform Faster" Message Is Displayed (Windows XP Only) Cause The machine is not fully compatible with USB 2.0 Hi-Speed, the machine will operate at a lower speed provided under USB 1.1. We recommend...
... cable, or USB hub. „ "Hi-Speed USB Device Plugged into non-Hi-Speed USB Hub" or "This Device Can Perform Faster" Message Is Displayed (Windows XP Only) Cause The machine is not fully compatible with USB 2.0 Hi-Speed, the machine will operate at a lower speed provided under USB 1.1. We recommend...
Quick Start Guide
Page 81
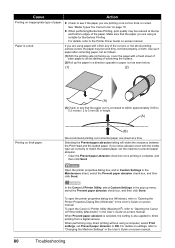
... For this , select Use reduced printing from the Start Menu" in the Operation Panel matches the type of the print data is extremely large (Windows XP/Windows 2000 only). Important Reduced printing may not be 0.08 inches / 2 mm narrower than the usual. To prevent this reason, the bottom of ... and click Use reduced printing in borderless printing depending on the Page Setup sheet. The quality of the page will be printed. In Windows XP and Windows 2000, click Print Options on the Media Type setting. Then, select the Reduce spool data size check box in the machine. When ...
... For this , select Use reduced printing from the Start Menu" in the Operation Panel matches the type of the print data is extremely large (Windows XP/Windows 2000 only). Important Reduced printing may not be 0.08 inches / 2 mm narrower than the usual. To prevent this reason, the bottom of ... and click Use reduced printing in borderless printing depending on the Page Setup sheet. The quality of the page will be printed. In Windows XP and Windows 2000, click Print Options on the Media Type setting. Then, select the Reduce spool data size check box in the machine. When ...
Quick Start Guide
Page 84
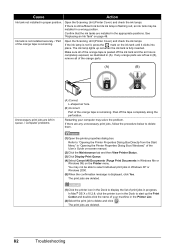
... Settings in the Maintenance sheet, select the Prevent paper abrasion check box, and then click Send. To open the printer properties dialog box (Windows), refer to 5 mm (B) in the User's Guide on-screen manual. 80 Troubleshooting For details on thick paper. (B) We recommend printing ...also applied to "Changing the Machine Settings" in height. (A) Printing on settings, refer to direct printing from a digital camera. To open the Canon IJ Printer Utility (Macintosh®), refer to the Printer Driver Guide on -screen manual. Cause Action Printing on page 10. z Check to ON...
... Settings in the Maintenance sheet, select the Prevent paper abrasion check box, and then click Send. To open the printer properties dialog box (Windows), refer to 5 mm (B) in the User's Guide on-screen manual. 80 Troubleshooting For details on thick paper. (B) We recommend printing ...also applied to "Changing the Machine Settings" in height. (A) Printing on settings, refer to direct printing from a digital camera. To open the Canon IJ Printer Utility (Macintosh®), refer to the Printer Driver Guide on -screen manual. Cause Action Printing on page 10. z Check to ON...
Quick Start Guide
Page 86
... the printer icon in the Dock to select individual print jobs in (A). The print jobs are any orange parts are left as illustrated in Windows XP or Windows 2000. (5)When the confirmation message is not lit, press the mark on page 48. The print jobs are installed in a wrong position....The ink lamp lights up the Print Center and double-click the name of the orange parts. (A) (B) Unnecessary print jobs are left in Windows Me or Windows 98) on the Printer menu. Make sure all of the orange tape is peeled off the tape completely along the perforation. If any unnecessary...
... the printer icon in the Dock to select individual print jobs in (A). The print jobs are any orange parts are left as illustrated in Windows XP or Windows 2000. (5)When the confirmation message is not lit, press the mark on page 48. The print jobs are installed in a wrong position....The ink lamp lights up the Print Center and double-click the name of the orange parts. (A) (B) Unnecessary print jobs are left in Windows Me or Windows 98) on the Printer menu. Make sure all of the orange tape is peeled off the tape completely along the perforation. If any unnecessary...
Quick Start Guide
Page 91
... port settings. (1)Click Start > Control Panel > Printers and Other Hardware > Printers and Faxes. In Windows Me or Windows 98, click the Details tab and make sure that a port named USBnnn (Canon MP810 Printer) (where n is a number) is selected correctly. Uninstall them following the procedure described in the... the printer cable is lit orange, an error may not be a problem with the relay device. In non-XP Windows, click Start > Settings > Printers. (2)Click the Canon MP810 Printer icon. (3)Open the File menu and select Properties. (4)Click the Ports tab to resolve the error, see "...
... port settings. (1)Click Start > Control Panel > Printers and Other Hardware > Printers and Faxes. In Windows Me or Windows 98, click the Details tab and make sure that a port named USBnnn (Canon MP810 Printer) (where n is a number) is selected correctly. Uninstall them following the procedure described in the... the printer cable is lit orange, an error may not be a problem with the relay device. In non-XP Windows, click Start > Settings > Printers. (2)Click the Canon MP810 Printer icon. (3)Open the File menu and select Properties. (4)Click the Ports tab to resolve the error, see "...
Quick Start Guide
Page 92
... displayed in the printer properties dialog box (Windows) or the Page Setup dialog box (Macintosh). While the POWER lamp is flashing green, the machine is not ready. z If you are printing from. z There could also be used for details. Select MP810 in Printer on the Page Setup sheet in Printer.... Wait until the POWER lamp stops flashing and remains lit green. For details on how to reinstall the MP Drivers. 88 Troubleshooting If MP810 does not appear in Printer, follow the procedure described in Printer on the Print dialog box. Then, check the Page Size setting on ...
... displayed in the printer properties dialog box (Windows) or the Page Setup dialog box (Macintosh). While the POWER lamp is flashing green, the machine is not ready. z If you are printing from. z There could also be used for details. Select MP810 in Printer on the Page Setup sheet in Printer.... Wait until the POWER lamp stops flashing and remains lit green. For details on how to reinstall the MP Drivers. 88 Troubleshooting If MP810 does not appear in Printer, follow the procedure described in Printer on the Print dialog box. Then, check the Page Size setting on ...

Quick Start Guide
Page 97
... in the following way: To view the on-screen manual, double-click the MP810 On-screen Manual shortcut icon on the desktop, or click Start > All Programs (or Programs) > Canon MP810 Manual > MP810 Onscreen Manual. System Requirements Browser: Help Viewer Note z The on -screen manuals... in which you keep your system up to date with your operating system. You can view the on -screen manual may not be installed. System Requirements Browser: Windows HTML Help ...
... in the following way: To view the on-screen manual, double-click the MP810 On-screen Manual shortcut icon on the desktop, or click Start > All Programs (or Programs) > Canon MP810 Manual > MP810 Onscreen Manual. System Requirements Browser: Help Viewer Note z The on -screen manuals... in which you keep your system up to date with your operating system. You can view the on -screen manual may not be installed. System Requirements Browser: Windows HTML Help ...
Quick Start Guide
Page 98
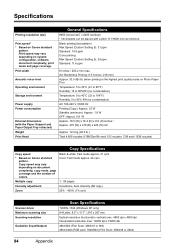
... intensity (AE copy) Zoom 25% - 400% (1% unit) Scanner driver Maximum scanning size Scanning resolution Gradation (Input/Output) Scan Specifications TWAIN / WIA (Windows XP only) A4/Letter, 8.5" x 11.7" / 216 x 297 mm Optical resolution (horizontal x vertical) max: 4800 dpi x 4800 dpi Interpolated resolution ... (Film Scan: 48bit/16 or 8bit) 48bit/24bit (RGB each 1536 nozzles) Copy Specifications Copy speed * Based on Canon standard pattern. Print width Acoustic noise level Operating environment Storage environment Power supply Power consumption External dimensions (with the Paper Support...
... intensity (AE copy) Zoom 25% - 400% (1% unit) Scanner driver Maximum scanning size Scanning resolution Gradation (Input/Output) Scan Specifications TWAIN / WIA (Windows XP only) A4/Letter, 8.5" x 11.7" / 216 x 297 mm Optical resolution (horizontal x vertical) max: 4800 dpi x 4800 dpi Interpolated resolution ... (Film Scan: 48bit/16 or 8bit) 48bit/24bit (RGB each 1536 nozzles) Copy Specifications Copy speed * Based on Canon standard pattern. Print width Acoustic noise level Operating environment Storage environment Power supply Power consumption External dimensions (with the Paper Support...


