Quick Start Guide
Page 4
Under the copyright laws, this manual and in the U.S. Specifications are not intended to be, nor should they be understood to be an easy-to change without the prior written consent of Canon U.S.A., Inc. © 2006 Canon U.S.A., Inc. The targeted products are licensed to your Canon PIXMA MP810 Photo All-in order that effectively reduce energy consumption...
Under the copyright laws, this manual and in the U.S. Specifications are not intended to be, nor should they be understood to be an easy-to change without the prior written consent of Canon U.S.A., Inc. © 2006 Canon U.S.A., Inc. The targeted products are licensed to your Canon PIXMA MP810 Photo All-in order that effectively reduce energy consumption...
Quick Start Guide
Page 5
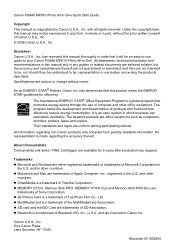
... Cannot Print Properly from a Digital Camera 90 Cannot Print Properly from a Photo Index Sheet 91 Cannot Scan Films 92 Appendix 93 Reading the On-screen Manuals 93 Specifications 94 Safety Precautions 97 Legal Limitations on Use of Your Product and Use of Images 100 Users in the U.S.A 101 Index 105 1
... Cannot Print Properly from a Digital Camera 90 Cannot Print Properly from a Photo Index Sheet 91 Cannot Scan Films 92 Appendix 93 Reading the On-screen Manuals 93 Specifications 94 Safety Precautions 97 Legal Limitations on Use of Your Product and Use of Images 100 Users in the U.S.A 101 Index 105 1
Quick Start Guide
Page 7
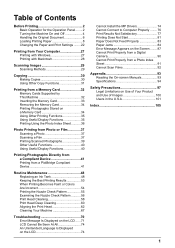
... a digital camera. Print the photo data stored in the User's Guide on page 37. Before Printing 3 See "Photo Printing from Photo or Film" on -screen manual. See "Printing from a Memory Card" on page 32. „ Other Buttons (A) NAVI button (B) Function buttons (A) (B) z NAVI Button You can scan the image data on page...
... a digital camera. Print the photo data stored in the User's Guide on page 37. Before Printing 3 See "Photo Printing from Photo or Film" on -screen manual. See "Printing from a Memory Card" on page 32. „ Other Buttons (A) NAVI button (B) Function buttons (A) (B) z NAVI Button You can scan the image data on page...
Quick Start Guide
Page 9
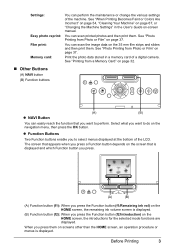
... the machine is turned off, and only the POWER lamp stay lit. See "Other Settings" in "Changing the Machine Settings" of User's Guide on-screen manual. Press any button to 1 hour or 4 hours. z Setting the Power Save Mode The machine enters Power save mode.
... the machine is turned off, and only the POWER lamp stay lit. See "Other Settings" in "Changing the Machine Settings" of User's Guide on-screen manual. Press any button to 1 hour or 4 hours. z Setting the Power Save Mode The machine enters Power save mode.

Quick Start Guide
Page 13
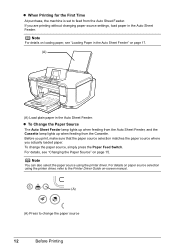
You may become marked when it is Canon specialty media. Refer to "Setting Items" in the US by using the Easy-Photo Print provided with a Model Number is fed in "Using Other Useful Printing Functions" of the User's Guide on-screen manual. Before Printing 9 In this paper from your ... To specify the page size and media type when printing photos saved on -screen manual. Load in the Auto Sheet Feeder. *4 When loading a stack of paper, the printed side may not be able to purchase some Canon genuine papers depending on your country. *1 Paper is not sold in "Setting the...
You may become marked when it is Canon specialty media. Refer to "Setting Items" in the US by using the Easy-Photo Print provided with a Model Number is fed in "Using Other Useful Printing Functions" of the User's Guide on-screen manual. Before Printing 9 In this paper from your ... To specify the page size and media type when printing photos saved on -screen manual. Load in the Auto Sheet Feeder. *4 When loading a stack of paper, the printed side may not be able to purchase some Canon genuine papers depending on your country. *1 Paper is not sold in "Setting the...
Quick Start Guide
Page 16
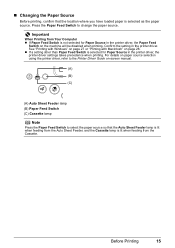
..., and the Cassette lamp lights up when feeding from the Auto Sheet Feeder. To change the paper source 12 Before Printing For details on -screen manual. (A) (A) Press to feed from the Cassette. Note You can also select the paper source using the printer driver, refer to the Printer Driver Guide on...
..., and the Cassette lamp lights up when feeding from the Auto Sheet Feeder. To change the paper source 12 Before Printing For details on -screen manual. (A) (A) Press to feed from the Cassette. Note You can also select the paper source using the printer driver, refer to the Printer Driver Guide on...
Quick Start Guide
Page 17
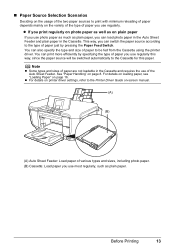
... by specifying the type of paper you use regularly this paper. z For details on printer driver settings, refer to the Printer Driver Guide on-screen manual. (A) (B) (A) Auto Sheet Feeder: Load paper of various types and sizes, including photo paper. (B) Cassette: Load paper you can also specify the type and size of...
... by specifying the type of paper you use regularly this paper. z For details on printer driver settings, refer to the Printer Driver Guide on-screen manual. (A) (B) (A) Auto Sheet Feeder: Load paper of various types and sizes, including photo paper. (B) Cassette: Load paper you can also specify the type and size of...
Quick Start Guide
Page 18
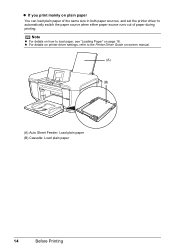
Note z For details on how to load paper, see "Loading Paper" on plain paper You can load plain paper of the same size in both paper sources, and set the printer driver to the Printer Driver Guide on-screen manual. (A) (B) (A) Auto Sheet Feeder: Load plain paper (B) Cassette: Load plain paper 14 Before Printing z If you print mainly on page 16. z For details on printer driver settings, refer to automatically switch the paper source when either paper source runs out of paper during printing.
Note z For details on how to load paper, see "Loading Paper" on plain paper You can load plain paper of the same size in both paper sources, and set the printer driver to the Printer Driver Guide on-screen manual. (A) (B) (A) Auto Sheet Feeder: Load plain paper (B) Cassette: Load plain paper 14 Before Printing z If you print mainly on page 16. z For details on printer driver settings, refer to automatically switch the paper source when either paper source runs out of paper during printing.
Quick Start Guide
Page 19
... have loaded paper is selected for Paper Source in the printer driver. See "Printing with Windows" on page 27 or "Printing with Macintosh" on -screen manual. (A) (B) (C) (A) Auto Sheet Feeder lamp (B) Paper Feed Switch (C) Cassette lamp Note Press the Paper Feed Switch to change the paper source. z If a setting other than Paper...
... have loaded paper is selected for Paper Source in the printer driver. See "Printing with Windows" on page 27 or "Printing with Macintosh" on -screen manual. (A) (B) (C) (A) Auto Sheet Feeder lamp (B) Paper Feed Switch (C) Cassette lamp Note Press the Paper Feed Switch to change the paper source. z If a setting other than Paper...
Quick Start Guide
Page 20
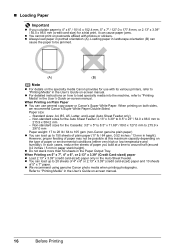
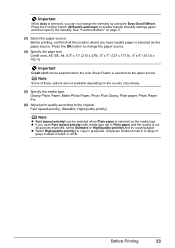
... type of paper may not be jammed. (A) (B) Note z For details on the specialty media Canon provides for the Auto Sheet Feeder: 2.13" x 3.39" to 8.5" x 23" / 54.0 x 86.0 mm to "Printing Media" in the User's Guide on-screen manual. When printing on 5" x 7", 4" x 6", or 2.13" x 3.39" (Credit Card-sized) paper z Load 2.... sizes for a trial print, it can load up to around half (around 0.2 inches / 5 mm in the User's Guide on-screen manual. z We recommend using genuine Canon photo media when printing photographs. z Do not stack more than 50 sheets in portrait orientation (A).
... type of paper may not be jammed. (A) (B) Note z For details on the specialty media Canon provides for the Auto Sheet Feeder: 2.13" x 3.39" to 8.5" x 23" / 54.0 x 86.0 mm to "Printing Media" in the User's Guide on-screen manual. When printing on 5" x 7", 4" x 6", or 2.13" x 3.39" (Credit Card-sized) paper z Load 2.... sizes for a trial print, it can load up to around half (around 0.2 inches / 5 mm in the User's Guide on-screen manual. z We recommend using genuine Canon photo media when printing photographs. z Do not stack more than 50 sheets in portrait orientation (A).
Quick Start Guide
Page 21
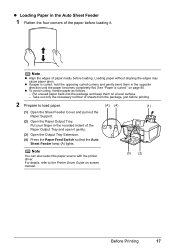
Loading paper without aligning the edges may cause paper jams. z If paper is curled." on -screen manual. (3) (2) Before Printing 17 Put your finger in the rounded indent of sheets from the package, just before printing. 2 Prepare to the Printer Driver Guide on ...
Loading paper without aligning the edges may cause paper jams. z If paper is curled." on -screen manual. (3) (2) Before Printing 17 Put your finger in the rounded indent of sheets from the package, just before printing. 2 Prepare to the Printer Driver Guide on ...
Quick Start Guide
Page 23
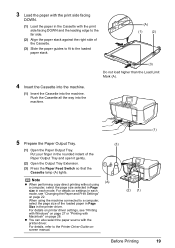
.... For details on settings in the printer driver. Note z When performing copy direct printing without using the machine connected to the Printer Driver Guide onscreen manual. (3) (A) (2) (1) Before Printing (1) 19 z You can also select the paper source with Macintosh" on page 22. Put your finger in the Cassette with the print side...
.... For details on settings in the printer driver. Note z When performing copy direct printing without using the machine connected to the Printer Driver Guide onscreen manual. (3) (A) (2) (1) Before Printing (1) 19 z You can also select the paper source with Macintosh" on page 22. Put your finger in the Cassette with the print side...
Quick Start Guide
Page 27
.... z If you have loaded paper is selected as expected, select Standard or High(quality-priority) and try copying again. z Select High(quality-priority) to enable manual intensity settings again and then specify the intensity. Before Printing 23
.... z If you have loaded paper is selected as expected, select Standard or High(quality-priority) and try copying again. z Select High(quality-priority) to enable manual intensity settings again and then specify the intensity. Before Printing 23
Quick Start Guide
Page 31
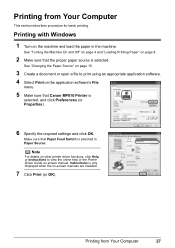
.... Note For details on other printer driver functions, click Help or Instructions to print using an appropriate application software. 4 Select Print on -screen manuals are installed. 7 Click Print (or OK). Instructions is selected, and click Preferences (or Properties). 6 Specify the required settings and click OK.... See "Turning the Machine On and Off" on page 4 and "Loading Printing Paper" on page 8. 2 Make sure that Canon MP810 Printer is only displayed when the on the application software's File menu. 5 Make sure that the proper paper source is selected in the machine.
.... Note For details on other printer driver functions, click Help or Instructions to print using an appropriate application software. 4 Select Print on -screen manuals are installed. 7 Click Print (or OK). Instructions is selected, and click Preferences (or Properties). 6 Specify the required settings and click OK.... See "Turning the Machine On and Off" on page 4 and "Loading Printing Paper" on page 8. 2 Make sure that Canon MP810 Printer is only displayed when the on the application software's File menu. 5 Make sure that the proper paper source is selected in the machine.

Quick Start Guide
Page 32
... application software. 4 Select Page Setup on page 8. 2 Make sure that Paper Feed Switch is selected. If the on-screen manuals are not installed, the Printer Driver Guide on-screen manual is not displayed even if is selected in Format for. 6 Select the desired paper size in Paper Size. 7 Click OK....open a file to view the Printer Driver Guide on the machine and load the paper in Paper Source. Printing with Macintosh 1 Turn on -screen manual. Make sure that the proper paper source is selected in the machine. See "Turning the Machine On and Off" on page 4 and "Loading Printing...
... application software. 4 Select Page Setup on page 8. 2 Make sure that Paper Feed Switch is selected. If the on-screen manuals are not installed, the Printer Driver Guide on-screen manual is not displayed even if is selected in Format for. 6 Select the desired paper size in Paper Size. 7 Click OK....open a file to view the Printer Driver Guide on the machine and load the paper in Paper Source. Printing with Macintosh 1 Turn on -screen manual. Make sure that the proper paper source is selected in the machine. See "Turning the Machine On and Off" on page 4 and "Loading Printing...
Quick Start Guide
Page 33
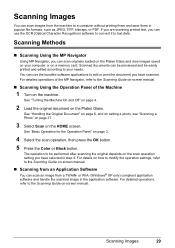
..., bitmaps, or PDF. Scanning Images You can scan images from the machine to be easily printed and edited according to the Scanning Guide on-screen manual. „ Scanning from an Application Software You can scan an image from a TWAIN- Scanning Methods „ Scanning Using the MP Navigator Using MP ...to edit or print the document you can use the OCR (Optical Character Recognition) software to convert it to the Scanning Guide on-screen manual. „ Scanning Using the Operation Panel of the MP Navigator, refer to text data. See "Basic Operation for the Operation Panel" on -...
..., bitmaps, or PDF. Scanning Images You can scan images from the machine to be easily printed and edited according to the Scanning Guide on-screen manual. „ Scanning from an Application Software You can scan an image from a TWAIN- Scanning Methods „ Scanning Using the MP Navigator Using MP ...to edit or print the document you can use the OCR (Optical Character Recognition) software to convert it to the Scanning Guide on-screen manual. „ Scanning Using the Operation Panel of the MP Navigator, refer to text data. See "Basic Operation for the Operation Panel" on -...
Quick Start Guide
Page 46
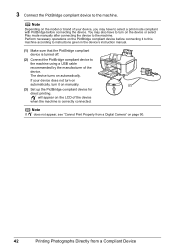
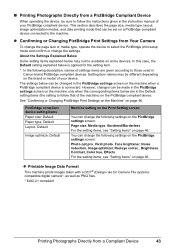
...on the PictBridge compliant device before connecting the device. 3 Connect the PictBridge compliant device to instructions given in the device's instruction manual. (1) Make sure that the PictBridge compliant device is correctly connected. The device turns on page 90. 42 Printing Photographs Directly ... a Compliant Device Note If does not appear, see "Cannot Print Properly from a Digital Camera" on automatically. Perform necessary operations on manually. (2) (3) Set up the PictBridge compliant device for direct printing. If your device, you may also have to the machine using a...
...on the PictBridge compliant device before connecting the device. 3 Connect the PictBridge compliant device to instructions given in the device's instruction manual. (1) Make sure that the PictBridge compliant device is correctly connected. The device turns on page 90. 42 Printing Photographs Directly ... a Compliant Device Note If does not appear, see "Cannot Print Properly from a Digital Camera" on automatically. Perform necessary operations on manually. (2) (3) Set up the PictBridge compliant device for direct printing. If your device, you may also have to the machine using a...
Quick Start Guide
Page 47
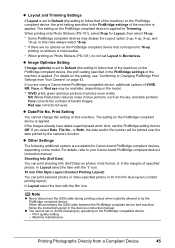
... compliant device connected to the machine. About the Settings Explained Below Some setting items explained below can be changed in the instruction manual of your PictBridge compliant device. You can change the following settings on the PictBridge settings screen: Photo opt.pro, Vivid photo,...item. * In the following description, names of settings items are in the Default setting items (the setting to those used in Canon-brand PictBridge compliant devices. PictBridge compliant device setting items Paper size: Default Paper type: Default Layout: Default Image optimize: Default ...
... compliant device connected to the machine. About the Settings Explained Below Some setting items explained below can be changed in the instruction manual of your PictBridge compliant device. You can change the following settings on the PictBridge settings screen: Photo opt.pro, Vivid photo,...item. * In the following description, names of settings items are in the Default setting items (the setting to those used in Canon-brand PictBridge compliant devices. PictBridge compliant device setting items Paper size: Default Paper type: Default Layout: Default Image optimize: Default ...
Quick Start Guide
Page 49
...Trimming. The setting on the PictBridge compliant device, the print setting specified in the device's instruction manual. When printing onto Photo Stickers (PS-101), select N-up for Canon-brand PictBridge-compliant devices, depending on the PictBridge compatible device. - z Other Settings The following ... (contact printing layout). Note z Never disconnect the USB cable during printing unless when explicitly allowed to your Canon-brand PictBridge compliant device's instruction manual. Print Setting You cannot change this setting on photos in list format, or in blue portions, such as...
...Trimming. The setting on the PictBridge compliant device, the print setting specified in the device's instruction manual. When printing onto Photo Stickers (PS-101), select N-up for Canon-brand PictBridge-compliant devices, depending on the PictBridge compatible device. - z Other Settings The following ... (contact printing layout). Note z Never disconnect the USB cable during printing unless when explicitly allowed to your Canon-brand PictBridge compliant device's instruction manual. Print Setting You cannot change this setting on photos in list format, or in blue portions, such as...
Quick Start Guide
Page 66
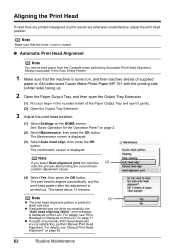
... (4) Select Yes, then press the OK button. Aligning the Print Head If ruled lines are printed misaligned or print results are not satisfactory, perform Manual Print Head Alignment. z If adjustment was not done successfully, the "Auto head align has failed." For details, see "Error Message Is Displayed on... Maintenance, then press the OK button. Note Make sure that the machine is printed out. z If results of supplied paper or A4/Letter-sized Canon Matte Photo Paper MP-101 with the printing side (whiter side) facing up. 2 Open the Paper Output Tray, and then open the Output Tray...
... (4) Select Yes, then press the OK button. Aligning the Print Head If ruled lines are printed misaligned or print results are not satisfactory, perform Manual Print Head Alignment. z If adjustment was not done successfully, the "Auto head align has failed." For details, see "Error Message Is Displayed on... Maintenance, then press the OK button. Note Make sure that the machine is printed out. z If results of supplied paper or A4/Letter-sized Canon Matte Photo Paper MP-101 with the printing side (whiter side) facing up. 2 Open the Paper Output Tray, and then open the Output Tray...


