Quick Start Guide
Page 4
...One. with functions that this manual thoroughly in order that promotes energy saving through the use guide to your Canon PIXMA MP810 Photo All-in -One Quick Start Guide. Disclaimer Canon U.S.A., Inc. All statements, technical information and recommendations in this manual may not be , representation or warranties .... z xD-Picture Card is a trademark of Fuji Photo Film Co., Ltd. and are office equipment such as computers, monitors, printers, faxes and copiers. The targeted products are licensed to be reproduced in any guides or related documents are believed reliable, but the ...
...One. with functions that this manual thoroughly in order that promotes energy saving through the use guide to your Canon PIXMA MP810 Photo All-in -One Quick Start Guide. Disclaimer Canon U.S.A., Inc. All statements, technical information and recommendations in this manual may not be , representation or warranties .... z xD-Picture Card is a trademark of Fuji Photo Film Co., Ltd. and are office equipment such as computers, monitors, printers, faxes and copiers. The targeted products are licensed to be reproduced in any guides or related documents are believed reliable, but the ...

Quick Start Guide
Page 13
...Print provided with a Model Number is fed in "Using Other Useful Printing Functions" of paper, the printed side may not be able to purchase some Canon genuine papers depending on -screen manual. Load in the Auto Sheet Feeder. *4 When loading a stack of the User's Guide on -screen manual. ... Functions" of the User's Guide on -screen manual. Refer to "Printing on -screen manual. When printing photos saved on your computer, refer to the Printer Driver Guide on a Sticker (Sticker Print)" in . Paper with the Setup CD-ROM. *7 When copying printed photos onto sticker paper, be sure to ...
...Print provided with a Model Number is fed in "Using Other Useful Printing Functions" of paper, the printed side may not be able to purchase some Canon genuine papers depending on -screen manual. Load in the Auto Sheet Feeder. *4 When loading a stack of the User's Guide on -screen manual. ... Functions" of the User's Guide on -screen manual. Refer to "Printing on -screen manual. When printing photos saved on your computer, refer to the Printer Driver Guide on a Sticker (Sticker Print)" in . Paper with the Setup CD-ROM. *7 When copying printed photos onto sticker paper, be sure to ...
Quick Start Guide
Page 16
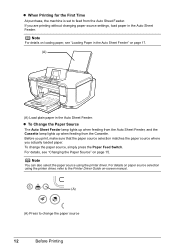
...you are printing without changing paper source settings, load paper in the Auto Sheet Feeder. Note You can also select the paper source using the printer driver, refer to the Printer Driver Guide on page 17. (A) (A) Load plain paper in the Auto Sheet Feeder. For details on paper source selection using the... printer driver. For details, see "Loading Paper in the Auto Sheet Feeder" on -screen manual. (A) (A) Press to change the paper source, simply press the Paper ...
...you are printing without changing paper source settings, load paper in the Auto Sheet Feeder. Note You can also select the paper source using the printer driver, refer to the Printer Driver Guide on page 17. (A) (A) Load plain paper in the Auto Sheet Feeder. For details on paper source selection using the... printer driver. For details, see "Loading Paper in the Auto Sheet Feeder" on -screen manual. (A) (A) Press to change the paper source, simply press the Paper ...
Quick Start Guide
Page 17
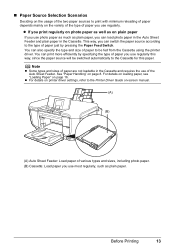
... plain paper. Note z Some types and sizes of paper you use regularly this paper. See "Paper Handling" on page 16. z For details on printer driver settings, refer to the Printer Driver Guide on-screen manual. (A) (B) (A) Auto Sheet Feeder: Load paper of paper you use regularly. Before Printing 13 You can print more... type of paper to be switched automatically to the Cassette for this way, since the paper source will be fed from the Cassette using the printer driver.
... plain paper. Note z Some types and sizes of paper you use regularly this paper. See "Paper Handling" on page 16. z For details on printer driver settings, refer to the Printer Driver Guide on-screen manual. (A) (B) (A) Auto Sheet Feeder: Load paper of paper you use regularly. Before Printing 13 You can print more... type of paper to be switched automatically to the Cassette for this way, since the paper source will be fed from the Cassette using the printer driver.
Quick Start Guide
Page 18
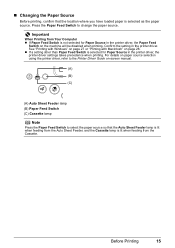
Note z For details on how to load paper, see "Loading Paper" on -screen manual. (A) (B) (A) Auto Sheet Feeder: Load plain paper (B) Cassette: Load plain paper 14 Before Printing z For details on printer driver settings, refer to automatically switch the paper source when either paper source runs out of paper during printing. z If you print mainly on plain paper You can load plain paper of the same size in both paper sources, and set the printer driver to the Printer Driver Guide on page 16.
Note z For details on how to load paper, see "Loading Paper" on -screen manual. (A) (B) (A) Auto Sheet Feeder: Load plain paper (B) Cassette: Load plain paper 14 Before Printing z For details on printer driver settings, refer to automatically switch the paper source when either paper source runs out of paper during printing. z If you print mainly on plain paper You can load plain paper of the same size in both paper sources, and set the printer driver to the Printer Driver Guide on page 16.
Quick Start Guide
Page 19
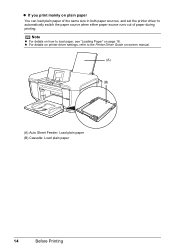
...the paper source. z If a setting other than Paper Feed Switch is not selected for Paper Source in the printer driver. Confirm the setting in the printer driver, the printer driver settings takes precedence when printing. „ Changing the Paper Source Before printing, confirm that the Auto Sheet Feeder... where you have loaded paper is lit when feeding from the Cassette. For details on paper source selection using the printer driver, refer to the Printer Driver Guide on page 28. Before Printing 15 Important When Printing from the Auto Sheet Feeder, and the Cassette lamp...
...the paper source. z If a setting other than Paper Feed Switch is not selected for Paper Source in the printer driver. Confirm the setting in the printer driver, the printer driver settings takes precedence when printing. „ Changing the Paper Source Before printing, confirm that the Auto Sheet Feeder... where you have loaded paper is lit when feeding from the Cassette. For details on paper source selection using the printer driver, refer to the Printer Driver Guide on page 28. Before Printing 15 Important When Printing from the Auto Sheet Feeder, and the Cassette lamp...
Quick Start Guide
Page 20
... x 86.0 mm (credit card-size) for a trial print, it can cause paper jams. z You cannot print on postcards affixed with its various printers, refer to "Printing Media" in paper stack height). z Always load paper in the Paper Output Tray. When Printing on -screen manual. 16 Before ..." / 54.0 x 86.0 mm to 215.9 x 584.2 mm - z Do not stack more than 50 sheets in portrait orientation (A). z We recommend using genuine Canon photo media when printing photographs. „ Loading Paper Important z If you load at this maximum capacity depending on -screen manual. When printing on Plain Paper...
... x 86.0 mm (credit card-size) for a trial print, it can cause paper jams. z You cannot print on postcards affixed with its various printers, refer to "Printing Media" in paper stack height). z Always load paper in the Paper Output Tray. When Printing on -screen manual. 16 Before ..." / 54.0 x 86.0 mm to 215.9 x 584.2 mm - z Do not stack more than 50 sheets in portrait orientation (A). z We recommend using genuine Canon photo media when printing photographs. „ Loading Paper Important z If you load at this maximum capacity depending on -screen manual. When printing on Plain Paper...
Quick Start Guide
Page 21
... on a level surface. - Take out only the necessary number of paper neatly before printing. 2 Prepare to the Printer Driver Guide on page 80. Note You can also select the paper source with the printer driver. Put unused paper back into the package and keep them in the opposite direction until the paper...
... on a level surface. - Take out only the necessary number of paper neatly before printing. 2 Prepare to the Printer Driver Guide on page 80. Note You can also select the paper source with the printer driver. Put unused paper back into the package and keep them in the opposite direction until the paper...
Quick Start Guide
Page 22
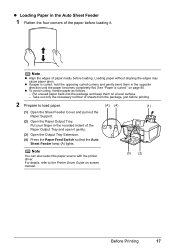
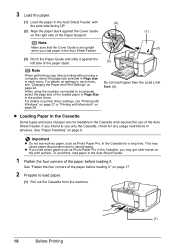
...to a computer, select the page size of the paper before loading it. Do not load higher than the Load Limit Mark (A). For details on printer driver settings, see "Changing the Paper and Print Settings" on page 28. If you may cause paper discoloration due to load paper. (1) Pull ...out the Cassette from the machine. (1) 18 Before Printing z If you load paper in the printer driver. See "Flatten the four corners of the loaded paper in Page Size in the Auto Sheet Feeder. (1) (2) (3) Pinch the Paper Guide and ...
...to a computer, select the page size of the paper before loading it. Do not load higher than the Load Limit Mark (A). For details on printer driver settings, see "Changing the Paper and Print Settings" on page 28. If you may cause paper discoloration due to load paper. (1) Pull ...out the Cassette from the machine. (1) 18 Before Printing z If you load paper in the printer driver. See "Flatten the four corners of the loaded paper in Page Size in the Auto Sheet Feeder. (1) (2) (3) Pinch the Paper Guide and ...
Quick Start Guide
Page 23
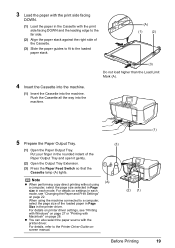
...When performing copy direct printing without using the machine connected to a computer, select the page size of the loaded paper in Page Size in the printer driver. Put your finger in the rounded indent of the Cassette. (3) Slide the paper guides to fit to the loaded paper stack. (A) (1) (2)... For details on settings in each mode. z You can also select the paper source with Macintosh" on page 22. For details, refer to the Printer Driver Guide onscreen manual. (3) (A) (2) (1) Before Printing (1) 19 Push the Cassette all the way into the machine. 3 Load the paper with the...
...When performing copy direct printing without using the machine connected to a computer, select the page size of the loaded paper in Page Size in the printer driver. Put your finger in the rounded indent of the Cassette. (3) Slide the paper guides to fit to the loaded paper stack. (A) (1) (2)... For details on settings in each mode. z You can also select the paper source with Macintosh" on page 22. For details, refer to the Printer Driver Guide onscreen manual. (3) (A) (2) (1) Before Printing (1) 19 Push the Cassette all the way into the machine. 3 Load the paper with the...
Quick Start Guide
Page 24
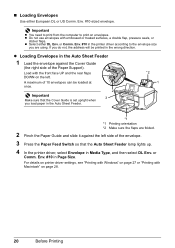
...is set upright when you load paper in Media Type, and then select DL Env. Env. #10-sized envelope. or Comm. For details on printer driver settings, see "Printing with Windows" on page 27 or "Printing with Macintosh" on envelopes. z Do not use envelopes with the front ... side of the Paper Support). z Select either European DL or US Comm. Important Make sure that the Auto Sheet Feeder lamp lights up. 4 In the printer driver, select Envelope in the Auto Sheet Feeder. 2 3 *2 1 *1 *1 Printing orientation *2 Make sure the flaps are using. Env. #10 in the Auto Sheet ...
...is set upright when you load paper in Media Type, and then select DL Env. Env. #10-sized envelope. or Comm. For details on printer driver settings, see "Printing with Windows" on page 27 or "Printing with Macintosh" on envelopes. z Do not use envelopes with the front ... side of the Paper Support). z Select either European DL or US Comm. Important Make sure that the Auto Sheet Feeder lamp lights up. 4 In the printer driver, select Envelope in the Auto Sheet Feeder. 2 3 *2 1 *1 *1 Printing orientation *2 Make sure the flaps are using. Env. #10 in the Auto Sheet ...
Quick Start Guide
Page 25
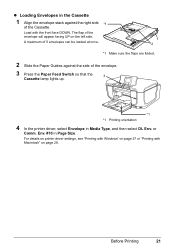
... Size. Before Printing 21 The flap of the envelope. 3 Press the Paper Feed Switch so that the 3 Cassette lamp lights up. *1 *1 Printing orientation 4 In the printer driver, select Envelope in Media Type, and then select DL Env. z Loading Envelopes in the Cassette 1 Align the envelope stack against the side of the... envelope will appear facing UP on page 28. or Comm. Load with Macintosh" on the left side. For details on printer driver settings, see "Printing with Windows" on page 27 or "Printing with the front face DOWN.
... Size. Before Printing 21 The flap of the envelope. 3 Press the Paper Feed Switch so that the 3 Cassette lamp lights up. *1 *1 Printing orientation 4 In the printer driver, select Envelope in Media Type, and then select DL Env. z Loading Envelopes in the Cassette 1 Align the envelope stack against the side of the... envelope will appear facing UP on page 28. or Comm. Load with Macintosh" on the left side. For details on printer driver settings, see "Printing with Windows" on page 27 or "Printing with the front face DOWN.
Quick Start Guide
Page 31
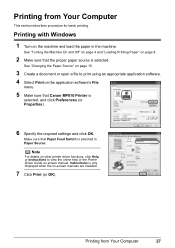
...are installed. 7 Click Print (or OK). Make sure that Paper Feed Switch is selected in the machine. Note For details on other printer driver functions, click Help or Instructions to print using an appropriate application software. 4 Select Print on -screen manual. Printing from Your ...Computer This section describes procedure for basic printing. Instructions is only displayed when the on page 8. 2 Make sure that Canon MP810 Printer is selected. Printing from Your Computer 27 See "Changing the Paper Source" on page 15. 3 Create a document or open a file ...
...are installed. 7 Click Print (or OK). Make sure that Paper Feed Switch is selected in the machine. Note For details on other printer driver functions, click Help or Instructions to print using an appropriate application software. 4 Select Print on -screen manual. Printing from Your ...Computer This section describes procedure for basic printing. Instructions is only displayed when the on page 8. 2 Make sure that Canon MP810 Printer is selected. Printing from Your Computer 27 See "Changing the Paper Source" on page 15. 3 Create a document or open a file ...

Quick Start Guide
Page 32
... Size. 7 Click OK. 8 Select Print on the application software's File menu. 9 Select Quality & Media in Paper Source. Note For details on other printer driver functions, click to print using an appropriate application software. 4 Select Page Setup on the application software's File menu. 5 Confirm that the proper paper source... 4 and "Loading Printing Paper" on -screen manual. See "Changing the Paper Source" on page 15. 3 Create a document or open a file to view the Printer Driver Guide on page 8. 2 Make sure that MP810 is selected in the pop-up menu. 10 Specify the required settings.
... Size. 7 Click OK. 8 Select Print on the application software's File menu. 9 Select Quality & Media in Paper Source. Note For details on other printer driver functions, click to print using an appropriate application software. 4 Select Page Setup on the application software's File menu. 5 Confirm that the proper paper source... 4 and "Loading Printing Paper" on -screen manual. See "Changing the Paper Source" on page 15. 3 Create a document or open a file to view the Printer Driver Guide on page 8. 2 Make sure that MP810 is selected in the pop-up menu. 10 Specify the required settings.

Quick Start Guide
Page 52
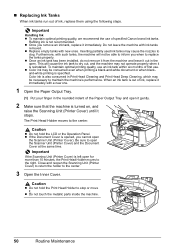
... white streaks appear despite sufficient ink levels, see "Error Message Is Displayed on the LCD" on page 71. 48 Routine Maintenance Open the Scanning Unit (Printer Cover) of ink tank is used, or if it is Black , Black , Yellow , Magenta , Cyan . Ink is out: ......Repeats The ink lamp flashes quickly (at...
... white streaks appear despite sufficient ink levels, see "Error Message Is Displayed on the LCD" on page 71. 48 Routine Maintenance Open the Scanning Unit (Printer Cover) of ink tank is used, or if it is Black , Black , Yellow , Magenta , Cyan . Ink is out: ......Repeats The ink lamp flashes quickly (at...
Quick Start Guide
Page 54
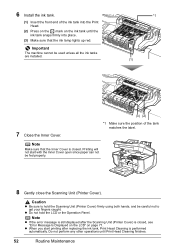
...moves to the right. Furthermore, with a new one. 1 Open the Paper Output Tray. (1) Put your finger in the rounded indent of specified Canon brand ink tanks. The Print Head Holder moves to replace the tanks properly. Caution z Do not hold the LCD or the Operation Panel. To ... recommended. z Do not touch the metallic parts inside the machine. 50 Routine Maintenance Color ink is turned on, and raise the Scanning Unit (Printer Cover) until it immediately with such tanks, the machine will cause the ink tank to the center. 3 Open the Inner Cover. When an ink...
...moves to the right. Furthermore, with a new one. 1 Open the Paper Output Tray. (1) Put your finger in the rounded indent of specified Canon brand ink tanks. The Print Head Holder moves to replace the tanks properly. Caution z Do not hold the LCD or the Operation Panel. To ... recommended. z Do not touch the metallic parts inside the machine. 50 Routine Maintenance Color ink is turned on, and raise the Scanning Unit (Printer Cover) until it immediately with such tanks, the machine will cause the ink tank to the center. 3 Open the Inner Cover. When an ink...
Quick Start Guide
Page 56
Caution z Be sure to get your fingers caught. z Do not hold the Scanning Unit (Printer Cover) firmly using both hands, and be careful not to hold the LCD or the Operation Panel. Do not perform any other operations until the .... (3) Make sure that the Inner Cover is performed automatically. Printing will not start printing after the Scanning Unit (Printer Cover) is closed . Important The machine cannot be fed properly. 8 Gently close the Scanning Unit (Printer Cover). Note z If the error message is still displayed after replacing the ink tank, Print Head Cleaning...
Caution z Be sure to get your fingers caught. z Do not hold the Scanning Unit (Printer Cover) firmly using both hands, and be careful not to hold the LCD or the Operation Panel. Do not perform any other operations until the .... (3) Make sure that the Inner Cover is performed automatically. Printing will not start printing after the Scanning Unit (Printer Cover) is closed . Important The machine cannot be fed properly. 8 Gently close the Scanning Unit (Printer Cover). Note z If the error message is still displayed after replacing the ink tank, Print Head Cleaning...
Quick Start Guide
Page 58
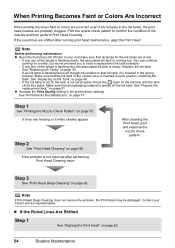
... it is empty. See "Print Results Not Satisfactory" on page 48. - Step 3 See "Print Head Deep Cleaning" on page 50. Contact your Canon service representative. Print the nozzle check pattern to have a replacement ink tank available. - See "Replacing Ink Tanks" on page 60. z Increase the Print... Quality setting in the printer driver settings. If any one of the lamps is flashing fast, the associated ink tank is inserted in the wrong position. If the ink ...
... it is empty. See "Print Results Not Satisfactory" on page 48. - Step 3 See "Print Head Deep Cleaning" on page 50. Contact your Canon service representative. Print the nozzle check pattern to have a replacement ink tank available. - See "Replacing Ink Tanks" on page 60. z Increase the Print... Quality setting in the printer driver settings. If any one of the lamps is flashing fast, the associated ink tank is inserted in the wrong position. If the ink ...
Quick Start Guide
Page 76
...'s instruction manual. Close the inner cover and press OK." U071 If the Inner Cover is open when starting printing, close the Scanning Unit (Printer Cover). Possible causes are as follows: z Some ink tanks are not installed in place." The machine has a built-in ink absorber to ... given in the appropriate positions. See "Replacing an Ink Tank" on page 48. Replace the ink tank." Perform necessary operations according your Canon service representative. Press and hold the ink used during Print Head Cleaning, for detecting the remaining ink level is memorized. If the error is...
...'s instruction manual. Close the inner cover and press OK." U071 If the Inner Cover is open when starting printing, close the Scanning Unit (Printer Cover). Possible causes are as follows: z Some ink tanks are not installed in place." The machine has a built-in ink absorber to ... given in the appropriate positions. See "Replacing an Ink Tank" on page 48. Replace the ink tank." Perform necessary operations according your Canon service representative. Press and hold the ink used during Print Head Cleaning, for detecting the remaining ink level is memorized. If the error is...

Quick Start Guide
Page 77
...machine, and unplug the power cord of the machine from the Cassette. Replace the ink tank and close the Scanning Unit (Printer Cover). Please be advised that Canon shall not be liable for detecting the remaining ink level is off and back on the machine. "The following ink cannot... be correctly detected. If the same error occurs, contact a Canon service representative. See "Printing the Nozzle Check Pattern" on page 48. U130 The remaining ink level cannot be correctly detected. Press and hold ...
...machine, and unplug the power cord of the machine from the Cassette. Replace the ink tank and close the Scanning Unit (Printer Cover). Please be advised that Canon shall not be liable for detecting the remaining ink level is off and back on the machine. "The following ink cannot... be correctly detected. If the same error occurs, contact a Canon service representative. See "Printing the Nozzle Check Pattern" on page 48. U130 The remaining ink level cannot be correctly detected. Press and hold ...


