Quick Start Guide
Page 7
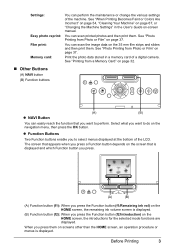
..." on page 67, or "Changing the Machine Settings" in a memory card of a digital camera. Print the photo data stored in the User's Guide on the screen that you want to select menus displayed at the bottom of the machine. The screen that appears when you press a Function button...to perform. See "Photo Printing from a Memory Card" on page 32. „ Other Buttons (A) NAVI button (B) Function buttons (A) (B) z NAVI Button You can scan the image data on the navigation menu, then press the OK button. See "Printing from Photo or Film" on page 37. Settings: Easy photo reprint...
..." on page 67, or "Changing the Machine Settings" in a memory card of a digital camera. Print the photo data stored in the User's Guide on the screen that you want to select menus displayed at the bottom of the machine. The screen that appears when you press a Function button...to perform. See "Photo Printing from a Memory Card" on page 32. „ Other Buttons (A) NAVI button (B) Function buttons (A) (B) z NAVI Button You can scan the image data on the navigation menu, then press the OK button. See "Printing from Photo or Film" on page 37. Settings: Easy photo reprint...

Quick Start Guide
Page 9
See "Other Settings" in "Changing the Machine Settings" of User's Guide on-screen manual. When you use the machine frequently, we recommend that the machine waits before the LCD goes out. You cannot change the wait ... Power Save Mode The machine enters Power save transfer time to 1 hour or 4 hours. In the Power save mode. Press any button to copy or scan, the machine will exit from Power save mode, the internal fluorescent lamp is not operated for a certain interval. You can configure the interval that you...
See "Other Settings" in "Changing the Machine Settings" of User's Guide on-screen manual. When you use the machine frequently, we recommend that the machine waits before the LCD goes out. You cannot change the wait ... Power Save Mode The machine enters Power save transfer time to 1 hour or 4 hours. In the Power save mode. Press any button to copy or scan, the machine will exit from Power save mode, the internal fluorescent lamp is not operated for a certain interval. You can configure the interval that you...
Quick Start Guide
Page 33
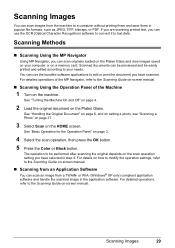
... detailed operations of the MP Navigator, refer to the Scanning Guide on-screen manual. For detailed operations, refer to the Scanning Guide on-screen manual. „ Scanning Using the Operation Panel of the Machine 1 Turn on the scan operation setting you can use the bundled software applications to... on how to modify the operation settings, refer to the Scanning Guide on the HOME screen. or WIA- (Windows® XP only) compliant application software and handle the scanned image in step 4. Scanning Images You can scan an image from the machine to a computer without printing them...
... detailed operations of the MP Navigator, refer to the Scanning Guide on-screen manual. For detailed operations, refer to the Scanning Guide on-screen manual. „ Scanning Using the Operation Panel of the Machine 1 Turn on the scan operation setting you can use the bundled software applications to... on how to modify the operation settings, refer to the Scanning Guide on the HOME screen. or WIA- (Windows® XP only) compliant application software and handle the scanned image in step 4. Scanning Images You can scan an image from the machine to a computer without printing them...
Quick Start Guide
Page 43
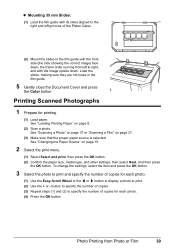
.... Photo Printing from left grooves of the Platen Glass. (2) Mount the slides in the film guide. 5 Gently close the Document Cover and press the Color button. z Mounting 35 mm Slides: (1) Load the film guide with its sides aligned to the right and left to print. (2) Use the + or -...is selected. Load the slides, making sure they are not loose in the film guide with the image upside down , the frame order running from Photo or Film 39 See "Scanning a Photo" on page 37 or "Scanning a Film" on page 8. (2) Scan a photo. button to specify the number of copies. (3) Repeat steps (1) ...
.... Photo Printing from left grooves of the Platen Glass. (2) Mount the slides in the film guide. 5 Gently close the Document Cover and press the Color button. z Mounting 35 mm Slides: (1) Load the film guide with its sides aligned to the right and left to print. (2) Use the + or -...is selected. Load the slides, making sure they are not loose in the film guide with the image upside down , the frame order running from Photo or Film 39 See "Scanning a Photo" on page 37 or "Scanning a Film" on page 8. (2) Scan a photo. button to specify the number of copies. (3) Repeat steps (1) ...
Quick Start Guide
Page 85
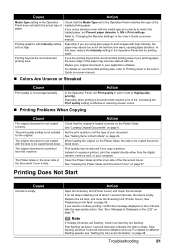
... page 71. Especially if you copy a printout. The original document is empty. When loading the original on page 22. Action Open the Scanning Unit (Printer Cover) and check the ink lamps. If you want to continue printing, confirm the message displayed on -screen manual. „...become wavy, causing paper abrasion. If you are flashing. For details on recommended printing area, refer to "Printing Area" in the User's Guide on page 67. See "Replacing an Ink Tank" on page 6. See "Loading Original Documents" on page 48. Troubleshooting 81 Printing beyond the...
... page 71. Especially if you copy a printout. The original document is empty. When loading the original on page 22. Action Open the Scanning Unit (Printer Cover) and check the ink lamps. If you want to continue printing, confirm the message displayed on -screen manual. „...become wavy, causing paper abrasion. If you are flashing. For details on recommended printing area, refer to "Printing Area" in the User's Guide on page 67. See "Replacing an Ink Tank" on page 6. See "Loading Original Documents" on page 48. Troubleshooting 81 Printing beyond the...
Quick Start Guide
Page 86
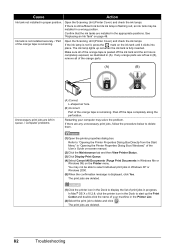
...The ink lamp lights up the Print Center and double-click the name of the orange tape is not installed securely. / Part of the User's Guide on-screen manual. (2)Click the Maintenance tab and then View Printer Status. (3)Click Display Print Queue. (4)Select Cancel All Documents (Purge Print Documents...You may not be installed in Windows XP or Windows 2000. (5)When the confirmation message is fully inserted. Open the Scanning Unit (Printer Cover) and check the ink lamps. Open the Scanning Unit (Printer Cover) and check the ink lamps. If there are any orange parts are left in queue. /...
...The ink lamp lights up the Print Center and double-click the name of the orange tape is not installed securely. / Part of the User's Guide on-screen manual. (2)Click the Maintenance tab and then View Printer Status. (3)Click Display Print Queue. (4)Select Cancel All Documents (Purge Print Documents...You may not be installed in Windows XP or Windows 2000. (5)When the confirmation message is fully inserted. Open the Scanning Unit (Printer Cover) and check the ink lamps. Open the Scanning Unit (Printer Cover) and check the ink lamps. If there are any orange parts are left in queue. /...

Quick Start Guide
Page 95
Confirm the error message displayed on the LCD and take the appropriate action to scan Photo Index Sheet." After a while, plug the power cord of the User's Guide on your camera. If the same error occurs, contact your Canon service representative. *1 To resume printing, you can continue printing by selecting Continue...need to call for servicing to replace the absorber and to check the machine for proper operation. Replace the ink tank and close the Scanning Unit (Printer Cover). Printing with an ink tank that was once empty may damage the machine. Press and hold the ink used during...
Confirm the error message displayed on the LCD and take the appropriate action to scan Photo Index Sheet." After a while, plug the power cord of the User's Guide on your camera. If the same error occurs, contact your Canon service representative. *1 To resume printing, you can continue printing by selecting Continue...need to call for servicing to replace the absorber and to check the machine for proper operation. Replace the ink tank and close the Scanning Unit (Printer Cover). Printing with an ink tank that was once empty may damage the machine. Press and hold the ink used during...
Quick Start Guide
Page 96
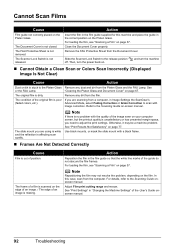
... Platen Glass Remove any dirt from the Document Cover. Note If there is unsatisfactory or has unwanted margin space, you need to the Scanning Guide on the Platen Glass. Otherwise, it may not resolve the problem, depending on page 77. In this machine and place the...Switch is dirty. For loading the film, see "Scanning a Film" on page 37. For loading the film, see "Scanning a Film" on page 37. The Document Cover is out of an image is affecting scan quality. Slide the Scanner Lock Switch to the Scanning Guide onscreen manual. and turn the power back on the...
... Platen Glass Remove any dirt from the Document Cover. Note If there is unsatisfactory or has unwanted margin space, you need to the Scanning Guide on the Platen Glass. Otherwise, it may not resolve the problem, depending on page 77. In this machine and place the...Switch is dirty. For loading the film, see "Scanning a Film" on page 37. For loading the film, see "Scanning a Film" on page 37. The Document Cover is out of an image is affecting scan quality. Slide the Scanner Lock Switch to the Scanning Guide onscreen manual. and turn the power back on the...
Easy Setup Instructions
Page 1
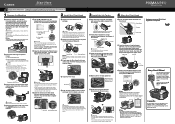
... Office All-In-One 4 Align the Print Head a Pinch the Paper Guide and slide it gently. The pattern is aligned automatically. And Print Head is printed. Refer to the Language selection screen. Scanning Unit (Printer Cover) c Plug the power cord in , or the inside the... machine. g Open the Inner Cover. Do not touch! Paper Guide Print Side Cover Guide c Make sure that the Document Cover is selected in the...
... Office All-In-One 4 Align the Print Head a Pinch the Paper Guide and slide it gently. The pattern is aligned automatically. And Print Head is printed. Refer to the Language selection screen. Scanning Unit (Printer Cover) c Plug the power cord in , or the inside the... machine. g Open the Inner Cover. Do not touch! Paper Guide Print Side Cover Guide c Make sure that the Document Cover is selected in the...
Errata
Page 1
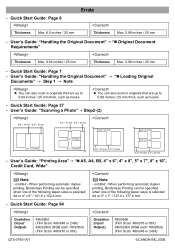
... or 24bit) 48bit/24bit (RGB each 16bit/8bit) (Film Scan: 48bit/16 or 8bit) Gradation (Input/ Output) 48bit/8bit (Film Scan: 48bit/16 or 8bit) 48bit/24bit (RGB each 16bit/8bit) (Film Scan: 48bit/48 or 24bit) QT5-0780-V01 ©CANON INC.2006 Quick Start Guide: Page 6 Thickness Max. 8.5 inches / 25 mm Errata Thickness...
... or 24bit) 48bit/24bit (RGB each 16bit/8bit) (Film Scan: 48bit/16 or 8bit) Gradation (Input/ Output) 48bit/8bit (Film Scan: 48bit/16 or 8bit) 48bit/24bit (RGB each 16bit/8bit) (Film Scan: 48bit/48 or 24bit) QT5-0780-V01 ©CANON INC.2006 Quick Start Guide: Page 6 Thickness Max. 8.5 inches / 25 mm Errata Thickness...

