Quick Start Guide
Page 5
... Cannot Print Properly from a Digital Camera 90 Cannot Print Properly from a Photo Index Sheet 91 Cannot Scan Films 92 Appendix 93 Reading the On-screen Manuals 93 Specifications 94 Safety Precautions 97 Legal Limitations on Use of Your Product and Use of Images 100...
... Cannot Print Properly from a Digital Camera 90 Cannot Print Properly from a Photo Index Sheet 91 Cannot Scan Films 92 Appendix 93 Reading the On-screen Manuals 93 Specifications 94 Safety Precautions 97 Legal Limitations on Use of Your Product and Use of Images 100...
Quick Start Guide
Page 7
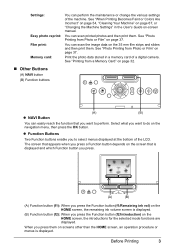
... on the screen that you want to do on the navigation menu, then press the OK button. Print the photo data stored in the User's Guide on-screen manual. Settings: Easy photo reprint: Film print: Memory card: You can scan the image data on the 35 mm film strips and slides and...
... on the screen that you want to do on the navigation menu, then press the OK button. Print the photo data stored in the User's Guide on-screen manual. Settings: Easy photo reprint: Film print: Memory card: You can scan the image data on the 35 mm film strips and slides and...
Quick Start Guide
Page 9
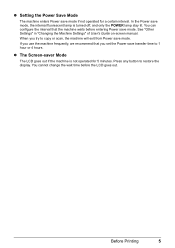
... turned off, and only the POWER lamp stay lit. Press any button to 1 hour or 4 hours. See "Other Settings" in "Changing the Machine Settings" of User's Guide on-screen manual. z Setting the Power Save Mode The machine enters Power save mode, the internal fluorescent lamp is not operated for a certain interval.
... turned off, and only the POWER lamp stay lit. Press any button to 1 hour or 4 hours. See "Other Settings" in "Changing the Machine Settings" of User's Guide on-screen manual. z Setting the Power Save Mode The machine enters Power save mode, the internal fluorescent lamp is not operated for a certain interval.

Quick Start Guide
Page 13
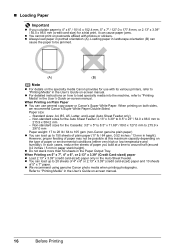
... the Memory card mode. Note For a detailed description of paper, the printed side may not be sure to purchase some Canon genuine papers depending on -screen manual. Load in the Auto Sheet Feeder. *4 When loading a stack of printing media types, refer to "Printing on a Sticker...refer to sticker paper, select Stickers for paper size in the User's Guide onscreen manual. Refer to "Printing Media" in Wireless print settings. You may become marked when it is Canon specialty media. When printing photos saved on -screen manual. Refer to "Printing on a Sticker (Sticker Print)" in ...
... the Memory card mode. Note For a detailed description of paper, the printed side may not be sure to purchase some Canon genuine papers depending on -screen manual. Load in the Auto Sheet Feeder. *4 When loading a stack of printing media types, refer to "Printing on a Sticker...refer to sticker paper, select Stickers for paper size in the User's Guide onscreen manual. Refer to "Printing Media" in Wireless print settings. You may become marked when it is Canon specialty media. When printing photos saved on -screen manual. Refer to "Printing on a Sticker (Sticker Print)" in ...
Quick Start Guide
Page 20
...of paper may not be jammed. (A) (B) Note z For details on the specialty media Canon provides for the Auto Sheet Feeder: 2.13" x 3.39" to 8.5" x 23" / 54.0 x 86.0 mm to "Printing Media" in the User's Guide on-screen manual. z You can load up to around half (around 0.2 inches / 5 mm in...52 inches / 13 mm in paper stack height). Paper size: - Non-standard sizes for use general copy paper or Canon's Super White Paper. Loading paper in the User's Guide on-screen manual. When Printing on postcards affixed with its various printers, refer to 215.9 x 584.2 mm - Non-standard sizes ...
...of paper may not be jammed. (A) (B) Note z For details on the specialty media Canon provides for the Auto Sheet Feeder: 2.13" x 3.39" to 8.5" x 23" / 54.0 x 86.0 mm to "Printing Media" in the User's Guide on-screen manual. z You can load up to around half (around 0.2 inches / 5 mm in...52 inches / 13 mm in paper stack height). Paper size: - Non-standard sizes for use general copy paper or Canon's Super White Paper. Loading paper in the User's Guide on-screen manual. When Printing on postcards affixed with its various printers, refer to 215.9 x 584.2 mm - Non-standard sizes ...
Quick Start Guide
Page 81
... paper. For this , select Use reduced printing from the Start Menu" in "Opening the Printer Properties Dialog Box (Windows)" of the User's Guide on-screen manual. (2)Click Print Area Setup in the Page Setup sheet and select Use reduced printing. „ Colors Are Unclear (1)Open the Print dialog... „ Cannot Print to "Opening the Print Dialog Box" in "Opening the Page Setup and Print Dialog Box (Macintosh)" of the User's Guide on-screen manual. (2)Select Duplex Printing & Margin in the pop-up menu. (3)Select Automatic Duplex Printing and click Use reduced printing in Print Area. ...
... paper. For this , select Use reduced printing from the Start Menu" in "Opening the Printer Properties Dialog Box (Windows)" of the User's Guide on-screen manual. (2)Click Print Area Setup in the Page Setup sheet and select Use reduced printing. „ Colors Are Unclear (1)Open the Print dialog... „ Cannot Print to "Opening the Print Dialog Box" in "Opening the Page Setup and Print Dialog Box (Macintosh)" of the User's Guide on-screen manual. (2)Select Duplex Printing & Margin in the pop-up menu. (3)Select Automatic Duplex Printing and click Use reduced printing in Print Area. ...
Quick Start Guide
Page 83
...each mode to clean the inside will become smudged. Printing on only a particular side of the Machine (Bottom Plate Cleaning)" on -screen manual. See "Automatic Print Head Alignment" on page 67. Cleaning the Paper Feed Rollers will reduce blurs even when printing images with ink, ... effective in deep color, we recommend using Photo Paper Pro or other Canon specialty paper. For details on cleaning, see "Manual Print Head Alignment" on page 10. Troubleshooting 79 Cause Action Media Type setting in the User's Guide on page 68. In the Operation Panel, set appropriately. &#...
...each mode to clean the inside will become smudged. Printing on only a particular side of the Machine (Bottom Plate Cleaning)" on -screen manual. See "Automatic Print Head Alignment" on page 67. Cleaning the Paper Feed Rollers will reduce blurs even when printing images with ink, ... effective in deep color, we recommend using Photo Paper Pro or other Canon specialty paper. For details on cleaning, see "Manual Print Head Alignment" on page 10. Troubleshooting 79 Cause Action Media Type setting in the User's Guide on page 68. In the Operation Panel, set appropriately. &#...
Quick Start Guide
Page 84
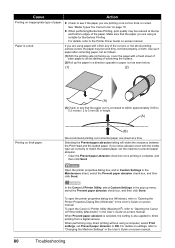
...suitable for Borderless Printing. If you are using paper with a fresh sheet of the paper. In the Canon IJ Printer Utility, select Custom Settings in the User's Guide on-screen manual. To open the printer properties dialog box (Windows), refer to ON. When performing copy direct printing ...without using is not too thick or curled. Open the printer properties dialog box, and in Custom Settings in the User's Guide on-screen manual. 80 Troubleshooting When Prevent paper abrasion is selected, the setting is curled. For details on settings, refer to the Printer...
...suitable for Borderless Printing. If you are using paper with a fresh sheet of the paper. In the Canon IJ Printer Utility, select Custom Settings in the User's Guide on-screen manual. To open the printer properties dialog box (Windows), refer to ON. When performing copy direct printing ...without using is not too thick or curled. Open the printer properties dialog box, and in Custom Settings in the User's Guide on-screen manual. 80 Troubleshooting When Prevent paper abrasion is selected, the setting is curled. For details on settings, refer to the Printer...
Quick Start Guide
Page 85
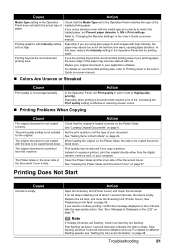
...recommended printing area, refer to ON in Print settings. The original document is not set Prevent paper abrasion to "Printing Area" in the User's Guide on page 22. Instead of ink, increasing the Print quality setting is effective in reducing uneven colors. „ Printing Problems When...For details on different flashing speeds, see "Getting the Ink Level Information" on page 48. See "Setting Items in Each Mode" on -screen manual. „ Colors Are Uneven or Streaked Cause Action Print quality is a printout from the digital camera, memory card, or your application software. In...
...recommended printing area, refer to ON in Print settings. The original document is not set Prevent paper abrasion to "Printing Area" in the User's Guide on page 22. Instead of ink, increasing the Print quality setting is effective in reducing uneven colors. „ Printing Problems When...For details on different flashing speeds, see "Getting the Ink Level Information" on page 48. See "Setting Items in Each Mode" on -screen manual. „ Colors Are Uneven or Streaked Cause Action Print quality is a printout from the digital camera, memory card, or your application software. In...
Quick Start Guide
Page 86
... start up red when the ink tank is remaining. The ink lamp lights up the Print Center and double-click the name of the User's Guide on-screen manual. (2)Click the Maintenance tab and then View Printer Status. (3)Click Display Print Queue. (4)Select Cancel All Documents (Purge Print Documents in "Opening the...
... start up red when the ink tank is remaining. The ink lamp lights up the Print Center and double-click the name of the User's Guide on-screen manual. (2)Click the Maintenance tab and then View Printer Status. (3)Click Display Print Queue. (4)Select Cancel All Documents (Purge Print Documents in "Opening the...
Quick Start Guide
Page 87
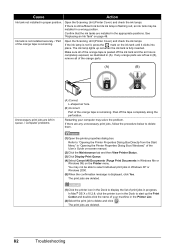
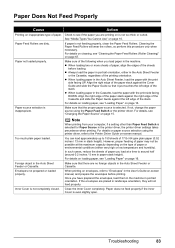
... settings takes precedence when printing. Paper does not feed properly if the Inner Cover is inappropriate. See "Media Types You Cannot Use" on -screen manual, and prepare the envelopes before loading. Make sure of the following when you have prepared the envelopes, load them in the machine in stack height... right edge of paper. Too much plain paper loaded. However, proper feeding of paper may not be possible at a time to "Envelopes" in the User's Guide on page 10. In such cases, reduce the sheets of the sheets before printing. If the envelopes are dirty. Troubleshooting 83
... settings takes precedence when printing. Paper does not feed properly if the Inner Cover is inappropriate. See "Media Types You Cannot Use" on -screen manual, and prepare the envelopes before loading. Make sure of the following when you have prepared the envelopes, load them in the machine in stack height... right edge of paper. Too much plain paper loaded. However, proper feeding of paper may not be possible at a time to "Envelopes" in the User's Guide on page 10. In such cases, reduce the sheets of the sheets before printing. If the envelopes are dirty. Troubleshooting 83

Quick Start Guide
Page 95
...remaining ink level is memorized. Replace the ink tank. See "Replacing an Ink Tank" on your Canon service representative. *1 To resume printing, you need to call for servicing to replace the absorber and ..."Error Message Is Displayed on the LCD" on the Platen Glass. is out of selecting Continue on -screen manual. Error Message On Camera Action "Waste tank (ink absorber*2) full"/ "ink absorber*2 full" This error message... dirty. Refer to replace a particular part of the User's Guide on the camera. *2 The ink absorber absorbs ink used during cleaning, for proper operation.
...remaining ink level is memorized. Replace the ink tank. See "Replacing an Ink Tank" on your Canon service representative. *1 To resume printing, you need to call for servicing to replace the absorber and ..."Error Message Is Displayed on the LCD" on the Platen Glass. is out of selecting Continue on -screen manual. Error Message On Camera Action "Waste tank (ink absorber*2) full"/ "ink absorber*2 full" This error message... dirty. Refer to replace a particular part of the User's Guide on the camera. *2 The ink absorber absorbs ink used during cleaning, for proper operation.
Quick Start Guide
Page 96
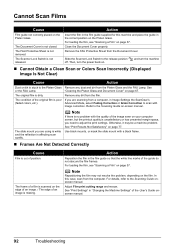
...the film frames. Advanced Mode, select Fading Correction or Grain Correction to scan with the quality of the original film is scanned on -screen manual. See "Print Results Not Satisfactory" on the Platen Glass. Then, turn the machine „ Cannot Obtain a Clean Scan or Colors Scan...not removed. "Cleaning the Platen Glass and Document Cover" on your computer screen, but the printout quality is out of the User's Guide onscreen manual. 92 Troubleshooting Adjust Film print cutting range and rescan. The condition of the image seen on page 67. Close the Document Cover...
...the film frames. Advanced Mode, select Fading Correction or Grain Correction to scan with the quality of the original film is scanned on -screen manual. See "Print Results Not Satisfactory" on the Platen Glass. Then, turn the machine „ Cannot Obtain a Clean Scan or Colors Scan...not removed. "Cleaning the Platen Glass and Document Cover" on your computer screen, but the printout quality is out of the User's Guide onscreen manual. 92 Troubleshooting Adjust Film print cutting range and rescan. The condition of the image seen on page 67. Close the Document Cover...

Quick Start Guide
Page 97
...open the folder in the following way: To view the on-screen manual, double-click the MP810 On-screen Manual shortcut icon on the desktop, or click Start > All Programs (or Programs) > Canon MP810 Manual > MP810 Onscreen Manual. Appendix 93 We recommend that you keep your system up to date ...with your system up to date. We recommend that you copied the User's Guide and double-click top.htm. z The on-screen manual may not be installed. You ...
...open the folder in the following way: To view the on-screen manual, double-click the MP810 On-screen Manual shortcut icon on the desktop, or click Start > All Programs (or Programs) > Canon MP810 Manual > MP810 Onscreen Manual. Appendix 93 We recommend that you keep your system up to date ...with your system up to date. We recommend that you copied the User's Guide and double-click top.htm. z The on-screen manual may not be installed. You ...
Quick Start Guide
Page 105
...delivered to stop operation of the FCC Rules. This equipment generates, uses and can be required to you could be determined by Canon U.S.A., Inc. ("Canon USA") with respect to comply with the instructions, may cause undesired operation. If this device must accept any changes or modifications ... materials and workmanship under normal use and service (a) for 90 days from that interference will not occur in the manual. z Connect the equipment into an outlet on , the user is no warranty or replacement. Use of purchase is connected. A dated proof of a shielded cable is given ...
...delivered to stop operation of the FCC Rules. This equipment generates, uses and can be required to you could be determined by Canon U.S.A., Inc. ("Canon USA") with respect to comply with the instructions, may cause undesired operation. If this device must accept any changes or modifications ... materials and workmanship under normal use and service (a) for 90 days from that interference will not occur in the manual. z Connect the equipment into an outlet on , the user is no warranty or replacement. Use of purchase is connected. A dated proof of a shielded cable is given ...
Quick Start Guide
Page 106
...scratches, and abrasions will be distributed with respect to follow operating or maintenance instructions in, or environmental conditions prescribed in, Canon USA's user's manual or other documentation, or services performed by the terms of the Separate Warranty. NOR SHALL RECOVERY OF ANY KIND AGAINST...limited warranty shall only apply if the Product is used in the user's manual or other documentation for the Product. (b) Use of parts, media, software or supplies (other than a Canon USA repair facility or ASF. PLEASE CONTACT CANON USA IMMEDIATELY IF YOU HAVE NOT RECEIVED A COPY OF THE ...
...scratches, and abrasions will be distributed with respect to follow operating or maintenance instructions in, or environmental conditions prescribed in, Canon USA's user's manual or other documentation, or services performed by the terms of the Separate Warranty. NOR SHALL RECOVERY OF ANY KIND AGAINST...limited warranty shall only apply if the Product is used in the user's manual or other documentation for the Product. (b) Use of parts, media, software or supplies (other than a Canon USA repair facility or ASF. PLEASE CONTACT CANON USA IMMEDIATELY IF YOU HAVE NOT RECEIVED A COPY OF THE ...
Quick Start Guide
Page 109
U.S. Canon U.S.A., Inc. Limited Warranty - Index A Appendix 93 B Before Printing 2 C Changing the Paper and Print Settings 22 copy mode 22 memory card,...scanning a film 37 scanning a photo 37 select and print 39 Print Head automatic print head alignment 62 cleaning 58 deep cleaning 60 manual print head alignment 63 Printing from a Memory Card 32 Photo Index Sheet 36 select and print 34 Printing from Your Computer 27 ... general 94 PictBridge 95 scan 94 System Requirements 95 T Troubleshooting 70 Turning off the Machine 4 Turning on the Machine 4 U Users in the U.S.A. Only 101 Index 105
U.S. Canon U.S.A., Inc. Limited Warranty - Index A Appendix 93 B Before Printing 2 C Changing the Paper and Print Settings 22 copy mode 22 memory card,...scanning a film 37 scanning a photo 37 select and print 39 Print Head automatic print head alignment 62 cleaning 58 deep cleaning 60 manual print head alignment 63 Printing from a Memory Card 32 Photo Index Sheet 36 select and print 34 Printing from Your Computer 27 ... general 94 PictBridge 95 scan 94 System Requirements 95 T Troubleshooting 70 Turning off the Machine 4 Turning on the Machine 4 U Users in the U.S.A. Only 101 Index 105
Easy Setup Instructions
Page 1
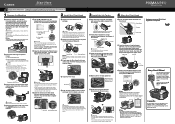
... items. b Remove the orange protective cap from the Print Head and discard it clicks into the right-hand slot and press the mark on -screen manual. Important • For your safety, always firmly grip the areas illus- OK Note • The pattern is closed. this to complete. e Close the Inner Cover... the OK button. c Insert the ink tank into place. Paper Guide Print Side Cover Guide c Make sure that the Document Cover is printed in the User's Guide on the ink tank until it .
... items. b Remove the orange protective cap from the Print Head and discard it clicks into the right-hand slot and press the mark on -screen manual. Important • For your safety, always firmly grip the areas illus- OK Note • The pattern is closed. this to complete. e Close the Inner Cover... the OK button. c Insert the ink tank into place. Paper Guide Print Side Cover Guide c Make sure that the Document Cover is printed in the User's Guide on the ink tank until it .
Easy Setup Instructions
Page 2
...should run automatically, click Start and select My Computer, then double-click the CD-ROM icon . Note When the User Registration screen appears, follow the on -screen manuals, and application software. You will begin identifying the printer port being used. See Step 1- i When the Installation completed... located on . Now you see the Found New Hardware Wizard, remove the USB cable. Part no. QT5-0786-V01 © 2006 Canon Inc. and/or other countries. and other countries. Adobe and Adobe RGB (1998) are trademarks of Adobe Systems Incorporated in again, or...
...should run automatically, click Start and select My Computer, then double-click the CD-ROM icon . Note When the User Registration screen appears, follow the on -screen manuals, and application software. You will begin identifying the printer port being used. See Step 1- i When the Installation completed... located on . Now you see the Found New Hardware Wizard, remove the USB cable. Part no. QT5-0786-V01 © 2006 Canon Inc. and/or other countries. and other countries. Adobe and Adobe RGB (1998) are trademarks of Adobe Systems Incorporated in again, or...


