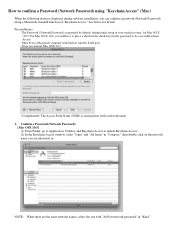
Obtaining the Password For Your Existing Wireless Network (Mac OS X)
Page 1
... in a Macintosh computer with "AirPort network password" in "Kind." See below for Mac OS X v10.5. The Access Point Name (SSID) is registered by default, during software installation, you can confirm a password (Network Password) using "Keychain Access" (Mac) When the following dialog is displayed during initial setup of "Keychain Access." For Mac...
... in a Macintosh computer with "AirPort network password" in "Kind." See below for Mac OS X v10.5. The Access Point Name (SSID) is registered by default, during software installation, you can confirm a password (Network Password) using "Keychain Access" (Mac) When the following dialog is displayed during initial setup of "Keychain Access." For Mac...
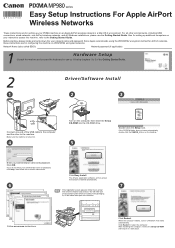
Easy Setup Instructions For Apple AirPort Wireless Networks
Page 1
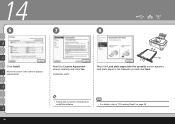
..., or, on your network to access the machine, refer to register your administrator name and password. When the computer restarts, Canon IJ Network Tool starts automatically. Click OK. Click Easy Install. After restarting the computer, remove the Setup CD-ROM and keep...um*b*er Click Restart. Before starting, please locate and write down the your PIXMA machine on -screen instructions. For all Windows installations, please use by following chapters 1 to 5 of the Getting Started Guide. 2 Driver/Software Install 1 2 3 Connect one end of the machine. Also for use...
..., or, on your network to access the machine, refer to register your administrator name and password. When the computer restarts, Canon IJ Network Tool starts automatically. Click OK. Click Easy Install. After restarting the computer, remove the Setup CD-ROM and keep...um*b*er Click Restart. Before starting, please locate and write down the your PIXMA machine on -screen instructions. For all Windows installations, please use by following chapters 1 to 5 of the Getting Started Guide. 2 Driver/Software Install 1 2 3 Connect one end of the machine. Also for use...
Getting Started
Page 14
... conventional wireless LAN settings. Disable Stealth (closed network) function - Confirm MAC address - If the warning message appears, set the security software to always allow access. • In an office setup, consult your network administrator. • If a screen not specified in the...• The machine may communicate with the administrator privilege. • Do not switch user accounts during installation. • It may appear that Canon software is a risk of the network device vary depending on your computer has been restarted. • Since Mac OS 9, Mac OS X Classic ...
... conventional wireless LAN settings. Disable Stealth (closed network) function - Confirm MAC address - If the warning message appears, set the security software to always allow access. • In an office setup, consult your network administrator. • If a screen not specified in the...• The machine may communicate with the administrator privilege. • Do not switch user accounts during installation. • It may appear that Canon software is a risk of the network device vary depending on your computer has been restarted. • Since Mac OS 9, Mac OS X Classic ...
Getting Started
Page 16
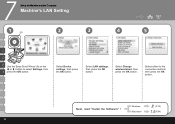
Select Change wireless/wired, then press the OK button. Windows Macintosh 8 (P.15) 1 4 (P.34) 14 Select Device settings, then press the OK button. Select either to select Settings, then F press the OK button. 7 Setup the Machine and the Computer Machine's LAN Setting 1 (A) 2 3 4 5 C D E Use the Easy-Scroll Wheel (A) or the [ or ] button to the connection method, then press the OK button. Select LAN settings, then press the OK button. Next, read "Install the Software" !
Select Change wireless/wired, then press the OK button. Windows Macintosh 8 (P.15) 1 4 (P.34) 14 Select Device settings, then press the OK button. Select either to select Settings, then F press the OK button. 7 Setup the Machine and the Computer Machine's LAN Setting 1 (A) 2 3 4 5 C D E Use the Easy-Scroll Wheel (A) or the [ or ] button to the connection method, then press the OK button. Select LAN settings, then press the OK button. Next, read "Install the Software" !

Getting Started
Page 17
... turns off. The setup program should run automatically. Windows Vista Go to quit the screen. 3 Proceed from . 8 Setup the Machine and the Computer Install the Software If the Found New Hardware or Found New Hardware Wizard screen appears: 1 (A) Windows 2 A C (B) Press the ON button (A) to TURN Turn on the computer. When the...
... turns off. The setup program should run automatically. Windows Vista Go to quit the screen. 3 Proceed from . 8 Setup the Machine and the Computer Install the Software If the Found New Hardware or Found New Hardware Wizard screen appears: 1 (A) Windows 2 A C (B) Press the ON button (A) to TURN Turn on the computer. When the...

Getting Started
Page 18
G User Account Control screen appears, click Continue. The drivers, application software, and on -screen instructions to proceed with the installation. 16 If the same screen reappears in subsequent steps, click Continue. Click Easy Install. I J • If you want to select particular items to install, click Custom Install and follow the on -screen manuals are installed automatically. 8 3 Windows Vista 4 Windows Vista 5 A C E AutoPlay screen appears, click Run Msetup4.exe.
G User Account Control screen appears, click Continue. The drivers, application software, and on -screen instructions to proceed with the installation. 16 If the same screen reappears in subsequent steps, click Continue. Click Easy Install. I J • If you want to select particular items to install, click Custom Install and follow the on -screen manuals are installed automatically. 8 3 Windows Vista 4 Windows Vista 5 A C E AutoPlay screen appears, click Run Msetup4.exe.
Getting Started
Page 19
A Go to either of the following procedures C according to install the software. Windows 6 7 Click Install. Read the License Agreement screen carefully and click Yes. A USB 9 (P.18) C Wired LAN 1 0 (P.19) E E Wireless LAN 1 1 (P.23) J Additional Computer 1 2 (P.28) G WPS 1 2 (P.28) G I WCN 1 2 (P.28) I J 17 Installation starts. • Follow any on-screen instructions to your connection method! Move the cursor over items to display explanations.
A Go to either of the following procedures C according to install the software. Windows 6 7 Click Install. Read the License Agreement screen carefully and click Yes. A USB 9 (P.18) C Wired LAN 1 0 (P.19) E E Wireless LAN 1 1 (P.23) J Additional Computer 1 2 (P.28) G WPS 1 2 (P.28) G I WCN 1 2 (P.28) I J 17 Installation starts. • Follow any on-screen instructions to your connection method! Move the cursor over items to display explanations.

Getting Started
Page 31
... enable a firewall by default. When using wired LAN : The machine is connected to Step . Windows 3 When the Printers screen appears, make sure of any such software. 29 I - J • Some programs that the machine is not detected, make sure that switch the network environment depending on . - When using wireless LAN : The computer...
... enable a firewall by default. When using wired LAN : The machine is connected to Step . Windows 3 When the Printers screen appears, make sure of any such software. 29 I - J • Some programs that the machine is not detected, make sure that switch the network environment depending on . - When using wireless LAN : The computer...
Getting Started
Page 36
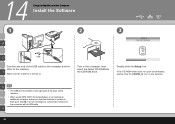
... is turned on the computer, then insert the Setup CD-ROM into the CD-ROM drive. 14 Setup the Machine and the Computer Install the Software 1 B 2 3 D USB Connect one end of the machine. • When using WPS (Wi-Fi Protected Setup) or connecting an additional computer, make sure that the machine...
... is turned on the computer, then insert the Setup CD-ROM into the CD-ROM drive. 14 Setup the Machine and the Computer Install the Software 1 B 2 3 D USB Connect one end of the machine. • When using WPS (Wi-Fi Protected Setup) or connecting an additional computer, make sure that the machine...
Getting Started
Page 37
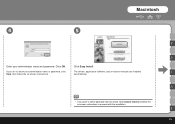
If you want to select particular items to proceed with the installation. automatically. Click Easy Install. K 35 Click OK. Macintosh 4 5 B D Enter your administrator name or password, click The drivers, application software, and on-screen manuals are installed F Help, then follow the on-screen instructions to install, click Custom Install and follow the on-screen instructions. H • If you do not know your administrator name and password.
If you want to select particular items to proceed with the installation. automatically. Click Easy Install. K 35 Click OK. Macintosh 4 5 B D Enter your administrator name or password, click The drivers, application software, and on-screen manuals are installed F Help, then follow the on-screen instructions to install, click Custom Install and follow the on-screen instructions. H • If you do not know your administrator name and password.
Getting Started
Page 38
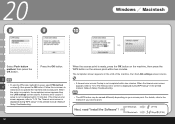
H (A) When the Load plain paper into the cassette screen appears, load plain paper in the Cassette (A) and click Next. • Follow any on-screen instructions to install the software. • For details, refer to display explanations. 14 6 7 8 B D Click Install. Installation starts. F Move the cursor over items to "22 Loading Paper" on page 58. Read the License Agreement screen carefully and click Yes. K 36
H (A) When the Load plain paper into the cassette screen appears, load plain paper in the Cassette (A) and click Next. • Follow any on-screen instructions to install the software. • For details, refer to display explanations. 14 6 7 8 B D Click Install. Installation starts. F Move the cursor over items to "22 Loading Paper" on page 58. Read the License Agreement screen carefully and click Yes. K 36
Getting Started
Page 49
... string after Canon MP980 F Mac OS X v.10.4.x Go to Step . - The firewall function of the following. - Wireless LAN Connection: The computer is turned off. K 47 Mac OS X v.10.5.x Go to Step . • If the machine has not been detected, make sure of any security software is connected to... 1 Mac OS X v.10.4.x/v.10.3.9 2 Mac OS X v.10.5.x/v.10.4.x Macintosh D When the Printer List screen appears, Wait for a while, then select Canon MP980 click Add. In Mac OS X v.10.4.x, click More Printers in the series is not set to the access point. - Mac OS X v.10.3.9 Go ...
... string after Canon MP980 F Mac OS X v.10.4.x Go to Step . - The firewall function of the following. - Wireless LAN Connection: The computer is turned off. K 47 Mac OS X v.10.5.x Go to Step . • If the machine has not been detected, make sure of any security software is connected to... 1 Mac OS X v.10.4.x/v.10.3.9 2 Mac OS X v.10.5.x/v.10.4.x Macintosh D When the Printer List screen appears, Wait for a while, then select Canon MP980 click Add. In Mac OS X v.10.4.x, click More Printers in the series is not set to the access point. - Mac OS X v.10.3.9 Go ...

Getting Started
Page 50
...- Wired LAN Connection: The machine is added to the access point. - F Confirm that your machine's name in the list of any security software is turned off. - The machine is the machine's MAC address. • If the machine has not been detected, make sure of printers. ... X v.10.4.x/v.10.3.9 4 Mac OS X v.10.4.x/v.10.3.9 D Select Canon IJ Network in the pop-up menu, select your MP980 series is connected to use access control (MAC address filtering). K 48 H • The alphanumeric string after Canon MP980 series is not set to the network device with the LAN cable. -...
...- Wired LAN Connection: The machine is added to the access point. - F Confirm that your machine's name in the list of any security software is turned off. - The machine is the machine's MAC address. • If the machine has not been detected, make sure of printers. ... X v.10.4.x/v.10.3.9 4 Mac OS X v.10.4.x/v.10.3.9 D Select Canon IJ Network in the pop-up menu, select your MP980 series is connected to use access control (MAC address filtering). K 48 H • The alphanumeric string after Canon MP980 series is not set to the network device with the LAN cable. -...
Getting Started
Page 54
... is ready, press the OK button on the machine, then press the WPS button on the LCD of your access point. Next, read "Install the Software" ! The completion screen appears on the access point within two minutes. Windows Macintosh 8 (P.15) 1 4 Step (P.34) If the timeout error screen appears, refer to the...
... is ready, press the OK button on the machine, then press the WPS button on the LCD of your access point. Next, read "Install the Software" ! The completion screen appears on the access point within two minutes. Windows Macintosh 8 (P.15) 1 4 Step (P.34) If the timeout error screen appears, refer to the...
Getting Started
Page 59
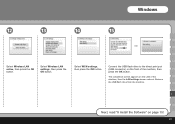
Windows 12 13 14 15 Select Wireless LAN active, then press the OK button. Select WCN settings, then press the OK button. Remove the USB flash drive from the machine. The completion screen appears on the LCD of the machine, then press the OK button. Connect the USB flash drive to the direct print port (USB connector) on page 15! 57 I Next, read "8 Install the Software" on the front of the machine, then the LAN settings screen returns. Select Wireless LAN settings, then press the OK button.
Windows 12 13 14 15 Select Wireless LAN active, then press the OK button. Select WCN settings, then press the OK button. Remove the USB flash drive from the machine. The completion screen appears on the LCD of the machine, then press the OK button. Connect the USB flash drive to the direct print port (USB connector) on page 15! 57 I Next, read "8 Install the Software" on the front of the machine, then the LAN settings screen returns. Select Wireless LAN settings, then press the OK button.

Getting Started
Page 63
Introduces the machine and its functions, the included manuals and application software. Describes the basic operations and gives an introduction to make full use of the machine. Describes various operating procedures to other functions available. Also includes "...
Introduces the machine and its functions, the included manuals and application software. Describes the basic operations and gives an introduction to make full use of the machine. Describes various operating procedures to other functions available. Also includes "...
Getting Started
Page 65
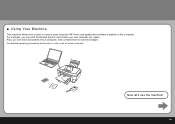
For detailed operating procedures and functions, refer to print in various ways using the MP driver and application software installed on -screen manuals. Also, you to the on the computer. Now let's use the machine! 63 ■ Using Your Machine This machine allows you can print borderless photos, and create your own calendar etc. For example, you can scan documents into a computer, and correct/enhance scanned images. easily.
For detailed operating procedures and functions, refer to print in various ways using the MP driver and application software installed on -screen manuals. Also, you to the on the computer. Now let's use the machine! 63 ■ Using Your Machine This machine allows you can print borderless photos, and create your own calendar etc. For example, you can scan documents into a computer, and correct/enhance scanned images. easily.
Network Setup Troubleshooting
Page 3
...before entering setup. work settings is not set Change wireless/wired to Wired LAN active. Confirm the following the procedures in "Install the Software" and onward in the printed manual: Getting Started. If so, click Manual Setup and enter the access point's SSID in the ... Cannot connect to the access point (the access point is not detected) 2.1 The target access point is enabled, disable this setting. c Ensure that Canon software is not detected (continued) • The wireless channel to access the network. If such feature is not detected • Refer to your access point...
...before entering setup. work settings is not set Change wireless/wired to Wired LAN active. Confirm the following the procedures in "Install the Software" and onward in the printed manual: Getting Started. If so, click Manual Setup and enter the access point's SSID in the ... Cannot connect to the access point (the access point is not detected) 2.1 The target access point is enabled, disable this setting. c Ensure that Canon software is not detected (continued) • The wireless channel to access the network. If such feature is not detected • Refer to your access point...
Network Setup Troubleshooting
Page 4
... point WEP key, refer to documentation provided with the access point or contact its manufacturer. Example: Using 64 bit key length, when the string "canon" is selected for the network device. Key 2: 87 C0 FB 05 6B - Otherwise, select Open System or Shared Key according to the setting ... setting. When entering a WEP key in the machine and the access point, the machine cannot communicate with your computer or your access point or application software. 3.2 How to set a WEP/WPA/WPA2 key" on page 2. • The wireless channel to be limited depending on page 3. • Make sure that...
... point WEP key, refer to documentation provided with the access point or contact its manufacturer. Example: Using 64 bit key length, when the string "canon" is selected for the network device. Key 2: 87 C0 FB 05 6B - Otherwise, select Open System or Shared Key according to the setting ... setting. When entering a WEP key in the machine and the access point, the machine cannot communicate with your computer or your access point or application software. 3.2 How to set a WEP/WPA/WPA2 key" on page 2. • The wireless channel to be limited depending on page 3. • Make sure that...
Network Setup Troubleshooting
Page 6
... or your machine cannot be created is displayed during setup Uninstall the MP Drivers, then setup the machine again following the procedures in "Install the Software" and onward in the printed manual: Getting Started. 5.6 The Set Printer IP Address dialog box is displayed during setup The following IP address. This requires...
... or your machine cannot be created is displayed during setup Uninstall the MP Drivers, then setup the machine again following the procedures in "Install the Software" and onward in the printed manual: Getting Started. 5.6 The Set Printer IP Address dialog box is displayed during setup The following IP address. This requires...


