User's Guide
Page 3
... Device 70 Printing Photographs Directly from a PictBridge Compliant Device 73 Printing Photographs Directly from a Canon Bubble Jet Direct Compatible Digital Camera 76 5 Faxing 79 Preparing Your Machine for Fax 79 ...Reset setting 141 Save settings 141 Load settings 141 10 Routine Maintenance 142 Replacing an Ink Tank 142 Getting the Ink Level Information 142 Knowing When to Replace Ink Tank .......... 143 Replacing Ink... LCD/Cannot See the Display on the LCD .. 166 Ink Does Not Come Out/Printing is Blurred/ Colors are Wrong/White Streaks/Straight Lines are Misaligned/Cannot Print...
... Device 70 Printing Photographs Directly from a PictBridge Compliant Device 73 Printing Photographs Directly from a Canon Bubble Jet Direct Compatible Digital Camera 76 5 Faxing 79 Preparing Your Machine for Fax 79 ...Reset setting 141 Save settings 141 Load settings 141 10 Routine Maintenance 142 Replacing an Ink Tank 142 Getting the Ink Level Information 142 Knowing When to Replace Ink Tank .......... 143 Replacing Ink... LCD/Cannot See the Display on the LCD .. 166 Ink Does Not Come Out/Printing is Blurred/ Colors are Wrong/White Streaks/Straight Lines are Misaligned/Cannot Print...
User's Guide
Page 18
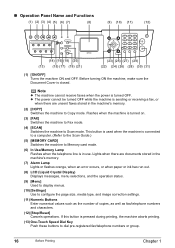
.... Lights when there are unsent faxes stored in the machine's memory. (7) Alarm Lamp Lights or flashes orange, when an error occurs, or when paper or ink has run out. (8) LCD (Liquid Crystal Display) Displays messages, menu selections, and the operation status. (9) [Menu] Used to display menus. (10) [Settings] Use to Copy... image correction settings. (11) Numeric Buttons Enter numerical values such as the number of copies, as well as fax/telephone numbers and characters. (12) [Stop/Reset] Cancels operations.
.... Lights when there are unsent faxes stored in the machine's memory. (7) Alarm Lamp Lights or flashes orange, when an error occurs, or when paper or ink has run out. (8) LCD (Liquid Crystal Display) Displays messages, menu selections, and the operation status. (9) [Menu] Used to display menus. (10) [Settings] Use to Copy... image correction settings. (11) Numeric Buttons Enter numerical values such as the number of copies, as well as fax/telephone numbers and characters. (12) [Stop/Reset] Cancels operations.
User's Guide
Page 118
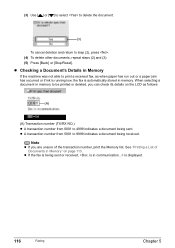
...(A) Transaction number (TX/RX NO.) z A transaction number from 5001 to step (2), press . (4) To delete other documents, repeat steps (2) and (3). (5) Press [Back] or [Stop/Reset]. Note z If you can check its details on page 113. See "Printing a List of the transaction number, print the Memory list. z A transaction number from 0001..., you are unsure of Documents in Memory" on the LCD as when paper has run out or a paper jam has occurred or if ink is running low, the fax is displayed. 116 Faxing Chapter 5 z If the fax is being sent or received, is automatically stored in...
...(A) Transaction number (TX/RX NO.) z A transaction number from 5001 to step (2), press . (4) To delete other documents, repeat steps (2) and (3). (5) Press [Back] or [Stop/Reset]. Note z If you can check its details on page 113. See "Printing a List of the transaction number, print the Memory list. z A transaction number from 0001..., you are unsure of Documents in Memory" on the LCD as when paper has run out or a paper jam has occurred or if ink is running low, the fax is displayed. 116 Faxing Chapter 5 z If the fax is being sent or received, is automatically stored in...
User's Guide
Page 124
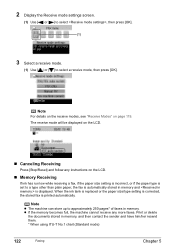
...receive mode will be displayed on the LCD. „ Canceling Receiving Press [Stop/Reset] and follow any more faxes. z If the memory becomes full, the machine cannot... Chapter 5 Note For details on the receive modes, see "Receive Modes" on the LCD. „ Memory Receiving If ink has run low while receiving a fax, if the paper size setting is incorrect, or if the paper type is set ...press [OK]. (1) 3 Select a receive mode. (1) Use [ ] or [ ] to approximately 250 pages* of faxes in memory. When the ink tank is replaced or the paper size/type setting is corrected, the stored fax is displayed.
...receive mode will be displayed on the LCD. „ Canceling Receiving Press [Stop/Reset] and follow any more faxes. z If the memory becomes full, the machine cannot... Chapter 5 Note For details on the receive modes, see "Receive Modes" on the LCD. „ Memory Receiving If ink has run low while receiving a fax, if the paper size setting is incorrect, or if the paper type is set ...press [OK]. (1) 3 Select a receive mode. (1) Use [ ] or [ ] to approximately 250 pages* of faxes in memory. When the ink tank is replaced or the paper size/type setting is corrected, the stored fax is displayed.
User's Guide
Page 145
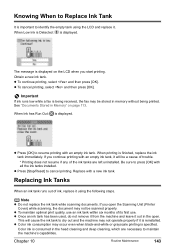
... black-and-white or grayscale printing is displayed. If you start printing. z Press [Stop/Reset] to maintain the machine's capabilities. Note z Do not replace the ink tank while scanning documents. Color ink is consumed in the head cleaning and deep cleaning, which are left uninstalled. Knowing When to... if any of the ink tanks are necessary to cancel printing. z Color ink consumption may not be stored in Memory" on the LCD when you continue printing with a new ink tank. Replacing Ink Tanks When an ink tank runs out of its first use. When Low Ink is Detected: is specified...
... black-and-white or grayscale printing is displayed. If you start printing. z Press [Stop/Reset] to maintain the machine's capabilities. Note z Do not replace the ink tank while scanning documents. Color ink is consumed in the head cleaning and deep cleaning, which are left uninstalled. Knowing When to... if any of the ink tanks are necessary to cancel printing. z Color ink consumption may not be stored in Memory" on the LCD when you continue printing with a new ink tank. Replacing Ink Tanks When an ink tank runs out of its first use. When Low Ink is Detected: is specified...

User's Guide
Page 164
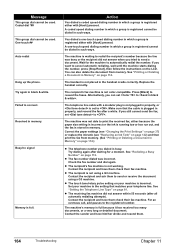
... cannot be compatible with the refilled ink tank installed, press and hold [Stop/Reset] for any machine malfunction or damage caused by this machine is installed (The lamp on the ink tank is off ). Install the appropriate ink tank. Replace the ink tank. If this machine (The lamp... same color are not installed in place. U072 More than one ink tank of the following color is off ). An ink tank that the ink tanks are installed in the Easy Setup Instructions to contact the Canon Customer Care Center as soon as follows: z Some ink tanks are installed. Canon shall...
... cannot be compatible with the refilled ink tank installed, press and hold [Stop/Reset] for any machine malfunction or damage caused by this machine is installed (The lamp on the ink tank is off ). Install the appropriate ink tank. Replace the ink tank. If this machine (The lamp... same color are not installed in place. U072 More than one ink tank of the following color is off ). An ink tank that the ink tanks are installed in the Easy Setup Instructions to contact the Canon Customer Care Center as soon as follows: z Some ink tanks are installed. Canon shall...
User's Guide
Page 166
... (see "Replacing an Ink Tank" on page 142) and then print the fax from memory. The handset is set to connect. Press [Black] to cancel automatic redialing, wait until the machine starts dialing the number, press [Stop/Reset], then follow the instructions on page 114.) z The telephone number you want...the handset cradle correctly. Try again in Memory" on page 81. Busy/no signal Memory is not color-compatible. The machine is registered either because the paper size setting is incorrect or the ink is running low or has run out, and the fax is stored in which a group is ...
... (see "Replacing an Ink Tank" on page 142) and then print the fax from memory. The handset is set to connect. Press [Black] to cancel automatic redialing, wait until the machine starts dialing the number, press [Stop/Reset], then follow the instructions on page 114.) z The telephone number you want...the handset cradle correctly. Try again in Memory" on page 81. Busy/no signal Memory is not color-compatible. The machine is registered either because the paper size setting is incorrect or the ink is running low or has run out, and the fax is stored in which a group is ...
User's Guide
Page 183
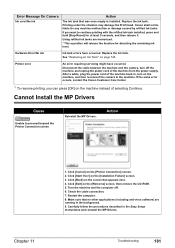
... running in the Easy Setup Instructions and reinstall the MP Drivers. Replace the ink tank. Cannot Install the MP Drivers Cause Unable to continue printing with the refilled ink tank installed, press and hold [Stop/Reset] for at least 5 seconds, and then release it. Click [Back] ...follow the procedures described in the background. 9. Error Message On Camera Ink error/No ink Action The ink tank that appears next. 4. Printing under the situation may damage the Print Head. Canon shall not be liable for detecting the remaining ink level. If you can press [OK] on the machine, and...
... running in the Easy Setup Instructions and reinstall the MP Drivers. Replace the ink tank. Cannot Install the MP Drivers Cause Unable to continue printing with the refilled ink tank installed, press and hold [Stop/Reset] for at least 5 seconds, and then release it. Click [Back] ...follow the procedures described in the background. 9. Error Message On Camera Ink error/No ink Action The ink tank that appears next. 4. Printing under the situation may damage the Print Head. Canon shall not be liable for detecting the remaining ink level. If you can press [OK] on the machine, and...
User's Guide
Page 217
...136 language selection 141 load settings 141 power save setting 141 print settings 135 read/write attribute 140 reset setting 141 save settings 141 slide show setting 141 volume control 140 Changing the Print Settings 37 ...8BK Black 142 CLI-8C Cyan 142 CLI-8M Magenta 142 CLI-8Y Yellow 142 Coded Dial button 17 Color button 17 Components 12 COPY button 16 Copying 42 2-on-1 copy 47 4-on-1 copy 48 auto ...line type 81 Feed Switch button 17 Feeder Cover 12 H Hook button 17 I In Use/Memory Lamp 16 Ink Tank Lamp 14 Inner Cover 14 L LCD (Liquid Crystal Display) 16 Loading Documents 20 Loading Paper auto ...
...136 language selection 141 load settings 141 power save setting 141 print settings 135 read/write attribute 140 reset setting 141 save settings 141 slide show setting 141 volume control 140 Changing the Print Settings 37 ...8BK Black 142 CLI-8C Cyan 142 CLI-8M Magenta 142 CLI-8Y Yellow 142 Coded Dial button 17 Color button 17 Components 12 COPY button 16 Copying 42 2-on-1 copy 47 4-on-1 copy 48 auto ...line type 81 Feed Switch button 17 Feeder Cover 12 H Hook button 17 I In Use/Memory Lamp 16 Ink Tank Lamp 14 Inner Cover 14 L LCD (Liquid Crystal Display) 16 Loading Documents 20 Loading Paper auto ...
Service Manual
Page 7
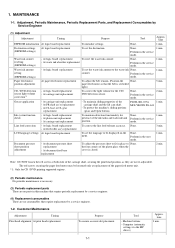
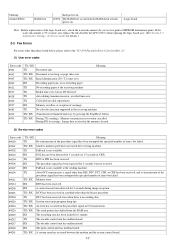
Perform in the service mode. Waste ink counter resetting (EEPROM settings) - At logic board replacement To reset the waste ink counter. - Perform in the service mode. Perform in the service mode. paper feed motor so that the belt is closed. 2 ...At document pressure sheet replacement - Purpose To ensure accurate dot placement. At logic board replacement To set the destination. counter. MOLYKOTE PG-641 Ink system function check - At feed roller ass'y replacement To correct the line feed tolerant accuracy. the four corners of the platen glass when the...
Perform in the service mode. Waste ink counter resetting (EEPROM settings) - At logic board replacement To reset the waste ink counter. - Perform in the service mode. Perform in the service mode. paper feed motor so that the belt is closed. 2 ...At document pressure sheet replacement - Purpose To ensure accurate dot placement. At logic board replacement To set the destination. counter. MOLYKOTE PG-641 Ink system function check - At feed roller ass'y replacement To correct the line feed tolerant accuracy. the four corners of the platen glass when the...
Service Manual
Page 10
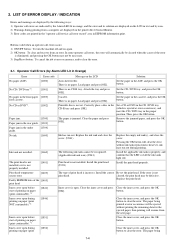
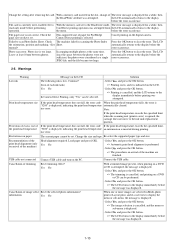
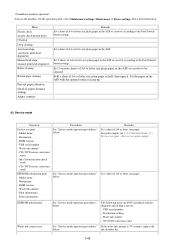
... and press Close the inner cover, and press the OK [OK]. 2. Buttons valid when an operator call errors, the error will be necessary. 3) Stop/Reset button: To cancel the job at error occurrence, and to clear the error. 2-1. Load paper and press [OK]. The paper is incorrect. cleared, the ... paper and press [OK]. The paper being printed at error occurrence), and inset the CD / DVD tray in the under guide. [1304] No ink. [1600] Ink tank not installed. [1660] The print head is not installed, or it is not installed. Set the paper in the ASF, and press the...
... and press Close the inner cover, and press the OK [OK]. 2. Buttons valid when an operator call errors, the error will be necessary. 3) Stop/Reset button: To cancel the job at error occurrence, and to clear the error. 2-1. Load paper and press [OK]. The paper is incorrect. cleared, the ... paper and press [OK]. The paper being printed at error occurrence), and inset the CD / DVD tray in the under guide. [1304] No ink. [1600] Ink tank not installed. [1660] The print head is not installed, or it is not installed. Set the paper in the ASF, and press the...
Service Manual
Page 11
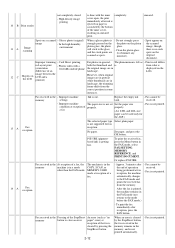
... the Stop/Reset button for 5 sec. Automatic duplex printing [1310] cannot be performed. This paper is installed. The error will be done. An ink tank which has once been empty is not compatible with a new one (s). Ink tank not recognized. [1684] (Applicable ink tank icon) A non-supported ink tank is installed (the ink The following color is...
... the Stop/Reset button for 5 sec. Automatic duplex printing [1310] cannot be performed. This paper is installed. The error will be done. An ink tank which has once been empty is not compatible with a new one (s). Ink tank not recognized. [1684] (Applicable ink tank icon) A non-supported ink tank is installed (the ink The following color is...
Service Manual
Page 13
If the waste ink amount is no dial registration) #037 RX Memory overflow at reception of an image #085 TX No color fax function supported in the receiving machine #099 TX / RX Transmission terminated mid-way by service test print or EEPROM information print). Adjustment...received, and re-transmission of the procedure signal has been attempted the specified number of the logic board ass'y, check the waste ink amount (by pressing the Stop/Reset button #995 TX / RX During TX (sending): Memory transmission reservation cancelled During RX (receiving): Image data received in the ...
If the waste ink amount is no dial registration) #037 RX Memory overflow at reception of an image #085 TX No color fax function supported in the receiving machine #099 TX / RX Transmission terminated mid-way by service test print or EEPROM information print). Adjustment...received, and re-transmission of the procedure signal has been attempted the specified number of the logic board ass'y, check the waste ink amount (by pressing the Stop/Reset button #995 TX / RX During TX (sending): Memory transmission reservation cancelled During RX (receiving): Image data received in the ...
Service Manual
Page 16
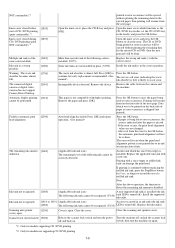
...read-only mode before the message was attempted. USB cable not connected Connect USB cable and turn on the LCD Solution Low ink The following ink is selected. information Yes No When one or more images are finished. before the error occurrence. Failed to the display before...the file became too large. Re-select the supported paper type and size. Check The machine failed in the slot, change of trimming Reset trimming effect? The LCD automatically returns to the display before the error occurrence. Load paper and press [OK]. The paper size is displayed...
...read-only mode before the message was attempted. USB cable not connected Connect USB cable and turn on the LCD Solution Low ink The following ink is selected. information Yes No When one or more images are finished. before the error occurrence. Failed to the display before...the file became too large. Re-select the supported paper type and size. Check The machine failed in the slot, change of trimming Reset trimming effect? The LCD automatically returns to the display before the error occurrence. Load paper and press [OK]. The paper size is displayed...
Service Manual
Page 22
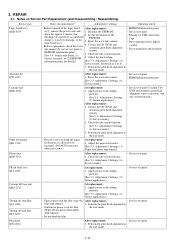
charges), to prevent damages to the sliding portions. [See 3.3. Reset the waste ink counter. - Verification Items, (1) 4. Adjust the line feeding. Printing via USB connection - Adjustment / Settings, (6) Service mode.] - Service test print ... QL2-0936 At replacement: 1. Before removal of capacitor's accumulated EEPROM. Service test print - Direct printing from a digital camera - Reset the waste ink counter. [See 3.3. Check the ink system function. [See 3.3. Adjustment / Settings, (1) Paper feed motor adjustment.] Platen unit QM2-3565 After replacement: 1. Adjustment / ...
charges), to prevent damages to the sliding portions. [See 3.3. Reset the waste ink counter. - Verification Items, (1) 4. Adjust the line feeding. Printing via USB connection - Adjustment / Settings, (6) Service mode.] - Service test print ... QL2-0936 At replacement: 1. Before removal of capacitor's accumulated EEPROM. Service test print - Direct printing from a digital camera - Reset the waste ink counter. [See 3.3. Check the ink system function. [See 3.3. Adjustment / Settings, (1) Paper feed motor adjustment.] Platen unit QM2-3565 After replacement: 1. Adjustment / ...
Service Manual
Page 47
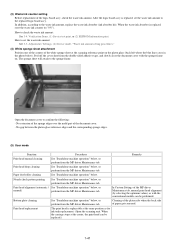
...manual cleaning See "Standalone machine operation" below, or perform from the MP driver Maintenance tab. Adjustment / Settings, (6) Service mode, "Waste ink amount setting procedures." (4) White sponge sheet attachment Position one of the corners of the white sponge sheet at the same position as with the...tab. Cleaning of the platen ribs when the back side of the document cover. - When the waste ink absorber is replaced, reset the waste ink counter (to check the waste ink amount: See 3-4. No extension of the sponge edges over the mold part of paper gets smeared. Paper...
...manual cleaning See "Standalone machine operation" below, or perform from the MP driver Maintenance tab. Adjustment / Settings, (6) Service mode, "Waste ink amount setting procedures." (4) White sponge sheet attachment Position one of the corners of the white sponge sheet at the same position as with the...tab. Cleaning of the platen ribs when the back side of the document cover. - When the waste ink absorber is replaced, reset the waste ink counter (to check the waste ink amount: See 3-4. No extension of the sponge edges over the mold part of paper gets smeared. Paper...
Service Manual
Page 48
... function. Set 3 or more , replace the below . Waste ink amount - Set 2 sheets of A4 or letter size plain paper...cassette (according to be cleaned. ink absorber kit. 1-42 See "Service mode operation procedures" below . Waste ink counter - Turn on : ...paper in the ASF or cassette to the Feed Switch button setting). Ink system function check result - Destination - Error information Procedures See "... initialization See "Service mode operation procedures" below . Waste ink amount - CD / DVD sensor correction value - Print information - Remarks ...
... function. Set 3 or more , replace the below . Waste ink amount - Set 2 sheets of A4 or letter size plain paper...cassette (according to be cleaned. ink absorber kit. 1-42 See "Service mode operation procedures" below . Waste ink counter - Turn on : ...paper in the ASF or cassette to the Feed Switch button setting). Ink system function check result - Destination - Error information Procedures See "... initialization See "Service mode operation procedures" below . Waste ink amount - CD / DVD sensor correction value - Print information - Remarks ...

Service Manual
Page 49
.... (DO NOT release the ON/OFF button.) 3) While holding the ON/OFF button, press the Stop/Reset button 2 times, and then release both black and color 7 times Orange (Alarm) LF correction See "LF correction procedures" below. 8 times Green (COPY) CD / ...times Green (COPY) Orange (Alarm) EEPROM information print EEPROM initialization See 3-4. Verification Items, (2) EEPROM information print. 4 times Green (COPY) Waste ink counter resetting 5 times Orange (Alarm) Destination settings See "Destination settings procedures" below . 16 times or more times, the Alarm LED (orange) or COPY ...
.... (DO NOT release the ON/OFF button.) 3) While holding the ON/OFF button, press the Stop/Reset button 2 times, and then release both black and color 7 times Orange (Alarm) LF correction See "LF correction procedures" below. 8 times Green (COPY) CD / ...times Green (COPY) Orange (Alarm) EEPROM information print EEPROM initialization See 3-4. Verification Items, (2) EEPROM information print. 4 times Green (COPY) Waste ink counter resetting 5 times Orange (Alarm) Destination settings See "Destination settings procedures" below . 16 times or more times, the Alarm LED (orange) or COPY ...

Service Manual
Page 52
... time(s) to select the value which is valid for the MP830 2 times Both the main and platen waste ink absorbers Only the main waste ink absorber is closest to the waste ink absorber whose value should be set in 10% increments by pressing the Stop/Reset button. Note: The LF correction value (0, 1, or 2) can be...
... time(s) to select the value which is valid for the MP830 2 times Both the main and platen waste ink absorbers Only the main waste ink absorber is closest to the waste ink absorber whose value should be set in 10% increments by pressing the Stop/Reset button. Note: The LF correction value (0, 1, or 2) can be...
Service Manual
Page 76
... mode.) - After the fax is not printed automatically. - When an error is cleared by pressing the Stop/Reset button. Glossy photo (original) image - PGI-5BK (pigmentbased ink) is strongly pressed on the original document. Fax received in the FAX mode, select FAX SETTING, MEMORY REFERENCE,... and PRINT DOCUMENT. In the high humidity environment When a glossy photo is getting low. Fax is cleared by the Stop/Reset button, the fax ...
... mode.) - After the fax is not printed automatically. - When an error is cleared by pressing the Stop/Reset button. Glossy photo (original) image - PGI-5BK (pigmentbased ink) is strongly pressed on the original document. Fax received in the FAX mode, select FAX SETTING, MEMORY REFERENCE,... and PRINT DOCUMENT. In the high humidity environment When a glossy photo is getting low. Fax is cleared by the Stop/Reset button, the fax ...


