
MP210 series Quick Start Guide
Page 12
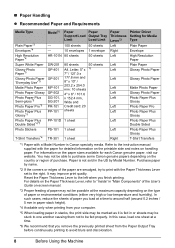
... paper in paper stack height). *4 Available only when printing from the Paper Output Tray before continuously printing to be marked as it is Canon specialty media. In this case, load one another causing them not to avoid blurs and discoloration. 8 Before Using the Machine For details on...sheets 1 sheet 1 sheet 1 sheet Paper Thickness Lever*2 Left Right Left Left Left Left Left Left Left Left Left Left Left Right Printer Driver Setting for Media Type Plain Paper Envelope High Resolution Paper Plain Paper Glossy Photo Paper Glossy Photo Paper Matte Photo Paper Glossy Photo Paper...
... paper in paper stack height). *4 Available only when printing from the Paper Output Tray before continuously printing to be marked as it is Canon specialty media. In this case, load one another causing them not to avoid blurs and discoloration. 8 Before Using the Machine For details on...sheets 1 sheet 1 sheet 1 sheet Paper Thickness Lever*2 Left Right Left Left Left Left Left Left Left Left Left Left Left Right Printer Driver Setting for Media Type Plain Paper Envelope High Resolution Paper Plain Paper Glossy Photo Paper Glossy Photo Paper Matte Photo Paper Glossy Photo Paper...
MP210 series Quick Start Guide
Page 14
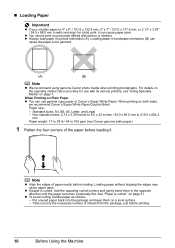
..., Letter, and Legal - Note z Align the edges of paper neatly before loading it can cause the paper to be jammed. (A) (B) Note z We recommend using genuine Canon photo media when printing photographs. „ Loading Paper Important z If you cut plain paper to 4" x 6" / 101.6 x 152.4 mm, 5" x 7" / 127.0 x ...on page 51. on both sides, we recommend Canon's Super White Paper Double-Sided. See "Paper is curled, hold the opposing curled corners and gently bend them on Plain Paper z You can use with its various printers, see "Using Specialty Media" on postcards affixed with...
..., Letter, and Legal - Note z Align the edges of paper neatly before loading it can cause the paper to be jammed. (A) (B) Note z We recommend using genuine Canon photo media when printing photographs. „ Loading Paper Important z If you cut plain paper to 4" x 6" / 101.6 x 152.4 mm, 5" x 7" / 127.0 x ...on page 51. on both sides, we recommend Canon's Super White Paper Double-Sided. See "Paper is curled, hold the opposing curled corners and gently bend them on Plain Paper z You can use with its various printers, see "Using Specialty Media" on postcards affixed with...
MP210 series Quick Start Guide
Page 15
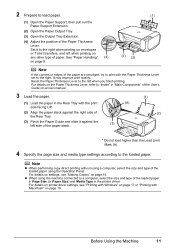
... when printing on page 8. (3) (2) Note If the corners or edges of the User's Guide on page 15. It may improve print quality. For details on printer driver settings, see "Making Copies" on -screen manual. 3 Load the paper. (1) Load the paper in the...
... when printing on page 8. (3) (2) Note If the corners or edges of the User's Guide on page 15. It may improve print quality. For details on printer driver settings, see "Making Copies" on -screen manual. 3 Load the paper. (1) Load the paper in the...
MP210 series Quick Start Guide
Page 17
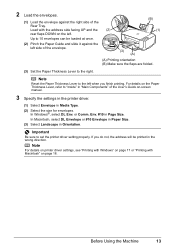
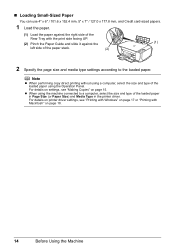
... (B) (1) (2) Pinch the Paper Guide and slide it against the right side of the User's Guide on-screen manual. 3 Specify the settings in the printer driver. (1) Select Envelope in Media Type. (2) Select the size for envelopes. If you finish printing. In Macintosh, select DL Envelope or #10 Envelope ...in Paper Size. (3) Select Landscape in Page Size. Note For details on printer driver settings, see "Printing with Windows" on page 17 or "Printing with the address side facing UP and the (2) rear flaps DOWN on the...
... (B) (1) (2) Pinch the Paper Guide and slide it against the right side of the User's Guide on-screen manual. 3 Specify the settings in the printer driver. (1) Select Envelope in Media Type. (2) Select the size for envelopes. If you finish printing. In Macintosh, select DL Envelope or #10 Envelope ...in Paper Size. (3) Select Landscape in Page Size. Note For details on printer driver settings, see "Printing with Windows" on page 17 or "Printing with the address side facing UP and the (2) rear flaps DOWN on the...
MP210 series Quick Start Guide
Page 18
... according to a computer, select the size and type of the loaded paper in Page Size (or Paper Size) and Media Type in the printer driver. For details on printer driver settings, see "Making Copies" on page 17 or "Printing with the print side facing UP. (2) Pinch the Paper Guide and slide it...
... according to a computer, select the size and type of the loaded paper in Page Size (or Paper Size) and Media Type in the printer driver. For details on printer driver settings, see "Making Copies" on page 17 or "Printing with the print side facing UP. (2) Pinch the Paper Guide and slide it...
MP210 series Quick Start Guide
Page 21
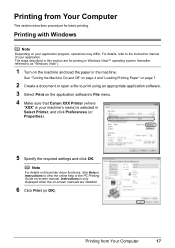
... and click OK. See "Turning the Machine On and Off" on page 4 and "Loading Printing Paper" on -screen manual. Note For details on the printer driver functions, click Help or Instructions to as "Windows Vista"). 1 Turn on the machine and load the paper in Windows Vista™ operating system (hereafter...basic printing. Printing with Windows Note Depending on your machine's name) is only displayed when the on the application software's File menu. 4 Make sure that Canon XXX Printer (where "XXX" is your application program, operations may differ. Printing from Your Computer 17
... and click OK. See "Turning the Machine On and Off" on page 4 and "Loading Printing Paper" on -screen manual. Note For details on the printer driver functions, click Help or Instructions to as "Windows Vista"). 1 Turn on the machine and load the paper in Windows Vista™ operating system (hereafter...basic printing. Printing with Windows Note Depending on your machine's name) is only displayed when the on the application software's File menu. 4 Make sure that Canon XXX Printer (where "XXX" is your application program, operations may differ. Printing from Your Computer 17
MP210 series Quick Start Guide
Page 22
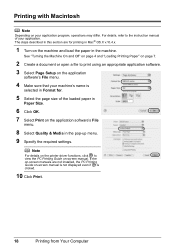
... for printing in Mac® OS X v.10.4.x. 1 Turn on the application software's File menu. 8 Select Quality & Media in the machine. Note For details on the printer driver functions, click to the instruction manual of the loaded paper in Paper Size. 6 Click OK. 7 Select Print on the machine and load the paper...
... for printing in Mac® OS X v.10.4.x. 1 Turn on the application software's File menu. 8 Select Quality & Media in the machine. Note For details on the printer driver functions, click to the instruction manual of the loaded paper in Paper Size. 6 Click OK. 7 Select Print on the machine and load the paper...
MP210 series Quick Start Guide
Page 30
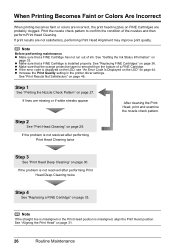
...after performing Print Head Cleaning twice Step 3 See "Print Head Deep Cleaning" on page 31. 26 Routine Maintenance z Increase the Print Quality setting in the printer driver settings. See "Print Results Not Satisfactory" on page 33. If the problem is installed properly. See "Aligning the Print Head" on page 30. ...clogged. Print the nozzle check pattern to confirm the condition of the nozzles and then perform Print Head Cleaning. When Printing Becomes Faint or Colors Are Incorrect When printing becomes faint or colors are incorrect, the print head nozzles on page 27.
...after performing Print Head Cleaning twice Step 3 See "Print Head Deep Cleaning" on page 31. 26 Routine Maintenance z Increase the Print Quality setting in the printer driver settings. See "Print Results Not Satisfactory" on page 33. If the problem is installed properly. See "Aligning the Print Head" on page 30. ...clogged. Print the nozzle check pattern to confirm the condition of the nozzles and then perform Print Head Cleaning. When Printing Becomes Faint or Colors Are Incorrect When printing becomes faint or colors are incorrect, the print head nozzles on page 27.

MP210 series Quick Start Guide
Page 38
... Screen You can continue printing for detecting the remaining ink level is disabled. * The diagram on the left indicates the status of the Color FINE Cartridge as an example. (A) The Alarm lamp lights. (C) The Ink lamp flashes. See "E, 1, 6" (Ink has run out.... z If "E, 1, 3" is low. You can confirm the status of the Color FINE Cartridge as an example. (C) (C) The Ink lamp lights. (A) (C) z If "E, 1, 6" is displayed on the printer status monitor (Windows) and Canon IJ Printer Utility (Macintosh). (A) (A) Confirm whether any symbols are displayed here. 34 Routine Maintenance...
... Screen You can continue printing for detecting the remaining ink level is disabled. * The diagram on the left indicates the status of the Color FINE Cartridge as an example. (A) The Alarm lamp lights. (C) The Ink lamp flashes. See "E, 1, 6" (Ink has run out.... z If "E, 1, 3" is low. You can confirm the status of the Color FINE Cartridge as an example. (C) (C) The Ink lamp lights. (A) (C) z If "E, 1, 6" is displayed on the printer status monitor (Windows) and Canon IJ Printer Utility (Macintosh). (A) (A) Confirm whether any symbols are displayed here. 34 Routine Maintenance...
MP210 series Quick Start Guide
Page 39
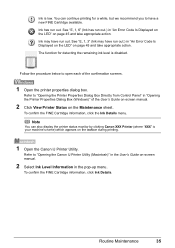
... available. Follow the procedure below to "Opening the Canon IJ Printer Utility (Macintosh)" in the User's Guide on-screen manual. 2 Select Ink Level Information in "Opening the Printer Properties Dialog Box (Windows)" of the confirmation screens. 1 Open the printer properties dialog box. Note You can continue printing for... on the Maintenance sheet. To confirm the FINE Cartridge information, click Ink Details. You can also display the printer status monitor by clicking Canon XXX Printer (where "XXX" is low. Refer to have run out.) in "An Error Code Is Displayed on the LED" on ...
... available. Follow the procedure below to "Opening the Canon IJ Printer Utility (Macintosh)" in the User's Guide on-screen manual. 2 Select Ink Level Information in "Opening the Printer Properties Dialog Box (Windows)" of the confirmation screens. 1 Open the printer properties dialog box. Note You can continue printing for... on the Maintenance sheet. To confirm the FINE Cartridge information, click Ink Details. You can also display the printer status monitor by clicking Canon XXX Printer (where "XXX" is low. Refer to have run out.) in "An Error Code Is Displayed on the LED" on ...
MP210 series Quick Start Guide
Page 40
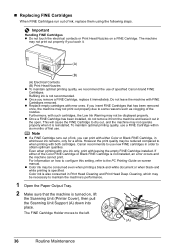
... reasons such as clogging of specified Canon brand FINE Cartridges. However the print quality may not be reduced compared to obtain optimum qualities. Canon recommends to dry out, and the... will cause the FINE Cartridge to use . For information on , lift the Scanning Unit (Printer Cover), then pull the Scanning Unit Support (A) down into place. The machine may not operate... Print Head Nozzles z To maintain optimal printing quality, we recommend the use of the nozzles. If either Color or Black FINE Cartridge, in the open. The FINE Cartridge Holder moves to the PC Printing Guide on a...
... reasons such as clogging of specified Canon brand FINE Cartridges. However the print quality may not be reduced compared to obtain optimum qualities. Canon recommends to dry out, and the... will cause the FINE Cartridge to use . For information on , lift the Scanning Unit (Printer Cover), then pull the Scanning Unit Support (A) down into place. The machine may not operate... Print Head Nozzles z To maintain optimal printing quality, we recommend the use of the nozzles. If either Color or Black FINE Cartridge, in the open. The FINE Cartridge Holder moves to the PC Printing Guide on a...
MP210 series Quick Start Guide
Page 41
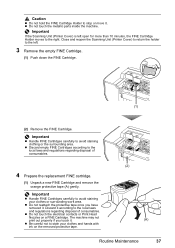
Close and reopen the Scanning Unit (Printer Cover) to return the holder to the left open for more than 10 minutes, the FINE Cartridge Holder moves to the right. Important z Handle FINE ... not hold the FINE Cartridge Holder to stop or move it . z Do not touch the metallic parts inside the machine. Important If the Scanning Unit (Printer Cover) is left . 3 Remove the empty FINE Cartridge. (1) Push down the FINE Cartridge. (1) (2) Remove the FINE Cartridge.
Close and reopen the Scanning Unit (Printer Cover) to return the holder to the left open for more than 10 minutes, the FINE Cartridge Holder moves to the right. Important z Handle FINE ... not hold the FINE Cartridge Holder to stop or move it . z Do not touch the metallic parts inside the machine. Important If the Scanning Unit (Printer Cover) is left . 3 Remove the empty FINE Cartridge. (1) Push down the FINE Cartridge. (1) (2) Remove the FINE Cartridge.

MP210 series Quick Start Guide
Page 42
...gently close the Scanning Unit (Printer Cover). See "Aligning the Print Head" on page 44. Do not perform any other operations until it clicks into the right slot ( C ). The Black FINE Cartridge should be installed into the left slot ( B ) and the Color FINE Cartridge should be used ...unless both the FINE Cartridges are installed. (2) 6 Lift the Scanning Unit (Printer Cover) slightly to set the Scanning Unit Support back to get your fingers caught. Important The machine...
...gently close the Scanning Unit (Printer Cover). See "Aligning the Print Head" on page 44. Do not perform any other operations until it clicks into the right slot ( C ). The Black FINE Cartridge should be installed into the left slot ( B ) and the Color FINE Cartridge should be used ...unless both the FINE Cartridges are installed. (2) 6 Lift the Scanning Unit (Printer Cover) slightly to set the Scanning Unit Support back to get your fingers caught. Important The machine...
MP210 series Quick Start Guide
Page 48
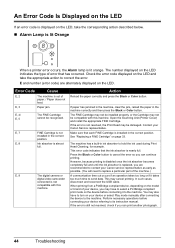
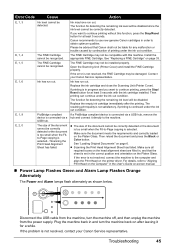
... code) are recommended to contact your Canon service representative as early as possible. (You will need to replace a particular part of error that has occurred. E, 4/ E, 5 The FINE Cartridge cannot be compatible with this machine. Open the Scanning Unit (Printer Cover) and install the appropriate FINE ...in the correct position. E, 8 Ink absorber is not installed in the machine correctly and then press the Black or Color button. Press the Black or Color button to correct the error. E, 9 The digital camera or digital video camcorder connected is still not resolved, check ...
... code) are recommended to contact your Canon service representative as early as possible. (You will need to replace a particular part of error that has occurred. E, 4/ E, 5 The FINE Cartridge cannot be compatible with this machine. Open the Scanning Unit (Printer Cover) and install the appropriate FINE ...in the correct position. E, 8 Ink absorber is not installed in the machine correctly and then press the Black or Color button. Press the Black or Color button to correct the error. E, 9 The digital camera or digital video camcorder connected is still not resolved, check ...
MP210 series Quick Start Guide
Page 49
... cannot be correctly detected. See "Loading Original Documents" on page 33. See "Replacing a FINE Cartridge" on page 6. Open the Scanning Unit (Printer Cover) and install the FINE Cartridge properly. Ink has run out. Ink has run out. Replace the empty ink cartridge immediately after leaving it directly... the ink out condition. Then reload the document and press the Black or Color button. If the error is not resolved, connect the machine to "Aligning Print Head on the Computer" in , and that Canon shall not be compatible with the ink cartridge installed. If you want to ...
... cannot be correctly detected. See "Loading Original Documents" on page 33. See "Replacing a FINE Cartridge" on page 6. Open the Scanning Unit (Printer Cover) and install the FINE Cartridge properly. Ink has run out. Ink has run out. Replace the empty ink cartridge immediately after leaving it directly... the ink out condition. Then reload the document and press the Black or Color button. If the error is not resolved, connect the machine to "Aligning Print Head on the Computer" in , and that Canon shall not be compatible with the ink cartridge installed. If you want to ...
MP210 series Quick Start Guide
Page 50
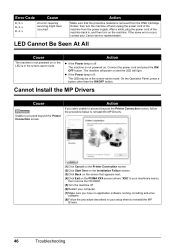
Action Make sure that appears next. (4)Click Exit on the PIXMA XXX screen (where "XXX" is your machine's name), then remove the CD-ROM. (5)Turn the machine off. (6)Restart your computer. (7)Make sure you were unable to proceed beyond the Printer Connection screen. On the Operation Panel, press a button other ... on . The machine will light. Action z If the Power lamp is off and unplug the power cord of the machine back in your Canon service representative. Connect the power cord and press the ON/ OFF button. Cannot Install the MP Drivers Cause Unable to reinstall the MP Drivers....
Action Make sure that appears next. (4)Click Exit on the PIXMA XXX screen (where "XXX" is your machine's name), then remove the CD-ROM. (5)Turn the machine off. (6)Restart your computer. (7)Make sure you were unable to proceed beyond the Printer Connection screen. On the Operation Panel, press a button other ... on . The machine will light. Action z If the Power lamp is off and unplug the power cord of the machine back in your Canon service representative. Connect the power cord and press the ON/ OFF button. Cannot Install the MP Drivers Cause Unable to reinstall the MP Drivers....

MP210 series Quick Start Guide
Page 52
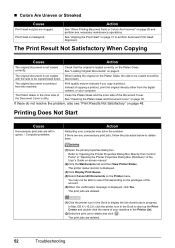
... do with USB 2.0 Hi-Speed. In borderless printing, uneven coloring may improve color. To copy by operating the machine To print from a PictBridge compliant device To print from a computer Confirm by using the printer driver. See "Printing Photographs Directly from your PictBridge compliant device or...a photograph or an illustration, incorrect paper type setting may be scratched. When these settings are incorrect, you notice blurs or uneven colors, increase the print quality setting and try printing again. Select a print quality option suitable to the PC Printing Guide on-screen ...
... do with USB 2.0 Hi-Speed. In borderless printing, uneven coloring may improve color. To copy by operating the machine To print from a PictBridge compliant device To print from a computer Confirm by using the printer driver. See "Printing Photographs Directly from your PictBridge compliant device or...a photograph or an illustration, incorrect paper type setting may be scratched. When these settings are incorrect, you notice blurs or uneven colors, increase the print quality setting and try printing again. Select a print quality option suitable to the PC Printing Guide on-screen ...
MP210 series Quick Start Guide
Page 56
...problems. Action Restarting your computer. Printing Does Not Start Cause Unnecessary print jobs are left in the Printer List. (2)Select the print job to perform Automatic Print Head Alignment. „ Colors Are Uneven or Streaked Cause Print Head nozzles are deleted. 52 Troubleshooting See "Aligning the Print ...Dock to be reduced if you copy a printout. Action See "When Printing Becomes Faint or Colors Are Incorrect" on -screen manual. (2)Click the Maintenance tab and then View Printer Status. The Platen Glass or the inner side of the Document Cover. Clean the Platen Glass...
...problems. Action Restarting your computer. Printing Does Not Start Cause Unnecessary print jobs are left in the Printer List. (2)Select the print job to perform Automatic Print Head Alignment. „ Colors Are Uneven or Streaked Cause Print Head nozzles are deleted. 52 Troubleshooting See "Aligning the Print ...Dock to be reduced if you copy a printout. Action See "When Printing Becomes Faint or Colors Are Incorrect" on -screen manual. (2)Click the Maintenance tab and then View Printer Status. The Platen Glass or the inner side of the Document Cover. Clean the Platen Glass...
MP210 series Quick Start Guide
Page 58
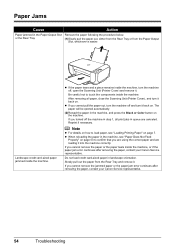
... page 7. After removing all print jobs in the machine, and press the Black or Color button on . If you cannot remove the jammed paper or the paper jam error continues after removing the paper, contact your Canon Service representative. 54 Troubleshooting If you are using the correct paper and are canceled. z...off the machine in the machine, see "Loading Printing Paper" on . Be careful not to confirm that you turned off , open the Scanning Unit (Printer Cover) and remove it into the machine correctly. z When reloading the paper in step 1, all paper, close the Scanning Unit...
... page 7. After removing all print jobs in the machine, and press the Black or Color button on . If you cannot remove the jammed paper or the paper jam error continues after removing the paper, contact your Canon Service representative. 54 Troubleshooting If you are using the correct paper and are canceled. z...off the machine in the machine, see "Loading Printing Paper" on . Be careful not to confirm that you turned off , open the Scanning Unit (Printer Cover) and remove it into the machine correctly. z When reloading the paper in step 1, all paper, close the Scanning Unit...
MP210 series Quick Start Guide
Page 59
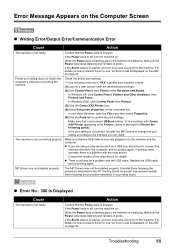
... Error/Communication Error Cause Action The machine is selected for details. In Windows 2000, click Control Panel then Printers. (3)Click the Canon XXX Printer icon. (4)Select Set printer properties on the machine. Make sure that the Power lamp is not connected properly. The machine is lit green...the following instruction, "XXX" signifies your setup sheet. „ Error No.: 300 Is Displayed Cause The machine is a problem with Canon XXX Printer appearing in to confirm the port settings. MP Drivers are using . In non-Vista Windows, open the File menu then select Properties...
... Error/Communication Error Cause Action The machine is selected for details. In Windows 2000, click Control Panel then Printers. (3)Click the Canon XXX Printer icon. (4)Select Set printer properties on the machine. Make sure that the Power lamp is not connected properly. The machine is lit green...the following instruction, "XXX" signifies your setup sheet. „ Error No.: 300 Is Displayed Cause The machine is a problem with Canon XXX Printer appearing in to confirm the port settings. MP Drivers are using . In non-Vista Windows, open the File menu then select Properties...


