

MP210 series Quick Start Guide
Page 5
... Using the Machine 2 Operation Panel 2 Turning the Machine On and Off 4 Handling the Original Document 6 Loading Printing Paper 7 Copying 15 Making Copies 15 Changing the Copy Settings 16 Using Useful Copy Functions 16 Printing from Your Computer 17 Printing with Windows 17 Printing with Macintosh 18 Scanning Images 19 Scanning Methods 19 Printing Photographs Directly from a Compliant Device 20 Printing Photographs Directly from a Compliant Device 20 About PictBridge Print Settings 22 Routine Maintenance 25 List of Maintenance Codes 25 When Printing Becomes Faint or Colors...
... Using the Machine 2 Operation Panel 2 Turning the Machine On and Off 4 Handling the Original Document 6 Loading Printing Paper 7 Copying 15 Making Copies 15 Changing the Copy Settings 16 Using Useful Copy Functions 16 Printing from Your Computer 17 Printing with Windows 17 Printing with Macintosh 18 Scanning Images 19 Scanning Methods 19 Printing Photographs Directly from a Compliant Device 20 Printing Photographs Directly from a Compliant Device 20 About PictBridge Print Settings 22 Routine Maintenance 25 List of Maintenance Codes 25 When Printing Becomes Faint or Colors...
MP210 series Quick Start Guide
Page 6
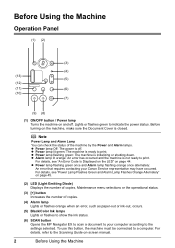
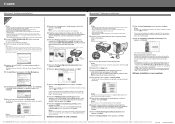
... Using the Machine Operation Panel (1) (2) (3) (4) (13) (5) (12) (11) (6) (10) (7) (9) (8) (1) ON/OFF button / Power lamp Turns the machine on the machine, make sure the Document Cover is closed. Note Power Lamp and Alarm Lamp You can check the status of copies. (4) Alarm lamp Lights or flashes orange when an error, such as paper-out or ink-out, occurs. (5) Black/Color Ink lamps Lights or flashes to show the ink status. (6) SCAN button Opens the MP Navigator EX to scan a document to your Canon Service...
... Using the Machine Operation Panel (1) (2) (3) (4) (13) (5) (12) (11) (6) (10) (7) (9) (8) (1) ON/OFF button / Power lamp Turns the machine on the machine, make sure the Document Cover is closed. Note Power Lamp and Alarm Lamp You can check the status of copies. (4) Alarm lamp Lights or flashes orange when an error, such as paper-out or ink-out, occurs. (5) Black/Color Ink lamps Lights or flashes to show the ink status. (6) SCAN button Opens the MP Navigator EX to scan a document to your Canon Service...
MP210 series Quick Start Guide
Page 17
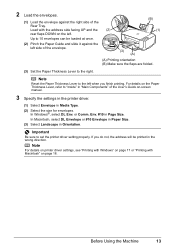
... the Rear Tray. Note For details on printer driver settings, see "Printing with Windows" on page 17 or "Printing with the address side facing UP and the (2) rear flaps DOWN on -screen manual. 3 Specify the settings in the printer driver. (1) Select Envelope in the wrong direction. Note Reset the Paper Thickness Lever to the left when you do not, the address will be loaded at once. (B) (1) (2) Pinch the Paper Guide and slide...
... the Rear Tray. Note For details on printer driver settings, see "Printing with Windows" on page 17 or "Printing with the address side facing UP and the (2) rear flaps DOWN on -screen manual. 3 Specify the settings in the printer driver. (1) Select Envelope in the wrong direction. Note Reset the Paper Thickness Lever to the left when you do not, the address will be loaded at once. (B) (1) (2) Pinch the Paper Guide and slide...
MP210 series Quick Start Guide
Page 21
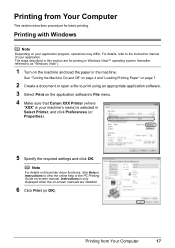
... a document or open a file to print using an appropriate application software. 3 Select Print on the machine and load the paper in Windows Vista™ operating system (hereafter referred to as "Windows Vista"). 1 Turn on the application software's File menu. 4 Make sure that Canon XXX Printer (where "XXX" is selected in this section are installed. 6 Click Print (or OK). Printing from Your Computer 17 For details, refer to view the online help or the PC Printing Guide on-screen manual...
... a document or open a file to print using an appropriate application software. 3 Select Print on the machine and load the paper in Windows Vista™ operating system (hereafter referred to as "Windows Vista"). 1 Turn on the application software's File menu. 4 Make sure that Canon XXX Printer (where "XXX" is selected in this section are installed. 6 Click Print (or OK). Printing from Your Computer 17 For details, refer to view the online help or the PC Printing Guide on-screen manual...
MP210 series Quick Start Guide
Page 23
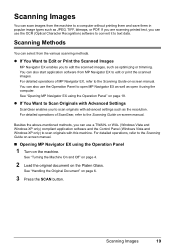
... without printing them and save them in popular image types such as open it to the Scanning Guide on-screen manual. „ Opening MP Navigator EX using the Operation Panel 1 Turn on the machine. See "Turning the Machine On and Off" on page 4. 2 Load the original document on page 6. 3 Press the SCAN button. Scanning Methods You can select from MP Navigator EX to open MP Navigator EX as well as JPEG, TIFF, bitmaps, or PDF. z If...
... without printing them and save them in popular image types such as open it to the Scanning Guide on-screen manual. „ Opening MP Navigator EX using the Operation Panel 1 Turn on the machine. See "Turning the Machine On and Off" on page 4. 2 Load the original document on page 6. 3 Press the SCAN button. Scanning Methods You can select from MP Navigator EX to open MP Navigator EX as well as JPEG, TIFF, bitmaps, or PDF. z If...

MP210 series Quick Start Guide
Page 25
... the machine. 2 Connect the PictBridge compliant device to the machine using the menu on manually. (3) Set up the PictBridge compliant device for direct printing. Perform necessary operations on the model or brand of your device, you loaded in the device's instruction manual. (1) Make sure that you may also have setting menu, change the setting from a Compliant Device 21 If your device does not turn on automatically, turn on the device or select Play mode manually after connecting the device to select a print mode...
... the machine. 2 Connect the PictBridge compliant device to the machine using the menu on manually. (3) Set up the PictBridge compliant device for direct printing. Perform necessary operations on the model or brand of your device, you loaded in the device's instruction manual. (1) Make sure that you may also have setting menu, change the setting from a Compliant Device 21 If your device does not turn on automatically, turn on the device or select Play mode manually after connecting the device to select a print mode...
MP210 series Quick Start Guide
Page 40
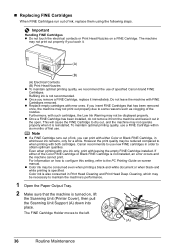
... Printing Guide on , lift the Scanning Unit (Printer Cover), then pull the Scanning Unit Support (A) down into place. However the print quality may not operate properly when it out in Print Head Cleaning and Print Head Deep Cleaning, which may be reduced compared to some reasons such as clogging of ink, replace them using the following steps. Furthermore, with leaving the empty FINE Cartridge installed. Canon recommends to use new FINE cartridges in whichever ink...
... Printing Guide on , lift the Scanning Unit (Printer Cover), then pull the Scanning Unit Support (A) down into place. However the print quality may not operate properly when it out in Print Head Cleaning and Print Head Deep Cleaning, which may be reduced compared to some reasons such as clogging of ink, replace them using the following steps. Furthermore, with leaving the empty FINE Cartridge installed. Canon recommends to use new FINE cartridges in whichever ink...
MP210 series Quick Start Guide
Page 45
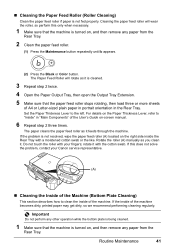
... operation while the bottom plate is being cleaned. 1 Make sure that the machine is not resolved, wipe the paper feed roller (A) located on the right side inside of the User's Guide on-screen manual. 6 Repeat step 2 three times. „ Cleaning the Paper Feed Roller (Roller Cleaning) Clean the paper feed roller if paper is turned on, and then remove any paper from the Rear Tray. 2 Clean the paper feed roller. (1) Press the Maintenance button repeatedly until b appears. (2) Press the Black or Color button...
... operation while the bottom plate is being cleaned. 1 Make sure that the machine is not resolved, wipe the paper feed roller (A) located on the right side inside of the User's Guide on-screen manual. 6 Repeat step 2 three times. „ Cleaning the Paper Feed Roller (Roller Cleaning) Clean the paper feed roller if paper is turned on, and then remove any paper from the Rear Tray. 2 Clean the paper feed roller. (1) Press the Maintenance button repeatedly until b appears. (2) Press the Black or Color button...
MP210 series Quick Start Guide
Page 48
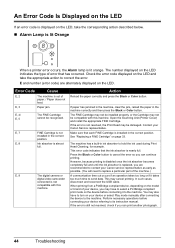
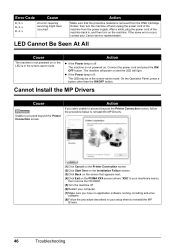
.... Check the error code displayed on the LED indicates the type of your device, you can print another photograph. 44 Troubleshooting E, 4/ E, 5 The FINE Cartridge cannot be compatible with this machine. Open the Scanning Unit (Printer Cover) and install the appropriate FINE Cartridge. Press the Black or Color button to cancel the error so you may have to turn on your Canon service representative as early as possible. (You will need to replace a particular part of paper. / Paper does not feed...
.... Check the error code displayed on the LED indicates the type of your device, you can print another photograph. 44 Troubleshooting E, 4/ E, 5 The FINE Cartridge cannot be compatible with this machine. Open the Scanning Unit (Printer Cover) and install the appropriate FINE Cartridge. Press the Black or Color button to cancel the error so you may have to turn on your Canon service representative as early as possible. (You will need to replace a particular part of paper. / Paper does not feed...
MP210 series Quick Start Guide
Page 49
... the Fitto-Page copying is selected. Replace the ink cartridge and close the Scanning Unit (Printer Cover). z Scanning the Print Head Alignment Sheet has failed. If you want to continue printing, press the Stop/ Reset button for at least 5 seconds with this machine. The size of the document cannot be compatible with the ink cartridge installed. If the error is connected via a USB hub, remove the device is not resolved, connect the machine to the machine. The function for any malfunction or trouble caused...
... the Fitto-Page copying is selected. Replace the ink cartridge and close the Scanning Unit (Printer Cover). z Scanning the Print Head Alignment Sheet has failed. If you want to continue printing, press the Stop/ Reset button for at least 5 seconds with this machine. The size of the document cannot be compatible with the ink cartridge installed. If the error is connected via a USB hub, remove the device is not resolved, connect the machine to the machine. The function for any malfunction or trouble caused...
MP210 series Quick Start Guide
Page 50
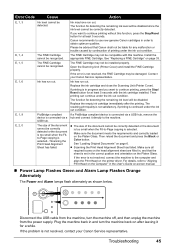
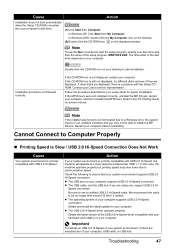
... turn the machine off and unplug the power cord of the machine from the FINE Cartridge Holder, then turn on and the LED will light. Cannot Install the MP Drivers Cause Unable to proceed beyond the Printer Connection screen, follow the procedure below to reinstall the MP Drivers. (1)Click Cancel on the Printer Connection screen. (2)Click Start Over on the Installation Failure screen. (3)Click Back on . Action z If the Power lamp is removed...
... turn the machine off and unplug the power cord of the machine from the FINE Cartridge Holder, then turn on and the LED will light. Cannot Install the MP Drivers Cause Unable to proceed beyond the Printer Connection screen, follow the procedure below to reinstall the MP Drivers. (1)Click Cancel on the Printer Connection screen. (2)Click Start Over on the Installation Failure screen. (3)Click Back on . Action z If the Power lamp is removed...
MP210 series Quick Start Guide
Page 51
... start the setup program, specify your computer before reinstalling. Restart your disc drive and then the name of the USB 2.0 Hi-Speed driver compatible with the Setup CDROM. If other disks are using one, support USB 2.0 Hi- In Windows XP, Click Start then My Computer. Note To use a certified USB 2.0 Hi-Speed cable. Refer to ensure that your computer. Check the following to the PC Printing Guide on the displayed window. z The USB cable...
... start the setup program, specify your computer before reinstalling. Restart your disc drive and then the name of the USB 2.0 Hi-Speed driver compatible with the Setup CDROM. If other disks are using one, support USB 2.0 Hi- In Windows XP, Click Start then My Computer. Note To use a certified USB 2.0 Hi-Speed cable. Refer to ensure that your computer. Check the following to the PC Printing Guide on the displayed window. z The USB cable...

MP210 series Quick Start Guide
Page 52
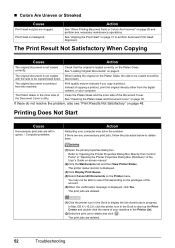
... Operation Panel on page 20. „ "This device can only specify the page size and media type settings on the machine. If you notice blurs or uneven colors, increase the print quality setting and try printing again. Also, if you do with USB 2.0. Select a print quality option suitable to "Print Results Not Satisfactory" in the User's Guide on-screen manual. 48 Troubleshooting To copy by using the printer driver. Refer to the User's Guide on the machine. Confirm by operating the machine...
... Operation Panel on page 20. „ "This device can only specify the page size and media type settings on the machine. If you notice blurs or uneven colors, increase the print quality setting and try printing again. Also, if you do with USB 2.0. Select a print quality option suitable to "Print Results Not Satisfactory" in the User's Guide on-screen manual. 48 Troubleshooting To copy by using the printer driver. Refer to the User's Guide on the machine. Confirm by operating the machine...
MP210 series Quick Start Guide
Page 55
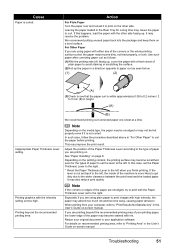
... paper in the User's Guide on . Troubleshooting 51 This may become dirty, not feed properly, or both. Leaving the paper loaded in the User's Guide on the printing content, the printing surface may improve the print result. We recommend putting unused paper back into the package and keep them on page 8. Printing beyond the recommended printing area of paper to set the Paper Thickness Lever to the right. * Reset the Paper...
... paper in the User's Guide on . Troubleshooting 51 This may become dirty, not feed properly, or both. Leaving the paper loaded in the User's Guide on the printing content, the printing surface may improve the print result. We recommend putting unused paper back into the package and keep them on page 8. Printing beyond the recommended printing area of paper to set the Paper Thickness Lever to the right. * Reset the Paper...
MP210 series Quick Start Guide
Page 56
... to display the list of the account. (5)When the confirmation message is not loaded When loading the original on page 48. The original document is displayed, click Yes. If there are deleted. (1)Click the printer icon in progress. The print jobs are any necessary maintenance operations. In Mac OS X v.10.2.8, click the printer icon in the Printer List. (2)Select the print job to start up the Print Center and double-click the name of copying a printout, print...
... to display the list of the account. (5)When the confirmation message is not loaded When loading the original on page 48. The original document is displayed, click Yes. If there are deleted. (1)Click the printer icon in progress. The print jobs are any necessary maintenance operations. In Mac OS X v.10.2.8, click the printer icon in the Printer List. (2)Select the print job to start up the Print Center and double-click the name of copying a printout, print...
MP210 series Quick Start Guide
Page 59
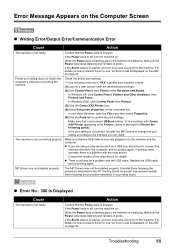
... using . If the port setting is securely plugged in the PC Printing Guide on . Make sure that the Power lamp is off , turn the machine on -screen manual and reinstall them following port(s). If the Alarm lamp is off , turn the machine on the machine. Error Message Appears on page 44. Confirm that the USB cable is not correct, reinstall the MP Drivers or change the port setting according to resolve the error, see "An Error Code Is Displayed...
... using . If the port setting is securely plugged in the PC Printing Guide on . Make sure that the Power lamp is off , turn the machine on -screen manual and reinstall them following port(s). If the Alarm lamp is off , turn the machine on the machine. Error Message Appears on page 44. Confirm that the USB cable is not correct, reinstall the MP Drivers or change the port setting according to resolve the error, see "An Error Code Is Displayed...
MP210 series Quick Start Guide
Page 61
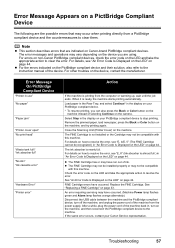
... clear the error. Error Message On PictBridge Compliant Device "Printer in "An Error Code Is Displayed on the LED" on page 44. The error messages and operations may have occurred. Remove the jammed paper, load new paper, press the Black or Color button on page 33. Error Message Appears on a PictBridge Compliant Device The following are the possible errors that are using. For errors on non-Canon PictBridge compliant devices, check the error code on the LED and take the appropriate action to the instruction manual...
... clear the error. Error Message On PictBridge Compliant Device "Printer in "An Error Code Is Displayed on the LED" on page 44. The error messages and operations may have occurred. Remove the jammed paper, load new paper, press the Black or Color button on page 33. Error Message Appears on a PictBridge Compliant Device The following are the possible errors that are using. For errors on non-Canon PictBridge compliant devices, check the error code on the LED and take the appropriate action to the instruction manual...
MP210 series Quick Start Guide
Page 74
... YOUR PRINTHEAD, INK CARTRIDGE(S) AND TANK(S). InstantExchange Service exchanges your Product with instructions and a prepaid waybill), follow the enclosed instructions on your request for the Product serial number and other rights, which will normally be shipped the same day if your original limited warranty. Canon USA offers a range of customer technical support* options: z Interactive troubleshooting, e-mail technical support, the latest driver downloads and answers...
... YOUR PRINTHEAD, INK CARTRIDGE(S) AND TANK(S). InstantExchange Service exchanges your Product with instructions and a prepaid waybill), follow the enclosed instructions on your request for the Product serial number and other rights, which will normally be shipped the same day if your original limited warranty. Canon USA offers a range of customer technical support* options: z Interactive troubleshooting, e-mail technical support, the latest driver downloads and answers...
MP210 series Quick Start Guide
Page 76
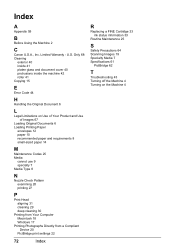
... Original Documents 6 Loading Printing Paper envelopes 12 paper 10 recommended paper and requirements 8 small-sized paper 14 M Maintenance Codes 25 Media cannot use 9 specialty 7 Media Type 8 N Nozzle Check Pattern examining 28 printing 27 P Print Head aligning 31 cleaning 29 deep cleaning 30 Printing from Your Computer Macintosh 18 Windows 17 Printing Photographs Directly from a Compliant Device 20 PictBridge print settings 22 72 Index R Replacing a FINE Cartridge 33 ink status information 33 Routine Maintenance 25 S Safety Precautions 64 Scanning Images 19 Specialty Media 7 Specifications...
... Original Documents 6 Loading Printing Paper envelopes 12 paper 10 recommended paper and requirements 8 small-sized paper 14 M Maintenance Codes 25 Media cannot use 9 specialty 7 Media Type 8 N Nozzle Check Pattern examining 28 printing 27 P Print Head aligning 31 cleaning 29 deep cleaning 30 Printing from Your Computer Macintosh 18 Windows 17 Printing Photographs Directly from a Compliant Device 20 PictBridge print settings 22 72 Index R Replacing a FINE Cartridge 33 ink status information 33 Routine Maintenance 25 S Safety Precautions 64 Scanning Images 19 Specialty Media 7 Specifications...
MP210 series Easy Setup Instructions
Page 2
... TURN THE MACHINE ON. We would take part in this message is a trademark of Microsoft Corporation, registered in the User's Guide on as "Windows Vista") installation. You will begin identifying the printer port being used. "Windows" is located on the operating system you may appear during the installation process. c Double-click the Setup icon. Refer to proceed the installation. m When the PIXMA Extended Survey Program screen appears, confirm the message. The MP Drivers, On-screen Manuals...
... TURN THE MACHINE ON. We would take part in this message is a trademark of Microsoft Corporation, registered in the User's Guide on as "Windows Vista") installation. You will begin identifying the printer port being used. "Windows" is located on the operating system you may appear during the installation process. c Double-click the Setup icon. Refer to proceed the installation. m When the PIXMA Extended Survey Program screen appears, confirm the message. The MP Drivers, On-screen Manuals...


