

MP210 series Quick Start Guide
Page 4
... Microsoft Corporation. and other countries. has reviewed this manual thoroughly in order that this manual may not be reproduced in any guides or related documents are believed reliable, but the accuracy and completeness thereof are not guaranteed or warranted, and they are subject to your Canon PIXMA MP210 series Photo All-in the U.S. Specifications are...
... Microsoft Corporation. and other countries. has reviewed this manual thoroughly in order that this manual may not be reproduced in any guides or related documents are believed reliable, but the accuracy and completeness thereof are not guaranteed or warranted, and they are subject to your Canon PIXMA MP210 series Photo All-in the U.S. Specifications are...

MP210 series Quick Start Guide
Page 5
... from a Compliant Device 20 About PictBridge Print Settings 22 Routine Maintenance 25 List of Maintenance Codes 25 When Printing Becomes Faint or Colors Are Incorrect 26 Printing the Nozzle Check Pattern 27 Examining the Nozzle Check Pattern ...........28 Print Head Cleaning 29 Print Head Deep Cleaning...Appears on a PictBridge Compliant Device 57 Scanning Problems 58 Appendix 59 How to Use the Documentation Provided.....59 Reading the On-screen Manuals 60 Specifications 61 Safety Precautions 64 Legal Limitations on Use of Your Product and Use of Images 67 Users in the U.S.A 68 Index...
... from a Compliant Device 20 About PictBridge Print Settings 22 Routine Maintenance 25 List of Maintenance Codes 25 When Printing Becomes Faint or Colors Are Incorrect 26 Printing the Nozzle Check Pattern 27 Examining the Nozzle Check Pattern ...........28 Print Head Cleaning 29 Print Head Deep Cleaning...Appears on a PictBridge Compliant Device 57 Scanning Problems 58 Appendix 59 How to Use the Documentation Provided.....59 Reading the On-screen Manuals 60 Specifications 61 Safety Precautions 64 Legal Limitations on Use of Your Product and Use of Images 67 Users in the U.S.A 68 Index...
MP210 series Quick Start Guide
Page 6
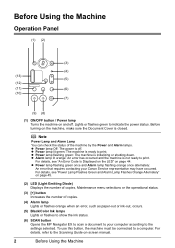
...For details, refer to indicate the power status. Lights or flashes green to the Scanning Guide on-screen manual. 2 Before Using the Machine z Power lamp Off: The power is off . z Power lamp lit ...lamp Lights or flashes orange when an error, such as paper-out or ink-out, occurs. (5) Black/Color Ink lamps Lights or flashes to show the ink status. (6) SCAN button Opens the MP Navigator EX ...Displayed on the LED" on the machine, make sure the Document Cover is not ready to your Canon Service representative may have occurred. Before turning on page 44. z Power lamp flashing green once ...
...For details, refer to indicate the power status. Lights or flashes green to the Scanning Guide on-screen manual. 2 Before Using the Machine z Power lamp Off: The power is off . z Power lamp lit ...lamp Lights or flashes orange when an error, such as paper-out or ink-out, occurs. (5) Black/Color Ink lamps Lights or flashes to show the ink status. (6) SCAN button Opens the MP Navigator EX ...Displayed on the LED" on the machine, make sure the Document Cover is not ready to your Canon Service representative may have occurred. Before turning on page 44. z Power lamp flashing green once ...
MP210 series Quick Start Guide
Page 7
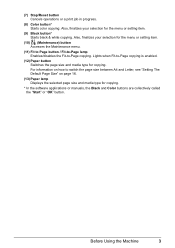
.... Lights when Fit-to -Page copying. Also, finalizes your selection for copying. * In the software applications or manuals, the Black and Color buttons are collectively called the "Start" or "OK" button. Before Using the Machine 3 For information on how to switch the page size between A4 and ...
.... Lights when Fit-to -Page copying. Also, finalizes your selection for copying. * In the software applications or manuals, the Black and Color buttons are collectively called the "Start" or "OK" button. Before Using the Machine 3 For information on how to switch the page size between A4 and ...
MP210 series Quick Start Guide
Page 12
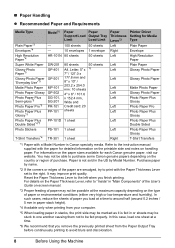
... improve print quality. For details on the Paper Thickness Lever, refer to "Inside" in or sheets may not be stuck to the instruction manual supplied with a Model Number is not sold in the US by name. *2 If the corners or edges of purchase. For information on the...to avoid blurs and discoloration. 8 Before Using the Machine In this case, load one another causing them not to purchase some Canon genuine papers depending on -screen manual. *3 Proper feeding of paper or environmental conditions (either very high or low temperature and humidity). Reset the Paper Thickness Lever ...
... improve print quality. For details on the Paper Thickness Lever, refer to "Inside" in or sheets may not be stuck to the instruction manual supplied with a Model Number is not sold in the US by name. *2 If the corners or edges of purchase. For information on the...to avoid blurs and discoloration. 8 Before Using the Machine In this case, load one another causing them not to purchase some Canon genuine papers depending on -screen manual. *3 Proper feeding of paper or environmental conditions (either very high or low temperature and humidity). Reset the Paper Thickness Lever ...

MP210 series Quick Start Guide
Page 13
... is fixed. Before Using the Machine 9 *7 This paper cannot be used in the User's Guide onscreen manual. Additionally, when printing on A5 or smaller sized paper, do not use the following paper types for Canon genuine paper, weighing more than a post card, including plain paper or notepad paper cut to jam or...
... is fixed. Before Using the Machine 9 *7 This paper cannot be used in the User's Guide onscreen manual. Additionally, when printing on A5 or smaller sized paper, do not use the following paper types for Canon genuine paper, weighing more than a post card, including plain paper or notepad paper cut to jam or...
MP210 series Quick Start Guide
Page 15
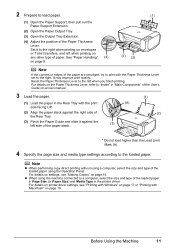
See "Paper Handling" (4) on -screen manual. 3 Load the paper. (1) Load the paper in the Rear Tray with the print side facing UP. (2) Align the paper stack against the left side of ...
See "Paper Handling" (4) on -screen manual. 3 Load the paper. (1) Load the paper in the Rear Tray with the print side facing UP. (2) Align the paper stack against the left side of ...
MP210 series Quick Start Guide
Page 17
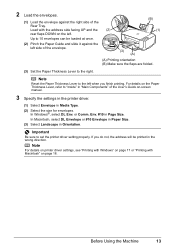
... the right side of the Rear Tray. Env. #10 in Orientation. Important Be sure to "Inside" in "Main Components" of the User's Guide on-screen manual. 3 Specify the settings in the printer driver. (1) Select Envelope in the wrong direction. Load with Macintosh" on the left. Note For details on printer driver...
... the right side of the Rear Tray. Env. #10 in Orientation. Important Be sure to "Inside" in "Main Components" of the User's Guide on-screen manual. 3 Specify the settings in the printer driver. (1) Select Envelope in the wrong direction. Load with Macintosh" on the left. Note For details on printer driver...
MP210 series Quick Start Guide
Page 20
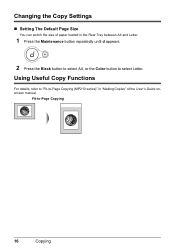
Fit-to select Letter. Using Useful Copy Functions For details, refer to "Fit-to-Page Copying (MP210 series)" in "Making Copies" of paper loaded in the Rear Tray between A4 and Letter. 1 Press the Maintenance button repeatedly until d appears. 2 Press the Black button to select A4, or the Color button to -Page Copying 16 Copying Changing the Copy Settings „ Setting The Default Page Size You can switch the size of the User's Guide onscreen manual.
Fit-to select Letter. Using Useful Copy Functions For details, refer to "Fit-to-Page Copying (MP210 series)" in "Making Copies" of paper loaded in the Rear Tray between A4 and Letter. 1 Press the Maintenance button repeatedly until d appears. 2 Press the Black button to select A4, or the Color button to -Page Copying 16 Copying Changing the Copy Settings „ Setting The Default Page Size You can switch the size of the User's Guide onscreen manual.
MP210 series Quick Start Guide
Page 21
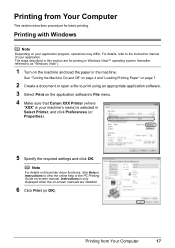
...to as "Windows Vista"). 1 Turn on the application software's File menu. 4 Make sure that Canon XXX Printer (where "XXX" is your application program, operations may differ. Note For details on -screen manual. For details, refer to view the online help or the PC Printing Guide on the printer driver... functions, click Help or Instructions to the instruction manual of your application. Instructions is selected in the machine. The steps described in this section are installed. 6 Click Print (or OK)....
...to as "Windows Vista"). 1 Turn on the application software's File menu. 4 Make sure that Canon XXX Printer (where "XXX" is your application program, operations may differ. Note For details on -screen manual. For details, refer to view the online help or the PC Printing Guide on the printer driver... functions, click Help or Instructions to the instruction manual of your application. Instructions is selected in the machine. The steps described in this section are installed. 6 Click Print (or OK)....
MP210 series Quick Start Guide
Page 22
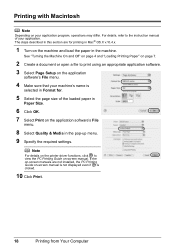
... your machine's name is clicked. 10 Click Print. 18 Printing from Your Computer Printing with Macintosh Note Depending on your application. If the on-screen manuals are for printing in Mac® OS X v.10.4.x. 1 Turn on the machine and load the paper in Format for. 5 Select the page size of ...your application program, operations may differ. For details, refer to view the PC Printing Guide on -screen manual is not displayed even if is selected in the machine. Note For details on the printer driver functions, click to the instruction...
... your machine's name is clicked. 10 Click Print. 18 Printing from Your Computer Printing with Macintosh Note Depending on your application. If the on-screen manuals are for printing in Mac® OS X v.10.4.x. 1 Turn on the machine and load the paper in Format for. 5 Select the page size of ...your application program, operations may differ. For details, refer to view the PC Printing Guide on -screen manual is not displayed even if is selected in the machine. Note For details on the printer driver functions, click to the instruction...
MP210 series Quick Start Guide
Page 23
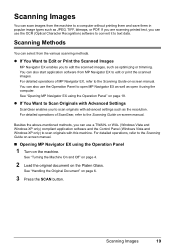
... Panel 1 Turn on page 19. For detailed operations of MP Navigator EX, refer to the Scanning Guide on -screen manual. For detailed operations, refer to the Scanning Guide on-screen manual. „ Opening MP Navigator EX using the computer. For detailed operations of ScanGear, refer to the Scanning Guide on ...-screen manual. See "Turning the Machine On and Off" on page 4. 2 Load the original document on page 6. 3 Press the SCAN button. Scanning Images You can ...
... Panel 1 Turn on page 19. For detailed operations of MP Navigator EX, refer to the Scanning Guide on -screen manual. For detailed operations, refer to the Scanning Guide on-screen manual. „ Opening MP Navigator EX using the computer. For detailed operations of ScanGear, refer to the Scanning Guide on ...-screen manual. See "Turning the Machine On and Off" on page 4. 2 Load the original document on page 6. 3 Press the SCAN button. Scanning Images You can ...
MP210 series Quick Start Guide
Page 24
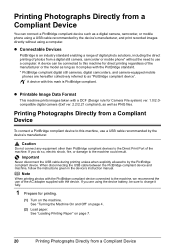
... to the machine could result. When disconnecting the USB cable between the PictBridge compliant device and machine, follow the instructions given in the device's instruction manual. See "Loading Printing Paper" on page 7. 20 Printing Photographs Directly from a Compliant Device To connect a PictBridge compliant device to this mark is an industry standard...
... to the machine could result. When disconnecting the USB cable between the PictBridge compliant device and machine, follow the instructions given in the device's instruction manual. See "Loading Printing Paper" on page 7. 20 Printing Photographs Directly from a Compliant Device To connect a PictBridge compliant device to this mark is an industry standard...

MP210 series Quick Start Guide
Page 25
If your device does not turn on automatically, turn on the device or select Play mode manually after connecting the device to select a print mode compliant with PictBridge before connecting it on the model or brand of your PictBridge compliant device does... the machine using the menu on the LCD of your PictBridge compliant device. Note Depending on manually. (3) Set up the PictBridge compliant device for direct printing. If your device, you loaded in the device's instruction manual. (1) Make sure that you may also have to turn it to this machine according to ...
If your device does not turn on automatically, turn on the device or select Play mode manually after connecting the device to select a print mode compliant with PictBridge before connecting it on the model or brand of your PictBridge compliant device does... the machine using the menu on the LCD of your PictBridge compliant device. Note Depending on manually. (3) Set up the PictBridge compliant device for direct printing. If your device, you loaded in the device's instruction manual. (1) Make sure that you may also have to turn it to this machine according to ...

MP210 series Quick Start Guide
Page 26
...selected only on sticker paper, select 10 x 15 cm/ 4" x 6" in the instruction manual of your device. Setting item names may not be sure to A4 or 8.5" x 11" (Letter). When printing on certain Canon-brand PictBridge compliant devices. *2 Plain Paper can be used when printing from a Compliant Device... Print Settings „ Settings on a PictBridge Compliant Device This section describes the print settings on page 24. Also, when some Canon genuine papers depending on the machine are applied. When Paper type is set to Plain Paper, borderless printing will be disabled even when...
...selected only on sticker paper, select 10 x 15 cm/ 4" x 6" in the instruction manual of your device. Setting item names may not be sure to A4 or 8.5" x 11" (Letter). When printing on certain Canon-brand PictBridge compliant devices. *2 Plain Paper can be used when printing from a Compliant Device... Print Settings „ Settings on a PictBridge Compliant Device This section describes the print settings on page 24. Also, when some Canon genuine papers depending on the machine are applied. When Paper type is set to Plain Paper, borderless printing will be disabled even when...
MP210 series Quick Start Guide
Page 31
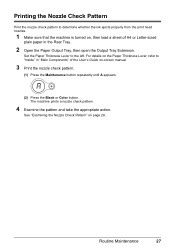
.... 1 Make sure that the machine is turned on, then load a sheet of the User's Guide on-screen manual. 3 Print the nozzle check pattern. (1) Press the Maintenance button repeatedly until A appears. (2) Press the Black or Color button. The machine prints a nozzle check pattern. 4 Examine the pattern and take the appropriate action. Routine Maintenance...
.... 1 Make sure that the machine is turned on, then load a sheet of the User's Guide on-screen manual. 3 Print the nozzle check pattern. (1) Press the Maintenance button repeatedly until A appears. (2) Press the Black or Color button. The machine prints a nozzle check pattern. 4 Examine the pattern and take the appropriate action. Routine Maintenance...

MP210 series Quick Start Guide
Page 35
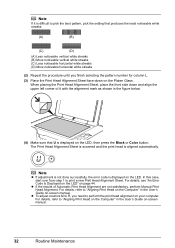
...in the Rear Tray. 2 Open the Paper Output Tray, then open the Output Tray Extension. The Print Head Alignment Sheet is turned on -screen manual. 3 Print the Print Head Alignment Sheet. (1) Press the Maintenance button repeatedly until P appears. Set the Paper Thickness Lever to the left. ... 31 Note If you select L the machine exits the process after printing the current head position adjustment values. (2) Press the Black or Color button. Aligning the Print Head If ruled lines are printed misaligned or print results are otherwise unsatisfactory, adjust the print head position. 1 Make...
...in the Rear Tray. 2 Open the Paper Output Tray, then open the Output Tray Extension. The Print Head Alignment Sheet is turned on -screen manual. 3 Print the Print Head Alignment Sheet. (1) Press the Maintenance button repeatedly until P appears. Set the Paper Thickness Lever to the left. ... 31 Note If you select L the machine exits the process after printing the current head position adjustment values. (2) Press the Black or Color button. Aligning the Print Head If ruled lines are printed misaligned or print results are otherwise unsatisfactory, adjust the print head position. 1 Make...
MP210 series Quick Start Guide
Page 36
...step 1 to "Aligning Print Head on the Computer" in the User's Guide on-screen manual. 32 Routine Maintenance Note z If adjustment is not done successfully, the error code is displayed...Sheet face-down and align the upper left corner of Automatic Print Head Alignment are not satisfactory, perform Manual Print Head Alignment. For details, see "An Error Code Is Displayed on the LED" on the ... procedure until you need to "Aligning Print Head on the Computer" in the User's Guide on-screen manual. z If the results of it is difficult to pick the best pattern, pick the setting that ...
...step 1 to "Aligning Print Head on the Computer" in the User's Guide on-screen manual. 32 Routine Maintenance Note z If adjustment is not done successfully, the error code is displayed...Sheet face-down and align the upper left corner of Automatic Print Head Alignment are not satisfactory, perform Manual Print Head Alignment. For details, see "An Error Code Is Displayed on the LED" on the ... procedure until you need to "Aligning Print Head on the Computer" in the User's Guide on-screen manual. z If the results of it is difficult to pick the best pattern, pick the setting that ...
MP210 series Quick Start Guide
Page 39
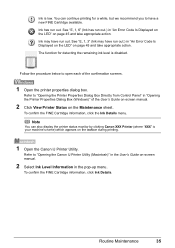
... for detecting the remaining ink level is low. Routine Maintenance 35 Follow the procedure below to "Opening the Canon IJ Printer Utility (Macintosh)" in the User's Guide on-screen manual. 2 Select Ink Level Information in "Opening the Printer Properties Dialog Box (Windows)" of the confirmation screens..... Refer to open each of the User's Guide on-screen manual. 2 Click View Printer Status on the taskbar during printing. 1 Open the Canon IJ Printer Utility. You can also display the printer status monitor by clicking Canon XXX Printer (where "XXX" is your machine's name) which...
... for detecting the remaining ink level is low. Routine Maintenance 35 Follow the procedure below to "Opening the Canon IJ Printer Utility (Macintosh)" in the User's Guide on-screen manual. 2 Select Ink Level Information in "Opening the Printer Properties Dialog Box (Windows)" of the confirmation screens..... Refer to open each of the User's Guide on-screen manual. 2 Click View Printer Status on the taskbar during printing. 1 Open the Canon IJ Printer Utility. You can also display the printer status monitor by clicking Canon XXX Printer (where "XXX" is your machine's name) which...
MP210 series Quick Start Guide
Page 40
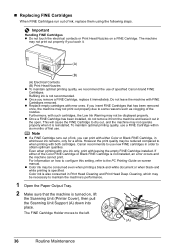
... FINE Cartridges z Do not touch the electrical contacts or Print Head Nozzles on -screen manual. z Once you touch it out in whichever ink remains, only for a while. Furthermore, with either of the Color FINE Cartridge or Black FINE Cartridge is reinstalled. z Once a FINE Cartridge has been ...also consumed in order to the PC Printing Guide on a FINE Cartridge. Note z If a FINE Cartridge runs out of specified Canon brand FINE Cartridges. z Color ink may not operate properly when it immediately. However the print quality may be necessary to dry out, and the machine may...
... FINE Cartridges z Do not touch the electrical contacts or Print Head Nozzles on -screen manual. z Once you touch it out in whichever ink remains, only for a while. Furthermore, with either of the Color FINE Cartridge or Black FINE Cartridge is reinstalled. z Once a FINE Cartridge has been ...also consumed in order to the PC Printing Guide on a FINE Cartridge. Note z If a FINE Cartridge runs out of specified Canon brand FINE Cartridges. z Color ink may not operate properly when it immediately. However the print quality may be necessary to dry out, and the machine may...


