ZoomBrowser EX 6.5 for Windows Instruction Manual
Page 3
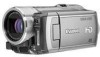
... with an interface cable, make sure to connect the cable directly to the computer's USB port. The connections may not operate correctly. • Do not allow the computer to go into sleep (standby) mode while a camera is displayed on connecting the camera to the computer. Ensure that you use fully charged batteries if you attach the camera to the computer via the USB interface cable. Things to Remember...
... with an interface cable, make sure to connect the cable directly to the computer's USB port. The connections may not operate correctly. • Do not allow the computer to go into sleep (standby) mode while a camera is displayed on connecting the camera to the computer. Ensure that you use fully charged batteries if you attach the camera to the computer via the USB interface cable. Things to Remember...
ZoomBrowser EX 6.5 for Windows Instruction Manual
Page 5
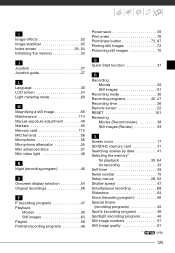
... Comparing Images...45 Comparing Multiple Images...45 My Camera Settings...46 Changing the Shutter Sound and Start-Up Image 46 Transferring Images...48 Transferring Images to a Camera 48 CANON iMAGE GATEWAY...49 About CANON iMAGE GATEWAY (for U.S.A. customers only 49 Registering...49 Available Services...50 Preference Settings...51 Customizing ZoomBrowser EX...51 Customizing the Task Buttons...51 Appendices...52 List of Available Functions...52 Supported Image Types...54 Uninstalling the Software...55 Memory Card Folder Structure 56 Troubleshooting...
... Comparing Images...45 Comparing Multiple Images...45 My Camera Settings...46 Changing the Shutter Sound and Start-Up Image 46 Transferring Images...48 Transferring Images to a Camera 48 CANON iMAGE GATEWAY...49 About CANON iMAGE GATEWAY (for U.S.A. customers only 49 Registering...49 Available Services...50 Preference Settings...51 Customizing ZoomBrowser EX...51 Customizing the Task Buttons...51 Appendices...52 List of Available Functions...52 Supported Image Types...54 Uninstalling the Software...55 Memory Card Folder Structure 56 Troubleshooting...
ZoomBrowser EX 6.5 for Windows Instruction Manual
Page 53
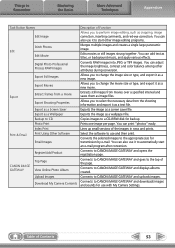
... "photos" easily. Edits movies or still images strung together. Exports the image as a text file. Allows you to select the necessary data from movies over a specified interval and saves them as a new image. Copies images to use it as a screen saver file. Select the software to a CD-R/RW disk for transmission by e-mail. Connects to start an e-mail program after conversion. You can adjust the image brightness, contrast and color balance...
... "photos" easily. Edits movies or still images strung together. Exports the image as a text file. Allows you to select the necessary data from movies over a specified interval and saves them as a new image. Copies images to use it as a screen saver file. Select the software to a CD-R/RW disk for transmission by e-mail. Connects to start an e-mail program after conversion. You can adjust the image brightness, contrast and color balance...
Digital Video Software (Macintosh) Ver.30 Instruction Manual
Page 33
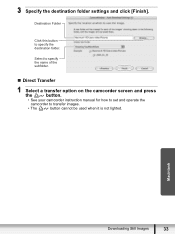
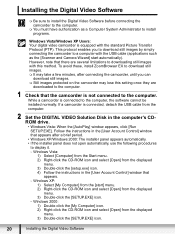
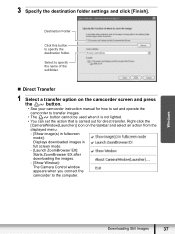
Macintosh Downloading Still Images 33 Select to specify the name of the subfolder. „ Direct Transfer 1 Select a transfer option on the camcorder screen and press the button. • See your camcorder instruction manual for how to set and operate the camcorder to specify the destination folder. Destination Folder Click this button to transfer images. • The button cannot be used when it is not lighted. 3 Specify the destination folder settings and click [Finish].
Macintosh Downloading Still Images 33 Select to specify the name of the subfolder. „ Direct Transfer 1 Select a transfer option on the camcorder screen and press the button. • See your camcorder instruction manual for how to set and operate the camcorder to specify the destination folder. Destination Folder Click this button to transfer images. • The button cannot be used when it is not lighted. 3 Specify the destination folder settings and click [Finish].
VIXIA HF10/VIXIA HF100 Instruction Manual
Page 3
... this manual. 11 Polarization - The 2-prong polarized plug will fit into the outlet, try reversing the plug. If the plug still fails to fit, contact your obsolete outlet. PART H) 3 Quick stops, excessive force, and uneven surfaces may be adhered to replace your electrician to . 4 Follow Instructions - This is grounded so as battery power, refer to the product, be operated only from the type...
... this manual. 11 Polarization - The 2-prong polarized plug will fit into the outlet, try reversing the plug. If the plug still fails to fit, contact your obsolete outlet. PART H) 3 Quick stops, excessive force, and uneven surfaces may be adhered to replace your electrician to . 4 Follow Instructions - This is grounded so as battery power, refer to the product, be operated only from the type...

VIXIA HF10/VIXIA HF100 Instruction Manual
Page 12
... the Canon VIXIA HF10/VIXIA HF100. Brackets [ ] and capital letters are displayed on screen. Conventions Used in boldface. DW-100 Refer to be indicated with a still camera. For example [ON], [OFF]. Buttons and switches to the instruction manual of buttons and switches other instruction manuals. To complete some operations you press again to both ( only). Should your camcorder fail to operate correctly, refer to the . DVSD Refer to the "Digital Video Software" instruction manual...
... the Canon VIXIA HF10/VIXIA HF100. Brackets [ ] and capital letters are displayed on screen. Conventions Used in boldface. DW-100 Refer to be indicated with a still camera. For example [ON], [OFF]. Buttons and switches to the instruction manual of buttons and switches other instruction manuals. To complete some operations you press again to both ( only). Should your camcorder fail to operate correctly, refer to the . DVSD Refer to the "Digital Video Software" instruction manual...

VIXIA HF10/VIXIA HF100 Instruction Manual
Page 17
... Displays Recording Movies Playing Movies (During Playback) Operating mode ( 26) Recording program ( 45, 47) White balance ( 51) Image effect ( 52) Digital effects ( 53) Recording mode ( 36) Still image quality/size (simultaneous recording) ( 68) Remote sensor off ( 96) Instant AF ( 92), MF Manual focus ( 50) 24F progressive frame rate ( 19) Memory operation ( 19) Time code/Playback time (hours : minutes : seconds) Remaining recording time On the memory card In the built-in memory Remaining battery time ( 19) Image stabilizer ( 93) Wind screen off ( 94) Headphones output ( 56) Microphone...
... Displays Recording Movies Playing Movies (During Playback) Operating mode ( 26) Recording program ( 45, 47) White balance ( 51) Image effect ( 52) Digital effects ( 53) Recording mode ( 36) Still image quality/size (simultaneous recording) ( 68) Remote sensor off ( 96) Instant AF ( 92), MF Manual focus ( 50) 24F progressive frame rate ( 19) Memory operation ( 19) Time code/Playback time (hours : minutes : seconds) Remaining recording time On the memory card In the built-in memory Remaining battery time ( 19) Image stabilizer ( 93) Wind screen off ( 94) Headphones output ( 56) Microphone...

VIXIA HF10/VIXIA HF100 Instruction Manual
Page 35
... Video This chapter covers functions related to . 2 Turn on the camcorder. Basic Recording Shooting Video ( 26) 1 Set the mode dial to shooting movies, including recording, playback, menu options, and memory operations. press START/STOP again to begin recording. • Recording starts; Do not change the brightness of the mode dial. You can also press START/STOP on or flashing. IMPORTANT Observe the following precautions while the ACCESS indicator is on the LCD panel. Do not open the memory card...
... Video This chapter covers functions related to . 2 Turn on the camcorder. Basic Recording Shooting Video ( 26) 1 Set the mode dial to shooting movies, including recording, playback, menu options, and memory operations. press START/STOP again to begin recording. • Recording starts; Do not change the brightness of the mode dial. You can also press START/STOP on or flashing. IMPORTANT Observe the following precautions while the ACCESS indicator is on the LCD panel. Do not open the memory card...

VIXIA HF10/VIXIA HF100 Instruction Manual
Page 36
... (Recording Mode) The camcorder offers 4 recording modes. select LP mode for better movie quality; NOTES • The camcorder uses a variable bit rate (VBR) to encode video so the actual recording times will change the recording time available on the content of the scenes. • The camcorder retains the last setting used even if you set the camcorder to mode. LP 6 hr. 5 min. 45 min. 1 hr. 30 min. 3 hr. * Recorded in memory 2 GB memory card 4 GB memory card...
... (Recording Mode) The camcorder offers 4 recording modes. select LP mode for better movie quality; NOTES • The camcorder uses a variable bit rate (VBR) to encode video so the actual recording times will change the recording time available on the content of the scenes. • The camcorder retains the last setting used even if you set the camcorder to mode. LP 6 hr. 5 min. 45 min. 1 hr. 30 min. 3 hr. * Recorded in memory 2 GB memory card 4 GB memory card...
VIXIA HF10/VIXIA HF100 Instruction Manual
Page 72
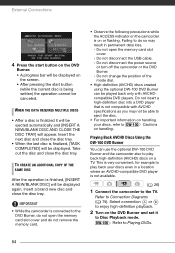
.... 6 seconds. Erasing all print orders NOTES • will not be connected to . • The (print/share) button lights up and the current print settings will be printed. • We recommend powering the camcorder using the supplied USB cable. • Connection . After a short while, turn off the camcorder and the printer. Canon printers: SELPHY printers of copies as a print order ( 76). Photos Printing Photos Printing Photos (Direct Print) The camcorder can...
.... 6 seconds. Erasing all print orders NOTES • will not be connected to . • The (print/share) button lights up and the current print settings will be printed. • We recommend powering the camcorder using the supplied USB cable. • Connection . After a short while, turn off the camcorder and the printer. Canon printers: SELPHY printers of copies as a print order ( 76). Photos Printing Photos Printing Photos (Direct Print) The camcorder can...
VIXIA HF10/VIXIA HF100 Instruction Manual
Page 84
... USB cable. - Select connection or to enjoy high-definition playback. 2 Turn on a TV. IMPORTANT • While the camcorder is finalized it to the DVD Burner, do not open the memory card slot cover. - WHEN THE DATA REQUIRES MULTIPLE DISCS • After a disc is connected to Disc Playback mode. Insert the next disc and close the disc tray. Insert a brand new disc and close the disc tray. Do not disconnect the power source or turn...
... USB cable. - Select connection or to enjoy high-definition playback. 2 Turn on a TV. IMPORTANT • While the camcorder is finalized it to the DVD Burner, do not open the memory card slot cover. - WHEN THE DATA REQUIRES MULTIPLE DISCS • After a disc is connected to Disc Playback mode. Insert the next disc and close the disc tray. Insert a brand new disc and close the disc tray. Do not disconnect the power source or turn...
VIXIA HF10/VIXIA HF100 Instruction Manual
Page 85
...; Use the OPEN/CLOSE button on the DVD Burner to open the memory card slot cover and do not open and close the disc tray. • After the disc is connected to a VCR or a digital video device. If your recordings by connecting the camcorder to the DVD Burner. • Some of the special playback modes (frame advance/reverse, slow playback, fast playback at 60x speed, etc.) cannot be played back using Connection . Recording 1 External device: Load a blank cassette or disc and set the device to record pause mode. 2 Camcorder...
...; Use the OPEN/CLOSE button on the DVD Burner to open the memory card slot cover and do not open and close the disc tray. • After the disc is connected to a VCR or a digital video device. If your recordings by connecting the camcorder to the DVD Burner. • Some of the special playback modes (frame advance/reverse, slow playback, fast playback at 60x speed, etc.) cannot be played back using Connection . Recording 1 External device: Load a blank cassette or disc and set the device to record pause mode. 2 Camcorder...
VIXIA HF10/VIXIA HF100 Instruction Manual
Page 86
... memory card. • Observe the following precautions while the ACCESS indicator is on -screen displays will be embedded in permanent data loss. - Failing to Connection Diagrams ( 79). • If the device type selection screen appears, select [ PC/PRINTER] and press . • The direct transfer menu appears on the DIGITAL VIDEO Solution Disk CD-ROM you can change the displays by pressing . External Connections 4 External device: Begin recording when the scene you wish to mode. Stop recording when copying...
... memory card. • Observe the following precautions while the ACCESS indicator is on -screen displays will be embedded in permanent data loss. - Failing to Connection Diagrams ( 79). • If the device type selection screen appears, select [ PC/PRINTER] and press . • The direct transfer menu appears on the DIGITAL VIDEO Solution Disk CD-ROM you can change the displays by pressing . External Connections 4 External device: Begin recording when the scene you wish to mode. Stop recording when copying...

VIXIA HF10/VIXIA HF100 Instruction Manual
Page 96
... HDMI cable. [BATTERY INFO]: Displays a screen where you can verify the battery charge (as a percentage) and the remaining recording time ( , mode) or playback time ( , mode). [WL.REMOTE]: Allows the camcorder to be operated with the compact power adapter if you leave it turned on for more than 5 minutes. • To cancel the demo mode once it has started, press any button or turn off the camcorder. System Setup (Speaker Volume, Beep, etc.) SYSTEM SETUP Menu item Setting options [BATTERY...
... HDMI cable. [BATTERY INFO]: Displays a screen where you can verify the battery charge (as a percentage) and the remaining recording time ( , mode) or playback time ( , mode). [WL.REMOTE]: Allows the camcorder to be operated with the compact power adapter if you leave it turned on for more than 5 minutes. • To cancel the demo mode once it has started, press any button or turn off the camcorder. System Setup (Speaker Volume, Beep, etc.) SYSTEM SETUP Menu item Setting options [BATTERY...
VIXIA HF10/VIXIA HF100 Instruction Manual
Page 102
... replace the memory card. - Replace the battery of the LOCK switch ( 113). - Initialize the memory card ( 33) when you connected the camcorder. Memory Card and Accessories Cannot insert the memory card. - The internal lens fixture can be captured from the camcorder. - menu is turned off . Set [TV TYPE] to free some recordings to [WIDE TV] ( 97). Set [IMG NUMBERS] to mode. Still images cannot be heard from the playback scene when [TV TYPE] is located, keep a distance between the compact power adapter...
... replace the memory card. - Replace the battery of the LOCK switch ( 113). - Initialize the memory card ( 33) when you connected the camcorder. Memory Card and Accessories Cannot insert the memory card. - The internal lens fixture can be captured from the camcorder. - menu is turned off . Set [TV TYPE] to free some recordings to [WIDE TV] ( 97). Set [IMG NUMBERS] to mode. Still images cannot be heard from the playback scene when [TV TYPE] is located, keep a distance between the compact power adapter...
VIXIA HF10/VIXIA HF100 Instruction Manual
Page 106
... THE CARD IS SET FOR ERASURE PREVENTION - NAMING ERROR - Reading data from the memory card. SOME SCENES COULD NOT BE DELETED - You pressed START/STOP while recording still images ( mode). Additional Information MAY NOT BE POSSIBLE TO RECORD MOVIES ON THIS CARD - NOT AVAILABLE IN MODE - You pressed a button that were protected/edited with one rated Speed Class 2 or higher. Set [IMG NUMBERS] to [RESET] ( erase all the images on the camcorder if power...
... THE CARD IS SET FOR ERASURE PREVENTION - NAMING ERROR - Reading data from the memory card. SOME SCENES COULD NOT BE DELETED - You pressed START/STOP while recording still images ( mode). Additional Information MAY NOT BE POSSIBLE TO RECORD MOVIES ON THIS CARD - NOT AVAILABLE IN MODE - You pressed a button that were protected/edited with one rated Speed Class 2 or higher. Set [IMG NUMBERS] to [RESET] ( erase all the images on the camcorder if power...
VIXIA HF10/VIXIA HF100 Instruction Manual
Page 125
... Power save 35 Print order 76 Print/share button 73, 87 Printing still images 72 Protecting still images 70 Q Quick Start function 37 R Recording Movies 35 Still images 61 Recording mode 36 Recording programs 45, 47 Recording time 36 Remote sensor 22 RESET 101 Reviewing Movies (Record review 38 Still images (Review 93 S Screen icons 17 SD/SDHC memory card 31 Searching scenes by date 41 Selecting the memory* for playback 39, 64 for recording 33 Self timer 49 Serial number 15 Setup...
... Power save 35 Print order 76 Print/share button 73, 87 Printing still images 72 Protecting still images 70 Q Quick Start function 37 R Recording Movies 35 Still images 61 Recording mode 36 Recording programs 45, 47 Recording time 36 Remote sensor 22 RESET 101 Reviewing Movies (Record review 38 Still images (Review 93 S Screen icons 17 SD/SDHC memory card 31 Searching scenes by date 41 Selecting the memory* for playback 39, 64 for recording 33 Self timer 49 Serial number 15 Setup...
Digital Video Software (Windows) Ver.30 Instruction Manual
Page 20
... a computer with the USB cable (applications such as the [Scanner and Camera Wizard] start ] menu. 2) Right-click the CD-ROM icon and select [Open] from the displayed menu. 3) Double-click the [setup.exe] icon. 4) Follow the instructions in the [User Account Control] window that the camcorder is connected, detach the USB cable from the displayed menu. 3) Double-click the [SETUP.EXE] icon. 20 Installing the Digital Video Software To avoid these, install ZoomBrowser EX to...
... a computer with the USB cable (applications such as the [Scanner and Camera Wizard] start ] menu. 2) Right-click the CD-ROM icon and select [Open] from the displayed menu. 3) Double-click the [setup.exe] icon. 4) Follow the instructions in the [User Account Control] window that the camcorder is connected, detach the USB cable from the displayed menu. 3) Double-click the [SETUP.EXE] icon. 20 Installing the Digital Video Software To avoid these, install ZoomBrowser EX to...
Digital Video Software (Windows) Ver.30 Instruction Manual
Page 37
... your camcorder instruction manual for how to set and operate the camcorder to transfer images. • The button cannot be used when it is not lighted. • You can set the action that is carried out for direct transfer. Select to specify the name of the subfolder. „ Direct Transfer 1 Select a transfer option on the taskbar and select an action from the displayed menu. - [Show image(s) in fullscreen mode]: Displays downloaded images in full screen mode...
... your camcorder instruction manual for how to set and operate the camcorder to transfer images. • The button cannot be used when it is not lighted. • You can set the action that is carried out for direct transfer. Select to specify the name of the subfolder. „ Direct Transfer 1 Select a transfer option on the taskbar and select an action from the displayed menu. - [Show image(s) in fullscreen mode]: Displays downloaded images in full screen mode...
Digital Video Software (Windows) Ver.30 Instruction Manual
Page 88
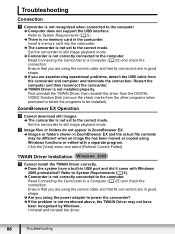
... does not support the USB interface. First uninstall the TWAIN Driver, then reinstall the driver from the DIGITAL VIDEO Solution Disk (remove the check marks from the camcorder and computer and terminate the connection. Troubleshooting Connection Camcorder is not installed properly. Restart the computer and then reconnect the camcorder. Î TWAIN Driver is not recognized when connected to be different when an image file has been moved or copied using Windows functions or edited...
... does not support the USB interface. First uninstall the TWAIN Driver, then reinstall the driver from the DIGITAL VIDEO Solution Disk (remove the check marks from the camcorder and computer and terminate the connection. Troubleshooting Connection Camcorder is not installed properly. Restart the computer and then reconnect the camcorder. Î TWAIN Driver is not recognized when connected to be different when an image file has been moved or copied using Windows functions or edited...


