
Basic Guide
Page 10
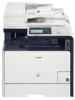
... panel to release the locks and slide the paper guides. MF8580Cdw Power switch Turns the power ON or OFF. Press the levers that are marked with arrows in the illustrations to control the machine (→p.13). Paper drawer Load paper here (→p.21). Ventilation slots Allows heat ... Learn the Names and Functions of Each Part of the machine. Lock release lever (for Legal size paper. 10 Front cover Open the cover to fit the paper. MF8280Cw Paper guides Adjust these guides to replace toner cartridges or clear paper jams. Speaker Emits sounds produced by the machine.
... panel to release the locks and slide the paper guides. MF8580Cdw Power switch Turns the power ON or OFF. Press the levers that are marked with arrows in the illustrations to control the machine (→p.13). Paper drawer Load paper here (→p.21). Ventilation slots Allows heat ... Learn the Names and Functions of Each Part of the machine. Lock release lever (for Legal size paper. 10 Front cover Open the cover to fit the paper. MF8280Cw Paper guides Adjust these guides to replace toner cartridges or clear paper jams. Speaker Emits sounds produced by the machine.
Basic Guide
Page 11
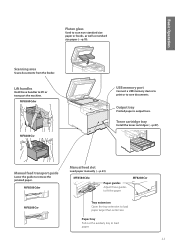
... memory port Connect a USB memory device to print or to fit the paper. MF8580Cdw Paper guides Adjust these handles to remove the jammed paper. Lift handles Hold these guides to save documents. MF8580Cdw Manual feed slot Load paper manually (→p.23). Manual feed transport guide Lower the guide to lift or transport the machine. Scanning area Scans...
... memory port Connect a USB memory device to print or to fit the paper. MF8580Cdw Paper guides Adjust these handles to remove the jammed paper. Lift handles Hold these guides to save documents. MF8580Cdw Manual feed slot Load paper manually (→p.23). Manual feed transport guide Lower the guide to lift or transport the machine. Scanning area Scans...

Basic Guide
Page 12
... a computer via a LAN cable. Power socket Connect the power cord. Rear cover Open this guide for reference when contacting the Canon Customer Care Center. 12 Rating label The machine's serial number (consists of this cover to escape from inside of the machine. Ventilation slots Allows heat to clear paper jams (→p.98, 99).
... a computer via a LAN cable. Power socket Connect the power cord. Rear cover Open this guide for reference when contacting the Canon Customer Care Center. 12 Rating label The machine's serial number (consists of this cover to escape from inside of the machine. Ventilation slots Allows heat to clear paper jams (→p.98, 99).

Basic Guide
Page 18
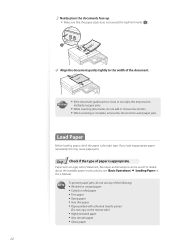
... glue, ink, or correction fluid on the document is completely dry. • To prevent paper jams in the feeder, place a document on the platen glass when using the following types of plain paper in the same size, thickness, and weight: Check available documents Size (Width X Length) ...12 to 28 lb Bond (50 to the document's type. Curled or rolled paper -- Transparency 18 Documents with staples or paper clips attached -- When placing non-standard documents such as heavy paper, small paper, or booklets: Check available documents NN Size (Width X Length) NN Maximum...
... glue, ink, or correction fluid on the document is completely dry. • To prevent paper jams in the feeder, place a document on the platen glass when using the following types of plain paper in the same size, thickness, and weight: Check available documents Size (Width X Length) ...12 to 28 lb Bond (50 to the document's type. Curled or rolled paper -- Transparency 18 Documents with staples or paper clips attached -- When placing non-standard documents such as heavy paper, small paper, or booklets: Check available documents NN Size (Width X Length) NN Maximum...
Basic Guide
Page 20
... following: • Wrinkled or creased paper • Curled or rolled paper • Torn paper • Damp paper • Very thin paper • Paper printed with a thermal transfer printer (Do not copy on the reverse side.) • Highly textured paper • Very smooth paper • Glossy paper 20 If you load inappropriate paper repeatedly, this may cause paper jams. 1 Step Check if the...
... following: • Wrinkled or creased paper • Curled or rolled paper • Torn paper • Damp paper • Very thin paper • Paper printed with a thermal transfer printer (Do not copy on the reverse side.) • Highly textured paper • Very smooth paper • Glossy paper 20 If you load inappropriate paper repeatedly, this may cause paper jams. 1 Step Check if the...
Basic Guide
Page 22
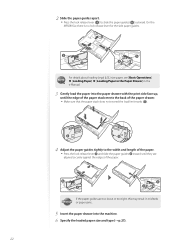
... On the MF8280Cw, there is no lock release lever for the side paper guides. For details about loading Legal (LGL) size paper, see [Basic Operations] [Loading Paper] [Loading Paper in the Paper Drawer] in misfeeds IMPORTANT or paper jams. 5 Insert the paper drawer into the paper drawer with the print side face up, until the edge of...
... On the MF8280Cw, there is no lock release lever for the side paper guides. For details about loading Legal (LGL) size paper, see [Basic Operations] [Loading Paper] [Loading Paper in the Paper Drawer] in misfeeds IMPORTANT or paper jams. 5 Insert the paper drawer into the paper drawer with the print side face up, until the edge of...
Basic Guide
Page 23
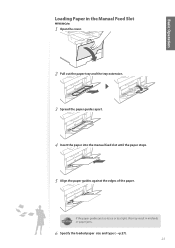
Basic Operation Loading Paper in misfeeds IMPORTANT or paper jams. 6 Specify the loaded paper size and type (→p.27). 23 If the paper guides are too loose or too tight, this may result in the Manual Feed Slot MF8580Cdw 1 Open the cover. 2 Pull out the paper tray and the tray extension. 3 Spread the paper guides apart. 4 Insert the paper into the manual feed slot until the paper stops. 5 Align the paper guides against the edges of the paper.
Basic Operation Loading Paper in misfeeds IMPORTANT or paper jams. 6 Specify the loaded paper size and type (→p.27). 23 If the paper guides are too loose or too tight, this may result in the Manual Feed Slot MF8580Cdw 1 Open the cover. 2 Pull out the paper tray and the tray extension. 3 Spread the paper guides apart. 4 Insert the paper into the manual feed slot until the paper stops. 5 Align the paper guides against the edges of the paper.

Basic Guide
Page 24
If the paper guides are too loose or too tight, this may result in misfeeds IMPORTANT or paper jams. 3 Specify the loaded paper size and type (→p.27). 24 MF8280Cw 1 Spread the paper guides apart. 2 Gently load the paper into the paper drawer with the print side face up, and adjust the paper guides tightly to the width of the paper.
If the paper guides are too loose or too tight, this may result in misfeeds IMPORTANT or paper jams. 3 Specify the loaded paper size and type (→p.27). 24 MF8280Cw 1 Spread the paper guides apart. 2 Gently load the paper into the paper drawer with the print side face up, and adjust the paper guides tightly to the width of the paper.

Basic Guide
Page 93
Troubleshooting This chapter describes how to clear paper jams and offers solutions to problems you may be having. Clear Jams 94 Resolve a Displayed Message 105 Resolve an Error Code 106 Improve Output Quality 107 Resolve a Problem 108 93
Troubleshooting This chapter describes how to clear paper jams and offers solutions to problems you may be having. Clear Jams 94 Resolve a Displayed Message 105 Resolve an Error Code 106 Improve Output Quality 107 Resolve a Problem 108 93

Basic Guide
Page 94
...MF8580Cdw Message Refer to: Clearing Document Jams in the Feeder (→p.95) Clearing Paper Jams in the Front Side (→p.97) Clearing Paper Jams in the Manual Feed Slot (→p.101) Clearing Paper Jams in the Paper Drawer (→p.100) Clearing Paper Jams in the Back Side (→p.98) MF8280Cdw Message ▶ ▶ Refer to display a message that no pieces of paper...put your hand in an area other metal objects to avoid paper cuts. Clear Jams If a paper jams, is jammed. When removing jammed paper or inspecting the inside the machine according to stain your ...
...MF8580Cdw Message Refer to: Clearing Document Jams in the Feeder (→p.95) Clearing Paper Jams in the Front Side (→p.97) Clearing Paper Jams in the Manual Feed Slot (→p.101) Clearing Paper Jams in the Paper Drawer (→p.100) Clearing Paper Jams in the Back Side (→p.98) MF8280Cdw Message ▶ ▶ Refer to display a message that no pieces of paper...put your hand in an area other metal objects to avoid paper cuts. Clear Jams If a paper jams, is jammed. When removing jammed paper or inspecting the inside the machine according to stain your ...

Basic Guide
Page 95
Clearing Document Jams in the Feeder (MF8580Cdw) After removing any documents placed in the feeder, follow the procedure below to remove jammed documents. 1 Open the feeder cover. 2 Move the lever to align the paper before loading it gently. Troubleshooting 95 IMPORTANT If the jammed paper is torn: Remove all torn pieces to avoid further jams. If repeated paper jams occur...
Clearing Document Jams in the Feeder (MF8580Cdw) After removing any documents placed in the feeder, follow the procedure below to remove jammed documents. 1 Open the feeder cover. 2 Move the lever to align the paper before loading it gently. Troubleshooting 95 IMPORTANT If the jammed paper is torn: Remove all torn pieces to avoid further jams. If repeated paper jams occur...

Basic Guide
Page 97
Clearing Paper Jams in the Front Side (MF8580Cdw) 1 Step Remove the jammed paper inside. 1 Open the front cover. 2 Lift the operation panel. 3 Gently pull out the paper. 2 Step Lower the operation panel and the front cover. 97 Troubleshooting
Clearing Paper Jams in the Front Side (MF8580Cdw) 1 Step Remove the jammed paper inside. 1 Open the front cover. 2 Lift the operation panel. 3 Gently pull out the paper. 2 Step Lower the operation panel and the front cover. 97 Troubleshooting

Basic Guide
Page 98
Clearing Paper Jams in the Back Side (MF8580Cdw) 1 Step Open the rear cover. 2 Step Remove the jammed paper deep in the back side. 1 Pull down the green knob toward you. 2 Gently pull out the paper. 3 Step Remove the jammed paper close this part until it clicks ▶ Gently pull out the paper. Step Close the rear cover. 98 Hold the green knobs, and firmly close to the back side.
Clearing Paper Jams in the Back Side (MF8580Cdw) 1 Step Open the rear cover. 2 Step Remove the jammed paper deep in the back side. 1 Pull down the green knob toward you. 2 Gently pull out the paper. 3 Step Remove the jammed paper close this part until it clicks ▶ Gently pull out the paper. Step Close the rear cover. 98 Hold the green knobs, and firmly close to the back side.

Basic Guide
Page 99
Lift the operation panel ▶ Gently pull out the paper. 2 Step Lower the operation panel. 3 Step Remove the jammed paper in the front side. Step Close the rear cover. 99 Troubleshooting Open the rear cover ▶ Gently pull out the paper. Clearing Paper Jams in the Front and Back Sides (MF8280Cw) 1 Step Remove the jammed paper in the back side.
Lift the operation panel ▶ Gently pull out the paper. 2 Step Lower the operation panel. 3 Step Remove the jammed paper in the front side. Step Close the rear cover. 99 Troubleshooting Open the rear cover ▶ Gently pull out the paper. Clearing Paper Jams in the Front and Back Sides (MF8280Cw) 1 Step Remove the jammed paper in the back side.

Basic Guide
Page 100
... same way. 3 Step When the screen shown below is installed, remove the paper in the Paper Drawer 1 Step Remove the jammed paper inside the paper drawer. Otherwise, you pulled out an optional paper drawer, set it slides out too easily. • Even if an optional paper drawer (MF8580Cdw only) is displayed, press [▲] or [▼] to hold the...
... same way. 3 Step When the screen shown below is installed, remove the paper in the Paper Drawer 1 Step Remove the jammed paper inside the paper drawer. Otherwise, you pulled out an optional paper drawer, set it slides out too easily. • Even if an optional paper drawer (MF8580Cdw only) is displayed, press [▲] or [▼] to hold the...

Basic Guide
Page 101
Do not forcibly remove jammed paper from the machine. If the jammed paper cannot be removed easily, proceed to the next step. 1 Gently pull out the paper. 2 Close the tray. 3 Step Remove the jammed document inside the tray. 1 Hold the paper drawer with both hands, and pull it out. 2 Hold the green knobs, and push down this part. 101 Troubleshooting Clearing Paper Jams in the Manual Feed Slot (MF8580Cdw) 1 Step Remove the paper that is loaded in the tray. 2 Step Remove the jammed paper in the tray.
Do not forcibly remove jammed paper from the machine. If the jammed paper cannot be removed easily, proceed to the next step. 1 Gently pull out the paper. 2 Close the tray. 3 Step Remove the jammed document inside the tray. 1 Hold the paper drawer with both hands, and pull it out. 2 Hold the green knobs, and push down this part. 101 Troubleshooting Clearing Paper Jams in the Manual Feed Slot (MF8580Cdw) 1 Step Remove the paper that is loaded in the tray. 2 Step Remove the jammed paper in the tray.

Basic Guide
Page 103
Paper Jams in the Manual Feed Slot (MF8280Cw) 1 Step Hold the paper drawer with both hands, and pull it out. 2 Step Remove the jammed document inside the manual feed slot. 1 Open the cover. 2 Hold the green knobs, and push down this part. 3 Gently pull out the paper. 103 Troubleshooting
Paper Jams in the Manual Feed Slot (MF8280Cw) 1 Step Hold the paper drawer with both hands, and pull it out. 2 Step Remove the jammed document inside the manual feed slot. 1 Open the cover. 2 Hold the green knobs, and push down this part. 3 Gently pull out the paper. 103 Troubleshooting

Basic Guide
Page 106
...be canceled. For details, see [Troubleshooting] [When an Error Code Appears] in the e-Manual. Error code For more information. Remove the jammed document. When sending a fax: • Reduce the scanning resolution, and try again. No pause was deleted from the Address Book. Sending faxes ...from the beginning. Printing, sending, or receiving was canceled. Wait a moment, and then try to the high volume of paper. Print, send, or delete any documents stored in the feeder. Transmission failed due to send the document again. A fax recipient did not ...
...be canceled. For details, see [Troubleshooting] [When an Error Code Appears] in the e-Manual. Error code For more information. Remove the jammed document. When sending a fax: • Reduce the scanning resolution, and try again. No pause was deleted from the Address Book. Sending faxes ...from the beginning. Printing, sending, or receiving was canceled. Wait a moment, and then try to the high volume of paper. Print, send, or delete any documents stored in the feeder. Transmission failed due to send the document again. A fax recipient did not ...

Basic Guide
Page 108
...8594;p.20). • Remove any jammed paper (→p.94). • Turn OFF the machine, wait for assistance. WARNING If the machine makes strange noises or emits smoke or odors: Turn OFF the machine immediately, disconnect the power cord, and contact the Canon Customer Care Center. If you have ... display. • If a message appears, resolve the problem (→p.105). Press [Status Monitor] to check the status of the official Canon Web site. If you cannot solve the problem Contact your problem. Do not attempt to disassemble or repair the machine yourself. Verify that the...
...8594;p.20). • Remove any jammed paper (→p.94). • Turn OFF the machine, wait for assistance. WARNING If the machine makes strange noises or emits smoke or odors: Turn OFF the machine immediately, disconnect the power cord, and contact the Canon Customer Care Center. If you have ... display. • If a message appears, resolve the problem (→p.105). Press [Status Monitor] to check the status of the official Canon Web site. If you cannot solve the problem Contact your problem. Do not attempt to disassemble or repair the machine yourself. Verify that the...
Getting Started
Page 31
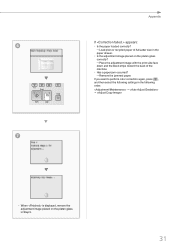
Appendix If appears: • Is the paper loaded correctly? → Load plain or recycled paper of the machine. • Has a paper jam occurred? → Remove the jammed paper. If you want to perform color correction again, press , and then select the following order. → → • When is displayed, remove the adjustment image placed on the...
Appendix If appears: • Is the paper loaded correctly? → Load plain or recycled paper of the machine. • Has a paper jam occurred? → Remove the jammed paper. If you want to perform color correction again, press , and then select the following order. → → • When is displayed, remove the adjustment image placed on the...


