
Users Manual - English
Page 2
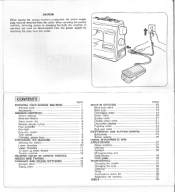
... SEWING MACHINE Principal parts Accessories VARIOUS CONTROLS Pattern selector Electronic display Stitch length dial Reverse sewing button Foot controller Sew-light Free-arm model Twin needle Changing presser foot THREADING THE MACHINE Winding the bobbin Lower threading Upper threading To draw up lower thread Tension controls RELATIVE CHART OF SEWING FABRICS, NEEDLE AND THREAD STRAIGHT AND ZIGZAG STITCHING Straight stitch Zigzag stitch PAGE 1 1 3 3 5 6 6 6 6 7 7 8 9 9 9 10 11 12 13 14 15 15 17 BUILT-IN STITCHES Blind hem stitch Shell tuck Overedging stitch Elastic stitch Scallop stitch Double...
... SEWING MACHINE Principal parts Accessories VARIOUS CONTROLS Pattern selector Electronic display Stitch length dial Reverse sewing button Foot controller Sew-light Free-arm model Twin needle Changing presser foot THREADING THE MACHINE Winding the bobbin Lower threading Upper threading To draw up lower thread Tension controls RELATIVE CHART OF SEWING FABRICS, NEEDLE AND THREAD STRAIGHT AND ZIGZAG STITCHING Straight stitch Zigzag stitch PAGE 1 1 3 3 5 6 6 6 6 7 7 8 9 9 9 10 11 12 13 14 15 15 17 BUILT-IN STITCHES Blind hem stitch Shell tuck Overedging stitch Elastic stitch Scallop stitch Double...
Users Manual - English
Page 3
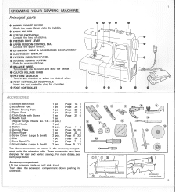
... PATTERN SELECTOR Turn in any direction to select the desired stitch. ® FOOT CONTROLLER RECEPTACLE Insert the foot controller plug for easy and perfect sewing. For more details, see each page listed. CO SPOOL HOLDER O STITCH LENGTH DIAL Controls the feed of stitches. These accessories have been designed for operation. 4110 FOOT CONTROLLER O 000 0 0 o O Accessories ()Straight stitch foot 02 Buttonhole Foot ©Button Sewing Foot ()Zipper Foot ©Cloth Guide with Screw C)Needle Pack (Regular Single Needle No. 14 (Twin Needle © Bobbin ® Darning Plate ®Seam...
... PATTERN SELECTOR Turn in any direction to select the desired stitch. ® FOOT CONTROLLER RECEPTACLE Insert the foot controller plug for easy and perfect sewing. For more details, see each page listed. CO SPOOL HOLDER O STITCH LENGTH DIAL Controls the feed of stitches. These accessories have been designed for operation. 4110 FOOT CONTROLLER O 000 0 0 o O Accessories ()Straight stitch foot 02 Buttonhole Foot ©Button Sewing Foot ()Zipper Foot ©Cloth Guide with Screw C)Needle Pack (Regular Single Needle No. 14 (Twin Needle © Bobbin ® Darning Plate ®Seam...

Users Manual - English
Page 4
...machine. VARIOUS CONTROLS Pattern selector To select a stitch, simply turn the pattern selector located on the end of stitch length. CD CD 9 10 :0 14 16 17 20 .§4 RECOMMENDED LENGTH PATTERN 1 2 3 4 5 6 7 8 9 10 11 12 13 14 15 16 17 18 19 20 21 STITCH NAME ONE-STEP BUTTONHOLE STRAIGHT SITCH (Left needle position) STRAIGHT STITCH (Center needle position) ZIGZAG STITCH ZIGZAG STITCH ZIGZAG STITCH BLIND HEM STITCH SHELL TUCK ELASTIC OVERLOCK STITCH ELASTIC STITCH GERMAN BLIND STITCH SCALLOP STITCH DOUBLE ACTION STITCH SWAN STITCH TULIP STITCH FAGOTING STITCH ARROW-HEAD STITCH...
...machine. VARIOUS CONTROLS Pattern selector To select a stitch, simply turn the pattern selector located on the end of stitch length. CD CD 9 10 :0 14 16 17 20 .§4 RECOMMENDED LENGTH PATTERN 1 2 3 4 5 6 7 8 9 10 11 12 13 14 15 16 17 18 19 20 21 STITCH NAME ONE-STEP BUTTONHOLE STRAIGHT SITCH (Left needle position) STRAIGHT STITCH (Center needle position) ZIGZAG STITCH ZIGZAG STITCH ZIGZAG STITCH BLIND HEM STITCH SHELL TUCK ELASTIC OVERLOCK STITCH ELASTIC STITCH GERMAN BLIND STITCH SCALLOP STITCH DOUBLE ACTION STITCH SWAN STITCH TULIP STITCH FAGOTING STITCH ARROW-HEAD STITCH...
Users Manual - English
Page 5
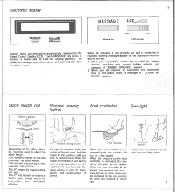
... set bobbin winder pin to adjust the stitch length. Hold the button in the Liquid Crystal Display (LCD). Sew-light switch To turn the sew-light on the dial represent the stitch length. The guidance message runs three times and automatically back to sew forward. Stitch length dial STITCH LENGTH II y 3 Fine Coarse Reverse sewing button Foot controller Sew-light Depending on the foot controller when the machine is not in reverse, push the button as far as it will spring back in original position and the machine...
... set bobbin winder pin to adjust the stitch length. Hold the button in the Liquid Crystal Display (LCD). Sew-light switch To turn the sew-light on the dial represent the stitch length. The guidance message runs three times and automatically back to sew forward. Stitch length dial STITCH LENGTH II y 3 Fine Coarse Reverse sewing button Foot controller Sew-light Depending on the foot controller when the machine is not in reverse, push the button as far as it will spring back in original position and the machine...
Users Manual - English
Page 6
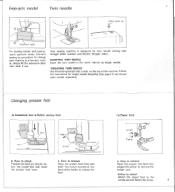
... manner as single needle. Extension table For sewing tubular and hard-toreach garment areas, free-arm sewing is designed for single needle threading (See pagel 1), but thread each needle separately. To change your machine to the needle bar and fasten the screw. 8 Your sewing machine is convenient. Free-arm model Twin needle 7 Extra spool pin CD O4g. Changing presser foot (• Buttonhole foot • Button sewing foot) Slot Push sar Screw Removed 0 • How to attach Position the foot pin directly below the holder-end and lower the presser foot lever. • How to...
... manner as single needle. Extension table For sewing tubular and hard-toreach garment areas, free-arm sewing is designed for single needle threading (See pagel 1), but thread each needle separately. To change your machine to the needle bar and fasten the screw. 8 Your sewing machine is convenient. Free-arm model Twin needle 7 Extra spool pin CD O4g. Changing presser foot (• Buttonhole foot • Button sewing foot) Slot Push sar Screw Removed 0 • How to attach Position the foot pin directly below the holder-end and lower the presser foot lever. • How to...
Users Manual - English
Page 7
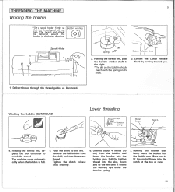
.... 3. Remove the full bobbin from the bobbin, and insert the bobbin into the shuttle race. The thread end should match with the spring on the bobbin should be delivered around the bobbin in clockwise direction. The machine stops automatically when the bobbin is full. 5. Tighten the clutch release knob securely. 6. Bobbin winding ) Spool Holder 1 1 - Holding the bobbin case latch, insert the bobbin into the bobbin case. Holding the thread end, push the bobbin winder shaft to wind the thread...
.... 3. Remove the full bobbin from the bobbin, and insert the bobbin into the shuttle race. The thread end should match with the spring on the bobbin should be delivered around the bobbin in clockwise direction. The machine stops automatically when the bobbin is full. 5. Tighten the clutch release knob securely. 6. Bobbin winding ) Spool Holder 1 1 - Holding the bobbin case latch, insert the bobbin into the bobbin case. Holding the thread end, push the bobbin winder shaft to wind the thread...

Users Manual - English
Page 8
... spool pin. 4. Press the spool holder firmly to the highest position. Make sure to its highest position. 2. Raise the needle and the presser foot to the spool. 6. The upper thread has caught the lower thread in a large loop. 3. Pull about 4 inches (10 cm) of thread under the toe of the presser foot toward you until the needle moves down and up lower thread Upper Thread a I 7. Raise the needle to guide the thread through thread-takeup lever from the bobbin...
... spool pin. 4. Press the spool holder firmly to the highest position. Make sure to its highest position. 2. Raise the needle and the presser foot to the spool. 6. The upper thread has caught the lower thread in a large loop. 3. Pull about 4 inches (10 cm) of thread under the toe of the presser foot toward you until the needle moves down and up lower thread Upper Thread a I 7. Raise the needle to guide the thread through thread-takeup lever from the bobbin...
Users Manual - English
Page 9
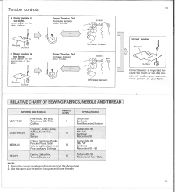
... Cotton: 40 - 50 Mercerized Heavy Duty NOTE: 1. Reverse Surface Upper Tension Dial Decrease tension Lower number. Tension controls ■ Upper tension is too loose. Select the correct needle and thread size from the above chart. 2. Locks appear on the fabric surface. or Upper Tension Dial Increase tension. or '3 Bobbin O 0 Increase tension Bobbin Ov Decrease tension 13 Correct tension Reverse Surface Correct tension is important because too much or too little tension will weaken your seams or cause puckers on your...
... Cotton: 40 - 50 Mercerized Heavy Duty NOTE: 1. Reverse Surface Upper Tension Dial Decrease tension Lower number. Tension controls ■ Upper tension is too loose. Select the correct needle and thread size from the above chart. 2. Locks appear on the fabric surface. or Upper Tension Dial Increase tension. or '3 Bobbin O 0 Increase tension Bobbin Ov Decrease tension 13 Correct tension Reverse Surface Correct tension is important because too much or too little tension will weaken your seams or cause puckers on your...
Users Manual - English
Page 10
...) from Machine 1. STRAIGHT AND ZIGZAG STITCHING Straight stitch Pattern 2 (Left needle position) 3 (Center needle position) 21 (Stretch Straight Stitch) Stitch Length 1-4 4 How to the left side. 4. Lower the presser foot and start sewing in new direction. Pull up lever is in the highest position. To back tack, push the Reverse Sewing Button as far as the axis. 3. Stop the machine at the end of the seam fabric. ■ Thread cutter , 3. How to Remove from end of the seam or wherever reinforcement is used to lock the threads at...
...) from Machine 1. STRAIGHT AND ZIGZAG STITCHING Straight stitch Pattern 2 (Left needle position) 3 (Center needle position) 21 (Stretch Straight Stitch) Stitch Length 1-4 4 How to the left side. 4. Lower the presser foot and start sewing in new direction. Pull up lever is in the highest position. To back tack, push the Reverse Sewing Button as far as the axis. 3. Stop the machine at the end of the seam fabric. ■ Thread cutter , 3. How to Remove from end of the seam or wherever reinforcement is used to lock the threads at...

Users Manual - English
Page 11
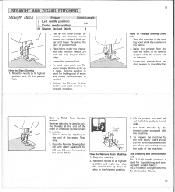
... useful for making buttonholes or decorative stitches. , BUILT-IN STITCHES Blind hem stitch Pattern 7 (Blind Hem Stitch) 11 (German Blind Stitch) Stitch Length 1-2 1. B f Fig. pending on the fold as shown in Figure C. Leave 1/4 inch overlap at "F" position, it produces the "SATIN STITCH" used for stretch fabrics. C , , rl . _ 18 Fig. Sew on the width you will have a blind stitch hem as the fabric used should be the same color as in Figure A. Thread used . Fig. NOTE: The "German Blind stitch" is unfolded you need...
... useful for making buttonholes or decorative stitches. , BUILT-IN STITCHES Blind hem stitch Pattern 7 (Blind Hem Stitch) 11 (German Blind Stitch) Stitch Length 1-2 1. B f Fig. pending on the fold as shown in Figure C. Leave 1/4 inch overlap at "F" position, it produces the "SATIN STITCH" used for stretch fabrics. C , , rl . _ 18 Fig. Sew on the width you will have a blind stitch hem as the fabric used should be the same color as in Figure A. Thread used . Fig. NOTE: The "German Blind stitch" is unfolded you need...
Users Manual - English
Page 12
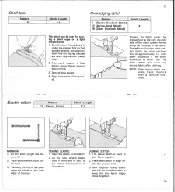
...the presser foot. 3. This work requires a little tighter upper thread tension than the stitch pattern, trim away any excess fabric after stitching. Care should be - SEWING ELASTIC 1. The elastic stitch is useful as shown in back of the fabric. If the seam allowance is wider than normal. 3. Sew at slow speed. 4. tween F-1. 2. Shell tuck Pattern 8 Stitch Length 2-4 19 Overedging stitch Pattern 9 (Elastic Overlock Stitch) 17 (Arrow-Head Stitch) 19 (Slant Overlock Stitch) Stitch Length 4 This stitch can be used to join fabric together. 2. As you sew, stretch elastic...
...the presser foot. 3. This work requires a little tighter upper thread tension than the stitch pattern, trim away any excess fabric after stitching. Care should be - SEWING ELASTIC 1. The elastic stitch is useful as shown in back of the fabric. If the seam allowance is wider than normal. 3. Sew at slow speed. 4. tween F-1. 2. Shell tuck Pattern 8 Stitch Length 2-4 19 Overedging stitch Pattern 9 (Elastic Overlock Stitch) 17 (Arrow-Head Stitch) 19 (Slant Overlock Stitch) Stitch Length 4 This stitch can be used to join fabric together. 2. As you sew, stretch elastic...

Users Manual - English
Page 13
... both threads slightly when starting. * Use thicker threads than for instance, patch work. Scallop stitch Pattern 12 Stitch Length F-1 21 Double action stitch Pattern 13 Stitch Length 1-2 This machine produces decorative stitch (Scallop) automatically. If desired, trim around scallop with scissors to thin paper, leaving a small space between the two pieces. 2. Decorative stitches Pattern 14 (Swan) 15 (Tulip) Stitch Length 4 Fagoting stitch Pattern 16 First needle drop -1:14r---11 1.5 mm Stitch Length 4 1. Basting Baste edges of the seams on the reverse...
... both threads slightly when starting. * Use thicker threads than for instance, patch work. Scallop stitch Pattern 12 Stitch Length F-1 21 Double action stitch Pattern 13 Stitch Length 1-2 This machine produces decorative stitch (Scallop) automatically. If desired, trim around scallop with scissors to thin paper, leaving a small space between the two pieces. 2. Decorative stitches Pattern 14 (Swan) 15 (Tulip) Stitch Length 4 Fagoting stitch Pattern 16 First needle drop -1:14r---11 1.5 mm Stitch Length 4 1. Basting Baste edges of the seams on the reverse...
Users Manual - English
Page 14
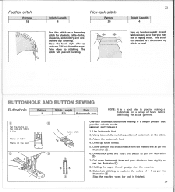
...; 7. Buttonhole stitching is finished. 24 Use buttonhole foot. 2. Draw up If and sew 3/8 inch from the edge. Pull down buttonhole lever and push this stitch as a hemming stitch for blankets, table-cloths, draperies, embroidery and decorative top stitching. Lower presser foot in any area that provides reliable results. MAKING BUTTONHOLE 1. Attach the buttonhole foot. 4. Feather stitch Pattern 18 Stitch Length 4 Rick-rack stitch Pattern 20 Use this lever back slightly as per the illustration 8. Place the fabric right side up lower thread. 5. Draw button plate...
...; 7. Buttonhole stitching is finished. 24 Use buttonhole foot. 2. Draw up If and sew 3/8 inch from the edge. Pull down buttonhole lever and push this stitch as a hemming stitch for blankets, table-cloths, draperies, embroidery and decorative top stitching. Lower presser foot in any area that provides reliable results. MAKING BUTTONHOLE 1. Attach the buttonhole foot. 4. Feather stitch Pattern 18 Stitch Length 4 Rick-rack stitch Pattern 20 Use this lever back slightly as per the illustration 8. Place the fabric right side up lower thread. 5. Draw button plate...
Users Manual - English
Page 15
... fabric, and make sure that pins are placed across both threads at back side. 26 Distance of buttonhole as a protection against cutting bar tack stitching. At slow speed, sew approximately 10 stitches. 6. Remove the material from the machine. Care should be taken not to Button Sewing Foot. It is recommended that needle enters both holes without hitting the button. 5. Button sewing Pattern 4 or 5 or 6 (3\ 0 Buttonhole Tie knot Stitch Length Any position I Foot Button Sewing Foot Others Darning plate fi r _., 1. Cut upper and lower threads...
... fabric, and make sure that pins are placed across both threads at back side. 26 Distance of buttonhole as a protection against cutting bar tack stitching. At slow speed, sew approximately 10 stitches. 6. Remove the material from the machine. Care should be taken not to Button Sewing Foot. It is recommended that needle enters both holes without hitting the button. 5. Button sewing Pattern 4 or 5 or 6 (3\ 0 Buttonhole Tie knot Stitch Length Any position I Foot Button Sewing Foot Others Darning plate fi r _., 1. Cut upper and lower threads...
Users Manual - English
Page 16
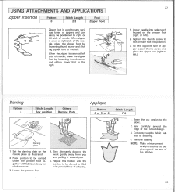
... cutout design. 3. NOTE: Make reinforcement straight stitches at left .) Darning Pattern 3 Stitch Length Any position Others Darning Plate Applique Pattern 4 or 5 or 6 Darning plate 1. When the zipper is filled with fabric underlay for reinforcement. 3. Tighten the thumb screw to the right. -N Needle 1. Place portion to be darned is sewn at beginning and the end of the needle, place the zipper foot by loosening thumb screw and sliding zipper foot to lock presser foot into side notch located on the needle plate...
... cutout design. 3. NOTE: Make reinforcement straight stitches at left .) Darning Pattern 3 Stitch Length Any position Others Darning Plate Applique Pattern 4 or 5 or 6 Darning plate 1. When the zipper is filled with fabric underlay for reinforcement. 3. Tighten the thumb screw to the right. -N Needle 1. Place portion to be darned is sewn at beginning and the end of the needle, place the zipper foot by loosening thumb screw and sliding zipper foot to lock presser foot into side notch located on the needle plate...

Users Manual - English
Page 17
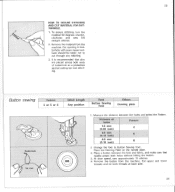
... the work between embroidery hoops as firmly as per the above instructions. 3. Fill in design stitch from the outline of the design to the inside and from inside to sew parallel straight at edge of needle plate. Keep stitching close together. Cloth guide Using cloth guide will help to edge of the fabric. 4. 29 Monogramming and Embroidering Pattern 4 or 5 or 6 Stitch Length At any position Foot Remove Others Darning plate Nre PREPARATION FOR MONOGRAMMING AND EMBROIDERING 1. Set your sewing machine as possible...
... the work between embroidery hoops as firmly as per the above instructions. 3. Fill in design stitch from the outline of the design to the inside and from inside to sew parallel straight at edge of needle plate. Keep stitching close together. Cloth guide Using cloth guide will help to edge of the fabric. 4. 29 Monogramming and Embroidering Pattern 4 or 5 or 6 Stitch Length At any position Foot Remove Others Darning plate Nre PREPARATION FOR MONOGRAMMING AND EMBROIDERING 1. Set your sewing machine as possible...

Users Manual - English
Page 18
Remove the needle Lower the presser foot and loosen the screw. 2. Inserting the needle With the flat side facing back, insert the needle as far as shown in illustration at right. Tighten the screw. 1. Changing the bulb • Remove the power supply plug from 3. Remove the face plate from the outlet. machine. 0 4. Attach the face plate and fasten the screw. 32 To check if needle is bent, place flat side of needle down as...
Remove the needle Lower the presser foot and loosen the screw. 2. Inserting the needle With the flat side facing back, insert the needle as far as shown in illustration at right. Tighten the screw. 1. Changing the bulb • Remove the power supply plug from 3. Remove the face plate from the outlet. machine. 0 4. Attach the face plate and fasten the screw. 32 To check if needle is bent, place flat side of needle down as...

Users Manual - English
Page 19
... ring Hook a Driver Latch lever Race body Retaining ring 0 33 a HOW TO REMOVE THE SHUTTLE HOOK 1. CLEANING SHUTTLE RACE 1. Open the shuttle cover. 3. NOTE: When needle is lowered, shuttle hook cannot be used to wipe shuttle race clean. 3. A cloth dampened with brush. 2. Take out the needle plate. 2. Face Plate • OIL 2 TO 3 DROPS TO THE POINTS MARKED • After oiling, run the machine fast without thread. • Be sure to its highest position. 2. Cleaning • Remove the power supply plug...
... ring Hook a Driver Latch lever Race body Retaining ring 0 33 a HOW TO REMOVE THE SHUTTLE HOOK 1. CLEANING SHUTTLE RACE 1. Open the shuttle cover. 3. NOTE: When needle is lowered, shuttle hook cannot be used to wipe shuttle race clean. 3. A cloth dampened with brush. 2. Take out the needle plate. 2. Face Plate • OIL 2 TO 3 DROPS TO THE POINTS MARKED • After oiling, run the machine fast without thread. • Be sure to its highest position. 2. Cleaning • Remove the power supply plug...
Users Manual - English
Page 20
... THREAD BREAKS LOWER THREAD BREAKS SKIPPED STITCHES LOOP IN SEAM Upper threading No Upper thread is is wrong. thread/fabric is not correct. No I - .-Page 6 .-Page 9 36 No Threading is too tight. Page 13 FABRIC PUCKERS FABRIC DOES NOT FEED PROPERLY NEEDLE BREAKS Thread tension No Threading is not No Wrong needle is not correct. No Inferior needle is tangled. No Thread is used . No Insufficient oiling No - -Page33 -N.-Page34 MACHINE DOES NOT START Use foot controller. No Upper thread tension is too tight. No Lower thread tension...
... THREAD BREAKS LOWER THREAD BREAKS SKIPPED STITCHES LOOP IN SEAM Upper threading No Upper thread is is wrong. thread/fabric is not correct. No I - .-Page 6 .-Page 9 36 No Threading is too tight. Page 13 FABRIC PUCKERS FABRIC DOES NOT FEED PROPERLY NEEDLE BREAKS Thread tension No Threading is not No Wrong needle is not correct. No Inferior needle is tangled. No Thread is used . No Insufficient oiling No - -Page33 -N.-Page34 MACHINE DOES NOT START Use foot controller. No Upper thread tension is too tight. No Lower thread tension...
Users Manual - English
Page 21
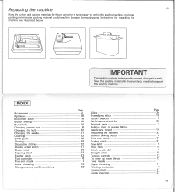
O INDEX Accessories Applique Blind hem stitch Button sewing Buttonhole Changing presser foot Changing the bulb Changing the needle Cleaning Cloth guide Darning Decorative stitches Double action stitch Elastic stitch Fagoting stitch Feather stitch Foot controller Free-arm model Lower threading Monogramming and Embroidering ( IMPORTANT This packing material is necessary to prevent damage in transit. Repacking the machine 37 Keep the carton and packing materials for repacking the machine are illustrated below. Save this sewing machine. Page 2 28 18 26 24 8 32 31 33 30 28 22 21 20 22...
O INDEX Accessories Applique Blind hem stitch Button sewing Buttonhole Changing presser foot Changing the bulb Changing the needle Cleaning Cloth guide Darning Decorative stitches Double action stitch Elastic stitch Fagoting stitch Feather stitch Foot controller Free-arm model Lower threading Monogramming and Embroidering ( IMPORTANT This packing material is necessary to prevent damage in transit. Repacking the machine 37 Keep the carton and packing materials for repacking the machine are illustrated below. Save this sewing machine. Page 2 28 18 26 24 8 32 31 33 30 28 22 21 20 22...


