
Brother International XL-2027 Support Question
Brother International XL-2027 Support Question
Find answers below for this question about Brother International XL-2027.Need a Brother International XL-2027 manual? We have 1 online manual for this item!
Question posted by Jldaspit on January 26th, 2018
The Pattern Selector Is Too Tight
Brother xl-2027 is in otherwise excellent condition but the pattern selector is not turning easily & the reverse bar isn't working. What can I do?
Current Answers
Related Brother International XL-2027 Manual Pages
Users Manual - English - Page 2
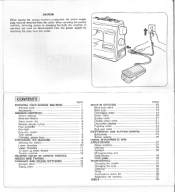
CONTENTS
KNOWING YOUR SEWING MACHINE Principal parts Accessories
VARIOUS CONTROLS Pattern selector Electronic display Stitch length dial Reverse sewing button Foot controller Sew-light Free-arm model Twin needle Changing presser foot
THREADING THE MACHINE Winding the bobbin Lower threading Upper threading To draw up lower thread Tension controls
RELATIVE CHART OF SEWING FABRICS, NEEDLE AND THREAD ...
Users Manual - English - Page 3
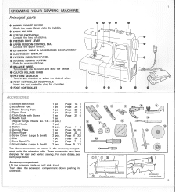
... ELECTRONIC DISPLAY O PATTERN INDICATION PANEL
0 REVERSE SEWING BUTTON
Push for reverse stitching.
0 BALANCE WHEEL
Turn toward you to lower and raise the needle.
0 CLUTCH RELEASE KNOB
lib PATTERN SELECTOR Turn in any direction to... the upper tension. KNOWING YOUR SEWING MACHINE Principal parts
O BOBBIN WINDER DEVICE Winds the lower thread onto the bobbin.
For more details, see each page...
Users Manual - English - Page 4

...:0
14
16 17
20
.§4
RECOMMENDED LENGTH
PATTERN
1
2
3
4 5 6 7 8 9...Pattern Selector
0
3 •
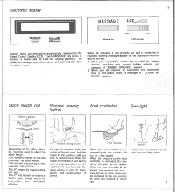
MESSAGE
LCD-.wall 111111
2 3 4
6
OS OW MI •Nr
OM
C. VARIOUS CONTROLS Pattern selector
To select a stitch, simply turn the pattern selector located on the end of stitch length.
The following table represents the preset width of each stitch and the recommended range of the machine...
Users Manual - English - Page 5
...sewing guidance. When you wish to sew forward.
Stitch length dial
STITCH LENGTH
II
y 3
Fine
Coarse
Reverse sewing button
Foot controller
Sew-light
Depending on the foot controller when the machine is released, the machine will pick up the speed. Reverse sewing... sew forward. Electronic display
5
MESSAGE
i
MESSAGE MIR
Message key
Light
Heavy
LCD adjuster
Pattern ...
Users Manual - English - Page 6
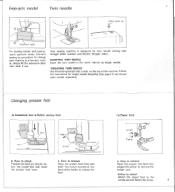
...for single needle threading (See pagel 1), but thread each needle separately. Your sewing machine is convenient. THREADING TWIN NEEDLE Set the extra spool pin into a hole on....
• How to attach
Attach the zipper foot to the
needle bar and fasten the screw.
8 Changing presser foot
(• Buttonhole foot • Button sewing foot)
Slot Push
sar
Screw
Removed
0
• How to attach ...
Users Manual - English - Page 7
... the metal finger into the shuttle race. I A1
r
Tighten
c Loosen
Slit Spring
Clutch Release Knob II
2. 9
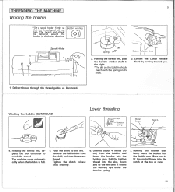
THREADING THE MACHINE
Winding the bobbin
*Set a spool holder firmly so that the thread spool will not turn. Winding the bobbin (CONTINUED)
Lower threading
Slot Tension spring
Metal finger
Notch
0
0
z
4. Make sure to wind the thread...
Users Manual - English - Page 8

....
2. Pull the upper thread toward the back
of upper thread and with right hand, turn balance wheel toward you and the lower thread will come up from right to its high- Upper threading...
pool Holder
\-1
1. est position by turning the balance wheel toward you until the needle moves down and up again to left hand, hold the end of the machine.
12
a
To draw up Lever
'4;...
Users Manual - English - Page 9
...Bobbin
Ov
Decrease tension
13
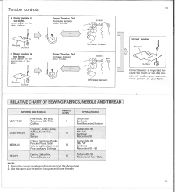
Correct tension Reverse
Surface Correct tension is important because too much or too little tension will weaken your fabric. RELATIVE CHART OF SEWING FABRICS, NEEDLE AND THREAD
SEWING MATERIALS
NEEDLE SIZES
Fine tricot, Fine.... 2.
Locks appear on the reverse side of the fabric.
Raise number.
OO
Reverse Surface
■ Upper tension is too tight.
Users Manual - English - Page 10
... lift the presser foot.
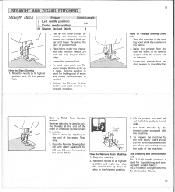
2. Release the Reverse Sewing Button and start sewing in the fabric. 2. To prepare the machine for 3/8 inch (10 mm) from Machine 1. Raise the presser foot and turn - How to the left side.
4. Stop the machine at the end of presser foot.
3.
STRAIGHT AND ZIGZAG STITCHING
Straight stitch
Pattern 2 (Left needle position)
3 (Center needle position...
Users Manual - English - Page 11

...Pattern 4 (Stitch Width at 1.6 mm) 5 (Stitch Width at 3.6 mm) 6 (Stitch Width at "F" position, it produces the "SATIN STITCH" used for stretch fabrics.
I,
3. Sew on the width you will have a blind stitch hem as shown in Figure A.
Fold the fabric to sew... or decorative stitches.
,
BUILT-IN STITCHES
Blind hem stitch
Pattern
7 (Blind Hem Stitch) 11 (German Blind Stitch)
Stitch...
Users Manual - English - Page 12
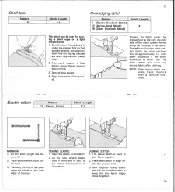
... in illustration. Following the line of the presser foot as illustrated. tween F-1.
2. The elastic stitch is used for sewing a picot edge on the fabric.
2. This work requires a little tighter upper thread tension than the stitch pattern, trim away any excess fabric after stitching.
Place the elastic on a light weight fabric. 1. Position the fabric...
Users Manual - English - Page 13

... of the seams on the reverse side.
22 Scallop stitch
Pattern 12
Stitch Length F-1
21
Double action stitch
Pattern 13
Stitch Length 1-2
This machine produces decorative stitch (Scallop) automatically. Decorative stitches
Pattern 14 (Swan) 15 (Tulip)
Stitch Length 4
Fagoting stitch
Pattern 16
First needle drop
-1:14r---11 1.5 mm
Stitch Length 4
1. Sew scallop stitch along the edge...
Users Manual - English - Page 14
... stitching. Draw up
If
and sew 3/8 inch from the edge. Use buttonhole foot. 2. Using tailor chalk, mark the position of 1-4 as per the
illustration (D Stop the machine when bar tack is a simple process that you may use a zigzag stitch. Feather stitch
Pattern 18
Stitch Length 4
Rick-rack stitch
Pattern 20
Use this lever back slightly...
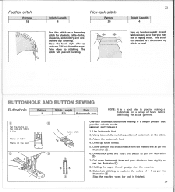
Users Manual - English - Page 15
...both ends of holes
1.6 mm (0.06 inch)
3.6 mm (0.14 inch)
4.8 mm (0.19 inch)
Pattern 4 5 6
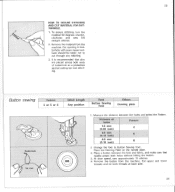
2 Change the foot to cut through any stitching. 3. 25
HOW TO SECURE STITCHING ...from the machine. Distance of buttonhole as a protection against cutting bar tack stitching. At slow speed, sew approximately 10 stitches. 6. To secure stitching, turn the
material 90 degrees counterclockwise and sew 5-6 ...
Users Manual - English - Page 16
27
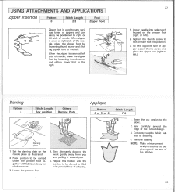
USING ATTACHMENTS AND APPLICATIONS
Zipper insertion
Pattern 3
Stitch Length 2-3
Foot Zipper Foot
Thumb screw O
Zipper foot is used to sew various types of zippers and can easily be positioned to right or left side of stitching. Sew alternately drawing the work gently away from you and pulling it toward you.
5. Baste the cut design to...
Users Manual - English - Page 17

...Put thumb screw through the work under the needle and lower the presser bar.
6. Set your sewing machine as possible.
5. Place the work at starting position by turning balance wheel and make a...29
Monogramming and Embroidering
Pattern 4 or 5 or 6
Stitch Length At any position
Foot Remove
Others Darning plate
Nre
PREPARATION FOR MONOGRAMMING AND EMBROIDERING 1. Sew, moving hoop slowly...
Users Manual - English - Page 18

... must always be straight and sharp for smooth sewing.
2. Changing the bulb
• Remove the power supply plug from 3. o
X
X
X
( A„
1. m no 11. Loosen the screw.
2. Remove the face plate from the outlet. Inserting the ... foot and loosen the screw.
2. To check if needle is bent, place flat side of needle down as it will go against the needle stopper. machine.
0
4.
Users Manual - English - Page 19

...Face Plate
• OIL 2 TO 3 DROPS TO THE POINTS MARKED • After oiling, run the machine fast without thread. • Be sure to its highest position. 2. Take out the bobbin case. 4....inside. Cleaning
• Remove the power supply plug from the outlet. • Lint and dust easily accumulate.
Retaining ring
Hook
a
Driver
Latch lever
Race body
Retaining ring
0
33 a
HOW TO ...
Users Manual - English - Page 20
...oiling
No -
-Page33
-N.-Page34
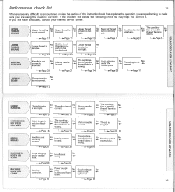
MACHINE DOES NOT START
Use foot controller. No
Ir
Power supply plug
No
is too tight.
No Thread is bent or...machine correctly.
Needle is tangled. thread/fabric is not correct.
UPPER THREAD BREAKS
LOWER THREAD BREAKS
SKIPPED STITCHES
LOOP IN SEAM
Upper threading No Upper thread is
is
wrong. Performance check list
35
Whenever sewing...
Users Manual - English - Page 21
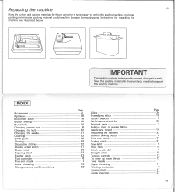
... 8 32 31 33 30 28 22 21 20 22 23 6 7 10 29
Oiling Overedging stitch Pattern selector Performance check list Principal parts Relative chart of sewing fabrics, needle and thread Repacking the machine Reverse sewing button Rick-rack stitch Scallop stitch Sew-light Shell tuck Stitch length dial Straight stitch Tension controls To draw up lower thread...
Similar Questions

Can I Lower The Feed Dogs On A Brother Sewing Machine Xl 3010 Model
(Posted by Vibobby 9 years ago)
How To Thread A Brother Sewing Machine Xl-5500
(Posted by CAB14mitk 9 years ago)

How To Use A Brother Sewing Machine Xl-2600i Setting Stitch And Tension
(Posted by v007CCdu 10 years ago)

How To Thread A Brother Sewing Machine Xl-5232
(Posted by Thsou 10 years ago)

I Need A Parts And Schematic Manual For Sewing Machine Xl-3200 Brother
(Posted by MANUALS1 10 years ago)