
Users Manual - English
Page 2
... Electronic display Stitch length dial Reverse sewing button Foot controller Sew-light Free-arm model Twin needle Changing presser foot THREADING THE MACHINE Winding the bobbin Lower threading Upper threading To draw up lower thread Tension controls RELATIVE CHART OF SEWING FABRICS, NEEDLE AND THREAD STRAIGHT AND ZIGZAG STITCHING Straight stitch...
... Electronic display Stitch length dial Reverse sewing button Foot controller Sew-light Free-arm model Twin needle Changing presser foot THREADING THE MACHINE Winding the bobbin Lower threading Upper threading To draw up lower thread Tension controls RELATIVE CHART OF SEWING FABRICS, NEEDLE AND THREAD STRAIGHT AND ZIGZAG STITCHING Straight stitch...
Users Manual - English
Page 3
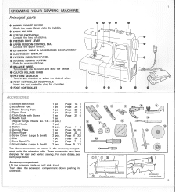
... foot 02 Buttonhole Foot ©Button Sewing Foot ()Zipper Foot ©Cloth Guide with Screw C)Needle Pack (Regular Single Needle No. 14 (Twin Needle © Bobbin ® Darning Plate ®Seam Ripper @Screw Driver (Large & Small) ©Oiler @Extra Spool Pin is Spool Holder (Large & Small) 1 pc. 1 pc. 1 pc. 1 pc. 1 set... out. For more details, see each page listed. CO SPOOL HOLDER O STITCH LENGTH DIAL Controls the feed of stitches. KNOWING YOUR SEWING MACHINE Principal parts O BOBBIN WINDER DEVICE Winds the lower thread onto the...
... foot 02 Buttonhole Foot ©Button Sewing Foot ()Zipper Foot ©Cloth Guide with Screw C)Needle Pack (Regular Single Needle No. 14 (Twin Needle © Bobbin ® Darning Plate ®Seam Ripper @Screw Driver (Large & Small) ©Oiler @Extra Spool Pin is Spool Holder (Large & Small) 1 pc. 1 pc. 1 pc. 1 pc. 1 set... out. For more details, see each page listed. CO SPOOL HOLDER O STITCH LENGTH DIAL Controls the feed of stitches. KNOWING YOUR SEWING MACHINE Principal parts O BOBBIN WINDER DEVICE Winds the lower thread onto the...
Users Manual - English
Page 5
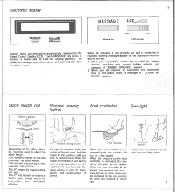
...controller when the machine is placed on the display and instruct you to right for bobbin winding, machine only accept bobbin winding and message of LCD for sewing guidance. When you set machine at below side of "BOBBIN WINDING" appears. 2. The "0" means the material does not feed. When the ...Light Heavy LCD adjuster Pattern name you selected is used for backtacking and reinforcement of seams. When the foot controller is not properly set bobbin winder pin to correct. 1. Sew-light switch To turn the sew-light on the foot controller is released, the machine will spring back...
...controller when the machine is placed on the display and instruct you to right for bobbin winding, machine only accept bobbin winding and message of LCD for sewing guidance. When you set machine at below side of "BOBBIN WINDING" appears. 2. The "0" means the material does not feed. When the ...Light Heavy LCD adjuster Pattern name you selected is used for backtacking and reinforcement of seams. When the foot controller is not properly set bobbin winder pin to correct. 1. Sew-light switch To turn the sew-light on the foot controller is released, the machine will spring back...
Users Manual - English
Page 7
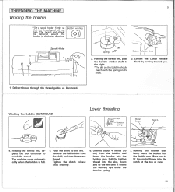
...3. Tighten the clutch release knob securely. 6. Make sure to the left until it enters the delivery eye under the tension spring. 7. Winding the bobbin (CONTINUED) Lower threading Slot Tension spring Metal finger Notch 0 0 z 4. Push the shaft to fit the metal finger into the slot, down.... Pull the trailing thread into the notch at the top of race. 10 Holding the bobbin case latch, insert the bobbin into the bobbin case. Remove the full bobbin from the bobbin, and insert the bobbin into the shuttle race. Holding the thread end, depress the foot controller to the left...
...3. Tighten the clutch release knob securely. 6. Make sure to the left until it enters the delivery eye under the tension spring. 7. Winding the bobbin (CONTINUED) Lower threading Slot Tension spring Metal finger Notch 0 0 z 4. Push the shaft to fit the metal finger into the slot, down.... Pull the trailing thread into the notch at the top of race. 10 Holding the bobbin case latch, insert the bobbin into the bobbin case. Remove the full bobbin from the bobbin, and insert the bobbin into the shuttle race. Holding the thread end, depress the foot controller to the left...

Users Manual - English
Page 8
... the upper thread as illustrated. 11 Thread Take-up lower thread Upper Thread a I 7. Make sure to guide the thread through thread-takeup lever from the bobbin in a loop. Raise the presser foot lever. 2. est position by turning the balance wheel toward you until the needle moves down and up from right...
... the upper thread as illustrated. 11 Thread Take-up lower thread Upper Thread a I 7. Make sure to guide the thread through thread-takeup lever from the bobbin in a loop. Raise the presser foot lever. 2. est position by turning the balance wheel toward you until the needle moves down and up from right...
Users Manual - English
Page 9
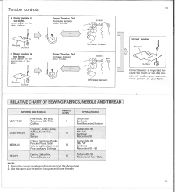
Select the correct needle and thread size from the above chart. 2. OO Reverse Surface ■ Upper tension is too tight. Raise number. or '3 Bobbin O 0 Increase tension Bobbin Ov Decrease tension 13 Correct tension Reverse Surface Correct tension is important because too much or too little tension will weaken your fabric. RELATIVE CHART ...
Select the correct needle and thread size from the above chart. 2. OO Reverse Surface ■ Upper tension is too tight. Raise number. or '3 Bobbin O 0 Increase tension Bobbin Ov Decrease tension 13 Correct tension Reverse Surface Correct tension is important because too much or too little tension will weaken your fabric. RELATIVE CHART ...

Users Manual - English
Page 19
... the power supply plug from the outlet. • OIL ONCE A WEEK IF THE MACHINE IS USED MORE THAN ONE HOUR PER DAY. Take out the bobbin case. 4. Clean the upper part of the hook. Reassemble and push the latch levers inside. Retaining ring Hook a Driver Latch lever Race body Retaining ring...
... the power supply plug from the outlet. • OIL ONCE A WEEK IF THE MACHINE IS USED MORE THAN ONE HOUR PER DAY. Take out the bobbin case. 4. Clean the upper part of the hook. Reassemble and push the latch levers inside. Retaining ring Hook a Driver Latch lever Race body Retaining ring...
Users Manual - English
Page 20
... Needle is clinging under needle plate. Page 31 i.-Page 31 I ---p-Page 31 .-Page 31 N. No Upper thread tension is clinging under the needle plate. No Bobbin is used. is not threaded pro- No Inferior needle is encountered, review the section of needle/ not sharp. No - • I "-Page 11 1.--Page 11 111...
... Needle is clinging under needle plate. Page 31 i.-Page 31 I ---p-Page 31 .-Page 31 N. No Upper thread tension is clinging under the needle plate. No Bobbin is used. is not threaded pro- No Inferior needle is encountered, review the section of needle/ not sharp. No - • I "-Page 11 1.--Page 11 111...
Users Manual - English
Page 21
... stitch Scallop stitch Sew-light Shell tuck Stitch length dial Straight stitch Tension controls To draw up lower thread Twin needle Upper threading Winding the bobbin Zigzag stitch Zipper insertion Page 34 19 3 35 1 14 37 6 23 21 6 19 6 15 13 12 7 11 9 17 27 38 Save this packing material in...
... stitch Scallop stitch Sew-light Shell tuck Stitch length dial Straight stitch Tension controls To draw up lower thread Twin needle Upper threading Winding the bobbin Zigzag stitch Zipper insertion Page 34 19 3 35 1 14 37 6 23 21 6 19 6 15 13 12 7 11 9 17 27 38 Save this packing material in...


