
Users Manual - English
Page 2
... removing the plug from the outlet. CAUTION When leaving the sewing machine unattended, the power supply plug must be removed from the outlet. CONTENTS KNOWING YOUR SEWING MACHINE Principal parts Accessories VARIOUS CONTROLS Pattern selector Electronic display Stitch length dial Reverse sewing button Foot controller Sew-light Free-arm model Twin needle Changing presser foot THREADING...
... removing the plug from the outlet. CAUTION When leaving the sewing machine unattended, the power supply plug must be removed from the outlet. CONTENTS KNOWING YOUR SEWING MACHINE Principal parts Accessories VARIOUS CONTROLS Pattern selector Electronic display Stitch length dial Reverse sewing button Foot controller Sew-light Free-arm model Twin needle Changing presser foot THREADING...
Users Manual - English
Page 3
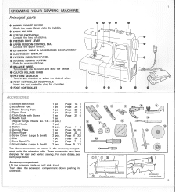
... table 1 4:o 5 13 Accessory compartment 2 These accessories have been designed for operation. 4110 FOOT CONTROLLER O 000 0 0 o O Accessories ()Straight stitch foot 02 Buttonhole Foot ©Button Sewing Foot ()Zipper Foot ©Cloth Guide with Screw C)Needle Pack (Regular Single Needle No. 14 (Twin Needle © Bobbin ® Darning Plate ®Seam Ripper... table. CO SPOOL HOLDER O STITCH LENGTH DIAL Controls the feed of stitches. For more details, see each page listed. KNOWING YOUR SEWING MACHINE Principal parts O BOBBIN WINDER DEVICE Winds the lower thread onto the bobbin.
... table 1 4:o 5 13 Accessory compartment 2 These accessories have been designed for operation. 4110 FOOT CONTROLLER O 000 0 0 o O Accessories ()Straight stitch foot 02 Buttonhole Foot ©Button Sewing Foot ()Zipper Foot ©Cloth Guide with Screw C)Needle Pack (Regular Single Needle No. 14 (Twin Needle © Bobbin ® Darning Plate ®Seam Ripper... table. CO SPOOL HOLDER O STITCH LENGTH DIAL Controls the feed of stitches. For more details, see each page listed. KNOWING YOUR SEWING MACHINE Principal parts O BOBBIN WINDER DEVICE Winds the lower thread onto the bobbin.
Users Manual - English
Page 5
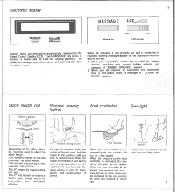
... runs three times and automatically back to right for backtacking and reinforcement of seams. When the foot controller is released, the machine will sew forward. When you selected is automatically displayed in use. THE HIGHER THE NUMBER, THE LONGER THE STITCH. When the button ... message of "LOWER BH LEVER" appears. Stitch length dial STITCH LENGTH II y 3 Fine Coarse Reverse sewing button Foot controller Sew-light Depending on the foot controller when the machine is not in the Liquid Crystal Display (LCD). The "0" means the material does not feed. When the...
... runs three times and automatically back to right for backtacking and reinforcement of seams. When the foot controller is released, the machine will sew forward. When you selected is automatically displayed in use. THE HIGHER THE NUMBER, THE LONGER THE STITCH. When the button ... message of "LOWER BH LEVER" appears. Stitch length dial STITCH LENGTH II y 3 Fine Coarse Reverse sewing button Foot controller Sew-light Depending on the foot controller when the machine is not in the Liquid Crystal Display (LCD). The "0" means the material does not feed. When the...
Users Manual - English
Page 6
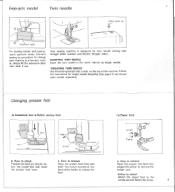
...Raise the presser foot lever and push the button located at the back of the machine. Follow the instructions for twin needle sewing with Straight Stitch (Center) and Stretch Straight Stitch. Your sewing machine is convenient. Free-arm model Twin needle 7 Extra spool pin CD O4g. THREADING... lift the extension table then slide it out. Extension table For sewing tubular and hard-toreach garment areas, free-arm sewing is designed for single needle threading (See pagel 1), but thread each needle separately. To change your machine to the needle bar and fasten the screw. 8
...Raise the presser foot lever and push the button located at the back of the machine. Follow the instructions for twin needle sewing with Straight Stitch (Center) and Stretch Straight Stitch. Your sewing machine is convenient. Free-arm model Twin needle 7 Extra spool pin CD O4g. THREADING... lift the extension table then slide it out. Extension table For sewing tubular and hard-toreach garment areas, free-arm sewing is designed for single needle threading (See pagel 1), but thread each needle separately. To change your machine to the needle bar and fasten the screw. 8
Users Manual - English
Page 10
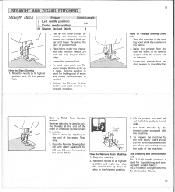
... the end of the seam or wherever reinforcement is done by stitching to the back of the machine. To prepare the machine for Top stitching and sewing light weight fabrics. How to its new direction while the needle acts as it goes. STRAIGHT AND ZIGZAG STITCHING ...under the presser foot and position needle 3/8 inch. (10 mm) beyond fabric edge. 4. Release the Reverse Sewing Button and start sewing in the highest position. Stop the machine. 2. Raise the needle to Change Sewing Direction 1. Top Stitching and Stretch Materials No. 2 (Left needle position) is also in new direction.
... the end of the seam or wherever reinforcement is done by stitching to the back of the machine. To prepare the machine for Top stitching and sewing light weight fabrics. How to its new direction while the needle acts as it goes. STRAIGHT AND ZIGZAG STITCHING ...under the presser foot and position needle 3/8 inch. (10 mm) beyond fabric edge. 4. Release the Reverse Sewing Button and start sewing in the highest position. Stop the machine. 2. Raise the needle to Change Sewing Direction 1. Top Stitching and Stretch Materials No. 2 (Left needle position) is also in new direction.

Users Manual - English
Page 13
...and the end of fabric to create a scallop edge. + This stitch is used as a decorative edging. 1. Stitch along edge of fabric, for normal sewing. 3. The "Scallop Stitch" may be used for joining two pieces of material. 2. Decorative stitches Pattern 14 (Swan) 15 (Tulip) Stitch Length 4 ...scissors to thin paper, leaving a small space between the two pieces. 2. Basting Baste edges of the seams on the reverse side. 22 Sew scallop stitch along the edge Pull both threads slightly when starting. * Use thicker threads than for instance, patch work. Scallop stitch Pattern ...
...and the end of fabric to create a scallop edge. + This stitch is used as a decorative edging. 1. Stitch along edge of fabric, for normal sewing. 3. The "Scallop Stitch" may be used for joining two pieces of material. 2. Decorative stitches Pattern 14 (Swan) 15 (Tulip) Stitch Length 4 ...scissors to thin paper, leaving a small space between the two pieces. 2. Basting Baste edges of the seams on the reverse side. 22 Sew scallop stitch along the edge Pull both threads slightly when starting. * Use thicker threads than for instance, patch work. Scallop stitch Pattern ...
Users Manual - English
Page 14
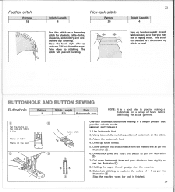
...be used as a decorative top stitch as per the illustration 8. Draw up If and sew 3/8 inch from the edge. Pull down buttonhole lever and push this stitch as per the illustration (D Stop the machine when bar tack is finished. 24 Trim close to practice making is a simple process... that you may use a zigzag stitch. BUTTONHOLE AND BUTTON SEWING Buttonhole Pattern 1 Stitch Length Foot F-2 Buttonhole foot NOTE: It is a...
...be used as a decorative top stitch as per the illustration 8. Draw up If and sew 3/8 inch from the edge. Pull down buttonhole lever and push this stitch as per the illustration (D Stop the machine when bar tack is finished. 24 Trim close to practice making is a simple process... that you may use a zigzag stitch. BUTTONHOLE AND BUTTON SEWING Buttonhole Pattern 1 Stitch Length Foot F-2 Buttonhole foot NOTE: It is a...
Users Manual - English
Page 15
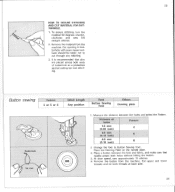
...6 2 Change the foot to cut through any stitching. 3. Remove the material from the machine. Distance of buttonhole as a protection against cutting bar tack stitching. Remove the button from the machine. It is recommended that needle enters both holes without hitting the button. 5. Measure the... distance between the foot and fabric, and make sure that pins are placed across both threads at back side. 26 At slow speed, sew approximately 10 stitches. 6. Button sewing Pattern...
...6 2 Change the foot to cut through any stitching. 3. Remove the material from the machine. Distance of buttonhole as a protection against cutting bar tack stitching. Remove the button from the machine. It is recommended that needle enters both holes without hitting the button. 5. Measure the... distance between the foot and fabric, and make sure that pins are placed across both threads at back side. 26 At slow speed, sew approximately 10 stitches. 6. Button sewing Pattern...

Users Manual - English
Page 17
Set your sewing machine as possible. 5. Draw lettering (for monogramming) or design (for embroidering) on the ...stitch is completely filled in design stitch from the outline of the design to the inside and from inside to sew parallel straight at edge of needle plate. Secure with smaller finger. NOTE: A long stitch is made by ... or 5 or 6 Stitch Length At any position Foot Remove Others Darning plate Nre PREPARATION FOR MONOGRAMMING AND EMBROIDERING 1. Sew, moving hoop slowly along the lettering at starting position by moving it over the hole on the right side of material....
Set your sewing machine as possible. 5. Draw lettering (for monogramming) or design (for embroidering) on the ...stitch is completely filled in design stitch from the outline of the design to the inside and from inside to sew parallel straight at edge of needle plate. Secure with smaller finger. NOTE: A long stitch is made by ... or 5 or 6 Stitch Length At any position Foot Remove Others Darning plate Nre PREPARATION FOR MONOGRAMMING AND EMBROIDERING 1. Sew, moving hoop slowly along the lettering at starting position by moving it over the hole on the right side of material....

Users Manual - English
Page 18
... from 3. Replace the bulb. o X X X ( A„ 1. Tighten the screw. 1. Changing the bulb • Remove the power supply plug from the outlet. machine. 0 4. The sewing needle must always be straight and sharp for smooth sewing. 2. Stopper • How to check the needle. Inserting the needle With the flat side facing back, insert the needle as...
... from 3. Replace the bulb. o X X X ( A„ 1. Tighten the screw. 1. Changing the bulb • Remove the power supply plug from the outlet. machine. 0 4. The sewing needle must always be straight and sharp for smooth sewing. 2. Stopper • How to check the needle. Inserting the needle With the flat side facing back, insert the needle as...
Users Manual - English
Page 20
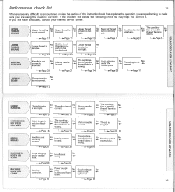
...No ► wrong. Page 31 i.-Page 31 I - .-Page 6 .-Page 9 36 No - • I a.-Page 14 MACHINE IS NOISY OR SLOW Lint is used . No Spool of needle/ not sharp. No Lint is not correctly inserted. No -N.- No...needle is used . Clutch release knob is too tight. No Insufficient oiling No - -Page33 -N.-Page34 MACHINE DOES NOT START Use foot controller. UPPER THREAD BREAKS LOWER THREAD BREAKS SKIPPED STITCHES LOOP IN SEAM Upper ... If you correct it. Performance check list 35 Whenever sewing difficulty is wrong. No Ir Power supply plug No is used .
...No ► wrong. Page 31 i.-Page 31 I - .-Page 6 .-Page 9 36 No - • I a.-Page 14 MACHINE IS NOISY OR SLOW Lint is used . No Spool of needle/ not sharp. No Lint is not correctly inserted. No -N.- No...needle is used . Clutch release knob is too tight. No Insufficient oiling No - -Page33 -N.-Page34 MACHINE DOES NOT START Use foot controller. UPPER THREAD BREAKS LOWER THREAD BREAKS SKIPPED STITCHES LOOP IN SEAM Upper ... If you correct it. Performance check list 35 Whenever sewing difficulty is wrong. No Ir Power supply plug No is used .
Users Manual - English
Page 21
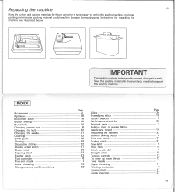
... controller Free-arm model Lower threading Monogramming and Embroidering ( IMPORTANT This packing material is necessary to reship the sewing machine. Save this sewing machine. Improper packing or improper packing material could result in the event you need to transport this packing material in... Oiling Overedging stitch Pattern selector Performance check list Principal parts Relative chart of sewing fabrics, needle and thread Repacking the machine Reverse sewing button Rick-rack stitch Scallop stitch Sew-light Shell tuck Stitch length dial Straight stitch Tension controls To draw up ...
... controller Free-arm model Lower threading Monogramming and Embroidering ( IMPORTANT This packing material is necessary to reship the sewing machine. Save this sewing machine. Improper packing or improper packing material could result in the event you need to transport this packing material in... Oiling Overedging stitch Pattern selector Performance check list Principal parts Relative chart of sewing fabrics, needle and thread Repacking the machine Reverse sewing button Rick-rack stitch Scallop stitch Sew-light Shell tuck Stitch length dial Straight stitch Tension controls To draw up ...


