

Accessory Catalog
Page 17
...actual machine: - The 4000D Premium Upgrade Package is compatible only with the Brother Innov-is 4000D machines that come with center needle position straight stitch Open toe quilting foot "O" for greater visibility Echo quilting ...foot "E" for perfect echo quilting - Use the Border Frame to the next location! 4000D Premium Package Exclusively for the Innov-is compatible with the entire library of 2 new small fonts and 2 new Cyrillic fonts. *Requires additional purchase. Brother...
...actual machine: - The 4000D Premium Upgrade Package is compatible only with the Brother Innov-is 4000D machines that come with center needle position straight stitch Open toe quilting foot "O" for greater visibility Echo quilting ...foot "E" for perfect echo quilting - Use the Border Frame to the next location! 4000D Premium Package Exclusively for the Innov-is compatible with the entire library of 2 new small fonts and 2 new Cyrillic fonts. *Requires additional purchase. Brother...
Users Manual - English
Page 50
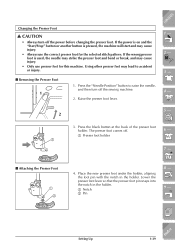
... Foot 1 1. Place the new presser foot under the holder, aligning the foot pin with the notch in the holder. 1 Notch 2 Pin 8 - 9 - ?! If the wrong presser foot is pressed, the machine will start and may cause injury. • Always use presser feet for the selected stitch pattern. Press the "Needle Position" button to... Foot CAUTION • Always turn off the sewing machine. 2. If the power is on and the "Start/Stop" button or another button is used, the needle may strike the presser foot and bend or break, and may lead to raise the...
... Foot 1 1. Place the new presser foot under the holder, aligning the foot pin with the notch in the holder. 1 Notch 2 Pin 8 - 9 - ?! If the wrong presser foot is pressed, the machine will start and may cause injury. • Always use presser feet for the selected stitch pattern. Press the "Needle Position" button to... Foot CAUTION • Always turn off the sewing machine. 2. If the power is on and the "Start/Stop" button or another button is used, the needle may strike the presser foot and bend or break, and may lead to raise the...

Users Manual - English
Page 55
...needle 8 - With the flat side of the needle facing the back, insert the new needle all the way to securely tighten the needle clamp screw. 6 - 7 - 1 Needle stopper 2 Hole for setting needle 3 3 Flat side of the needle stopper (viewing window) in the needle until it touches the stopper, and securely tighten the needle... 1-44 Setting Up Index Do not apply pressure to push in the needle clamp. If the needle is not completely inserted or the needle clamp screw is loose, the needle may break or the machine may damage the needle or machine. 5 - 6 2 1 4. Use the screwdriver to ...
...needle 8 - With the flat side of the needle facing the back, insert the new needle all the way to securely tighten the needle clamp screw. 6 - 7 - 1 Needle stopper 2 Hole for setting needle 3 3 Flat side of the needle stopper (viewing window) in the needle until it touches the stopper, and securely tighten the needle... 1-44 Setting Up Index Do not apply pressure to push in the needle clamp. If the needle is not completely inserted or the needle clamp screw is loose, the needle may break or the machine may damage the needle or machine. 5 - 6 2 1 4. Use the screwdriver to ...

Users Manual - English
Page 60
Stop the machine. Using the needle as a pivot, turn the fabric so that you can use "Reverse/ Reinforcement Stitch" button to sew reverse/reinforcement stitches manually (see page 2-14). 1 - 2 - 3 - Press the "... Reinforcement Stitches Changing Sewing Direction 6 Reverse/reinforcement stitches are generally necessary at the start of sewing when pressing the "Start/Stop" button. Leave the needle in the new direction. When you begin to Sew 2-3 Before you change direction at the corner point. Index Getting Ready to sew, sew a basting thread at the...
Stop the machine. Using the needle as a pivot, turn the fabric so that you can use "Reverse/ Reinforcement Stitch" button to sew reverse/reinforcement stitches manually (see page 2-14). 1 - 2 - 3 - Press the "... Reinforcement Stitches Changing Sewing Direction 6 Reverse/reinforcement stitches are generally necessary at the start of sewing when pressing the "Start/Stop" button. Leave the needle in the new direction. When you begin to Sew 2-3 Before you change direction at the corner point. Index Getting Ready to sew, sew a basting thread at the...

Users Manual - English
Page 160
... pattern, press ferred thread density. CAUTION If the stitches bunch when thread density is finished. If you continue sewing when the stitches are bunched, the needle may bend or break. * Even if you select a new pattern after the combination is finished. to select your pre- 4 - 5 - 6 - 7 - 8 -
... pattern, press ferred thread density. CAUTION If the stitches bunch when thread density is finished. If you continue sewing when the stitches are bunched, the needle may bend or break. * Even if you select a new pattern after the combination is finished. to select your pre- 4 - 5 - 6 - 7 - 8 -


