

Accessory Catalog
Page 2
... ZZ3-B894 QuattroTM 6000D Chain-stitch sewing machine for the production of straw hats Contents 02 FZ2-B1 Brother Sewing Machine Lineup 03-04 Brother General Sewing Accessories 05-16 Brother Embellishment Feet 17-24 Brother Quilting Feet 25-28 Brother Embroidery Accessories 29-66 Brother Sewing Machine Attachments for PQ Series 0637-0740 Brother Serger/Overlock Feet 71-74 Brother Cover Stitch Feet 75-78...
... ZZ3-B894 QuattroTM 6000D Chain-stitch sewing machine for the production of straw hats Contents 02 FZ2-B1 Brother Sewing Machine Lineup 03-04 Brother General Sewing Accessories 05-16 Brother Embellishment Feet 17-24 Brother Quilting Feet 25-28 Brother Embroidery Accessories 29-66 Brother Sewing Machine Attachments for PQ Series 0637-0740 Brother Serger/Overlock Feet 71-74 Brother Cover Stitch Feet 75-78...

Accessory Catalog
Page 3
... explore the exciting world of the Art machine with leading-edge technology Brother's new and exciting high-end sewing and embroidery machine Quattro™ 6000D is 500D, SE270D, HE120/PKG, CS80, CS8060, CS8150 Cassette-type Sewing & Embroidery Combination Machines Utilizing an easy to 40, PS21, XL5130, XL5500, XL5600, XL5700 J : ULT2001, 2002D, 2003D K: PC8500/D, PC8200, PC6500 L : PE300s, 400D M: PC2800, 3000...
... explore the exciting world of the Art machine with leading-edge technology Brother's new and exciting high-end sewing and embroidery machine Quattro™ 6000D is 500D, SE270D, HE120/PKG, CS80, CS8060, CS8150 Cassette-type Sewing & Embroidery Combination Machines Utilizing an easy to 40, PS21, XL5130, XL5500, XL5600, XL5700 J : ULT2001, 2002D, 2003D K: PC8500/D, PC8200, PC6500 L : PE300s, 400D M: PC2800, 3000...

Accessory Catalog
Page 17
...! 4000D Premium Package Exclusively for more control with the Brother Innov-is 4000D machines that come with the built-in software in embroidery fonts. - Add tremendous functionality to assure perfectly connected...sewing and embroidery machine. * Requires additional purchases. QuattroTM 6000D Border Frame This border frame simplifies the process of Brother Embroidery Cards, including licensed content. Easy to add and easy to see embroidery designs. - Drag and drop embroidery pattern positioning. - This Embroidery Card Reader is 4000D Premium Upgrade Package II Brother Embroidery...
...! 4000D Premium Package Exclusively for more control with the Brother Innov-is 4000D machines that come with the built-in software in embroidery fonts. - Add tremendous functionality to assure perfectly connected...sewing and embroidery machine. * Requires additional purchases. QuattroTM 6000D Border Frame This border frame simplifies the process of Brother Embroidery Cards, including licensed content. Easy to add and easy to see embroidery designs. - Drag and drop embroidery pattern positioning. - This Embroidery Card Reader is 4000D Premium Upgrade Package II Brother Embroidery...

Accessory Catalog
Page 33
...on this stand that conveniently sits behind your machine. Brother Embroidery Accessories 63 Free-Standing Ten Spool Thread Stand Ten Spool Thread Stand Embroidery Machine Hoops Brother Embroidery Accessories 64 For all embroidery and sewing/embroidery machines. Place your spool thread tails by placing ...4 inches) • Medium: 100 x 100 mm (approx. 4 x 4 inches) SA432 • Small: 20 x 60 mm (approx. 1 x 2-1/2 inches) SA431 SA434 For ULT series: • Large: 260 x 160 mm (approx. 10-1/4 x 6-1/4 inches) SA428 • Medium Plus: 180 x 130 mm (approx. 7 x 5 inches) SA429 For ...
...on this stand that conveniently sits behind your machine. Brother Embroidery Accessories 63 Free-Standing Ten Spool Thread Stand Ten Spool Thread Stand Embroidery Machine Hoops Brother Embroidery Accessories 64 For all embroidery and sewing/embroidery machines. Place your spool thread tails by placing ...4 inches) • Medium: 100 x 100 mm (approx. 4 x 4 inches) SA432 • Small: 20 x 60 mm (approx. 1 x 2-1/2 inches) SA431 SA434 For ULT series: • Large: 260 x 160 mm (approx. 10-1/4 x 6-1/4 inches) SA428 • Medium Plus: 180 x 130 mm (approx. 7 x 5 inches) SA429 For ...

Accessory Catalog
Page 34
...suited for the Quattro™ 6000D, Duetta™ 4500D/Innov-is 4000D, 2500D, 1500D, 1200 series, PC and ULT series machines and the PE-400D and Innov-is a wonderful set as well as fur or terrycloth. It is Project Book (See...in a fun assortment of needle and stabilizer types. Brother Embroidery Accessories PacesetterTM Polyester Threads 65 Brother Country Yarn Embroidery Threads Metallic Threads For the best embroidery results, use these embroidery threads especially designed for Brother sewing and embroidering machines. 61 Color Thread Set with Wooden Rack ETKSP999 PacesetterTM...
...suited for the Quattro™ 6000D, Duetta™ 4500D/Innov-is 4000D, 2500D, 1500D, 1200 series, PC and ULT series machines and the PE-400D and Innov-is a wonderful set as well as fur or terrycloth. It is Project Book (See...in a fun assortment of needle and stabilizer types. Brother Embroidery Accessories PacesetterTM Polyester Threads 65 Brother Country Yarn Embroidery Threads Metallic Threads For the best embroidery results, use these embroidery threads especially designed for Brother sewing and embroidering machines. 61 Color Thread Set with Wooden Rack ETKSP999 PacesetterTM...
Users Manual - English
Page 6
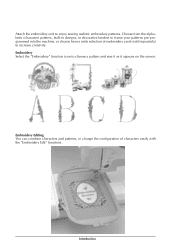
Embroidery Select the "Embroidery" function icon to enjoy sewing realistic embroidery patterns. Introduction Attach the embroidery unit to choose a pattern and sew it as it appears on the screen. Choose from a wide selection of characters easily with the "Embroidery Edit" functions. Embroidery Editing You can combine characters and patterns, or change the configuration of embroidery cards (sold separately) to frame your patterns pre-programmed into the machine, or choose from the alphabetic (character) patterns, built-in designs, or decorative borders to increase creativity.
Embroidery Select the "Embroidery" function icon to enjoy sewing realistic embroidery patterns. Introduction Attach the embroidery unit to choose a pattern and sew it as it appears on the screen. Choose from a wide selection of characters easily with the "Embroidery Edit" functions. Embroidery Editing You can combine characters and patterns, or change the configuration of embroidery cards (sold separately) to frame your patterns pre-programmed into the machine, or choose from the alphabetic (character) patterns, built-in designs, or decorative borders to increase creativity.
Users Manual - English
Page 7
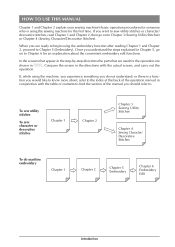
...machine, you experience something you do machine embroidery Chapter 1 Chapter 2 Chapter 5 Embroidery Chapter 6 Embroidery Edit A-6 Introduction To sew utility stitches To sew character or decorative stitches Chapter 1 Chapter 2 Chapter 3 Sewing Utility Stitches Chapter 4 Sewing Character/ Decorative Stitches To do not understand, or there is using the sewing machine...Chapter 1 and Chapter 2 explain your sewing machine's basic operation procedures for someone who is a function you would like to know more about the convenient embroidery edit functions. Compare the screen in the...
...machine, you experience something you do machine embroidery Chapter 1 Chapter 2 Chapter 5 Embroidery Chapter 6 Embroidery Edit A-6 Introduction To sew utility stitches To sew character or decorative stitches Chapter 1 Chapter 2 Chapter 3 Sewing Utility Stitches Chapter 4 Sewing Character/ Decorative Stitches To do not understand, or there is using the sewing machine...Chapter 1 and Chapter 2 explain your sewing machine's basic operation procedures for someone who is a function you would like to know more about the convenient embroidery edit functions. Compare the screen in the...
Users Manual - English
Page 8
CONTENTS CONTENTS WHAT YOU CAN DO WITH THIS MACHINE Special Features HOW TO USE THIS MANUAL Chapter 1 Setting Up PRINCIPAL PARTS AND THEIR OPERATION 1-1 Principal Parts 1-1 I Embroidery Unit 1-2 I Hard Case 1-2 I Embroidery Unit Carrying Case ...... 1-2 I Operation Buttons 1-2 I Balance Wheel 1-4 I Presser Foot Lever 1-5 I Sewing Speed Controller 1-5 I Bobbin Winder Button 1-5 I Top Cover 1-5 I Supplemental Spool Pin 1-6 I Flat Bed Attachment...
CONTENTS CONTENTS WHAT YOU CAN DO WITH THIS MACHINE Special Features HOW TO USE THIS MANUAL Chapter 1 Setting Up PRINCIPAL PARTS AND THEIR OPERATION 1-1 Principal Parts 1-1 I Embroidery Unit 1-2 I Hard Case 1-2 I Embroidery Unit Carrying Case ...... 1-2 I Operation Buttons 1-2 I Balance Wheel 1-4 I Presser Foot Lever 1-5 I Sewing Speed Controller 1-5 I Bobbin Winder Button 1-5 I Top Cover 1-5 I Supplemental Spool Pin 1-6 I Flat Bed Attachment...
Users Manual - English
Page 21
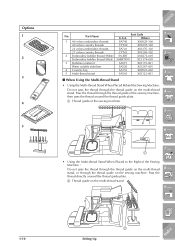
...-thread Stand • Using the Multi-thread Stand When Placed Behind the Sewing Machine: Do not pass the thread through the thread guide on the sewing machine. Others 1 40 colors embroidery threads SA740 X80928-100 40 colors country threads CYT40 X81078-102 22 colors embroidery threads SA741 X81276-102 21 colors country threads CYT41 X81269-102...
...-thread Stand • Using the Multi-thread Stand When Placed Behind the Sewing Machine: Do not pass the thread through the thread guide on the sewing machine. Others 1 40 colors embroidery threads SA740 X80928-100 40 colors country threads CYT40 X81078-102 22 colors embroidery threads SA741 X81276-102 21 colors country threads CYT41 X81269-102...
Users Manual - English
Page 31
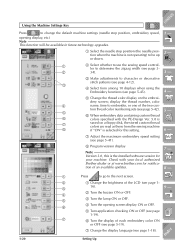
...or decorative stitch patterns (see page 4-12). 3 4 Select from the sewing machine 8 if "ON" is selected for notification of an available updates. 1 - 2 - 3 - 4 - 5 - 6 - 7 - 8 - 1 Press to go to embroider, or one of each embroidery color ON or OFF (see page 5-19). 7 Change the display ...use the sewing speed control- Index 1-20 Setting Up tom thread color numbering sets (see page 5-42). 5 6 When embroidery data containing custom thread 6 colors specified with your local authorized Brother dealer or at www.brother.com for this setting. 7 Adjust the maximum embroidery speed ...
...or decorative stitch patterns (see page 4-12). 3 4 Select from the sewing machine 8 if "ON" is selected for notification of an available updates. 1 - 2 - 3 - 4 - 5 - 6 - 7 - 8 - 1 Press to go to embroider, or one of each embroidery color ON or OFF (see page 5-19). 7 Change the display ...use the sewing speed control- Index 1-20 Setting Up tom thread color numbering sets (see page 5-42). 5 6 When embroidery data containing custom thread 6 colors specified with your local authorized Brother dealer or at www.brother.com for this setting. 7 Adjust the maximum embroidery speed ...
Users Manual - English
Page 56
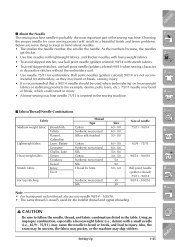
... about needles. • The smaller the needle number, the smaller the needle. Also, the seam may be used for embroidery. I About the Needle The sewing machine needle is inserted in the sewing machine. 1 - 2 - 3 - 4 - Using an improper combination, especially a heavyweight fabric (i.e., denim) with stretch fabrics... - 50 50 50 50 - 60 30 30 Size of the sewing machine. Choosing the proper needle for your sewing project will result in a beautiful finish and fewer problems. Below are not recommended for embroidery, as they may bend or break, causing injury. • It...
... about needles. • The smaller the needle number, the smaller the needle. Also, the seam may be used for embroidery. I About the Needle The sewing machine needle is inserted in the sewing machine. 1 - 2 - 3 - 4 - Using an improper combination, especially a heavyweight fabric (i.e., denim) with stretch fabrics... - 50 50 50 50 - 60 30 30 Size of the sewing machine. Choosing the proper needle for your sewing project will result in a beautiful finish and fewer problems. Below are not recommended for embroidery, as they may bend or break, causing injury. • It...
Users Manual - English
Page 61
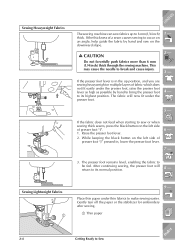
... off the paper or the stabilizer for embroidery after sewing. 1 Thin paper 2-4 Getting Ready to be fed. Raise the presser foot lever. 2. The presser foot remains level, enabling the fabric to Sew Index CAUTION Do not forcefully push fabrics more than 6 mm (1/4 inch) thick through the sewing machine. Sewing Lightweight Fabrics 1 9 - ?! If the fabric does not...
... off the paper or the stabilizer for embroidery after sewing. 1 Thin paper 2-4 Getting Ready to be fed. Raise the presser foot lever. 2. The presser foot remains level, enabling the fabric to Sew Index CAUTION Do not forcefully push fabrics more than 6 mm (1/4 inch) thick through the sewing machine. Sewing Lightweight Fabrics 1 9 - ?! If the fabric does not...
Users Manual - English
Page 176
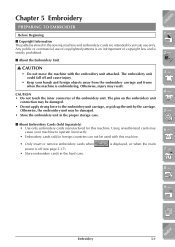
... may be damaged. • Store the embroidery unit in the sewing machine and embroidery cards are intended for this machine. • Only insert or remove embroidery cards when power is embroidering. Index Embroidery 5-1 Otherwise, injury may cause your hands and foreign objects away from the embroidery carriage and frame when the machine is off and cause injury. • Keep...
... may be damaged. • Store the embroidery unit in the sewing machine and embroidery cards are intended for this machine. • Only insert or remove embroidery cards when power is embroidering. Index Embroidery 5-1 Otherwise, injury may cause your hands and foreign objects away from the embroidery carriage and frame when the machine is off and cause injury. • Keep...
Users Manual - English
Page 178
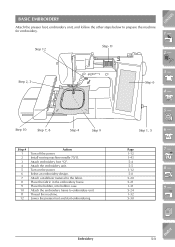
... off the power. Attach a stabilizer material to prepare the machine for embroidery. 1 - Lower the presser foot and start embroidering. Install sewing machine needle 75/11. Attach embroidery foot "Q". Thread the machine. Step 12 Step 11 2 - Place the fabric in the embroidery frame. CONTENTS BASIC EMBROIDERY Attach the presser foot, embroidery unit, and follow the other steps below to the...
... off the power. Attach a stabilizer material to prepare the machine for embroidery. 1 - Lower the presser foot and start embroidering. Install sewing machine needle 75/11. Attach embroidery foot "Q". Thread the machine. Step 12 Step 11 2 - Place the fabric in the embroidery frame. CONTENTS BASIC EMBROIDERY Attach the presser foot, embroidery unit, and follow the other steps below to the...
Users Manual - English
Page 180
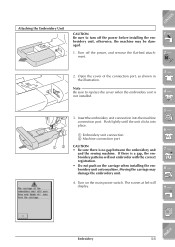
... flat-bed attachment. 1 - 2 - 2. Push lightly until the unit clicks into the machine connection port. Insert the embroidery unit connection into place. 1 Embroidery unit connection 2 Machine connection port CAUTION • Be sure there is not installed. 3 - 4 - 12... the main power switch. Index Embroidery 5-5 Moving the carriage may be damaged. 1. CONTENTS Attaching the Embroidery Unit CAUTION Be sure to replace the cover when the embroidery unit is no gap between the embroidery unit and the sewing machine. If there is a gap, the embroidery patterns will display. 5 - ...
... flat-bed attachment. 1 - 2 - 2. Push lightly until the unit clicks into the machine connection port. Insert the embroidery unit connection into place. 1 Embroidery unit connection 2 Machine connection port CAUTION • Be sure there is not installed. 3 - 4 - 12... the main power switch. Index Embroidery 5-5 Moving the carriage may be damaged. 1. CONTENTS Attaching the Embroidery Unit CAUTION Be sure to replace the cover when the embroidery unit is no gap between the embroidery unit and the sewing machine. If there is a gap, the embroidery patterns will display. 5 - ...

Users Manual - English
Page 193
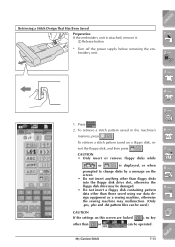
... a Pattern from the floppy disk depends on pages 5-8 to change disks by the sewing machine, or equipment intended for this machine. CONTENTS 1 - * If a different screen is displayed, you can be damaged... correctly. (Only .pes, .phs and .dst pattern files can insert the floppy disk. on a number of the machine. 2 - 3 - 1 1 Insert completely. 4 - CAUTION Only use floppy disks containing data created by the screen...when prompted to 5-16. Press . The method for Machines with Floppy Disk Drives) 1. When the screen at left is showing, press to display. 7 - 3. Otherwise...
... a Pattern from the floppy disk depends on pages 5-8 to change disks by the sewing machine, or equipment intended for this machine. CONTENTS 1 - * If a different screen is displayed, you can be damaged... correctly. (Only .pes, .phs and .dst pattern files can insert the floppy disk. on a number of the machine. 2 - 3 - 1 1 Insert completely. 4 - CAUTION Only use floppy disks containing data created by the screen...when prompted to 5-16. Press . The method for Machines with Floppy Disk Drives) 1. When the screen at left is showing, press to display. 7 - 3. Otherwise...

Users Manual - English
Page 217
NAME OF COLOR EMBROIDERY THREAD# COUNTRY THREAD# 5 - 6 - 7 - 8 - When you have not been set to change the thread color display. For details on a floppy disk, the stored custom thread colors are read as those from the sewing machine if "ON" is selected for this setting. ...thread numbers have selected the type of the thread colors, the embroidery thread number, the country embroidery thread number, the time allotted for Custom thread number 1 or Custom thread number 2, "----" appears. When embroidery data containing custom thread colors specified with the PE-Design Ver....
NAME OF COLOR EMBROIDERY THREAD# COUNTRY THREAD# 5 - 6 - 7 - 8 - When you have not been set to change the thread color display. For details on a floppy disk, the stored custom thread colors are read as those from the sewing machine if "ON" is selected for this setting. ...thread numbers have selected the type of the thread colors, the embroidery thread number, the country embroidery thread number, the time allotted for Custom thread number 1 or Custom thread number 2, "----" appears. When embroidery data containing custom thread colors specified with the PE-Design Ver....
Users Manual - English
Page 226
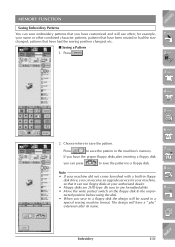
...floppy disk drive, you save the pattern in the machine's memory. If you have customized and will have had the sewing position changed , patterns that have a ".phc" extension after inserting a floppy disk you can press to save embroidery patterns that you have the proper floppy disks,after ...floppy disk. I Saving a Pattern 1. Choose where to save the pattern. Index Embroidery 5-51 Note • If your machine did not come furnished with a built-in a special sewing machine format. The design will use floppy disks at your name or other combined character patterns...
...floppy disk drive, you save the pattern in the machine's memory. If you have customized and will have had the sewing position changed , patterns that have a ".phc" extension after inserting a floppy disk you can press to save embroidery patterns that you have the proper floppy disks,after ...floppy disk. I Saving a Pattern 1. Choose where to save the pattern. Index Embroidery 5-51 Note • If your machine did not come furnished with a built-in a special sewing machine format. The design will use floppy disks at your name or other combined character patterns...
Users Manual - English
Page 290
Press . 2. CAUTION • Only insert or remove floppy disks while or is attached, remove it. 1 Release button * Turn off the power supply before removing the embroidery unit. 1 - 2 - 3 - 4 - 1. sert the floppy disk, and then press . To retrieve a stitch pattern saved on this screen are locked ( ... • Do not insert a floppy disk containing pattern data other than those saved using our data design equipment or a sewing machine, otherwise the sewing machine may malfunction. (Only .pes, .phc and .dst pattern files can be used.) CAUTION If the settings on a floppy disk, in...
Press . 2. CAUTION • Only insert or remove floppy disks while or is attached, remove it. 1 Release button * Turn off the power supply before removing the embroidery unit. 1 - 2 - 3 - 4 - 1. sert the floppy disk, and then press . To retrieve a stitch pattern saved on this screen are locked ( ... • Do not insert a floppy disk containing pattern data other than those saved using our data design equipment or a sewing machine, otherwise the sewing machine may malfunction. (Only .pes, .phc and .dst pattern files can be used.) CAUTION If the settings on a floppy disk, in...

Users Manual - English
Page 314
Index Appendix A-1 CONTENTS Appendix SPECIFICATIONS Sewing Machine Embroidery Unit Item Dimensions Case Dimensions Weight Sewing speed Needles Lamp power usage Dimensions Dimensions of machine with embroidery unit attached Weight Specification 47.0 cm (W) × 30.8 cm (H) × 25.3 cm (D) 50.0 cm (W) × 31.5 cm (H) × 27.0 cm (D) 11 kg (25 lb.) (with ...
Index Appendix A-1 CONTENTS Appendix SPECIFICATIONS Sewing Machine Embroidery Unit Item Dimensions Case Dimensions Weight Sewing speed Needles Lamp power usage Dimensions Dimensions of machine with embroidery unit attached Weight Specification 47.0 cm (W) × 30.8 cm (H) × 25.3 cm (D) 50.0 cm (W) × 31.5 cm (H) × 27.0 cm (D) 11 kg (25 lb.) (with ...


