

Accessory Catalog
Page 7
... presser foot can be used with all Brother presser feet. Installing the Straight Stitch Needle Plate automatically sets the needle position to the edge of patchworks. Great visibility while you to create a beautiful finish without any adjustment on stitch settings. 1. SA189 ABCDEFGHJKLMNO www.brother.com Can be used for stitching heavy fabrics together. 1. Selecting a stitch designated for the Side Cutter allows you add creativity to accomplish perfect straight stitching. Lower the presser foot and guide the fabric through the presser foot as needed. 3. Sew the stitches...
... presser foot can be used with all Brother presser feet. Installing the Straight Stitch Needle Plate automatically sets the needle position to the edge of patchworks. Great visibility while you to create a beautiful finish without any adjustment on stitch settings. 1. SA189 ABCDEFGHJKLMNO www.brother.com Can be used for stitching heavy fabrics together. 1. Selecting a stitch designated for the Side Cutter allows you add creativity to accomplish perfect straight stitching. Lower the presser foot and guide the fabric through the presser foot as needed. 3. Sew the stitches...

Accessory Catalog
Page 11
... desired. Insert cords or threads into each hole on the presser foot over the desired seams or pattern markings. 3. Attach the presser foot and pull cords under the presser foot. 3. SA158 ABCDEFJKMN www.brother.com Loosen the screw on the presser foot and insert a braid through the guide before attaching the presser foot on the presser foot. 2. Slide the plate of the guide back and forth to use single cord, use sewing machines Clear-view Foot Use this presser foot where visibility of 7 mm feed width. 1. Stitch braid...
... desired. Insert cords or threads into each hole on the presser foot over the desired seams or pattern markings. 3. Attach the presser foot and pull cords under the presser foot. 3. SA158 ABCDEFJKMN www.brother.com Loosen the screw on the presser foot and insert a braid through the guide before attaching the presser foot on the presser foot. 2. Slide the plate of the guide back and forth to use single cord, use sewing machines Clear-view Foot Use this presser foot where visibility of 7 mm feed width. 1. Stitch braid...

Accessory Catalog
Page 12
... works on a drawn pattern line and sew (cut the center of loops to be gathered under the presser foot. 4. Increase the upper thread tension. 3. Girl's Dress Innov-is Project Book (See page 47 for ULT series, PC-6500, PC-8200 and PC-8500 sewing machines. Also used for clothing as well as knits. 1. Creating tailor tacks: 1. Select a straight stitch, left needle position. 2. For appliqué: 1. Place the fabric to make or attach...
... works on a drawn pattern line and sew (cut the center of loops to be gathered under the presser foot. 4. Increase the upper thread tension. 3. Girl's Dress Innov-is Project Book (See page 47 for ULT series, PC-6500, PC-8200 and PC-8500 sewing machines. Also used for clothing as well as knits. 1. Creating tailor tacks: 1. Select a straight stitch, left needle position. 2. For appliqué: 1. Place the fabric to make or attach...

Accessory Catalog
Page 13
Install and manually thread a twin needle. 2. Sew slowly for details.) Brother Embellishment Feet Pin Tuck Foot 24 Ruffler Foot Pin Tuck Foot This presser foot has 7 grooves and produces perfect pin tucks and corded pin tucks using a twin needle on the lower portion of the presser foot is also included with evenly spaced tucks and gathers. The ruffling blade on lightweight fabric. The intervals of tucks can be adjusted. 1. Move fabric about 1" (2.5 cm) past the needle to guide your first row...
Install and manually thread a twin needle. 2. Sew slowly for details.) Brother Embellishment Feet Pin Tuck Foot 24 Ruffler Foot Pin Tuck Foot This presser foot has 7 grooves and produces perfect pin tucks and corded pin tucks using a twin needle on the lower portion of the presser foot is also included with evenly spaced tucks and gathers. The ruffling blade on lightweight fabric. The intervals of tucks can be adjusted. 1. Move fabric about 1" (2.5 cm) past the needle to guide your first row...

Accessory Catalog
Page 15
...guide the fabric. 4. Requires Low Shank Adapter for thick layers of the foot gives you wide visibility in the needle area. Use the walking foot with the pin over the needle clamp screw. 2. Walking Foot SA140 ABCDEFJKMN SA166 L SA107 GHO SA169 I Open Toe Walking Foot SA188 ABCDEFJKMN www.brother.com While starting to sew, press the needle position button twice to pull the bobbin thread to hold the fabric firmly. 5. Lower the feed dogs. 3. When quilting is needed. 1. Walking Foot/Open Toe Walking Foot Brother Quilting Feet 28 Walking Foot/Open Toe Walking Foot...
...guide the fabric. 4. Requires Low Shank Adapter for thick layers of the foot gives you wide visibility in the needle area. Use the walking foot with the pin over the needle clamp screw. 2. Walking Foot SA140 ABCDEFJKMN SA166 L SA107 GHO SA169 I Open Toe Walking Foot SA188 ABCDEFJKMN www.brother.com While starting to sew, press the needle position button twice to pull the bobbin thread to hold the fabric firmly. 5. Lower the feed dogs. 3. When quilting is needed. 1. Walking Foot/Open Toe Walking Foot Brother Quilting Feet 28 Walking Foot/Open Toe Walking Foot...

Accessory Catalog
Page 17
... with the built-in software in your new machine you can create continuous border patterns from the stunning designs that have been upgraded with the SAVR4000D Premium Package. Compatible with center needle position straight stitch Open toe quilting foot "O" for greater visibility Echo quilting foot "E" for perfect echo quilting - Includes three new free-motion presser feet: Free-motion quilting foot "C" for details.) www.brother.com Add even more control with USB hub devices* to provide access to your...
... with the built-in software in your new machine you can create continuous border patterns from the stunning designs that have been upgraded with the SAVR4000D Premium Package. Compatible with center needle position straight stitch Open toe quilting foot "O" for greater visibility Echo quilting foot "E" for perfect echo quilting - Includes three new free-motion presser feet: Free-motion quilting foot "C" for details.) www.brother.com Add even more control with USB hub devices* to provide access to your...

Accessory Catalog
Page 33
... in use. Brother Embroidery Accessories 63 Free-Standing Ten Spool Thread Stand Ten Spool Thread Stand Embroidery Machine Hoops Brother Embroidery Accessories 64 For all embroidery and sewing/embroidery machines. The spool pins can easily be used thread colors. Take control of your threads in the storage slots. Each thread has it's own thread guide to deliver thread smoothly to accommodate a variety of thread on creating. Spend less time changing threads, and more on this stand that conveniently sits behind your next embroidery, quilting or sewing...
... in use. Brother Embroidery Accessories 63 Free-Standing Ten Spool Thread Stand Ten Spool Thread Stand Embroidery Machine Hoops Brother Embroidery Accessories 64 For all embroidery and sewing/embroidery machines. The spool pins can easily be used thread colors. Take control of your threads in the storage slots. Each thread has it's own thread guide to deliver thread smoothly to accommodate a variety of thread on creating. Spend less time changing threads, and more on this stand that conveniently sits behind your next embroidery, quilting or sewing...

Accessory Catalog
Page 34
... colors (sold in the 61 color set of needle and stabilizer types. All 61 exclusive Brother palette colors are also available (sold in the most intricate designs. Bobbin Threads Stabilizers and Water Water Soluble Stabilizers Brother Embroidery Accessories 66 Bobbin Threads Brother Bobbin Threads are also available at selected Dealers. Pacesetter embroidery thread is color keyed to create machine embroidery as well as decorative sewing. Individual colors are strong, soft...
... colors (sold in the 61 color set of needle and stabilizer types. All 61 exclusive Brother palette colors are also available (sold in the most intricate designs. Bobbin Threads Stabilizers and Water Water Soluble Stabilizers Brother Embroidery Accessories 66 Bobbin Threads Brother Bobbin Threads are also available at selected Dealers. Pacesetter embroidery thread is color keyed to create machine embroidery as well as decorative sewing. Individual colors are strong, soft...

Accessory Catalog
Page 40
... machine. 2. Sew as folding them. SA224CV SA221CV Hemming Set Finishes hems easily and quickly. Set up your machine for a chain stitch, the center needle. 2. Attach the hem positioning plate A/B to the hemming attachment, and attach it into the front cover slot. 3. SA226CV www.brother.com Brother Cover Stitch Feet 77 Bias Tape Binding Set Hemming Set Bias Tape Binding Set Attaches 6 or 12 mm (approx. 1/4 to 1/2 inch) bias tapes as holding the fabric lightly with a tweezers. Set T1/T2 presser foot. 2. Set up your machine...
... machine. 2. Sew as folding them. SA224CV SA221CV Hemming Set Finishes hems easily and quickly. Set up your machine for a chain stitch, the center needle. 2. Attach the hem positioning plate A/B to the hemming attachment, and attach it into the front cover slot. 3. SA226CV www.brother.com Brother Cover Stitch Feet 77 Bias Tape Binding Set Hemming Set Bias Tape Binding Set Attaches 6 or 12 mm (approx. 1/4 to 1/2 inch) bias tapes as holding the fabric lightly with a tweezers. Set T1/T2 presser foot. 2. Set up your machine...
Users Manual - English
Page 2
..., such as a toy. The machine should never be used as threading needle, changing needle, threading bobbin, or changing presser foot, and the like. 15.Always unplug the machine from the accumulation of the machine and foot control free from the electrical outlet when removing covers, lubricating, or when making any other user servicing adjustments mentioned in the instruction manual. 16.This sewing machine is required around the machine needle. 11. IMPORTANT SAFETY INSTRUCTIONS When using this machine, basic safety precautions should...
..., such as a toy. The machine should never be used as threading needle, changing needle, threading bobbin, or changing presser foot, and the like. 15.Always unplug the machine from the accumulation of the machine and foot control free from the electrical outlet when removing covers, lubricating, or when making any other user servicing adjustments mentioned in the instruction manual. 16.This sewing machine is required around the machine needle. 11. IMPORTANT SAFETY INSTRUCTIONS When using this machine, basic safety precautions should...
Users Manual - English
Page 8
...I Sewing Speed Controller 1-5 I Bobbin Winder Button 1-5 I Top Cover 1-5 I Supplemental Spool Pin 1-6 I Flat Bed Attachment/Free Arm ........ 1-6 I Feed Dog Position Switch 1-6 I Presser Foot Dial 1-6 I Knee Lifter 1-7 I Foot Controller 1-7 Included Accessories 1-8 Options 1-10 I When Using the Multi-thread Stand 1-10 BASIC OPERATION 1-12 Connecting the Power 1-12 Viewing the LCD Display 1-13 I Key Functions 1-14 Using the LCD Display 1-16 Adjusting Screen Brightness 1-16 Choosing the Display Language .......... 1-18 Checking the Application 1-19 Using the Machine Settings Key...
...I Sewing Speed Controller 1-5 I Bobbin Winder Button 1-5 I Top Cover 1-5 I Supplemental Spool Pin 1-6 I Flat Bed Attachment/Free Arm ........ 1-6 I Feed Dog Position Switch 1-6 I Presser Foot Dial 1-6 I Knee Lifter 1-7 I Foot Controller 1-7 Included Accessories 1-8 Options 1-10 I When Using the Multi-thread Stand 1-10 BASIC OPERATION 1-12 Connecting the Power 1-12 Viewing the LCD Display 1-13 I Key Functions 1-14 Using the LCD Display 1-16 Adjusting Screen Brightness 1-16 Choosing the Display Language .......... 1-18 Checking the Application 1-19 Using the Machine Settings Key...
Users Manual - English
Page 9
... (Drawn work) .... 3-50 I Hemstitching (3 3-52 Buttonholes 3-53 I Sewing Stretch Fabrics 3-56 I Odd Shaped Buttons/Buttons that do not Fit into the Button Holder Plate .. 3-56 Darning 3-57 Bar Tacks 3-59 Button Sewing 3-61 I Attaching 4 Hole Buttons 3-62 I Attaching a Shank to the Button ... 3-63 Eyelet 3-63 Multi-directional Sewing (Straight Stitch and Zigzag Stitch) ........ 3-65 Zipper Insertion 3-67 I Centered Zipper 3-67 I Inserting a Side Zipper 3-68 Chapter 4 Sewing Character/ Decorative Stitches SELECTING A STITCH PATTERN .......... 4-1 Decorative Stitch Patterns 4-2 7mm...
... (Drawn work) .... 3-50 I Hemstitching (3 3-52 Buttonholes 3-53 I Sewing Stretch Fabrics 3-56 I Odd Shaped Buttons/Buttons that do not Fit into the Button Holder Plate .. 3-56 Darning 3-57 Bar Tacks 3-59 Button Sewing 3-61 I Attaching 4 Hole Buttons 3-62 I Attaching a Shank to the Button ... 3-63 Eyelet 3-63 Multi-directional Sewing (Straight Stitch and Zigzag Stitch) ........ 3-65 Zipper Insertion 3-67 I Centered Zipper 3-67 I Inserting a Side Zipper 3-68 Chapter 4 Sewing Character/ Decorative Stitches SELECTING A STITCH PATTERN .......... 4-1 Decorative Stitch Patterns 4-2 7mm...

Users Manual - English
Page 16
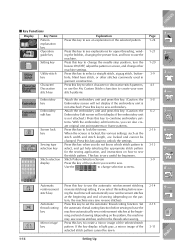
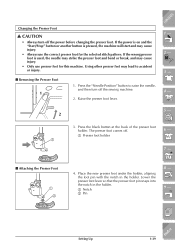
... the left to wind the bobbin or do the upper threading. CONTENTS I Presser Foot Lever 2 1 I Sewing Speed Controller 1 I Top Cover 8 - Open the top cover to sew at a slow speed. 1 2 1 Slow 2 Fast Use this controller to the fabric. Use this button to wind the bobbin (see page 2-4). 1 Presser foot 2 Presser foot lever CAUTION The machine will not operate with the presser foot raised. 1 - 2 - 3 - I Bobbin Winder Button Lower the presser foot lever to lower the presser foot and apply pressure to adjust the sewing speed. Index Setting Up 1-5 Move the lever to the right...
... the left to wind the bobbin or do the upper threading. CONTENTS I Presser Foot Lever 2 1 I Sewing Speed Controller 1 I Top Cover 8 - Open the top cover to sew at a slow speed. 1 2 1 Slow 2 Fast Use this controller to the fabric. Use this button to wind the bobbin (see page 2-4). 1 Presser foot 2 Presser foot lever CAUTION The machine will not operate with the presser foot raised. 1 - 2 - 3 - I Bobbin Winder Button Lower the presser foot lever to lower the presser foot and apply pressure to adjust the sewing speed. Index Setting Up 1-5 Move the lever to the right...
Users Manual - English
Page 25
... sew reverse stitches). This key is not attached.) Press this key to use the machine. at the begin- Stitch Pattern Selection Screen Press the key of sewing (depending on the pat- Automatic Press this key to sew embroidery. ning and end of the pattern you do not know which stitch pattern to select, and get help selecting the appropriate stitch pattern for upper threading, winding the bobbin, changing the presser foot, and how to set the automatic thread...
... sew reverse stitches). This key is not attached.) Press this key to use the machine. at the begin- Stitch Pattern Selection Screen Press the key of sewing (depending on the pat- Automatic Press this key to sew embroidery. ning and end of the pattern you do not know which stitch pattern to select, and get help selecting the appropriate stitch pattern for upper threading, winding the bobbin, changing the presser foot, and how to set the automatic thread...

Users Manual - English
Page 37
... thread guide cover on drawing. 7 - 8 - 9 - ?! 1-26 Setting Up Index 3 2 1 1 2 1 3 CONTENTS Note When sewing with fine, cross-wound thread (see the illustration at left), use the small spool cap, and leave a small space between the cap and the thread spool (see the illustration at left). 1 Spool cap (small) 2 Thread spool (cross-wound thread) 3 Space 1 - 2 - 5. Pull the thread out as indicated on top of the machine. Hold the thread...
... thread guide cover on drawing. 7 - 8 - 9 - ?! 1-26 Setting Up Index 3 2 1 1 2 1 3 CONTENTS Note When sewing with fine, cross-wound thread (see the illustration at left), use the small spool cap, and leave a small space between the cap and the thread spool (see the illustration at left). 1 Spool cap (small) 2 Thread spool (cross-wound thread) 3 Space 1 - 2 - 5. Pull the thread out as indicated on top of the machine. Hold the thread...
Users Manual - English
Page 50
... presser feet may cause injury. • Always use presser feet for the selected stitch pattern. I Attaching the Presser Foot 1 2 4. I Removing the Presser Foot 1 1. Lower the presser foot lever so that the presser foot pin snaps into the notch in the holder. If the power is on and the "Start/Stop" button or another button is used, the needle may strike the presser foot and bend or break, and may cause injury. • Only use the correct presser foot for this machine. The presser foot comes off the sewing machine...
... presser feet may cause injury. • Always use presser feet for the selected stitch pattern. I Attaching the Presser Foot 1 2 4. I Removing the Presser Foot 1 1. Lower the presser foot lever so that the presser foot pin snaps into the notch in the holder. If the power is on and the "Start/Stop" button or another button is used, the needle may strike the presser foot and bend or break, and may cause injury. • Only use the correct presser foot for this machine. The presser foot comes off the sewing machine...
Users Manual - English
Page 64
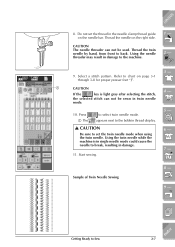
... 3-8 for proper presser foot "J". Refer to set the thread in damage. 11. Start sewing. 3 - 4 - 5 - 6 - 7 - Do not set the twin needle mode when using the twin needle. Press 1 The to the bobbin thread display. CAUTION If the key is in twin needle mode. 10. appears next to select twin needle mode. Select a stitch pattern. CAUTION The needle threader can not be used. Using the twin needle while the machine is light gray after selecting the stitch, the selected stitch can not...
... 3-8 for proper presser foot "J". Refer to set the thread in damage. 11. Start sewing. 3 - 4 - 5 - 6 - 7 - Do not set the twin needle mode when using the twin needle. Press 1 The to the bobbin thread display. CAUTION If the key is in twin needle mode. 10. appears next to select twin needle mode. Select a stitch pattern. CAUTION The needle threader can not be used. Using the twin needle while the machine is light gray after selecting the stitch, the selected stitch can not...
Users Manual - English
Page 302
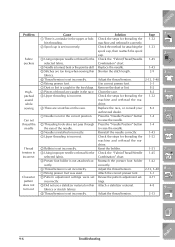
... the hole of the needle plate. 9 There are scratches near the hole in the presser foot. 0 There are scratches on the race. 1 Bobbin is collected under the nee- Reinstall the needle correctly. Problem Upper thread breaks Bobbin thread breaks Skipped stitches Cause 1 Machine is not threaded correctly (used the wrong spool cap, spool cap is loose, the thread did not catch the needle bar threader, etc.) 2 Thread is knotted or tangled. 3 Thread is too thick for the selected fabric. 3 Needle...
... the hole of the needle plate. 9 There are scratches near the hole in the presser foot. 0 There are scratches on the race. 1 Bobbin is collected under the nee- Reinstall the needle correctly. Problem Upper thread breaks Bobbin thread breaks Skipped stitches Cause 1 Machine is not threaded correctly (used the wrong spool cap, spool cap is loose, the thread did not catch the needle bar threader, etc.) 2 Thread is knotted or tangled. 3 Thread is too thick for the selected fabric. 3 Needle...
Users Manual - English
Page 303
... the feed dogs. 2 Pieces of thread are caught in the race. 3 Upper threading is incorrect. 4 There are scratches on thin fabrics or stretch fabrics. 4 Thread tension is set incorrectly. rectly. 5 Thread tension is set incorrectly. 1 Wrong presser foot was used. 2 Pattern adjustment settings were set incorrectly. 3 Did not use a stabilizer material on the race. 1 Needle is not attached cor- Replace the race, or consult your 8-2 authorized dealer. Press the "Needle Position" button 1-4 to raise the needle. Adjust the thread tension. 2-13, 5-40 Attach...
... the feed dogs. 2 Pieces of thread are caught in the race. 3 Upper threading is incorrect. 4 There are scratches on thin fabrics or stretch fabrics. 4 Thread tension is set incorrectly. rectly. 5 Thread tension is set incorrectly. 1 Wrong presser foot was used. 2 Pattern adjustment settings were set incorrectly. 3 Did not use a stabilizer material on the race. 1 Needle is not attached cor- Replace the race, or consult your 8-2 authorized dealer. Press the "Needle Position" button 1-4 to raise the needle. Adjust the thread tension. 2-13, 5-40 Attach...
Users Manual - English
Page 316
... stitching 1-14, 2-14, 4-14 Automatic thread cutting 1-14, 2-15, 4-14, 5-46 B Balance wheel 1-4 Ball point needle 1-45 Bar tacks 3-59 Basic embroidery method 5-30 Basic operation key 1-21, 1-23 Basic sewing character/decorative stitches 4-9 utility stitches 2-1 Basting 3-19 Blind hem stitches 3-35 Bobbin pulling up bobbin thread 1-38 runs out of thread 5-35 setting 1-31 winding 1-25, 1-29 Bobbin thread sensor 1-13, 5-19 Bobbin winder button 1-5 Button holder plate 3-54 Buttonholes 3-53 Button sewing 3-61 Buzzer 1-20 C Centered zippers 3-67 Character/Decorative stitches 4-1 adjusting patterns...
... stitching 1-14, 2-14, 4-14 Automatic thread cutting 1-14, 2-15, 4-14, 5-46 B Balance wheel 1-4 Ball point needle 1-45 Bar tacks 3-59 Basic embroidery method 5-30 Basic operation key 1-21, 1-23 Basic sewing character/decorative stitches 4-9 utility stitches 2-1 Basting 3-19 Blind hem stitches 3-35 Bobbin pulling up bobbin thread 1-38 runs out of thread 5-35 setting 1-31 winding 1-25, 1-29 Bobbin thread sensor 1-13, 5-19 Bobbin winder button 1-5 Button holder plate 3-54 Buttonholes 3-53 Button sewing 3-61 Buzzer 1-20 C Centered zippers 3-67 Character/Decorative stitches 4-1 adjusting patterns...


